28 August 2020

Hob Nobs Attempt 1

The other day, Lundulph had an unexpected hankering for biscuits around 10 pm. I generally don't keep a regular supply of biscuits because we'll just keep eating them, but I promised Lundulph I'd make some the next day. He said he wanted hob nobs. I searched on the internet and picked this one among the top results that seemed to be quite easy to do.

Ingredients

Makes 25 - 30

150 g unsalted butter
1 tbsp maple syrup
150 g plain flour
2 tsp baking powder
150 g granulated sugar
1 tsp bicarbonate of soda
120 g rolled oats

Method

  1. Pre-heat the oven to 180°C (not fan) and line a large baking sheet with baking paper.
  2. Gently melt the butter and maple syrup on low heat.
  3. Sift together the flour, baking powder, sugar and bicarbonate of soda into a large bowl. Stir in the rolled oats.
  4. Pour over the butter mixture and mix together into a dough, it will just about hold together.
  5. Divide up into pieces of about 20 - 30 g each and shape into balls as best you can. it'll be quite crumbly, so aim for a round shape, leave about 7 cm between as they will spread during baking.
  6. Bake for 10 - 12 minutes until golden brown.
  7. Remove from the oven, leave to cool a couple of minutes on the baking sheet, before carefully transferring to a cooling rack. They will be quite soft while warm.
  8. Store in an air-tight jar.

These turned out to be fairly similar to the Swedish havreflarn or oat snaps, though these were a bit thicker. Lundulph picked up on this and stated these were not hob nobs at all, however, I've seen him wandering around the house with the biscuit tin under his arm, so clearly they were still good. But this means, I need to find a different recipe.

16 August 2020

Pear Jam with Rosemary

Last week we visited Lundulph's parents to celebrate their birthdays with a picnic in their garden. Before we could do this, Lundulph tried to pick as many of the apples and pears as he could from the two trees, which dominate the seating area and are quite lethal at this time of the year, dropping large fruit randomly. Now I still have some apples from last year in the freezer, but no pears, so this year, I collected a bag of the largest pears and took home with the plans of making some sort of preserve.

I'd seen a recipe somewhere in my paper-based collection, while searching for other things and was very intrigued by it. Pears aren't that common as jams. The recipe also involved star anise, which I have, but use extremely rarely, so another reason to try this. As often happens I wasn't able to find this recipe again, so I searched on the internet and there are a couple that came up and seemed fairly good, but I also found this one that had rosemary in it and seemed even better, so I decided to do this instead.

Ingredients

1.5 kg pears, after peeling and coring
1 tbsp lemon zest (2 small lemons)
2 dl water
1 sprig rosemary
3 dl granulated sugar
2 dl soft dark brown sugar
3 sachets pectin (16 g)
1 tsp citric acid

Method

  1. Pre-heat the oven to 120°C and place several clean jam jars and their lids in there to heat up and steralise.
  2. Dice the pears fairly finely, about 1 cm, and place in a deep casserole dish.
  3. Add the lemon zest and water, stir through to combine and bring to the boil.
  4. When the pears boil, cover the saucepan, reduce the heat and let simmer for 20 minutes.
  5. Measure up the sugars and add the pectin, then stir well to mix.
  6. Once the 20 minutes are up, add the sugar mixture and the rosemary sprigs and stir carefully, cover and let simmer for a further 10 minutes.
  7. Remove from the heat, take out the rosemary sprigs and stir in the citric acid, then carefully mash with a potato masher or blend with a blender.
  8. Taking out one jar at a time, fill it with jam and secure the lid tightly.
  9. Allow the jam to cool down to room temperature, then store in the fridge for up to 6 months.

I now have about 1.75 litres of lovely stuff and from licking the spoon, I can tell you it was very tasty. The recipe recommends this with a cheese board, but I'm pretty sure it'll work lovely on toast. The only thing is that due to the dark brown sugar, the jam is sort of brown and the original recipe uses just granulated sugar, but I didn't have enough so had to improvise. I will need to try the other recipe with star anise as well, if I can get more pears from Lundulph's parents.

A week later we tried the jam with some freshly baked bread. As it turns out, the pear flavour is almost entirely lost and the rosemary dominated. Also the jam hadn't set, but was more like a very sweet purée, so I've adjusted the amounts above to reduce the rosemary and increase the pectin. Lundulph thought it was OK, but if I'd used apples instead of pears, he wouldn't have known the difference. He wasn't particularly impressed with the rosemary and reckons I should skip it next time. I disagree, but it does need to be less.

Given the consistency it's turned out to be, I'll try to turn some of it into ice cream with the aqua faba foam, it might be nice.

6 July 2020

Chewy Biscuits

A few days ago, my Dad sent me a scan of a recipe for Swedish soft, thin bread. This came from the weekly magazine my Mum's been reading for several decades and it struck me, because I recognised the picture. What is going on here? I searched through old cuttings of recipes from the same publication and indeed I found that I already had this recipe, published about 11 years ago. Everything was the same, just some minor changes to the layout. Outrageous!

IMG_5998

The good thing about all this is that I riffled through a good part of my recipe collection and spotted a few interesting recipes, which I set aside to action as soon as possible. Here is the first one, as it seemed fairly easy to do.

Ingredients

100 g unsalted butter at room temperature
1 dl granulated sugar
2 tbsp light syrup / golden syrup / runny honey
2½ dl plain flour
½ tsp baking powder
1 tsp vanilla sugar
100 g milk or dark chocolate with or without nuts

Method

  1. Pre-heat the oven to 175 °C (not fan) and line a large baking sheet with baking paper.
  2. Whisk together the butter, sugar and syrup smooth and fluffy.
  3. Sift in the flour, baking powder and vanilla sugar and fold together to a homogeneous dough, but don't over-work it.
  4. Divide into three equal parts and shape each one into a long sausage, about 2 cm in diameter, and place onto the baking sheet, then gently press down to flatten.
    IMG_5995
  5. Carefully grate the chocolate and sprinkle generously over the dough.
  6. Bake for about 13 minutes until it starts going golden brown.
  7. Remove from the oven, then cut each length with a knife into diagonal biscuits, then carefully transfer onto a cooling rack.
    IMG_5996

These were very nice indeed. Since Ocado have their Scandinavian food section, I have a regular supply of the light syrup, which is so popular in Swedish baking. I actually baked these a bit too long and they went harder than I wanted them once they cooled down. However, Lundulph and I gobbled them up far too quickly.

20 June 2020

Summery Swiss Roll

IMG_5991

Since the lockdown, my good friend Dr Cutie and I have started having Zoom-fika ever now and then and have been asking ourselves why we've not thought of doing this before now, it's really good to chat about this and that and discuss our latest bakes and ideas. Last time we spoke, I mentioned we always get massive jars with jam from my Mum and it takes us forever to get through, so she suggested using them on Swiss rolls. She says that's a staple for when you get unexpected guests, as it takes very short time to complete. So I decided to make a Swiss roll, it's been ages since the last one.

Following the double batch of strawberry custard I made, I decided to use it as filling instead of jam. When I asked Lundulph if he'd fancy this, his eyes sparkled and his smile went from one ear lobe to the other. And since I've not used my Cordon Bleu book for a while, I decided to use its sponge recipe. This also reminded me why I so rarely use this book, it focuses on cooking techniques, but is relatively vague with the recipes.

Ingredients

4 large eggs
1.5 dl icing sugar
1.25 dl plain flour
2 dl strawberry custard

Method

  1. Butter and line two shallow rectangular baking trays with baking paper. Each should measure 23 x 33 cm and be about 1.5 cm deep. It is easier to get the sponge out if the paper comes up around the edges.
  2. Place the eggs and icing sugar in a large glass bowl and place this bowl over a saucepan with simmering water. The glass bowl bottom should not touch the water.
  3. Whisk until the mixture goes thick and you can drizzle the figure "8" when you lift the whisk.
  4. Remove from the heat and keep whisking until the mixture cools down.
  5. Sift in the flour and carefully fold in.
  6. Divide the mixture between the two baking trays and carefully level each with a dough scraper.
  7. Bake for 4 - 5 minutes until golden brown. Then, take out of the oven, cover with a second piece of baking paper and a cooling rack, then flip out of the baking tray.
  8. Allow to cool, then prize off the baking paper from the tray. While keeping the sponge on the second baking paper, place it on a towel.
  9. Spread the strawberry custard evenly across the sponge, except 2 cm along one of the longer edges - this will be the outer edge of the roll.
  10. Now use the towel to carefully roll up as tightly as possible while making sure you don't get the baking paper included inside the roll. Place so that the outer edge ends up under the roll.
  11. Wrap with the baking paper and refrigerate to get it to keep its shape, then it's ready to decorate further or serve as it is. You may want to trim the edges, there will likely be custard oozing out from the rolling.

The recipe in the book actually stated that the above amount should be for one baking tray, but it was definitely twice more than it should have been. Unfortunately I'd only prepared one baking tray, so one it had to be and I ended up baking it for some 15 minutes due to its thickness. It also was very difficult to roll. Didn't correspond to the photos in the book at all. But it was very tasty and I think with half the thickness in the sponge, it would have been better. Perhaps heat up the custard and add some gelatin to it and prevent it from oozing out too much. Of course this isn't Dr Cutie's quick recipe, it takes a bit more work, but it's well worth the effort to make and serve guests.

Plus, Lundulph was happy and so was I, because it was very tasty and although it seemed to be massive, we got through it quite quickly. Another bonus with 2 Swiss rolls for a larger dinner party.

18 June 2020

Another No-churn Ice Cream Recipe

IMG_5986

A few weeks into our lockdown, I started making ice cream as a treat to Lundulph and myself and also to cool ourselves a little in the sweltering heat. But after 7 batches back-to-back, I've been wondering if there is another way of achieving a tasty ice cream with less fat and sugar, but which still freezes relatively soft. My Mum and my Sister experimented with oat whipping cream and reduced amount of condensed milk, which they reckon worked pretty well, though it did need some 15 minutes to "relax" a bit before it was scoopable. I've not come across oat whipping cream in the UK, so it's not something I've tried, but having made two batches of meringue recently, my thoughts spun onto the fabulous properties of aquafaba.

IMG_5994

I had some in the freezer (purposefully put there to test the statement that it will not lose its capabilities) and since Veggie-wannabe-Lundulph is working his way through various types of canned beans and chickpeas, there's always lots of this liquid in the house at the moment. Thus a search on the internet resulted in this recipe, which I used as inspiration for ice cream batch number 8.

Ingredients

Makes about 2 litres
3 dl strawberry custard
red gel food colouring
3 dl unsalted aquafaba
½ tsp cream of tartar
1 tbsp vanilla essence
120 g icing sugar

Method

  1. Measure up all the ingredients. Place the custard in a large bowl.
  2. Place the aquafaba in a stand mixer and sprinkle the cream of tarter over it, then start whisking on the highest speed for about 4 minutes.
  3. Add the vanilla essence, while the mixer continues to beat.
  4. In the meantime, using a whisk, stir through the custard to loosen it and add some red food colouring as it'll get very pale.
  5. After 2 more minutes of mixing the aquafaba, start adding the icing sugar, a spoon at a time, while the stand mixer continues to work for another 3 minutes until stiff peaks have formed.
  6. Start transferring the foam into the bowl with the custard in 4 - 5 parts, and fold each well before adding the next one, being careful not to know out too much of the air out of the mixture.
  7. Transfer to a plastic container and place in the freezer overnight.

Well, I think we have a winner. This was definitely soft scoop, I had no trouble dishing out our lunch dessert today. It wasn't too sweet, but also not too bland, the strawberry flavour came out very nicely and I thought it tasted a little like a sorbet, but fluffier.

IMG_6002

In addition, it seems that indeed aquafaba works fine for whipping even after freezing. I had some doubts as to it's lack of flavour. The "fresh" part was a little cloudy and the thawed part was very cloudy, but once there was air inside, the foam was white and looked silky and smooth. The inspirational recipe states that the aquafaba should be whipped for 9 minutes, which is why I've given the minutes in the instructions. It didn't mention the speed of whipping and the speed would depend on the size of the engine of the machine, but run on max should be a good bet. The idea is to reach "stiff peaks" stage when everything has been incorporated. Looking back when I first tried using aquafaba, I have a vague memory that it did take quite a bit longer to reach the desired stage, compared to egg whites, so a stand mixer is strongly recommended. I have a mixer attachment for my Kitchen Assistent and the bowl is very sadly plastic, so I've not used it for making meringue with egg whites, however, aquafaba worked absolutely fine.

IMG_5982

Of course, the aquafaba can't have any flavourings in it, so beware cans of beans in salted water or such. I believe any canned beans would work, but keep in mind that some beans will also release some colour into the liquid, so might not be suitable all times. I generally buy unsalted cans and have now instructed Lundulph not to throw the liquid away, but to start thinking of flavourings. The custard seems to be a decent base to use for a variety of fruit I should imagine. I also suspect we'll get through this ice cream a lot faster than the other one, there's just so much air in it.

IMG_5985

Lundulph thought it was very light and fluffy and agrees that there was a bit of a sorbet taste to it, but agrees it's a winner.

Update 12th June 2020:
Since the original batch, I've made 3 more, all of which I swapped out the strawberry custard with something else and omitted the vanilla essence.

Batch 1: 3 dl of puréed mango and strawberries. This was even more like a sorbet.

Batch 2: A ganache from 200 g Valrhona passion flavoured white chocolate and 90 g condensed milk. Melt the chocolate gently. Scald the condensed milk and stir the two together, this goes quite thick. I also only had 2 dl of aquafaba, so ended up with a smaller amount. This resulted in quite a tangy ice cream.

Batch 3:A ganache made with 438 g single cream, 62 g granulated sugar and 200 g 70% bittersweet chocolate. Scald the cream together with the sugar, chop the chocolate if needed, then pour the hot liquid over the chocolate and let stand for a couple of minutes until the chocolate melts. Stir together until it becomes smooth, cover the surface with clingfilm and let cool down to room temperature. This makes about 5 dl, so only use 3 in the ice cream recipe. I also added 1 tsp of ground cinnamon to the part I used for the ice cream. Lundulph didn't like this one much. My intention was to get a creamier feel to the ice cream, but it felt kind of coarse and I suspect was closer to a granita in texture. Still, I quite liked it and I'll try to incorporate chilli in the next batch. I've also run out of chocolate pencils, so I'll need to make some more of those too.

Batch 4:334 g ripe raspberries, 256 g granulated sugar, 1 red Thai chilli. Wash the raspberries well, then place in a large bowl and add the sugar. Wash and slice the chilli lengthwise, but keeping the stalk intact and add to the bowl. Stir through, then refrigerate for 24 h until the sugar has melted. Stir through every now and then. Remove the chilli and taste the mixture to decide if you want to remove the chilli or keep it in. If keeping it in, cut off the stalk, then blend the whole lot and push through a sieve to remove the pips. In the meantime whip 4 dl of aquafaba with 160 g icing sugar, then fold together and freeze. This amounts to almost 4 litres of ice cream.

Batch 5:200 g white caramel chocolate calets and 200 g single cream. Heat the cream to about 65°C, then add the chocolate and leave for a couple of minutes to let it melt, then stir until it all comes together into a fairly runny ganache, leave to cool to room temperature. Mixed with the whipped up aquafaba, this gives the usual 2 litres of ice cream.

15 June 2020

Strawberry Custard

Over the past few weeks, my Mum has very dilligently read the recipes in her weekly magazine, selected ones she believes are good and has got my Dad to scan and e-mail to me. The magazine usually has a theme or ingredient each week, so in the strawberry recipe leaflet, there were several good ones. One was for "a simple strawberry ice cream", which frankly is the basic recipe I've been using over the past month and a half, with some strawberry jam added and frozen in a bundt cake tin to make it prettier.

On the same page, there was a second recipe for what they called "strawberry curd". I've had several very positive experiences with curd in the past, so was quite keen to try this one, though it looked like pink yoghurt in the photo. Indeed, I'd say this is a custard, not a curd, but it was very tasty and combined brilliantly with home made yoghurt - one of Lundulph's favourite afternoon snacks. I made a double batch straight away last week and I've now made a second one, with the aim to try an idea for another no-churn ice cream.

Ingredients

Makes about 600 ml
500 g washed and trimmed strawberries
2 dl granulated sugar
4 large eggs
2 tbsp corn flour
50 g butter

Method

  1. Blend the strawberries and if you want a smooth custard, sieve them to remove the pips.
  2. Whisk together the strawberry purée, sugar, eggs and corn flour in a saucepan.
  3. Bring to a simmer slowly, while stirring constantly and let simmer until the mixture thickens.
  4. Remove from the heat and whisk in the butter, then transfer to an air-tight container, cover the surface with clingfilm and let cool to room temperature, then store in the fridge.

This should last 2 - 3 weeks in the fridge and I've frozen some to see how that works. I think it would make a good cake filler and as I mentioned above, mixed with yoghurt it is very tasty. If the frozen one is fine after thawing, I will try using it as a filler for chocolate bonbons.

The only thing is that the strawberries tend to lose their colour when cooked, so the custard will be pale pink with a tendency towards grey. This doesn't bother me for home use, but if it'll be served to guests, I'd add a little red colour to make it a bit more appealing to the eye.

Lundulph thought it was quite nice too and was speculating that it would be very nice on top of some sort of sponge cake or inside a Swiss roll. We'll try that next.

4 June 2020

Failed Meringues

IMG_5978

Following my lovely fruit basked cake for my birthday, I had 4 egg whites to be used up. Originally I planned to make them into marshmallow, but some research resulted in the realisation that marshmallows do not contain egg whites at all. So the next thing to do is meringues and I had a vague idea of trying to make them flavoured. I had some lovely orange flavouring and yellow food colour that should have done the trick.

As it turned out, they didn't. I made the Swiss meringue, following a recipe from Lenôtre's book and I strongly suspect the orange flavouring is what did it. It looked quite oily and probably contributed to the collapse of the egg whites. So I urgently started searching for what to do when a meringue mixture just doesn't happen and came across this, which I used as inspiration, in particular the Chewy Almond Macaroons recipe.

Ingredients

4 large egg whites
250 g granulated sugar
1 tsp orange flavouring
yellow food colour
2 dl sesame seeds
2 dl plain flour
1 tsp baking powder

Method

  1. Pre-heat the oven to 180 °C (not fan).
  2. Place the egg whites and the sugar in a glass bowl and place this bowl over a saucepan with gently simmering water. The water must not touch the bottom of the glass bowl.
  3. Whip the mixture over the water bath until it reaches 50 °C.
  4. Remove from the heat and continue to beat on high speed for about 5 minutes, then lower the speed and beat for a further 5 minutes until the mixture is very stiff.
  5. Towards the end add the flavouring and the food colour and watch the mixture deflate and go runny.
  6. Fold in the sesame seeds, then sift in and fold the flour and baking powder.
  7. Line a couple of baking sheets with baking paper, then pipe small blobs onto it.
  8. Bake until the biscuits puff up and just begin to get a colour on top.
  9. Remove from the oven and carefully transfer to a cooling rack and allow to cool down completely.

What I learned in addition from this exercise is that just using sesame seeds is way too intensive a flavour. This was surprising, because whenever a recipe uses sesame as a spice, I barely notice it and always thing there should be more, but in this case it was way too much, so mixing with sunflower seeds or using ground or finely chopped nuts might be better. The combination with the orange wasn't super, but not too bad either.

Lundulph quite happily ate the lot, I filled up a biscuit tin and put next to his desk and they did go over the following few days. His suggestion was that they should be covered in dark chocolate, so I might try that next time my meringues fail.

2 June 2020

Birthday Under Lockdown

IMG_20200524 cropped

We've now been in a lockdown for some 2 months and I've found a wondeful baker whose videos are just mesmerising. She publishes videos as Boone Bake and I believe she's from Korea and after spending a few hours watching her lovely creations, I decided to try this one for my birthday.

Ingredients

Pastry

125 g strong flour
125 g plain four
150 g unsalted butter
55 g water
6 g sugar
1 g salt
1 large yolk

Mould

grapeseed oil

Glazing

1 large yolk
5 g full milk

Strawberry compote

200 g strawberries
60 g granulated sugar
1 tbsp lemon juice

Vanilla cream filling

4 large yolks
60 g granulated sugar
20 g plain flour
10 g corn starch
400 g full milk
2 tsp vanilla essence
50 g white chocolate
60 g condensed milk
280 g double cream,whipped to stiff peaks

Decorations

selection of colourful fruit

For each part of the recipe, I measured up each ingredient in its own bowl and lined them up in the correct order before starting. I pretty much followed the video instructions, however, I split up the different parts and made them on different days, since I didn't want to go tired and mess up my cake by doing a shoddy finish.

IMG_5964

With regards to the pastry, one thing that isn't clear from the video is how long it takes to get the butter mixed in with the flours, I think I chopped and chopped around in the bowl with the dough scraper for ages, changing hands as they got tired. I tried using both hands with two scrapers and I also tried holding two scrapers in one hand with a finger inbetween, but still I didn't manage to get things well incorporated. So I think pinching with my fingers next time will be the way forward, as long as I can keep the kitchen and my fingers reasonably cool. It's been hot this week in the UK, so I've had difficulties keeping the kitchen below 25 °C. What I must remember to do is to use glass bowls for the mixing and chill them as well overnight before starting.

IMG_5965

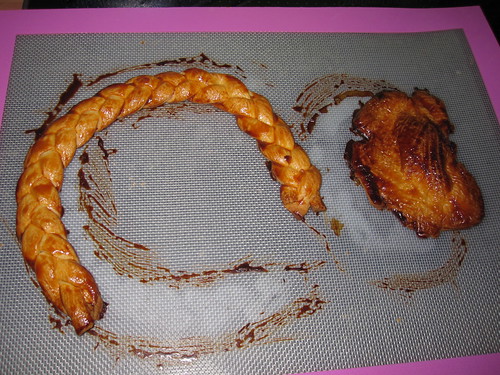
What I really liked is that once the egg mixture had been stirred into the dough, it was just pushed down to the bottom of the bowl to form a lump and then moved to cling film, shaped into a square and wrapped tightly before chilling. It clearly was still very much in a crumbly state, but the three rolls and folds made it turn into a lovely smooth dough, so I'll keep this in mind for other shortcrust pastries I make. I did notice that when I made the basket handle at the end, having rolled out all the offcuts from the previous rolling, the dough had become elastic, so it developed gluten fairly quickly, thanks to the strong flour. But I think it is important to have it there, to make the basket sturdy enough to be filled with things.

IMG_5966

I was most nervous about the weaving part, but this turned out to be easier than expected. For the basket shape, I used one of our soup bowls, which has a diameter of 19.5 cm and is possibly a bit deeper than the one used in the video. It is important to make sure to have everything ready and organised and also to make space in the fridge for the basket, if it's a hot day, so that it can be placed there while rolling the dough and cutting new strips. Another thing to keep in mind is to try and weave as tightly as possible and have a small container with water and a small brush handy, to glue together the dough strips as required. During baking, the dough shrunk quite a bit and left largish holes in the basket and it came apart in a couple of places where new strips had been added.

IMG_5967

I had severe doubts about how long this contraption would hold, given that its filled with a pastry cream and fresh fruit, so I chose to be cautious and baked the basket for 40 minutes, which is almost twice as long as the video recommends. Of course the pastry wasn't as melt-in-the-mouth, but it tasted OK to me. The handle and the remaining dough were baked for 23 minutes as per the instruction.

IMG_5968

So on the morning of my birthday, I finished the vanilla custard cream, which is extremely tasty and ended up a bit firmer than it looks in the video, which was good. But bacause my basket ended up a bit larger than the one in the video, there wasn't enough vanilla custard cream. It barely filled half the basket and I struggled to cover the strawberry compote, so I've doubled the amounts in the ingredients above. It was so tasty, any left-over will not go to waste for sure.

IMG_5969

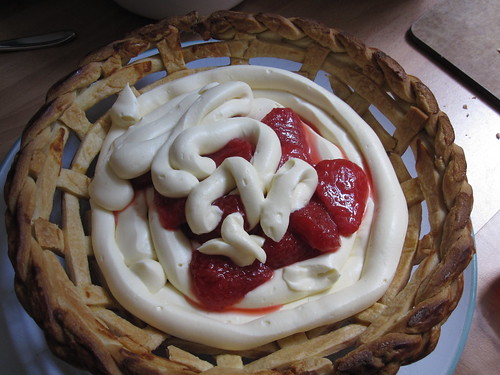
The baked fruit basket was ready just after lunchtime, so I was able to show it to my parents and my sister when it was looking its best. They were impressed. Lundulph then managed to get the barbecue going and we spent the early afternoon grilling a lot of meat and veggies before having a leisurly festive meal in the late afternoon. The fruit basket had started sagging a little, but was holding together OK. If I manage to make a tighter weave next time, it should hold even better.

IMG_5972

The only thing is, this pastry is not possible to cut in a gracious manner. So as soon as I stuck the knife into it, it collapsed, but it was extremely tasty and light, with a very good balance of crunch from the pastry, vanilla custard and fruit. A perfect dessert for a Summer's day and it did hold together for the 4 hours between completing it and cutting it up, though it had started to sag a little. Since I had lots of fruit left over, I had placed some underneath the basket and that added a little support.

I suspect we have at least 2 more portions each to work through, so I'd say this makes enough for 6 - 8 people and for anyone who wants some extra crunch, they can take a piece from the basket handle.

I how have 4 egg whites left over, so I will be making meringues in the coming days.

16 May 2020

Vegetarian Moussaka

I've been meaning to try my hand at a vegetarian moussaka for a while and in this week's shop, there were some lovely aubergines, so I bought some. I had intended to make this earlier in the week, but there were some urgent gardening activities required, so I kept putting it off.

IMG_5958

This time, I decided to do this on my own, without consulting with my Mum or the internet and to be honest, the gamble payed off this time. This morning I was thinking about the film Julie & Julia for some reason, I'm not sure why and I came to think of boeuf bourguignon. A bourguignon is a fairly simple dish to do, you chuck things in a pot and bake for a while, but you can go to the trouble of following the Julia Child recipe and you end up with something amazing. This got my head milling - a moussaka is also a fairly simple dish, would it make a difference to work along the same lines as Julia Child? It turns out that it does matter, so before I forget what I did, I'm writing up the recipe.

Method

2 x 400 g cans of black-eyed beans in water
400 g button mushrooms
butter
3 medium aubergines
1 medium onion
2 cloves of garlic
1 large courgette
1 x 400 g choped tomatoes
500 g boiled waxy potatoes
1 tbsp tomato purée
1 tbsp fresh thyme
3 tbsp fresh parsley
1 tbsp dried dill
1 tbsp dried savory
1 tbsp sweet paprika
salt and pepper 3 tbsp plain flour
3 - 4 dl semi-skimmed milk
3 large eggs

Method

  1. Drain and rinse the beans, then place in a pressure cooker, add water to cover some 5 cm above the level of beans and boil under pressure for 30 minutes. Leave in the pot until required.
  2. Wash and trim the aubergines, then slice to 1 cm thickness. Butter a round deep baking dish of 30 cm diameter and 5 cm deep.
  3. Peel and slice the mushrooms. Peel and dice the onion. Peel the garlic. Dice the potatoes into 1 cm pieces.
  4. Dry-fry the aubergines in a frying pan on high heat until they soften, then use half of them to line the baking dish, while keeping the rest separate.
  5. Now turn down the heat to medium and dry-fry the mushrooms in the same pan, but sprinkle with salt to help release their liquid. Once they start going dry, add about 10 g butter and stir through, then set aside.
  6. Continuing in the same frying pan, melt some 15 g butter and fry the onion. Press in the garlic and stir regularly to avoid burning them. Set aside once they are translucent.
  7. While the onions are frying, trim and peel the courgette, then slice to ½ cm thickness and cut each slice into 1 cm squares.
  8. Once the onions are done, change to a large casserole dish, bring the heat to medium-high and melt some 30 g butter until it starts bubbling.
  9. Add the courgette, sprinkle a little salt over it and fry until it begins to soften, stirring regularly. In the meantime, drain the beans well.
  10. Pre-heat the oven to 180 °C fan.
  11. Once the courgette begins to soften, add the beans, mushrooms, onion, the chopped tomatoes, tomato purée and all the herbs, salt and pepper and stir everything together.
  12. Remove from the heat and transfer to the baking dish and level off. Arrange the remaining aubergine slices on top.
  13. Place the casserole dish on high heat and melt about 30 g butter. Measure up the flour and add salt and pepper to it.
  14. Once it bubbles, add the flour and stir vigorouslly with a wooden spoon.
  15. After about a minute, begin to add the milk, a little at a time and stirring constantly to make sure it doesn't burn. Keep adding milk until it becomes a thick batter.
  16. Remove from the heat and swap the wooden spoon for a balloon whisk. Add one egg at a time and whisk into the batter mixture until it's smooth, then pour the topping over the aubergines in the baking dish.
  17. Bake for 30 - 35 minutes until the topping puffs up a bit and goes golden brown.
  • Overall, this took almost 5 h to do, from opening the cans of beans until we sat down at the table, but I think the result was very good, even if Lundulph didn't go for seconds. Possibly I've finally learned how big portions he needs. He certainly seemed to enjoy the moussaka, as did I. We ate a quarter of the dish, so there are 3 more meals in it, which we'll work through in the coming week. I don't think this dish will freeze well unfortunately, but I'll keep this one on the list for the vegetarian family members, once we get to socialise with them.

    IMG_5957

    A comment on the beans - it doesn't really matter what type are used, but as I've bought the full range of canned beans for Lundulph, he asked me to use the black-eyed ones in particular as these seem to be a bit on the crunchy side, even though they are canned. Other beans are less so. So this step could probably be skipped if using another type of bean.

    As I was transferring the mixture into the baking dish, I realised that I'd forgotten the 3 small carrots I intended to include. They would probably have been nice to have there too.

    Looking at the photos, it looks like a moussaka, but the insides are somewhat more like a weird gyuvetch. Still I'm very pleased with the result. Lundulph's comment was that it was very nicely filling and he could have gone for seconds, but decided not to, probably leaving room for some chocolate. Though if he could choose between this one and a regular moussaka with meat, he'd go for the meat alternative. He did say that it would have been nice to have some additional vegetables on the side, perhaps a salad or such like.

    IMG_5960

  • 7 May 2020

    Fudge Cake

    I'm immensely pleased about being able to make this fudge cake, it is a recipe from the mid-1970s at least. As I mentioned in the early days of the blog, we were neighbours with a family from Afganistan. This is a recipe from them and given the name, I suspect it is an English recipe that has made its way to Afganistan originally. My Mum used to make it regularly, it was always very popular with guests, but at some point before the year 2000, the recipe got lost.

    IMG_5949

    But it seems that my Mum had shared it with various friends over the years and now that everyone is in lockdown, a friend living in Milan piped up that she still has it and sent it back to my Mum. Thus it immediately made its way to me and I didn't waste any time baking it. In fact, the file that my Mum's friend sent over was actually titled with the originator's name, so there is no doubt that this is the correct recipe.

    Ingredients

    125 g butter + butter for greasing the baking tin
    140 g plain flour
    1 tsp baking powder
    2 tbsp cocoa powder
    270 g icing sugar
    3 large eggs
    3 tbsp desiccated coconut + more for the baking tin
    chopped walnuts for decoration (optional)

    Method

    1. Melt the butter on low heat. Grease a 20 cm springform cake tin with butter and coat with desiccated coconut. Pre-heat the oven to 175 °C.
    2. Sift together the flour, baking powder and cocoa powder.
    3. Beat together the icing sugar and the eggs until pale and fluffy.
    4. Add the flour mixture in 3 parts, making sure each part is well incorporated.
    5. Pour in the butter and stir in the coconut into the cake mixture.
    6. Transfer the batter to the cake tin and level off. Sprinkle with walnuts if using.
    7. Bake for 1 h, check that it's done with a stick and if yes, then take out of the oven and leave to cool for 10 minutes in the cake tin before carefully releasing it out onto a cooling rack.

    IMG_5948

    I'm so glad this recipe got found again and that it turned out so well too. I have vague memories that my Mum used to make this as a tray bake, and cut it into small diamond shapes. In this case the baking time is about half, as the cake is thinner, but as I wasn't sure of what amount I'd end up with, I opted for the safe with the springform. Even after an hour, the cake was very nicely moist and retained a little bit of chewiness. We experimented with a caramel ganache as topping on it, which Lundulph really liked. I was happy with just the fudge cake on its own though. I think some whipped cream would have been nice, and no need to sweeten it either, the cake is quite sweet. We needed a week to eat the whole lot.

    I also used a finer version of the desiccated coconut, which I spotted in our supermarket some time ago. It's not good for müsli, but for cakes where it shouldn't be too obvious, it is much better.

    I skipped the walnuts because Lundulph seems to get an allergic reaction to them these days, though I suspect after an hour's baking it would have been OK. Nevertheless, he thoroughly enjoyed this cake, so I'll probably try it again and make it into a tray bake.

    5 May 2020

    Mushroom pie

    It's been many weeks in lockdown in the UK and as I've still not been able to find a new job, I'm using some of my time to cook new things. In the past few weeks, I've bought several batches of lovely button mushrooms, which I've baked with a little salt and this has led to an accumulation of mushroom stems in the freezer. My initial intention was to make mushroom soup with them, but I've yet to find a recipe that I like. Thus I decided to use some of them to make a pie.

    IMG_5947

    Last week I also had the first ever opportunity to talk to my lovely friend Dr Cutie, who's reorganised her working life to be online for most things. She recently got diagnosed with coeliac disease and as she's been an avid baker for over 30 years, she's been experimenting with gluten-free flours and told me about a bread she'd made with teff flour. This reminded me that I've had a bag of teff flour in the larder for some time with the intent of making ingera bread, but never getting around to doing it so far.

    IMG_5946

    These things spurred me to try out teff flour and so I reviewed the pie recipes in the blog and made adjustments to this recipe from my Mum.

    Ingredients

    Pie crust
    150 g plain flour
    100 g teff flour
    50 g wholemeal flour
    1 ml salt
    150 g unsalted butter
    3 tbsp water
    plain flour for dusting if required

    Filling
    1 medium onion
    1 clove of garlic
    30 g unsalted butter
    1.5 dl parboiled ceps
    4 dl parboiled button mushroom stems
    1 tsp dried rosemary
    1 small pinch of grated nutmeg
    2 large eggs
    1.5 dl whipping cream
    1 dl semi-simmed milk
    salt and pepper

    Method

    1. Stir together the flours and salt in a large bowl, then dice the cold butter into the mixture and pinch together to fine crumbs.
    2. Add the water, 1 tbsp at a time and keep carefully mixing the dough until it just comes together.
    3. Divide into two equal parts. Wrap each part well and freeze one and put the other one in the fridge for at least 30 minutes.
    4. Peel and dice the onion, peel the garlic.
    5. Heat up the butter in a deep frying pan on medium heat and fry the onion and press in the garlic until translucent.
    6. Add the mushrooms, rosemary and nutmeg. Season with salt and pepper and fry until the mixture is dry.
    7. Pre-heat the oven to 200 °C and take the dough out of the fridge and roll to a thin sheet, about 3 mm thick.
    8. Line a round pie dish of 27 cm diameter and let the dough go a little over the edge of the dish so that it doesn't sink back.
    9. Prick with a fork and blind-bake for 10 minutes until it's dry.
    10. Whisk together the eggs, cream and milk in a bowl and season with salt and pepper.
    11. Spread the mushroom mixture in the pie crust and pour the egg mixture over.
    12. Bake the pie until the surface of the egg mixture has turned golden brown, about 30 minutes.

    This was very tasty and I'm particularly pleased that I have a second batch of dough in the freezer for the next savoury pie. The filling was a bit too little. I should have used one more egg I think and topping with cheese would have filled the pie dish. Obviously the last bit is not an option with Lundulph sadly, so if I make this recipe again, I'll need to revise the amounts.

    IMG_5942 IMG_5943
    IMG_5944 IMG_5945

    Otherwise, the pie disappeared quite quickly, Lundulph did like it, as did I, and it would be a good one to serve the vegetarian contingent of the extended family if they ever come to visit us in the future.

    26 April 2020

    Poussin Stuffed With Aromatic Herbs

    IMG_5937

    A couple of years ago, a lemon balm plant had seeded itself next to our pond. I like the smell of this herb and left it there. Chatting to a neighbour, she confirmed that it probably came from her garden. What we hadn't realised is that lemon balm is from the mint family, which means it is quite rampant and can take over fairly quickly.

    A few years before that, we made an attempt to rejuvenate our little pond and purchased several pretty looking aquatic plants, one of which was water mint. Again, this plant took over the pond and seems to have no issues growing on land either. Lundulph is not too happy about either and I humoured him, by removing some of the lemon balm seedlings in the flower patch around the pond now that we're in a lockdown. Thus I liberated a rose bush, my beloved ramsons and some lovely Welsh poppies.

    But the lemon balm got me wondering and googling on what can be done with it. Mostly it is tea, which I tried last week - it was quite nice, but the plant is way too large for us two to use up. I've also read that lemon balm is not suitable for drying. In Sweden it is used as decoration to desserts, very much like you'd do with mint leaves in the UK. It's also nice to put in drinking water now and then as well. But I managed to learn what lemon balm is in Bulgarian, and I searched for recipes, which resulted in this one (in Bulgarian) that seemed decent enough to try. So as it's Sunday today, I made it into our roast lunch. I did some tweaks to the recipe, the original instructions were on the sparse side.

    Ingredients

    a handful of lemon balm leaves
    a handful of mint leaves
    a handful of wild garlic leaves
    a handful of curly parsley
    a handful of dill
    2 poussins at 500 g each
    salt and pepper
    50 g butter

    baby potatoes
    chestnut mushrooms

    50 g butter
    3 tbsp plain flour
    4 dl semi-skimmed milk
    1 dl whipping cream
    nutmeg

    Method

    1. Wash all the herbs well and shake off the excess water, then cut them finely and mix together in a bowl.
      IMG_5934
    2. Wash the poussins and pat them dry with kitchen paper, then sprinkle with salt and pepper inside the cavity.
    3. Stuff the herb mixture into the cavities, but keep about a dl of the herbs aside for the sauce.
    4. Tie together the legs of each poussin, so the herbs don't fall off and rub butter over the breasts, legs and wings.
    5. Place the poussins in a roasting bag and season, then tie the bag, making sure to leave space or it to expand.
      IMG_5935
    6. Wash the baby potatoes and place in a pot ready to steam.
    7. Peel the mushrooms and line up on a roasting rack, then sprinkle some salt on each.
    8. Pre-heat the oven to 180 °C fan. Once hot, place the poussins to roast for 55 minutes.
    9. After 15 minutes, put the potatoes on to steam and after a further 10 minutes, put the mushrooms in to roast as well.
    10. When there are about 10 minutes left, heat up the butter in a saucepan.
    11. Once it bubbles, add the flour and stir with a wooden spoon to soak up the butter and fry it for a couple of minutes while constantly stirring.
    12. Slowly start adding the milk, a little at a time to prevent the saucepan temperature to drop too much and stir it in. It will look like a stretchy dough at first, but will eventually become a batter and finally a sauce.
    13. After the mixture has turned into a sauce, add the cream, season with salt and pepper and grate a little nutmeg into it.
    14. As it starts to bubble, stir in the remaining herb mixture.
    15. When the time is up, carefully remove the poussins in their roasting bag from the oven, then grabbing the top of the roasting bag, hold it over the saucepan, incline it towards one of the corners, then carefully partially snip this corner and let the roasting liquid drain into the sauce, while stirring.
    16. Once all the liquid is drained, let the poussins rest a couple of minutes, covered under a towel.
    17. Take out the poussins from the roasting bag and carve up onto pre-heated plates. Serve with the potatoes and mushrooms and pour the sauce on top.

    I don't know if any of the herbs permeated the chicken meat, but it was delicious. Lundulph concurs - a small but very nice chicken. The poussins were so tender and juicy. I'm also quite pleased with the sauce. We ate one of the poussins and kept the other one for next week. For dessert we had some of the lovely rhubarb ice cream. I really must start using my garden more and pick the stuff that grows on its own with no effort on my part.

    19 April 2020

    Crispy Tofu

    IMG_5933

    It's been ages since we had stir-fry and in last week's online food shop, I added a couple of bags of ready cut vegetables. But what to do along with them. Normally I'll get tiger prawns for Lundulph or some nice fillet steak, but I forgot to do that this time. Then it struck me, we have several packets of extra firm tofu in the fridge, on Lundulph's request. The intention was for him to have tofu as protein replacement, but he did some searching on the internet and established that tofu seems to have a lot lower protein content than the soy beans themselves, so I think he's now gone off the idea. Besides, he feels the texture is too close to cheese, which he still disapproves of.

    But a look at the packets indicated that they were about to go out of date, so I searched for how to make crispy tofu and the recipe I decided to try is this one. I converted the amounts to metric and also had to make some adjustments as the two packets I wanted to use were 280 g each. Otherwise, I was determined to follow the recipe as closely as possible.

    Ingredients

    560 g extra firm tofu
    2 tbsp olive oil
    2 tbsp soy sauce
    2 tbsp cornflour

    Method

    1. Pre-heat the oven to 205°C (not fan) and line a large baking tray with baking paper.
    2. Drain the tofu, if it is in liquid, then cut into cubes, about 1.5 cm and lay out on a clean and lint-free tea towel with a little space around each cube.
    3. Fold the towel over the pieces,then place a large chopping board on top and press down, I actually sat on top for a couple of minutes.
    4. Place the cubes in a large bowl and drizzle the oil and soy sauce over, then using one hand turn the cubes gently to get them coated.
    5. Sprinkle the cornflour and turn the cubes further to get them coated. Don't worry if some of the cubes crumble and break.
    6. Tip the tofu into the baking tray and spread them out, again so they don't touch each other. Then place in the oven.
    7. After 15 minutes, stir the cubes to turn them and bake for a further 15 minutes. They are now ready to serve.

    IMG_5932

    Both Lundulph and I loved these, the texture was very good, they were nicely crispy on the outside, but soft in the middle and worked really well with stir-fried vegetables and quinoa. Lundulph thought they were a bit on the salty side and possibly the tofu itself was salty and adding soy sauce took them over the top a bit. We ate most of them for our dinner, there's about a handful left and as I was putting it away, I ate one piece that looked particularly crunchy and it was tasty still, even though it was cold. I suspect they would be very nice in a Thai curry too, instead of chicken.

    Next time, I'll swap the olive oil and soy sauce for green masala, I've used it with silky tofu before and it's been very nice, so I have good hopes for this.

    12 April 2020

    Rhubarb Jam with Agar-Agar

    As mentioned in yesterday's post, I've harvested the rhubarbs for the first time this year (and I definitely expect one more harvest in the coming weeks) and there is work to be done to preserve it. As also mentioned, I have no pectin in the larder, but loads of agar-agar, so some searching on the internet resulted in selecting this recipe which seemed quite straightforward.

    IMG_5930

    Before listing the ingredients and the method, a note on my activites in the last few weeks. We in the UK have now been under a lockdown for almost 3 weeks and as I'm out of a job as well, I've taken the opportunity to tackle some jobs around the house. One of them is to thoroughly empty and clean the larder. This hadn't been done since I organised it in 2014, which I discovered after copying the clean-out photos to my photo album. This was long overdue and I did manage to fill a rubbish sack with stuff that was out of date or looked suspicious. It is also amazing how much stuff it's possible to fit in there. Now everything is nice and clean and has been shifted to new drawers, with the concept of often-used items are easy to reach, rarely used items are further back. What this means is that I end up going through all drawers for every single thing I need. But I now know what I have and what I don't and I do need the exercise.

    In this activity I also established that I have an astonishing variety of small containers with sugar in different forms or stages of refinement. Thus I took this jamming opportunity to use them up. The below amount is a combination of some 260 g soft dark sugar, about ½ dl light cane sugar flavoured with cloves (a gift from brother-in-law Roger after a trip to Mauritius), another ½ dl pink sugar for cookie decorations that I don't intend to use, a further ½ dl of palm sugar and a couple of tablespoons of crystallised golden syrup (didn't realise this was possible). There's no way I'll be able to reproduce this jam if it turns out well.

    Ingredients
    Makes about 1 litre

    750 g rhubarb stalks
    500 g sugar
    1 tbsp lemon juice
    1 tsp vanilla essence
    5 g agar-agar powder

    Method

    1. Heat up the oven to 120 °C fan and place jam jars and their lids to steralise for at least 20 minutes.
    2. Wash and slice the rhubarb into 2 cm pieces.
    3. Place in a saucepan together with the sugar, the lemon juice and the vanilla essence and bring to the boil while stirring.
    4. Let simmer for about 10 minutes uncovered and stir occasionally.
    5. Add the agar agar and stir in well. Let simmer for a further 5 minutes.
    6. Take one jar at a time out of the oven and fill with jam as much as possible, close tightly and move to the next one.
    7. Leave to cool down completely.

    Because I used so much dark sugar, the jam is quite dark in colour, but looking at the first time I made rhubarb jam, it was pretty dark too, even.

    IMG_5931

    We've not tried it yet, as we already have several other jams "on the go" as Lundulph says and I'm not opening another one until we've finished these.

    11 April 2020

    Rhubarb Purée

    Once again it is rhubarb season and the ones in the garden have gone mad with growth. This year one of the plants is producing no less than 3 flower spikes, in addition to a good number of thick-stemmed leaves. In my first harvest, I had over 2 kg of lovely smelling stems.

    I also discovered that I have no pectin and the packet of jam sugar that was lurking at the back of the larder had gone rock solid and was 2 years out of date, so I decided not to risk it and searched for alternative recipes using agar-agar, which I seem to have in large quantities at the moment. As I was searching, I also speculated whether it is possible to make purée, similar to the one I've made with apples many years ago. As it turns out, other people have had the same idea and very kindly posted their recipes. I opted for this one (in Swedish).

    Ingredients

    500 g rhubarb stalks
    2 apples
    ½ dl water
    2 dl golden syrup
    1 tsp vanilla essence

    Method

    1. Wash and slice the rhubarb into 2 cm pieces.
    2. Peel and core the apples, then dice.
    3. Place the rhubarb, apples and water in a saucepan and bring to the boil.
    4. Let simmer until the rhubarb goes soft and mushy, about 10 - 12 minutes.
    5. Add the syrup and stir through. Let simmer for a further 5 - 6 minutes.
    6. Remove from the heat, stir in the vanilla and transfer to clean jars or serve warm with ice cream.

    This purée will not last as long as a jam, as the amouht of sugar is quite low and there is no added pectin, but it can be frozen, in which case it'll last longer. If freezing, I recommend saving a juice/milk carton and washing it well, then pouring the purée into it and sealing at the top before freezing. This way, you can push some out from the carton and cut slices with a knife. The frozen slices can go directly onto a freshly made pancake or hot porridge. Chilled purée works nicely with yoghurt and 2 dl of it can go into the no-churn ice cream as flavouring.

    I don't seem to have made any photos this time, but it looks very much like the jam I've made previously.

    10 April 2020

    Кифли с мармалад

    These are one of my favourite breakfasts in Bulgaria. It is read as "kifli s marmalad" and is a curious take on croissants in that they are shaped in the same way, but not from puff pastry. The name comes from German I think - "Gipfel" which means tip/peak of a mountain. The traditional filling is marmalade made from rosehips, though I've seen chocolate and other things lately and it's probably nice too, though I wouldn't try it, if there's rosehip marmalade to be had. Google translates these as "marmalade muffins".

    IMG_5928

    Lundulph has wanted me to make these for ages, since he always has these when we go to Bulgaria and after trying out the recipe for the super fluffy bread rolls, I felt I've found the right type of dough for these delicacies. Though searching for recipes on the internet indicates dough for kozunak should be used, I disagree, eggs have no business in there. It is key to follow the initial recipe I wrote up, with 4 tbsp of sugar, possibly even 5 or 6, but skip the salt.

    I had a jar of 380 g rosehip marmalade and used about ⅔ of it. It was set quite hard, so I stirred it through with a fork, then put in a piping bag for easier distribution.

    IMG_5925

    I used the proofing function of the oven again, both for the first rise and for the first tray of kifli, to make sure they would rise nicely. The second tray of kifli would have longer to rise, so I left them on the work surface, the kitchen had become fairly warm at this point anyway.

    I divided the dough into 2 equal parts, then rolled each out to a circle just under 1 cm thick and cut into 6 wedges. I squirted about a tbsp of rosehip marmalade on each and rolled them up, then placed onto a baking tray lined with baking paper and left to proof.

    IMG_5926

    I pre-heated the oven to 180 °C fan and just before baking, I brushed the kifli with a whisked up egg and sprinkled granulated sugar on top. I baked for 30 minutes, then took out of the oven, left the kifli to cool a few minutes in the baking tin, before carefully moving to a cooling rack.

    I let Lundulph try one while it was still warm and his eyes started sparkling, which is a sure sign he liked them. What he did forget to mention is that the dough tasted a bit salty for some reason and I wonder if I'd forgotten to add the salt the first time I made the fluffy soup buns, because this was quite a dramatic difference. So should skip the salt next time.

    IMG_5928

    Also, I'll cut the dough circles into 8 pieces, it's so much easier, than to try and do 6, even if the kifli will end up slightly smaller.

    Lundulph's final comment was that these are like jam doughnuts, but not deep fried, which is good and also a disappointment that there were holes in the middle where the marmalade was. His view is that more marmalade is never wrong. I'm guessing these holes are due to the steam in the marmalade expanding during baking, then shrinking back/escaping after the dough has set during the baking. I suppose I could sneakily syringe in some extra jam after baking, just like for jam doughnuts. My Mum kindly bought me two filling nozzles for precisely this reason at the chocolate festival last year.

    I kept a couple for us for breakfast the following day, the rest went into the freezer, but I suspect will get eaten fairly quickly though.

    6 April 2020

    Leek and Potato Soup

    With the UK lockdown now in its third week, I find myself buying slightly random greens with vague ideas of what to do with them rather than a firm plan. This is not a good idea, but for some reason I keep thinking that I shouldn't make specific plans, since I don't know if I'll be able to get hold of the right ingredients at the supermarket. This is very silly, since there doesn't appear to be any shortages in the vegetable section, at least not in my local shops.

    But buying greens, they have a limited lifespan and must be used. Last week I bought a packet of leeks. They then had to live in the salad drawer at the bottom of the fridge, until Lundulph dug them out the other day and commented that they are going manky. Indeed, the outer leaves were yellow. Thus, I made sure to get potatoes when I went to the shop this week with the aim to make leek and potato soup. Oddly enough, this seems to be the only canned soup that's left on the shelf - no one is buying it.

    After some research in my cook books, I settled on Delia Smith's recipe, but decided to increase the amounts and also spruce up a little with some chilli.

    Ingredients

    430 g leeks
    1 kg potatoes
    145 g onions
    2 cloves of garlic
    100 g salted butter
    1 small scotch bonnet chilli
    1 l chicken and/or vegetable stock
    ½ dl chopped curly leaf parsley
    salt and pepper to taste

    Method

    1. Trim the green edges and the root plate of the leeks, cut them in half length-wise and make sure to wash any grit stuck between the layers. Then slice finely and set aside.
    2. Wash the potatoes well and peel if needed. Dice into 1 cm cubes and add to the leeks.
    3. Peel and wash the onion(s), then dice into 1 cm cubes and add to the other vegetables. Peel the garlic.
    4. Heat up the butter in a large stock pot and when it's bubby, add the vegetables and press in the garlic. Stir through to get them coated with the butter, then cover and turn down the heat somewhat and leave to fry/sweat for about 15 20 minutes, stirring occasionally.
    5. In the meantime, using a glove, halve the chilli and scrape off the seeds and pith and discard, then chop finely, taking care to protect your skin.
    6. Prepare/heat up your stock (I used 1 cube chicken stock and 4 cubes vegetable stock, as that's what I had).
    7. Wash and chop the parsley.
    8. Once the frying time is up, add the chilli, stock and parsley and season to taste. Stir everything, cover and let simmer for another 15 - 20 minutes until the potatoes are soft.
    9. Using a stick blender, blitz to achieve the consistency you prefer or leave as is if you'd rather, then serve.

    Delia recommends blending smooth, but both Lundulph and I prefer a little bit of texture in this type of soup, so I just did a little pulse blitzing.

    The amounts above also result in loads of soup. Lundulph and I had a generous portion each for lunch. The rest was left to cool down completely and I divided into 3 x 600 g portions which I've frozen. What I discovered, however, is that I was rather hungry a lot sooner after lunch than I expected, but I guess this is the standard thing with having mainly potatoes in a meal. They fill you up, but are processed quite quickly and you feel hungry after a couple of hours.

    2 April 2020

    Za'atar Salmon In Tahini

    IMG_5922

    Once per week we aim to eat fish for dinner. Given that I don't like fish, the only option in general is either salmon or trout and for the past couple of years, I tend to bulk buy large fillets with the skin on, then cut into around 350g pieces and freeze. In general, I do variations on this recipe, but it seems that Lundulph has had some time on his hands and has been looking for something new for me to try and printed out one of Ottolenghi's lovely recipes from The Guardian.

    The printout spent a couple of weeks on the fridge door, until I got my act together and included the ingredients in my weekly shopping list. I had to adjust the amounts for 2 portions and overall this recipe was a very pleasant surprise, as although it reads like something tasty, once I started making it, I lost confidence entirely that it would work at all. Having said that, I think a couple of tweaks are in order, but very minor ones and I've incorporated them below.

    Ingredients

    400 g salmon fillet with skin on
    salt and black pepper
    3 ¾ tsp za'atar
    1 ½ tsp sumac
    6 tbsp grapeseed oil
    250 g baby spinach
    120 g tahini
    4 ½ tbsp lemon juice
    3 garlic cloves

    Method

    1. Pre-heat the oven to 200 °C fan.
    2. Pat dry the salmon and place skin side down, then sprinkle salt, pepper, za'atar and sumac all over to form a crust.
    3. Place an oven-proof deep-ish frying pan on a medium-high heat on the hob and heat up half the oil.
    4. Add the spinach, sprinkle with salt and pepper and wilt it down while stirring - about 2 minutes.
    5. Make a space for the salmon in the middle of the pan and place it there skin down.
    6. Drizzle the remaining oil over the salmon, then transfer the pan to the oven for 5 minutes.
    7. In the meantime, put the tahini, lemon juice and garlic and more salt in a food processor and blend together.
    8. Remove the pan from the oven and pour the tahini mixture around the salmon to cover the spinach leaves.
    9. Put back in the oven for a further 20 minutes, until the salmon is cooked through.

    What I didn't expect was that the tahini mixture would puff up. Also I didn't expect all these fancy items to work together so well. I bought za'atar and sumac when I went to Dubai 7 years ago and I never really used either of these sadly. I did buy new batches for this recipe, since even if herbs and spices keep for a long time, I think 7 years is pushing it.

    Lately I've also taken to baking mushrooms in the oven, very much like this recipe, but without any fillings, just a sprinkle of salt. So I made these before the salmon and also steamed some potatoes and we had a lovely dinner at the start of April.

    IMG_5923

    With the coronavirus raving across the world, we're staying at home pretty much all the time now. I go out once per week to get some greens and fruit and I managed to book a delivery online for a huge stash of canned and dried pulses and various forms of dry carbs - pasta, couscous, rice, amaranth... Having grown up with my Mum, first in a communist country, then moving to Sweden and living on only one income for a number of years, I've learnt to stock up and save as much as I can, so being in a lockdown hasn't affected us too much yet.

    Plus I have planted vegetables in our little greenhouse, in case food does start to run low. If nothing, it gives me focus when I'm out in the garden, something to look after and enjoy at some point in the future, not just weed and mow the lawn.

    31 March 2020

    Caribbean Inspiration

    IMG_5921

    On my last day at work at the end of February, I finished a bit earlier and decided to do a grand tour of the various supermarkets available on my way home. For starters, I wanted to get some more of Lundulph's favourite alcohol-free beer, which is hard to get hold of and I had a reliable source near the office. And I also needed to get more canned beans, which has become Lundulph's staple now that he's trying to reduce his meat intake.

    Sadly, there was no beer to be had, in fact, the labels had even been removed. But next to the booze section was the Caribbean section and I wandered in to have a gander. What drew my attention were colourful cans of gungo peas in salted water, so I had to buy a couple to try out.

    A quick search on the internet yielded that gungo peas are also known as pigeon peas and are popular in the Caribbean dish "rice and peas". I decided on this recipe. Some further recipe searches indicated that this is very nice with jerk chicken and I particularly liked this one from John Torode, but since barbecue season is way off yet and the recipe requires a lot of prep, I decided on the super-easy alternative of jerk seasoning in a jar instead.

    Ingredients

    400 g can of gungo peas incl liquid
    400 ml can of coconut milk
    1.5 dl water
    3 dl shortgrain brown rice
    2 cloves garlic
    2 salad onions
    1 tsp dried thyme
    salt and pepper to taste
    5 chicken thighs without bone
    2 - 3 tbsp jerk seasoning

    Method

    1. Place the gungo peas including their liquid in a large pot, along with the coconut milk, water and rice.
    2. Peel the garlic and press into the pot. Trim, wash and slice the salad onions(~1 cm) and add to the pot.
    3. Add the thyme, salt and pepper and bring to the boil.
    4. Cover and simmer until the rice is done, about 30 minutes, and the liquid has been absorbed.
    5. Pre-heat the oven to 200 °C and pat the chicken thighs dry. Then coat generously on both sides with jerk seasoning and place on a roasting rack.
    6. Bake in the oven for 20 minutes until the meat has cooked through.
    7. Fluff up the rice before serving.

    The rice and peas turned out to be a disappointment for both Lundulph and myself. Maybe it is down to the fact that I tried to scale down the recipe a bit or that I had way too much liquid, so had to drain it off. I've tried to make an adjustment in the amounts above for this. It just didn't taste of much. I did save the liquid and used as gravy when I re-heated the rice at later meals and I suspect it would be rather nice with oven-baked mushrooms.

    Lundulph really liked the jerk chicken though. It had quite a kick to it, it seems. I don't like chicken thighs, so I didn't try them, but he seemed well pleased with the result.

    I'll need to see if I can try the rice and peas at a Caribbean restaurant, to see how they make it. And there's also John Torode's recipe to try.

    30 March 2020

    Hot Chocolate

    At a recent family gathering, we ended up discussing the difference between hot chocolate and hot cocoa. As suspected, the difference is that hot chocolate uses actual chocolate and hot cocoa uses cocoa powder. Since this discussion I've been wanting to try out hot chocolate, it sounded like it would be a lot nicer than hot cocoa.

    Now that I've been at home for the whole of March due to the coronavirus outbreak, I'm trying not to spend my days eating, but we had some milk on its last legs, so I decided to use it up in what turned out to be a massively delightful way. I used this recipe as basis, but made a few changes due to not having all the right ingredients. Possibly I should have read through the whole article, but I think my hot chocolate turned out very nice anyway.

    Ingredients
    Makes 2 portions

    70 g dark chocolate
    30 g caramel chocolate
    5 dl semi-skimmed milk

    Method

    1. If the chocolate is in a large block, chop it up into small pieces.
    2. Heat up 2 dl of the milk in a saucepan until it starts steaming, then remove from the heat and add the chocolate.
    3. Stir until the chocolate has melted fully and is well mixed with the milk. Place the saucepan back on the hob and add the remaining milk and heat up while stirring, but make sure it doesn't boil.
    4. Pour into two mugs and drink straight away.

    Caramel chocolate is basically white chocolate with caramel in it. It's colour is beige, a bit like latte and it is quite sweet, so worked really well in the above recipe. The dark chocolate I use contains 54.5% cocoa mass and is the one I use when I make pralines etc. It's not too sweet, but also not too bitter.

    I also used my trusty Aerolatte frother to foam up the hot chocolate, which helps keep the drink hot I think. It would probably be very nice with fresh marshmallows, I'll need to try and make some for next time. I also might try adding a little cinnamon and vanilla.

    2 March 2020

    Soft And Fluffy Bread Rolls

    At our local National Trust garden, the café serves soup with a wonderfully shaggy granary bread, which is Lundulph's favourite and for years now I've been trying to work out how to make something similar at home. As I'm now housewifing for a bit, I thought I'd dig out the various recipes I've bookmarked and work through them, starting with this one.

    The photos on the web page appealed, not the claim to be able to do them in an hour. So I set about to convert to metric system and also weighed things to get a more precise recipe. As usual, I did this on the fly and got a bit confused about the liquids, but the end result was pretty good, so it wasn't bad. I also tried out the dough proofing function of my oven, I've never done this before. I don't think it speeded things up too much compared to room temperature, it wasn't my intention to rush the proofing stages like in the original recipe.

    Ingredients

    Makes 12 large buns

    620 g (9 dl) strong flour
    60 g (4 tbsp) granulated sugar
    1½ tsp salt
    3.85 dl semi-skimmed milk
    57 g unsalted butter
    20 g fresh yeast
    1½ tsp lemon juice

    Method

    1. If using proofing drawer, warm it up. Weigh the bowl that will be used for proofing when it's empty and note the weight.
    2. Place the dry ingredients in the bowl of the Kitchen Assistent machine. Butter a large baking tin where all the rolls can fit with room to proof and set aside.
    3. Warm up the milk and butter in a saucepan on low heat until the butter just melts, but the mixture is at finger warmth.
    4. Add the yeast and stir until all has disssolved.
    5. Start the machine so that the dry ingredients mix well, then pour in the milk/butter mixture and finally the lemon juice.
    6. Let the machine work for a few minutes until a soft dough forms.
    7. Turn out the dough onto the work surface and fold it a couple of times to form a ball, then cover the bowl with cling film or a lid and place in the proofing drawer of a warm place until it more than doubles in size.
    8. Weigh the risen dough in its bowl, deduct the bowl weight, then divide by 12 and cut up into equal weight pieces. Mine worked out to just under 95 g each.
    9. Shape each piece to a round ball and place in the baking tin. Cover with cling film or a lid and let proof until they've filled up the baking tin.
    10. Remove from the oven and pre-heat it to 190° C, then bake the rolls for 17 minutes - keep an eye on them and cover with a piece of metal foil if they go too brown on top.
    11. Remove from the oven and leave to cool down fully.

    I left them in the baking tray overnight and had one for breakfast this morning - I cut it into slices and had it with butter and jam and honey. Yummy and so soft!

    Lundulph's verdict was that they were quite sweet and with a bit of sugar glaze on top, they would work very well along with a cup of tea. And it's true, there is a lot of sugar in these, I'll repeat this recipe and reduce the amount a bit, to see how that goes.

    The confusion I had was that there should have been 1.75 dl water + 2.1 dl milk.

    I've also recently started using the dough hook on my Kitchen Assistent machine, but I'm not sure if it makes much difference. I skimmed through the recommendations in the instruction manual and it seems it's very limited when this dough hook should be used and the few times I've used it, I've always had to "help" it out as the dough either got stuck and wouldn't knead or got plastered on the walls of the bowl mostly. So I'll go back to the more general purpose roller.

    Update 2020-04-10:
    I've now swapped out 100 g of the strong flour for strong wholemeal flour, reduced the sugar to 2 tbsp and also I make 2 loaves, rather than 12 baps. The bread isn't as fluffy, but is very good for toasting and now works with both savoury and sweet toppings. For the loaves, bake for 15 minutes, then cover so the crust doesn't go too dark, then bake for a further 10 - 15 minutes.

    28 January 2020

    Beetroot Falafels

    Lundulph has decided to reduce the amount of meat he eats and to replace the proteins, he's eating pulses like nobody's business. Today we decided to try out one of the cards I picked up some time ago from Waitrose.

    IMG_5897

    Ingredients

    1 tbsp grapeseed oil + extra for brushing
    1 onion
    2 cloves of garlic
    2 tsp ground cumin
    250 g cooked whole beetroots
    400 g can of chickpeas
    125 g breadcrumbs
    1 large egg

    Method

    1. Pre-heat the oven to 200 °C (not fan). Peel and chop the onion. Peel the garlic.
    2. Heat up the oil in a frying pan, add the onion and press in the garlic, then fry gently until softened.
    3. Add the cumin and stir through to mix well, then remove the pan from the heat.
    4. Drain the beetroots and pat dry, then cut up in chunks.
    5. Drain and rinse the chick peas.
    6. Add the onion mixture, beetroots, chickpeas and the remaining ingredients to a food processor and blitz into a firm paste.
    7. Using an ice cream scoop, large spoon or dampend fingers, form 20 large balls and place onto a non-stick baking sheet.
    8. Brush each falafel lightly with oil, then bake in the oven for 25 minutes.
    9. These can be eaten cold and even frozen.

    The photo above seems to be the only one I made and even using non-stick foil didn't help, but they got firmly stuck to it. We were hungry, so ate straigt away, but what I discovered afterwards is that once cooled, the falafels also lost their grip on the foil.

    As you may have noticed, the recipe is missing salt and pepper, so overall didn't taste much and was almost a little on the sweet side, thanks to the beetroots. At least the falafels kept their shape, unlike the veggie burgers I made the other day. But the recipe needs some work and some research into regular falafels. Luckily Lundulph isn't the complaining kind and ate his portion without grumbling.

    Gateau au Chocolat

    This year is a year of big round birthdays and anniversaries. Various parents are turning 75, various siblings are turning 50, 40 and 35 and my parents are celebrating their golden anniversary. First up is Roger, my Brother-in-law and it was going to be big - a long week-end away at a manor house with the extended family, some 25 people or so. I had the honour of making the birthday cake.

    20200207_194047

    I already had ideas about this, and decided to make a practice run, just to be sure. This dove-tailed nicely with the fact that one of my lovely colleagues took pity on me last year and supported me with one very tricky server set-up for weeks on end and I really wanted to thank her for all that help. I made the smaller size for the practicing.

    For the cake base, I decided to use a very old recipe for a gateau au chocolat, which my Mum has been using for some 30 years. The original is very stylish and simple and is actually supposed to be a sticky cake, but instead my Mum bakes it through, since my Dad strongly disapproves of uncooked things. Over the years, my Mum has made size adjustments and she sent across both of them. The cake base is best done a few days in advance and should be wrapped tightly in clingfilm once cooled down. Decorate the day before serving.

    Below are the two sizes, with slightly different proportions, but overall the results are the same.

    Ingredients

    20 cm diameter
    150 g unsalted butter
    200 g milk chocolate (~35% cocoa solids)
    1 tbsp instant coffee
    3 large eggs
    1 dl granulated sugar
    1 dl chopped walnuts or hazelnuts
    1 tbsp vanilla sugar (halve the amount if using vanilla extract)
    1 dl plain flour
    ½ tsp baking powder

    25 cm diameter
    150 g unsalted butter
    200 g milk chocolate (~35% cocoa solids)
    1 tbsp instant coffee
    4 large eggs
    2 dl granulated sugar
    1½ dl chopped walnuts
    1 tbsp vanilla sugar (halve the amount if using vanilla extract)
    1½ dl plain flour
    ½ tsp baking powder

    Method

    1. Pre-heat the oven to 180 °C (not fan) for the smaller size and 150 °C (not fan) for the larger size. Butter a round springform cake tin and line the bottom with baking paper.
    2. Melt the butter gently in a saucepan, then break up the chocolate into small pieces and add to the butter, allowing to melt at very low heat while stirring.
    3. Add the instant coffee and stir through to dissolve fully and remove from the heat.
    4. In a large bowl, whisk together the eggs and sugar until light and fluffy, about 5 minutes.
    5. Then stir in the walnuts, vanilla and the melted butter/chocolate mixture.
    6. Sift the flour and baking powder together in a separate bowl, making sure they are well mixed, then add to the batter and bring together to form a homogeneous mixture.
    7. Pour into the cake tin and bake for 1 h for the smaller size and 1 h 30 min for the larger size.
    8. Test with a skewer through the middle, if it comes out clean, remove the cake and leave in the tin for a few minutes before turning it out onto a cooling rack and removing the paper lining.
    9. Once completely cooled, wrap in clingfilm and store in a cool place or fridge. It can be frozen at this point as well.

    Now the recipe recommends a pouring ganache from dark chocolate for the decoration and walnut halves arranged in a circle around the edge, then served with a blob of unsweetened whipped cream or creme fraiche on the side. But having recently discovered the concept of water ganache, I wanted to use that instead, as the cake is quite rich to begin with. I also wanted to try my hand at fancy decorations as well, so I made two water ganaches, one with dark chocolate (54.5% cocoa solids) and one with ruby chocolate. I've never tried this cake with hazelnuts unfortunately, though I do like them, but I like walnuts more.

    And this is where my practice run was really useful, because it turns out, like for any other ganache, the proportions of chocolate to water yields differently runny ganache, depending on the chocolate used. So whilst the dark ganache was ready to pour immediately, the ruby ganache was way too thin and I had to put it in the fridge to get it to thicken. So overall, the practice decoration ended up a bit odd, because I couldn't pour both ganaches simultaneously to get the two halves and be able to blend them by pulling one ganache into the other. But the principle worked and I used my two-coloured chocolate pencil to cover the wonky middle. I did make adjustments for Roger's cakes and knowing what to expect and have everything ready, made decorating them a lot easier.

    IMG_5898 IMG_5899

    For Roger, I made 2 large cakes because we were going to be so many people. My Mum said she gets 12 pieces out of the large one, but they are generous sizes and after the large meal we had, one cake would have been enough. However, people did work through the second one in the following day, so nothing was lost. I also made several batches of this recipe, which has really good explanations, photos and videos, along with a trouble-shooting guide. But rather than tranditonal round ones, I wanted to make them in the shape of a 50, which sadly didn't quite work out too nicely and I suspect it's down to my oven baking unevenly and not using the correct temperature.

    Finally a word on transport. I put the cakes on silver cake drums and I used a little of the chocolate ganache to glue them securely onto the drums. Once the ganaches have set, things are pretty solid and fully capable of coping with a long drive. Both the small cake for my colleague survived over an hour in the rush hour to the office and the two larger cakes survived over 3 h drive to the manor house where we all gathered to celebrate Roger.

    22 January 2020

    Green Omelette

    In the past few years, I've been able to go and visit my parents in Sweden several times per year and they very kindly collect recipes, which might be interesting, so I always bring home a thick bundle of paper. Lately, I've started to go through the bundles before going back, weeding out the ones that don't appeal. This recipe is from last January.

    Ingredients
    Serves 3 - 4

    5 large eggs
    2 handfuls of baby spinach
    ½ water or milk
    ½ tsp salt
    ½ milled black pepper
    small fresh chilli(optional)
    2 salad onions
    15 g butter
    1 - 2 sprigs fresh basil
    2 dl cottage cheese (optional)
    1 ripe avocado
    ½ dl pumpkin seeds

    Method

    1. Blend together the eggs, half of the spinach, water/milk, salt, pepper and chilli with a hand-held blender.
    2. Trim and wash the onions. Heat up the butter and fry the onions and the remaining spinach for a couple of minutes.
    3. Turn down the heat to medium and pour in the egg mixture, then cover the pan and fry until it's set.
    4. Halve the avocado, peel it and dice. Shred the basil.
    5. When the omelette is ready cut into portions and transfer each to a plate. Sprinkle the avocado, cottage cheese, basil and pumpkin seeds and serve straight away.

    This is a really nice "middle of the week" freshly cooked meal and probably works for lunch as well as dinner. I've made this twice now, the first time with water and the second time with milk and I didn't notice much difference between the two. Obviously I skipped the cottage cheese, since Lundulph doesn't eat that and also I've managed to stock up on feta cheese lately, so I'm working my way through that. It would probably work as a topping as well, now that I think about it.

    One very important note, mostly for myself is that I should use my cast iron pan for this. Depending on the size of the pan, this is quite a thick omelette, almost like a frittata, so takes a while to cook through. I used the cast iron pan for the first omelette as I thought it would be the larger one. On the induction hob, it heated up very evenly and although it took quite some time to get the full omelette cooked through, it didn't burn. However, as I established, it is the same size as my teflon pan, so for the second omelette, I used that instead because it has a lid. My teflon pan doesn't have a full steel base,so tends to heat up quite unevenly on the induction hob and thus things invariably burn here and there, as happened this time. But with a lid on, the omelette cooked a lot quicker, since the heat was kept in. I'll need to work out a lid for my cast iron pan. And the teflon one should perhaps be disposed of, I don't use it very often, so it doesn't matter much, but still, I was surprised what a difference that made.

    Lundulph quite liked it, especially now that he's on a super healthy streak after the holidays and also is trying to go a bit more plant-strong in his food intake, this dish hits the spot. Sadly, I missed the photo opportunity on both occasions.

    15 January 2020

    Plant-stong Burgers

    IMG_5894

    I've been racking my brain on what to cook to make sure that Lundulph gets enough food, now that he's almost stopped eating meat and I remembered that my Sister told me about the "Engine2Diet" website, which she was very keen on a few years ago and I searched for it. It seems to still exist, however has been re-named to "Plant Strong" and still provides a selection of recipes and other stuff, which I didn't bother reading, but a scan through the photos yealded plant-strong burgers which looked really good, so I set about making these. Below are my choices of ingredients:

    canned chickpeas
    cooked amaranth
    carrots
    onions
    mushrooms
    garlic
    thyme,salt and pepper

    I followed the instructions on how to blend everything together, but I wasn't able to mash up the chickpeas and so ended up putting everything in food processor and ended up with a fairly runny and homogeneous "mince", so I had to use a food ring in order to make the burger patties.

    Once in the oven, they flowed out as if they were chocolate chip cookies and I ended up baking them for longer than the recipe stated and also there was no way I could flip them. Thus the messy lump on the plate in the photo at the top.

    IMG_5892 IMG_5893

    The patties did taste quite nice, I just didn't manage to get them to stay in a burger shape and blending in a processor removed a lot of the texture, which probably helps achieve the burger shape, not to mention makes it even tastier. But both Lundulph and I agreed that this "mince" would probably work very well in a vegetarian lasagne. If so, I'm guessing the carb part of the ingredients can probably be skipped. Thinking about it, it would work in a moussaka too.