26 April 2020

Poussin Stuffed With Aromatic Herbs

IMG_5937

A couple of years ago, a lemon balm plant had seeded itself next to our pond. I like the smell of this herb and left it there. Chatting to a neighbour, she confirmed that it probably came from her garden. What we hadn't realised is that lemon balm is from the mint family, which means it is quite rampant and can take over fairly quickly.

A few years before that, we made an attempt to rejuvenate our little pond and purchased several pretty looking aquatic plants, one of which was water mint. Again, this plant took over the pond and seems to have no issues growing on land either. Lundulph is not too happy about either and I humoured him, by removing some of the lemon balm seedlings in the flower patch around the pond now that we're in a lockdown. Thus I liberated a rose bush, my beloved ramsons and some lovely Welsh poppies.

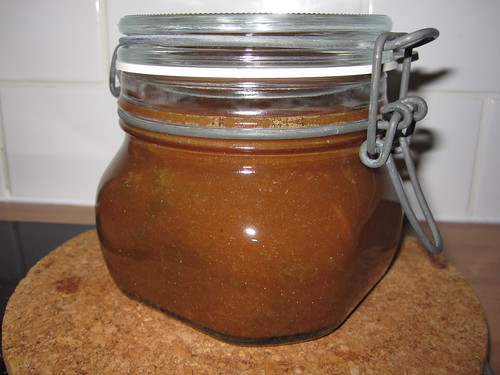
But the lemon balm got me wondering and googling on what can be done with it. Mostly it is tea, which I tried last week - it was quite nice, but the plant is way too large for us two to use up. I've also read that lemon balm is not suitable for drying. In Sweden it is used as decoration to desserts, very much like you'd do with mint leaves in the UK. It's also nice to put in drinking water now and then as well. But I managed to learn what lemon balm is in Bulgarian, and I searched for recipes, which resulted in this one (in Bulgarian) that seemed decent enough to try. So as it's Sunday today, I made it into our roast lunch. I did some tweaks to the recipe, the original instructions were on the sparse side.

Ingredients

a handful of lemon balm leaves
a handful of mint leaves
a handful of wild garlic leaves
a handful of curly parsley
a handful of dill
2 poussins at 500 g each
salt and pepper
50 g butter

baby potatoes
chestnut mushrooms

50 g butter
3 tbsp plain flour
4 dl semi-skimmed milk
1 dl whipping cream
nutmeg

Method

  1. Wash all the herbs well and shake off the excess water, then cut them finely and mix together in a bowl.
    IMG_5934
  2. Wash the poussins and pat them dry with kitchen paper, then sprinkle with salt and pepper inside the cavity.
  3. Stuff the herb mixture into the cavities, but keep about a dl of the herbs aside for the sauce.
  4. Tie together the legs of each poussin, so the herbs don't fall off and rub butter over the breasts, legs and wings.
  5. Place the poussins in a roasting bag and season, then tie the bag, making sure to leave space or it to expand.
    IMG_5935
  6. Wash the baby potatoes and place in a pot ready to steam.
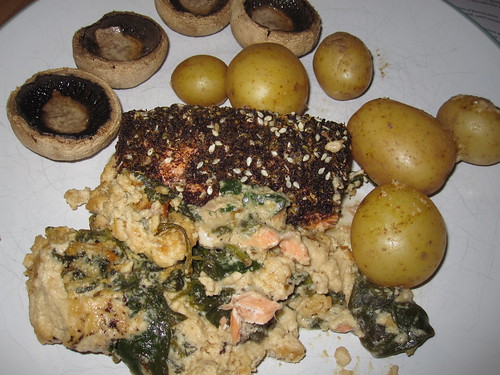
  7. Peel the mushrooms and line up on a roasting rack, then sprinkle some salt on each.
  8. Pre-heat the oven to 180 °C fan. Once hot, place the poussins to roast for 55 minutes.
  9. After 15 minutes, put the potatoes on to steam and after a further 10 minutes, put the mushrooms in to roast as well.
  10. When there are about 10 minutes left, heat up the butter in a saucepan.
  11. Once it bubbles, add the flour and stir with a wooden spoon to soak up the butter and fry it for a couple of minutes while constantly stirring.
  12. Slowly start adding the milk, a little at a time to prevent the saucepan temperature to drop too much and stir it in. It will look like a stretchy dough at first, but will eventually become a batter and finally a sauce.
  13. After the mixture has turned into a sauce, add the cream, season with salt and pepper and grate a little nutmeg into it.
  14. As it starts to bubble, stir in the remaining herb mixture.
  15. When the time is up, carefully remove the poussins in their roasting bag from the oven, then grabbing the top of the roasting bag, hold it over the saucepan, incline it towards one of the corners, then carefully partially snip this corner and let the roasting liquid drain into the sauce, while stirring.
  16. Once all the liquid is drained, let the poussins rest a couple of minutes, covered under a towel.
  17. Take out the poussins from the roasting bag and carve up onto pre-heated plates. Serve with the potatoes and mushrooms and pour the sauce on top.

I don't know if any of the herbs permeated the chicken meat, but it was delicious. Lundulph concurs - a small but very nice chicken. The poussins were so tender and juicy. I'm also quite pleased with the sauce. We ate one of the poussins and kept the other one for next week. For dessert we had some of the lovely rhubarb ice cream. I really must start using my garden more and pick the stuff that grows on its own with no effort on my part.

19 April 2020

Crispy Tofu

IMG_5933

It's been ages since we had stir-fry and in last week's online food shop, I added a couple of bags of ready cut vegetables. But what to do along with them. Normally I'll get tiger prawns for Lundulph or some nice fillet steak, but I forgot to do that this time. Then it struck me, we have several packets of extra firm tofu in the fridge, on Lundulph's request. The intention was for him to have tofu as protein replacement, but he did some searching on the internet and established that tofu seems to have a lot lower protein content than the soy beans themselves, so I think he's now gone off the idea. Besides, he feels the texture is too close to cheese, which he still disapproves of.

But a look at the packets indicated that they were about to go out of date, so I searched for how to make crispy tofu and the recipe I decided to try is this one. I converted the amounts to metric and also had to make some adjustments as the two packets I wanted to use were 280 g each. Otherwise, I was determined to follow the recipe as closely as possible.

Ingredients

560 g extra firm tofu
2 tbsp olive oil
2 tbsp soy sauce
2 tbsp cornflour

Method

  1. Pre-heat the oven to 205°C (not fan) and line a large baking tray with baking paper.
  2. Drain the tofu, if it is in liquid, then cut into cubes, about 1.5 cm and lay out on a clean and lint-free tea towel with a little space around each cube.
  3. Fold the towel over the pieces,then place a large chopping board on top and press down, I actually sat on top for a couple of minutes.
  4. Place the cubes in a large bowl and drizzle the oil and soy sauce over, then using one hand turn the cubes gently to get them coated.
  5. Sprinkle the cornflour and turn the cubes further to get them coated. Don't worry if some of the cubes crumble and break.
  6. Tip the tofu into the baking tray and spread them out, again so they don't touch each other. Then place in the oven.
  7. After 15 minutes, stir the cubes to turn them and bake for a further 15 minutes. They are now ready to serve.

IMG_5932

Both Lundulph and I loved these, the texture was very good, they were nicely crispy on the outside, but soft in the middle and worked really well with stir-fried vegetables and quinoa. Lundulph thought they were a bit on the salty side and possibly the tofu itself was salty and adding soy sauce took them over the top a bit. We ate most of them for our dinner, there's about a handful left and as I was putting it away, I ate one piece that looked particularly crunchy and it was tasty still, even though it was cold. I suspect they would be very nice in a Thai curry too, instead of chicken.

Next time, I'll swap the olive oil and soy sauce for green masala, I've used it with silky tofu before and it's been very nice, so I have good hopes for this.

12 April 2020

Rhubarb Jam with Agar-Agar

As mentioned in yesterday's post, I've harvested the rhubarbs for the first time this year (and I definitely expect one more harvest in the coming weeks) and there is work to be done to preserve it. As also mentioned, I have no pectin in the larder, but loads of agar-agar, so some searching on the internet resulted in selecting this recipe which seemed quite straightforward.

IMG_5930

Before listing the ingredients and the method, a note on my activites in the last few weeks. We in the UK have now been under a lockdown for almost 3 weeks and as I'm out of a job as well, I've taken the opportunity to tackle some jobs around the house. One of them is to thoroughly empty and clean the larder. This hadn't been done since I organised it in 2014, which I discovered after copying the clean-out photos to my photo album. This was long overdue and I did manage to fill a rubbish sack with stuff that was out of date or looked suspicious. It is also amazing how much stuff it's possible to fit in there. Now everything is nice and clean and has been shifted to new drawers, with the concept of often-used items are easy to reach, rarely used items are further back. What this means is that I end up going through all drawers for every single thing I need. But I now know what I have and what I don't and I do need the exercise.

In this activity I also established that I have an astonishing variety of small containers with sugar in different forms or stages of refinement. Thus I took this jamming opportunity to use them up. The below amount is a combination of some 260 g soft dark sugar, about ½ dl light cane sugar flavoured with cloves (a gift from brother-in-law Roger after a trip to Mauritius), another ½ dl pink sugar for cookie decorations that I don't intend to use, a further ½ dl of palm sugar and a couple of tablespoons of crystallised golden syrup (didn't realise this was possible). There's no way I'll be able to reproduce this jam if it turns out well.

Ingredients
Makes about 1 litre

750 g rhubarb stalks
500 g sugar
1 tbsp lemon juice
1 tsp vanilla essence
5 g agar-agar powder

Method

  1. Heat up the oven to 120 °C fan and place jam jars and their lids to steralise for at least 20 minutes.
  2. Wash and slice the rhubarb into 2 cm pieces.
  3. Place in a saucepan together with the sugar, the lemon juice and the vanilla essence and bring to the boil while stirring.
  4. Let simmer for about 10 minutes uncovered and stir occasionally.
  5. Add the agar agar and stir in well. Let simmer for a further 5 minutes.
  6. Take one jar at a time out of the oven and fill with jam as much as possible, close tightly and move to the next one.
  7. Leave to cool down completely.

Because I used so much dark sugar, the jam is quite dark in colour, but looking at the first time I made rhubarb jam, it was pretty dark too, even.

IMG_5931

We've not tried it yet, as we already have several other jams "on the go" as Lundulph says and I'm not opening another one until we've finished these.

11 April 2020

Rhubarb Purée

Once again it is rhubarb season and the ones in the garden have gone mad with growth. This year one of the plants is producing no less than 3 flower spikes, in addition to a good number of thick-stemmed leaves. In my first harvest, I had over 2 kg of lovely smelling stems.

I also discovered that I have no pectin and the packet of jam sugar that was lurking at the back of the larder had gone rock solid and was 2 years out of date, so I decided not to risk it and searched for alternative recipes using agar-agar, which I seem to have in large quantities at the moment. As I was searching, I also speculated whether it is possible to make purée, similar to the one I've made with apples many years ago. As it turns out, other people have had the same idea and very kindly posted their recipes. I opted for this one (in Swedish).

Ingredients

500 g rhubarb stalks
2 apples
½ dl water
2 dl golden syrup
1 tsp vanilla essence

Method

  1. Wash and slice the rhubarb into 2 cm pieces.
  2. Peel and core the apples, then dice.
  3. Place the rhubarb, apples and water in a saucepan and bring to the boil.
  4. Let simmer until the rhubarb goes soft and mushy, about 10 - 12 minutes.
  5. Add the syrup and stir through. Let simmer for a further 5 - 6 minutes.
  6. Remove from the heat, stir in the vanilla and transfer to clean jars or serve warm with ice cream.

This purée will not last as long as a jam, as the amouht of sugar is quite low and there is no added pectin, but it can be frozen, in which case it'll last longer. If freezing, I recommend saving a juice/milk carton and washing it well, then pouring the purée into it and sealing at the top before freezing. This way, you can push some out from the carton and cut slices with a knife. The frozen slices can go directly onto a freshly made pancake or hot porridge. Chilled purée works nicely with yoghurt and 2 dl of it can go into the no-churn ice cream as flavouring.

I don't seem to have made any photos this time, but it looks very much like the jam I've made previously.

10 April 2020

Кифли с мармалад

These are one of my favourite breakfasts in Bulgaria. It is read as "kifli s marmalad" and is a curious take on croissants in that they are shaped in the same way, but not from puff pastry. The name comes from German I think - "Gipfel" which means tip/peak of a mountain. The traditional filling is marmalade made from rosehips, though I've seen chocolate and other things lately and it's probably nice too, though I wouldn't try it, if there's rosehip marmalade to be had. Google translates these as "marmalade muffins".

IMG_5928

Lundulph has wanted me to make these for ages, since he always has these when we go to Bulgaria and after trying out the recipe for the super fluffy bread rolls, I felt I've found the right type of dough for these delicacies. Though searching for recipes on the internet indicates dough for kozunak should be used, I disagree, eggs have no business in there. It is key to follow the initial recipe I wrote up, with 4 tbsp of sugar, possibly even 5 or 6, but skip the salt.

I had a jar of 380 g rosehip marmalade and used about ⅔ of it. It was set quite hard, so I stirred it through with a fork, then put in a piping bag for easier distribution.

IMG_5925

I used the proofing function of the oven again, both for the first rise and for the first tray of kifli, to make sure they would rise nicely. The second tray of kifli would have longer to rise, so I left them on the work surface, the kitchen had become fairly warm at this point anyway.

I divided the dough into 2 equal parts, then rolled each out to a circle just under 1 cm thick and cut into 6 wedges. I squirted about a tbsp of rosehip marmalade on each and rolled them up, then placed onto a baking tray lined with baking paper and left to proof.

IMG_5926

I pre-heated the oven to 180 °C fan and just before baking, I brushed the kifli with a whisked up egg and sprinkled granulated sugar on top. I baked for 30 minutes, then took out of the oven, left the kifli to cool a few minutes in the baking tin, before carefully moving to a cooling rack.

I let Lundulph try one while it was still warm and his eyes started sparkling, which is a sure sign he liked them. What he did forget to mention is that the dough tasted a bit salty for some reason and I wonder if I'd forgotten to add the salt the first time I made the fluffy soup buns, because this was quite a dramatic difference. So should skip the salt next time.

IMG_5928

Also, I'll cut the dough circles into 8 pieces, it's so much easier, than to try and do 6, even if the kifli will end up slightly smaller.

Lundulph's final comment was that these are like jam doughnuts, but not deep fried, which is good and also a disappointment that there were holes in the middle where the marmalade was. His view is that more marmalade is never wrong. I'm guessing these holes are due to the steam in the marmalade expanding during baking, then shrinking back/escaping after the dough has set during the baking. I suppose I could sneakily syringe in some extra jam after baking, just like for jam doughnuts. My Mum kindly bought me two filling nozzles for precisely this reason at the chocolate festival last year.

I kept a couple for us for breakfast the following day, the rest went into the freezer, but I suspect will get eaten fairly quickly though.

6 April 2020

Leek and Potato Soup

With the UK lockdown now in its third week, I find myself buying slightly random greens with vague ideas of what to do with them rather than a firm plan. This is not a good idea, but for some reason I keep thinking that I shouldn't make specific plans, since I don't know if I'll be able to get hold of the right ingredients at the supermarket. This is very silly, since there doesn't appear to be any shortages in the vegetable section, at least not in my local shops.

But buying greens, they have a limited lifespan and must be used. Last week I bought a packet of leeks. They then had to live in the salad drawer at the bottom of the fridge, until Lundulph dug them out the other day and commented that they are going manky. Indeed, the outer leaves were yellow. Thus, I made sure to get potatoes when I went to the shop this week with the aim to make leek and potato soup. Oddly enough, this seems to be the only canned soup that's left on the shelf - no one is buying it.

After some research in my cook books, I settled on Delia Smith's recipe, but decided to increase the amounts and also spruce up a little with some chilli.

Ingredients

430 g leeks
1 kg potatoes
145 g onions
2 cloves of garlic
100 g salted butter
1 small scotch bonnet chilli
1 l chicken and/or vegetable stock
½ dl chopped curly leaf parsley
salt and pepper to taste

Method

  1. Trim the green edges and the root plate of the leeks, cut them in half length-wise and make sure to wash any grit stuck between the layers. Then slice finely and set aside.
  2. Wash the potatoes well and peel if needed. Dice into 1 cm cubes and add to the leeks.
  3. Peel and wash the onion(s), then dice into 1 cm cubes and add to the other vegetables. Peel the garlic.
  4. Heat up the butter in a large stock pot and when it's bubby, add the vegetables and press in the garlic. Stir through to get them coated with the butter, then cover and turn down the heat somewhat and leave to fry/sweat for about 15 20 minutes, stirring occasionally.
  5. In the meantime, using a glove, halve the chilli and scrape off the seeds and pith and discard, then chop finely, taking care to protect your skin.
  6. Prepare/heat up your stock (I used 1 cube chicken stock and 4 cubes vegetable stock, as that's what I had).
  7. Wash and chop the parsley.
  8. Once the frying time is up, add the chilli, stock and parsley and season to taste. Stir everything, cover and let simmer for another 15 - 20 minutes until the potatoes are soft.
  9. Using a stick blender, blitz to achieve the consistency you prefer or leave as is if you'd rather, then serve.

Delia recommends blending smooth, but both Lundulph and I prefer a little bit of texture in this type of soup, so I just did a little pulse blitzing.

The amounts above also result in loads of soup. Lundulph and I had a generous portion each for lunch. The rest was left to cool down completely and I divided into 3 x 600 g portions which I've frozen. What I discovered, however, is that I was rather hungry a lot sooner after lunch than I expected, but I guess this is the standard thing with having mainly potatoes in a meal. They fill you up, but are processed quite quickly and you feel hungry after a couple of hours.

2 April 2020

Za'atar Salmon In Tahini

IMG_5922

Once per week we aim to eat fish for dinner. Given that I don't like fish, the only option in general is either salmon or trout and for the past couple of years, I tend to bulk buy large fillets with the skin on, then cut into around 350g pieces and freeze. In general, I do variations on this recipe, but it seems that Lundulph has had some time on his hands and has been looking for something new for me to try and printed out one of Ottolenghi's lovely recipes from The Guardian.

The printout spent a couple of weeks on the fridge door, until I got my act together and included the ingredients in my weekly shopping list. I had to adjust the amounts for 2 portions and overall this recipe was a very pleasant surprise, as although it reads like something tasty, once I started making it, I lost confidence entirely that it would work at all. Having said that, I think a couple of tweaks are in order, but very minor ones and I've incorporated them below.

Ingredients

400 g salmon fillet with skin on
salt and black pepper
3 ¾ tsp za'atar
1 ½ tsp sumac
6 tbsp grapeseed oil
250 g baby spinach
120 g tahini
4 ½ tbsp lemon juice
3 garlic cloves

Method

  1. Pre-heat the oven to 200 °C fan.
  2. Pat dry the salmon and place skin side down, then sprinkle salt, pepper, za'atar and sumac all over to form a crust.
  3. Place an oven-proof deep-ish frying pan on a medium-high heat on the hob and heat up half the oil.
  4. Add the spinach, sprinkle with salt and pepper and wilt it down while stirring - about 2 minutes.
  5. Make a space for the salmon in the middle of the pan and place it there skin down.
  6. Drizzle the remaining oil over the salmon, then transfer the pan to the oven for 5 minutes.
  7. In the meantime, put the tahini, lemon juice and garlic and more salt in a food processor and blend together.
  8. Remove the pan from the oven and pour the tahini mixture around the salmon to cover the spinach leaves.
  9. Put back in the oven for a further 20 minutes, until the salmon is cooked through.

What I didn't expect was that the tahini mixture would puff up. Also I didn't expect all these fancy items to work together so well. I bought za'atar and sumac when I went to Dubai 7 years ago and I never really used either of these sadly. I did buy new batches for this recipe, since even if herbs and spices keep for a long time, I think 7 years is pushing it.

Lately I've also taken to baking mushrooms in the oven, very much like this recipe, but without any fillings, just a sprinkle of salt. So I made these before the salmon and also steamed some potatoes and we had a lovely dinner at the start of April.

IMG_5923

With the coronavirus raving across the world, we're staying at home pretty much all the time now. I go out once per week to get some greens and fruit and I managed to book a delivery online for a huge stash of canned and dried pulses and various forms of dry carbs - pasta, couscous, rice, amaranth... Having grown up with my Mum, first in a communist country, then moving to Sweden and living on only one income for a number of years, I've learnt to stock up and save as much as I can, so being in a lockdown hasn't affected us too much yet.

Plus I have planted vegetables in our little greenhouse, in case food does start to run low. If nothing, it gives me focus when I'm out in the garden, something to look after and enjoy at some point in the future, not just weed and mow the lawn.