31 March 2020

Caribbean Inspiration

IMG_5921

On my last day at work at the end of February, I finished a bit earlier and decided to do a grand tour of the various supermarkets available on my way home. For starters, I wanted to get some more of Lundulph's favourite alcohol-free beer, which is hard to get hold of and I had a reliable source near the office. And I also needed to get more canned beans, which has become Lundulph's staple now that he's trying to reduce his meat intake.

Sadly, there was no beer to be had, in fact, the labels had even been removed. But next to the booze section was the Caribbean section and I wandered in to have a gander. What drew my attention were colourful cans of gungo peas in salted water, so I had to buy a couple to try out.

A quick search on the internet yielded that gungo peas are also known as pigeon peas and are popular in the Caribbean dish "rice and peas". I decided on this recipe. Some further recipe searches indicated that this is very nice with jerk chicken and I particularly liked this one from John Torode, but since barbecue season is way off yet and the recipe requires a lot of prep, I decided on the super-easy alternative of jerk seasoning in a jar instead.

Ingredients

400 g can of gungo peas incl liquid
400 ml can of coconut milk
1.5 dl water
3 dl shortgrain brown rice
2 cloves garlic
2 salad onions
1 tsp dried thyme
salt and pepper to taste
5 chicken thighs without bone
2 - 3 tbsp jerk seasoning

Method

  1. Place the gungo peas including their liquid in a large pot, along with the coconut milk, water and rice.
  2. Peel the garlic and press into the pot. Trim, wash and slice the salad onions(~1 cm) and add to the pot.
  3. Add the thyme, salt and pepper and bring to the boil.
  4. Cover and simmer until the rice is done, about 30 minutes, and the liquid has been absorbed.
  5. Pre-heat the oven to 200 °C and pat the chicken thighs dry. Then coat generously on both sides with jerk seasoning and place on a roasting rack.
  6. Bake in the oven for 20 minutes until the meat has cooked through.
  7. Fluff up the rice before serving.

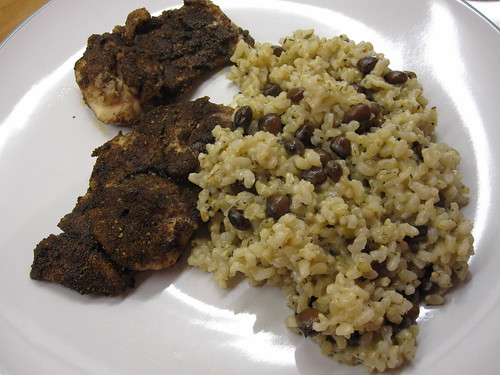
The rice and peas turned out to be a disappointment for both Lundulph and myself. Maybe it is down to the fact that I tried to scale down the recipe a bit or that I had way too much liquid, so had to drain it off. I've tried to make an adjustment in the amounts above for this. It just didn't taste of much. I did save the liquid and used as gravy when I re-heated the rice at later meals and I suspect it would be rather nice with oven-baked mushrooms.

Lundulph really liked the jerk chicken though. It had quite a kick to it, it seems. I don't like chicken thighs, so I didn't try them, but he seemed well pleased with the result.

I'll need to see if I can try the rice and peas at a Caribbean restaurant, to see how they make it. And there's also John Torode's recipe to try.

30 March 2020

Hot Chocolate

At a recent family gathering, we ended up discussing the difference between hot chocolate and hot cocoa. As suspected, the difference is that hot chocolate uses actual chocolate and hot cocoa uses cocoa powder. Since this discussion I've been wanting to try out hot chocolate, it sounded like it would be a lot nicer than hot cocoa.

Now that I've been at home for the whole of March due to the coronavirus outbreak, I'm trying not to spend my days eating, but we had some milk on its last legs, so I decided to use it up in what turned out to be a massively delightful way. I used this recipe as basis, but made a few changes due to not having all the right ingredients. Possibly I should have read through the whole article, but I think my hot chocolate turned out very nice anyway.

Ingredients
Makes 2 portions

70 g dark chocolate
30 g caramel chocolate
5 dl semi-skimmed milk

Method

  1. If the chocolate is in a large block, chop it up into small pieces.
  2. Heat up 2 dl of the milk in a saucepan until it starts steaming, then remove from the heat and add the chocolate.
  3. Stir until the chocolate has melted fully and is well mixed with the milk. Place the saucepan back on the hob and add the remaining milk and heat up while stirring, but make sure it doesn't boil.
  4. Pour into two mugs and drink straight away.

Caramel chocolate is basically white chocolate with caramel in it. It's colour is beige, a bit like latte and it is quite sweet, so worked really well in the above recipe. The dark chocolate I use contains 54.5% cocoa mass and is the one I use when I make pralines etc. It's not too sweet, but also not too bitter.

I also used my trusty Aerolatte frother to foam up the hot chocolate, which helps keep the drink hot I think. It would probably be very nice with fresh marshmallows, I'll need to try and make some for next time. I also might try adding a little cinnamon and vanilla.

2 March 2020

Soft And Fluffy Bread Rolls

At our local National Trust garden, the café serves soup with a wonderfully shaggy granary bread, which is Lundulph's favourite and for years now I've been trying to work out how to make something similar at home. As I'm now housewifing for a bit, I thought I'd dig out the various recipes I've bookmarked and work through them, starting with this one.

The photos on the web page appealed, not the claim to be able to do them in an hour. So I set about to convert to metric system and also weighed things to get a more precise recipe. As usual, I did this on the fly and got a bit confused about the liquids, but the end result was pretty good, so it wasn't bad. I also tried out the dough proofing function of my oven, I've never done this before. I don't think it speeded things up too much compared to room temperature, it wasn't my intention to rush the proofing stages like in the original recipe.

Ingredients

Makes 12 large buns

620 g (9 dl) strong flour
60 g (4 tbsp) granulated sugar
1½ tsp salt
3.85 dl semi-skimmed milk
57 g unsalted butter
20 g fresh yeast
1½ tsp lemon juice

Method

  1. If using proofing drawer, warm it up. Weigh the bowl that will be used for proofing when it's empty and note the weight.
  2. Place the dry ingredients in the bowl of the Kitchen Assistent machine. Butter a large baking tin where all the rolls can fit with room to proof and set aside.
  3. Warm up the milk and butter in a saucepan on low heat until the butter just melts, but the mixture is at finger warmth.
  4. Add the yeast and stir until all has disssolved.
  5. Start the machine so that the dry ingredients mix well, then pour in the milk/butter mixture and finally the lemon juice.
  6. Let the machine work for a few minutes until a soft dough forms.
  7. Turn out the dough onto the work surface and fold it a couple of times to form a ball, then cover the bowl with cling film or a lid and place in the proofing drawer of a warm place until it more than doubles in size.
  8. Weigh the risen dough in its bowl, deduct the bowl weight, then divide by 12 and cut up into equal weight pieces. Mine worked out to just under 95 g each.
  9. Shape each piece to a round ball and place in the baking tin. Cover with cling film or a lid and let proof until they've filled up the baking tin.
  10. Remove from the oven and pre-heat it to 190° C, then bake the rolls for 17 minutes - keep an eye on them and cover with a piece of metal foil if they go too brown on top.
  11. Remove from the oven and leave to cool down fully.

I left them in the baking tray overnight and had one for breakfast this morning - I cut it into slices and had it with butter and jam and honey. Yummy and so soft!

Lundulph's verdict was that they were quite sweet and with a bit of sugar glaze on top, they would work very well along with a cup of tea. And it's true, there is a lot of sugar in these, I'll repeat this recipe and reduce the amount a bit, to see how that goes.

The confusion I had was that there should have been 1.75 dl water + 2.1 dl milk.

I've also recently started using the dough hook on my Kitchen Assistent machine, but I'm not sure if it makes much difference. I skimmed through the recommendations in the instruction manual and it seems it's very limited when this dough hook should be used and the few times I've used it, I've always had to "help" it out as the dough either got stuck and wouldn't knead or got plastered on the walls of the bowl mostly. So I'll go back to the more general purpose roller.

Update 2020-04-10:
I've now swapped out 100 g of the strong flour for strong wholemeal flour, reduced the sugar to 2 tbsp and also I make 2 loaves, rather than 12 baps. The bread isn't as fluffy, but is very good for toasting and now works with both savoury and sweet toppings. For the loaves, bake for 15 minutes, then cover so the crust doesn't go too dark, then bake for a further 10 - 15 minutes.