The other day was one of the semi-finals. The three remaining contestants had to cook for the Roux family.
I'd never heard of them before - two brothers came over from France and opened up a haute cuisine restaurant in London. Not only were they successful, they've expanded their business over the years and now, their two sons are running the show.
The world of haute cuisine is very interesting and I've been looking it up a bit on the internet. Mentioning it to Lundulph, he said, no thanks, I like to eat sufficiently to make me full.
My Dad has had his share of haute cuisine meals in his career. He's a musician and ever so often he gets to play at royal dinners. Royals are stingy and aren't too keen on paying. Instead the musitians get to join in at the dinner. Around midnight, my Dad returns home on those nights. My Mum has a large plate of food ready for him - he's starved. At the dinner, he gets a huge plate with an itty-bitty piece of whatever in the middle. He's never impressed, but he likes to be able to say that he's had dinner with their majesties, the King and Queen of Sweden.
Speaking of that, Lundulph was surprised to see the Crown Princess do a childrens TV show and let herself be interviewed by a muppet. And why not. The royal family also cook, particularly the King, it's one of his hobbies.
True, haute cuisine is fancy stuff - you use exotic ingredients, they need to be cooked in a particular way to bring out their flavour at it's best and in addition, it needs to be beautifully presented. The dishes have fancy names too.
I like the presentation bit - it's really like playing with food and it's completely OK. One of the Master Chef contestants made a basket of caramel, I'm keen on trying that out. I have tried to do little bowls of a sugary egg mixture once, but it failed miserably, despite following the recipe to the letter. But the basket on Master Chef was of pure melted sugar and it was drizzled over the back of a metal ladle, criss cross and thus forms a basket. I suspect the ladle was oiled a bit, just so that the basket would come off easily without breaking.
Ah, well, I'll write about it when I've tried it out.
30 September 2006
Recipes and copyrights
Can recipes be copyrighted? If yes, at which point can a recipe be considered sufficiently changed, so that the original author can't sue? How does it work between the celebrity chefs? For example, I've seen comments in Delia Smith's Comlete Cookery Course, where she mentions that she has taken some recipes from other people.
Do you need to ask written permission? What if you take a recipe from the book of a chef, but change some ingredients, or even only some of the proportions of the ingredients, would that be OK to publish it in My Cook Book? And believe me, I've cooked some recipes from food "gurus" and boy were they crap. But sometimes, they are OK, just need something extra. Which I work out and make the dishes nice. So would that count as a different recipe?
I need to investigate this further. It's one thing to publish my Mum's and my own recipes, but if it'a my own personal take on someone elses recipe? Some are just happy with an acknowledge, but from a legal point of view, it's not that simple. Though I guess, the likelihood of getting sued would become a reality if I were actually making money on the recipes and at this point in time, I'm not.
Same goes if I've noted down a recipe from a TV show, particularly if it wasn't on the webpage of the show in question due to copyright reasons.
I have a recipe like that and I'm planning on trying it out tonight and I'd like to put it in My Cook Book. I'll change two ingredients - one because I don't what to buy it, since I think I have a good replacement for it already - the other because I couldn't find the actual ingredient in the supermarkets that I frequent.
That would be mainly Sainsbury's. I'm not trying to advertise for them, they certainly aren't paying me. But after 6 years in the UK, I've tried Waitrose (OK, but pricey), ASDA (feels a bit creepy, not sure why), Tesco (don't have many of the things I buy). Sainsbury's have the items I use in my everyday cooking. So there.
26 September 2006
Keeping things fresh in the fridge
This is a tip my Mum read about in a magazine many years ago.
When storing food in the fridge, particularly vegetables, fruit and cheese, if it's in a plastic bag, or other air tight container, it tends to go a bit sweaty and if you don't use it fast, it goes mouldy. The reason is that mould, like most fungi, needs moisture and something to feed on. So wrapping things in kitchen roll takes the moisture away from the food, thus it is more difficult for the mould to grow. This might give a day or two extra in the fridge.
Generally foods should be stored in air tight containers or sealed in plastic bags. If you have a good sized fridge, then on occasion the whole pot or saucepan in which the food was cooked can go in. Cover with plastic film, if the lid won't fit. Not with aluminium foil, that's for cooking and baking, as you can't really get it to fit well and stop air going in and out. I don't care what it says on the pack.
After the escapades this Saturday, there is so much food, I've frozen most of it into portions sufficient for one meal for me and Lundulph. I need another freezer though. If I see cheap fresh herbs, I buy them and chop them and freeze in boxes. This gives fresh herbs when ever I need them and takes some effort out of planning meals. I just need to focus on the main ingredients. i do the same with mushrooms.
Other things I keep in the freezer are Swedish meatballs - perfect emergency food if you can't be bothered to cook. Served traditionally with boiled potatoes and "brun sås" (literary means brown sauce, but is gravy actually) and a bit of lingonberry preserve (to give a nice tangy flavour), they are just as good with rice or pasta and Bisto. Actually ketchup will do, if you don't even have powdered gravy.
Also some packets of fresh pasta, it doesn't take long to cook, but tastes so much nicer than dry one.
At this point you realise I have a large freezer. Yes, I do. "American" sized some call them. Standard if you are from Scandinavia, anything less only works if you are single, I think. In fact I had a big discussion about this with my Dad when they refurbished their kitchen in Bulgaria. But there is a 24-7 minimarket at the end of the road - why bother with a fridge and freezer - it takes less than 2 minutes to walk down there and get anything you need.
I just like to have things stocked up at home, that saves me worrying if we'll run out of anything and also keep buying the same things every week. I like it when something runs out, I can just magically produce more.
Mushrooms
Today I had a lazy day and made soup. There were two baked potatoes left and also all the green peppers from the stuffing frenzy last Saturday. So I fried some onion, chopped the peppers and boiled them, together with an assortment of dried herbs and spices. Diced the potatoes and put them in at the end too. My latest favourite herb mix is dill, parsley, thyme, oregano and savory. In soups I've also started using Vegeta instead of salt. It's salt with some spices and is rather nice. But I should have put in a lot more than I did. Finally, when the soup was ready, I whisked two eggs together lightly and poured slowly into the hot soup, while stirring. This makes it look a bit thicker and "meatier" than just vegetables and water. It's a nice alternative to blending potatoes and mixing in.
Also something compelled me to buy large mushrooms on Friday. So today, I put the grill on low, then peeled the mushrooms (never wash, they just soak up more liquid) and placed upside down on the grill pan. I put some salt and pepper and a couple of thin slices of butter (really thin, like scrapings) and put them under the grill on the top shelf, then turned the grill down to it's lowest setting and left them there, not sure for how long, but kept an eye on them. when the butter seemed to be going a bit brown and burnt and I heard a couple of sputters, I moved the pan to the bottom shelf. When they looked ready, I took them out.
So, I served the soup with a big mushroom on top and I put some blue cheese on mine, absolutely yummy!
I used to get regular mushrooms at uni, peel them and take the stems off, then lay them out on a tray like little cups and I'd put small pieces of bacon, ham, garlic and butter or cheese in each, then bake under the grill. Not too healthy, but very nice fingerfood for the telly. On extreme days, I'd just do the mushrooms with only salt on top. The little cups would fill with liquid and I'd try to eat them without spilling. They weren't as nice when cold and/or reheated.
25 September 2006
Filo pastry
Filo pastry is a big thing in Bulgaria, very versatile and so there are lots of traditional dishes made with it. Generally it's filo pastry with stuffing - either sweet or savory - baked in the oven. And the common name for these dishes is баница (banitza). But some of them have their own name, like спаначник (spanatchnik) which is better known under it's Greek name spanakopita and тиквеник (tikvenik) made with pumpkin. Of course if apples are used, it's called strudel, which is a German dish. But the principle is the same for all.
Today I made tikvenik and instead of using syrup or honey, I put in the leftover honeycomb I did the other week. Since I didn't manage to get it out of the glass dish, I left it on top of the fridge in the kitchen and it absorbed moisture and went sticky:
1 large butternut squash
2 dl coarsely chopped walnuts
about 1 dl maple syrup or aromatic honey
2-3 tsp ground cinnamon
3-4 tbsp grape seed oil
100-150 g filo pastry
The proportions above are approximate, but if there's any filo pastry or filling left over (e. g. when the baking tin is full), they can be frozen for another time.
If you feel that someone needs punishment, skip the boiling of the pumpkin, just get that person to grate it by hand.
Variants
Banitza
As mentioned at the top, there is traditional banitza which is made with eggs and feta cheese:
3 eggs
300 g feta cheese
With a fork, mash up the cheese into fine crumbles and mix well with the eggs. Otherwise the procedure is the same as for the tikvenik above. If you can get hold of the feta cheese that's been in brine, even better.
Strudel
Just swap the pumpkin for apple in the tikvenik recipe and add some sultanas.
Spanatchnik
Here, I'm really not sure of the amounts, I'll make sure to measure next time I make it.
0.5 dl grape seed oil
15 g butter
1 leek, peeled and coarsely chopped
400 g chopped frozen spinach (thawed for cooking)
0.5 dl chopped parsley
1 dl chopped dill
500 ml creme fraiche
salt and pepper to taste
The creme fraiche can be substituted with cottage cheese.
This and the traditional banitza are perfect finger food or to take along cold on picnics.
Today I made tikvenik and instead of using syrup or honey, I put in the leftover honeycomb I did the other week. Since I didn't manage to get it out of the glass dish, I left it on top of the fridge in the kitchen and it absorbed moisture and went sticky:
1 large butternut squash
2 dl coarsely chopped walnuts
about 1 dl maple syrup or aromatic honey
2-3 tsp ground cinnamon
3-4 tbsp grape seed oil
100-150 g filo pastry
- Cut the butternut squash in two - the narrow bit and the round bit. Then cut the round bit in half and scoop out the seeds. Proceed to cut the whole squash into smallish chunks, then take a small vegetable knife and peel the bits. This is the easiest way to do it, the skin is far too hard for a potato peeler and when you peel small bits, you don't loose as much of the beautiful orange flesh.
- Put the peeled chunks in a pot , fill to the middle with water and boil until they just go soft. Better yet is to steam, if you have a steam inset, that preserves the flavour better. However, after a brief chat with my Mum, apparently she grates the pumpkin and fries it lightly in oil and butter. I'd recommend this if you are using a different variety of pumpkin, e g a jack-o-lantern, that might not have as much flavour.
- Remove the water and the steam inset, then mash up with a fork, but not too thoroughly, it should be a bit chunky.
- Stir in walnuts, syrup or honey and cinnamon until well mixed. It's OK if it's still warm.
- Pour the oil in a small bowl, use some of it to grease a deep (5 cm) baking tin with a brush.
- Open the filo pastry and spread onto a greaseproof piece of paper. The filo I normally buy is about 35-40 cm by 15-20 cm and that's too narrow, so I divide the filo sheets in two and place them next to each other, so that I can get the double width. Take the top one of the filo sheets pf one of the piles and move it to overlap with the top sheet of the other pile, about 2-3 cm.
- Brush lightly the combined sheet with oil, then put some of the pumpkin mix about 2 cm inside one of the edges. I usually put it across the overlap, but this doesn't matter much. I put enough of the mix to get up to 1 cm thick coating, 10-15 cm wide.
- Preheat the oven at 180 degrees C.
- Then starting from the 2 cm edge left clear, fold it in, then roll over the spread and onwards until you have a roll. Place the roll with it's outer edge down into the baking tin.
- Repeat until all the pumpkin mix has been used up.
- When you are done, brush the rolls with oil, then place in the middle and bake until the filo gets a nice golden brown colour.
- Take out and let rest for a few minutes, then cut across the rolls at 10 cm intervals.
- When serving, dust with icing sugar.
The proportions above are approximate, but if there's any filo pastry or filling left over (e. g. when the baking tin is full), they can be frozen for another time.
If you feel that someone needs punishment, skip the boiling of the pumpkin, just get that person to grate it by hand.
Variants
Banitza
As mentioned at the top, there is traditional banitza which is made with eggs and feta cheese:
3 eggs
300 g feta cheese
With a fork, mash up the cheese into fine crumbles and mix well with the eggs. Otherwise the procedure is the same as for the tikvenik above. If you can get hold of the feta cheese that's been in brine, even better.
Strudel
Just swap the pumpkin for apple in the tikvenik recipe and add some sultanas.
Spanatchnik
Here, I'm really not sure of the amounts, I'll make sure to measure next time I make it.
0.5 dl grape seed oil
15 g butter
1 leek, peeled and coarsely chopped
400 g chopped frozen spinach (thawed for cooking)
0.5 dl chopped parsley
1 dl chopped dill
500 ml creme fraiche
salt and pepper to taste
- Heat the oil and fry the leek.
- When it's going soft, add the butter, spinach and parsley. Stir around until the butter has melted and the spinach is heated through.
- Take off the heat and let cool a bit.
- Stir in creme fraiche, dill and season.
- Roll away, just like the tikvenik above.
The creme fraiche can be substituted with cottage cheese.
This and the traditional banitza are perfect finger food or to take along cold on picnics.
23 September 2006
Saving on water
So far, I've mostly written about cooking, but the blog has other useful things in the title as well.
Every now and then, there's leftover tea in the pot, it's gone cold and you don't want to re-heat it in the microwave oven. Why throw it away?
Pour it on your plants, they love it. The same goes with coffee. That's assuming you haven't put milk in either, that'll just go off and make your house smell badly, but as long as it's pure, the plant's will love it.
The same goes for regular fizzy drinks, not diet/light varieties. If a large bottle has been open for too long and the fizz has gone out, and hopefully there's not too much colourings in it, the plants will love some sugary liquid.
Of course, you still need to water them with water.
I know some people actually put the used tea leaves/coffee as a mulch ontop of the soil in the pots, but the few times I've done it, it has gone mouldy and unpleasant, so I compost it instead.
If you use a can with a filter for your drinking water, the first two lots of water filtered through a new filter are also good to use on plants, and I have a 6 pi milk bottle that I use to store this water in, should the filter change not coincide with plant watering time.
If you are really ambitious, you'd save the water you run from the tap and shower, while waiting for the hot water to come through. Thinking about it, that's quite a lot of water being wasted. And there are good types of washing-up liquid to use, so the washing up water can be used on the flowerbeds too. This one is not recommended for the vegetable and fruit garden.
Other things to do is to switch off the shower, while soaping in, and switch off the tap while brushing your teeth. And not having the tap running on full, in order to disguise noises!
Stuffed peppers
This is a traditional dish in Bulgaria, but a lot of other countries have variations on the theme. The best way to cook it is slowly, overnight, and in a terracotta dish. I've added lots of comments at the end.
2 onions, peeled and chopped
2 cloves of garlic, peeled
3-4 tbsp grapeseed oil
2-3 tbsp water
2 tbsp sweet paprika
500 g minced meat
1 dl pudding rice
1 tbsp savory
3 tbsp parsley
salt and pepper to taste
2 dl water
1 tbsp tomato puree with about 2 tbsp water stirred into it
water
5-6 red/yellow peppers
Special bechemel sauce
3 tbsp grapeseed oil
3 tbsp plain flour
0.5 l full or semi-skimmed milk
liquid from the cooked peppers
salt and pepper to taste
Variants
There are many variants on this, depending on what you want to achieve or what you happen to have at hand.
Do use pudding rice, as it swells nicely and goes a bit mushy, the long grain varieties don't work as well, but can of course be used instead.
For people without cookers, it is possible to boil instead. Use a deep pot with a thick bottom. Preferably an old fashioned pressure cooker that has a little inset plate to keep the peppers of the bottom and prevent burning. Here at least the bottom row of peppers needs to be under water. But just boil normally, not under pressure, put the lid on to prevent too much water evaporating. Cook the stuffing for longer and with more water - until it's almost ready. Then boil it for 15-20 minutes, until the peppers are ready.
A few years ago, Lundulph and I bought a beautiful terracotta pot from Bulgaria and brought home in our handluggage. It is painted and glazed and is great when serving for guests. A thing about these terracotta dishes is that they are sensitive to drastic heat changes, so if you do have a terracotta pot to cook in, make sure it goes into a cold oven, or it will crack! Particularly when cooking in a gas cooker, it heats up faster than an electric one I think, so staging the heat is advised. I put it on the S (slow cook) setting for 5 minutes, then go up to gas mark 3 for 5 minutes, then go up to gas mark 6.
As I mentioned before, for a really tasty dish, cooking overnight on the S setting is best. For electric ovens, this is 100 degrees C.
If you think the stuffing is just too fiddly, I recommend you slice the peppers lengthwise in two. Remove seeds and handle and spongy bits, then lay half of the halves at the bottom of your dish, then spread the mince over them, then lay out the remaining halves. It won't be as pretty, though.
In the Winter in Bulgaria, many people make sauerkraut. That is, pickled cabbage. It tastes quite differently to the German variety because it is made with whole cabbage heads. Many oriental shops sell soured cabbage leaves in brine and if you are brave, have a try. I think it's quite tasty. Take a cabbage leaf and put it in the palm of your hand. It should be large enough to cover the whole hand. Then put some of the mince stuffing in the middle, then fold the leaf sides into a packet and place it so that it rests on the folds and thus stops them from opening up. These can be put into the dish along with the peppers, or you can make them on their own. The same baking instructions apply.
And finally, as my Mum is a vegetarian of many years, there is a veggie option for the stuffing. Instead of the mince, add 2 dl pudding rice more, some finely chopped carrots and finely chopped mushrooms. Everything else is done the same. In fact, many meat eaters don't notice the difference at all. I'm not a big fan of quorn, but I don't see why it couldn't be used in stead of meat.
2 onions, peeled and chopped
2 cloves of garlic, peeled
3-4 tbsp grapeseed oil
2-3 tbsp water
2 tbsp sweet paprika
500 g minced meat
1 dl pudding rice
1 tbsp savory
3 tbsp parsley
salt and pepper to taste
2 dl water
1 tbsp tomato puree with about 2 tbsp water stirred into it
water
5-6 red/yellow peppers
- Fry the onions in the oil on medium-low. Press the garlic and add. As it begins to sizzle, add a couple of tablespoons of water to prevent burning.
- When the onions begin to soften and go translucent, add the paprika and stir vigorously as it can burn easily. This should take less than a minute.
- Add the mince and stir in to prevent lumps forming.
- When the mince has browned, add the rice and the remaining herbs and spices and 2 dl water. Stir in well, then bring the heat to low and let cook until the rice has taken up most of the liquid.
- Add the thinned tomato puree and stir in well. Cook for anoter 2-3 minutes, then take off the heat and let cool for a bit. At this stage, the stuffing can be frozen, e. g. if there's some left over, or you want to have some prepared for a later date.
- Wash the peppers, then with a vegetable knife cut out their handles by cutting about half a centimetre around the green base. Do not cut more off the peppers, the opening needs to be just wide enough to fill the pepper. Remove the handle with the seed part and try to get out as much of the remaining spongy bits and seeds as well.
- Now fill the peppers using a teaspoon, push in so no air gaps form inside the peppers and also as little as possible of the mince falls out during cooking. If you want, you can put some flour on a plate and dip the opening of the peppers in it. I don't bother with that.
- Place the filled peppers lying on their sides in an oven safe dish, pour some more water in to cover the bottom of the dish to about 1.5 cm, also put it's lid on or cover with aluminium foil,then cook for 1 h - 1.5 h at 200 degrees C/gas mark 6. Note that bell peppers release quite a lot of water during their cooking as well.
- At this point, the dish is ready and is traditionally served with a tablespoon or two of Bulgarian yougurt. My Mum is not a fan of this and makes a special bechemel sauce instead. It tends to run out long before the peppers do. Make the sauce after you have taken out the peppers from the oven.
Special bechemel sauce
3 tbsp grapeseed oil
3 tbsp plain flour
0.5 l full or semi-skimmed milk
liquid from the cooked peppers
salt and pepper to taste
- Heat up the oil in a sauce pan.
- Stir in the flour and let it fry lightly.
- Add milk, a little at the time while stirring constantly. The amout of liquid needed will vary, add enough to form a sauce. Top up with the cooking liquid from the peppers.
- Add the seasoning and it's ready to serve.
Variants
There are many variants on this, depending on what you want to achieve or what you happen to have at hand.
Do use pudding rice, as it swells nicely and goes a bit mushy, the long grain varieties don't work as well, but can of course be used instead.
For people without cookers, it is possible to boil instead. Use a deep pot with a thick bottom. Preferably an old fashioned pressure cooker that has a little inset plate to keep the peppers of the bottom and prevent burning. Here at least the bottom row of peppers needs to be under water. But just boil normally, not under pressure, put the lid on to prevent too much water evaporating. Cook the stuffing for longer and with more water - until it's almost ready. Then boil it for 15-20 minutes, until the peppers are ready.
A few years ago, Lundulph and I bought a beautiful terracotta pot from Bulgaria and brought home in our handluggage. It is painted and glazed and is great when serving for guests. A thing about these terracotta dishes is that they are sensitive to drastic heat changes, so if you do have a terracotta pot to cook in, make sure it goes into a cold oven, or it will crack! Particularly when cooking in a gas cooker, it heats up faster than an electric one I think, so staging the heat is advised. I put it on the S (slow cook) setting for 5 minutes, then go up to gas mark 3 for 5 minutes, then go up to gas mark 6.
As I mentioned before, for a really tasty dish, cooking overnight on the S setting is best. For electric ovens, this is 100 degrees C.
If you think the stuffing is just too fiddly, I recommend you slice the peppers lengthwise in two. Remove seeds and handle and spongy bits, then lay half of the halves at the bottom of your dish, then spread the mince over them, then lay out the remaining halves. It won't be as pretty, though.
In the Winter in Bulgaria, many people make sauerkraut. That is, pickled cabbage. It tastes quite differently to the German variety because it is made with whole cabbage heads. Many oriental shops sell soured cabbage leaves in brine and if you are brave, have a try. I think it's quite tasty. Take a cabbage leaf and put it in the palm of your hand. It should be large enough to cover the whole hand. Then put some of the mince stuffing in the middle, then fold the leaf sides into a packet and place it so that it rests on the folds and thus stops them from opening up. These can be put into the dish along with the peppers, or you can make them on their own. The same baking instructions apply.
And finally, as my Mum is a vegetarian of many years, there is a veggie option for the stuffing. Instead of the mince, add 2 dl pudding rice more, some finely chopped carrots and finely chopped mushrooms. Everything else is done the same. In fact, many meat eaters don't notice the difference at all. I'm not a big fan of quorn, but I don't see why it couldn't be used in stead of meat.
22 September 2006
Pots and Pans
I haven't mentioned the pots and pans in my recipes so far but I feel I should add a post on that now.
All except two of my pots and pans are non-stick. The two that aren't are my old fashioned pressure cooker and a little pot I bought from Tschibo when I lived in Germany. Everything else is non-stick and surprisingly has survived over a year of washing in a dishwasher.
The non-stick coating is so much easier to clean, should you need to do it manually and I have up until last year when we got the dishwasher. But mainly, you don't need to use as much fat in your cooking and that's so important for everyone in this age of obesity.
I'm thinking of expanding my collection of pots and pans and have had my eye on the German SKK series for a while, they have been recommended to me by several friends, but they are not dish washer safe and are very expensive, so I'm thinking buy cheap, buy twice, so I can put them in the dishwasher.
The dishwasher has indeed been a change in our lives - the little time there's left between dinner and bedtime we can spend together, rather than doing dishes, since we both work during the week. It's nice to have a sitdown with a cup of tea.
21 September 2006
Lundulph's Chili Con Carne
This is a favourite of ours and is fairly quick to make. Also freezes well.
2 onions
2 - 3 cloves of garlic
0.5 dl grapeseed oil
800 g - 1 kg minced beef
2 tbsp plain flour (or sauce flour, I suspect it's the same)
0.5 l beef stock (3 Oxo cubes)
3 tbsp tomato pure
2 cans (400 g) red kidney beans
4 - 5 green peppers
fresh or dried crushed chillies, black pepper and salt to taste
- Boil up the water for the stock and add the beef cubes and tomato puree and stir in.
- Dice the onions and fry, crush or press the garlic and put it in with the onion.
- When the onions are soft, add the mince and stir vigorously to stop it from going lumpy.
- When the mince has browned, add the flour and stir it in.
- Now add the beef and tomato puree stock.
- Stir in the kidney beans and the dried crushed chillies if you are using these.
- Cover and leave to cook for 15-20 minutes
- Add the peppers and the fresh chillies if you are using these and cook for another 10 minutes.
- Taste it and add black pepper and if needed salt.
Baked Potatoes with Mexican Style Topping
Every now and then I buy the Old El Paso Taco box, it's fun, makes a TV-Friday a bit more special and it doesn't quite qualify as unhealthy fast food - I chop lots of vegetables to stuff with and that takes time.
The box contains the taco shells and a bag or two of seasoning and has instructions on how to eat tacos. But they never tell you what to do with that seasoning! So I save the bags and use them for my Mexican style topping for baked potatoes.
I'm quite proud of it, because I invented it myself. Most other things I cook are mainly from my Mum or a book. First put the potatoes to bake, then make the topping
The Potatoes
A bag of baking potatoes - about 8 or 9 potatoes. Scrub well, then wrap each in aluminium foil and bake for 1 hour and 20 minutes at 210 degrees C. Then take them out, remove the foil and put them back in to make the skins crispy. No need for any oil.
The Topping
500 ml creme fraiche
3 tbsp mayonaise
1 packet seasoning from the taco box
2 cans (200 g) tuna in spring water
1 can (326 g) sweetcorn
1 can (400 g) red kidney beans
1 orange bell pepper
1 red bell pepper
1 red onion
- Cut the peppers and onion finely.
- Mix all ingredients and leave to stand in the fridge while the potatoes are baking.
20 September 2006
Ingredients
I started cooking in Sweden, then I moved to Germany and cooked there (without an oven, just two hobs), now I'm in the UK and still cooking.
So I have some things to say on ingredients.
Flour
Ohe 13th December is the day of St Lucia in Sweden and is celebrated with traditional sweet saffron buns (recipe to follow). So my first 13th December in the UK, I thought I'd treat some friends to some Swedish traditions. I buy the ingredients, I mix them, the dough doesn't rise in any significant way, I bake anyway, the dough doesn't proof, I bake anyway and burn the skinny looking things. In the bin they go. I go and buy a second lot of ingredients... guess what, same thing happens. I tell my Mum she sends "proper" yeast from Sweden. A third lot of saffron buns also hits the bin. My poor friends were polite and tried them, before I threw them away.
After letting my despair and frustration ebb out over the next couple of years, I read up on the flour situation in the excellent recipe book that comes with the bread machine I got for Christmas.
It turns out there are different types of flour, depending on where the wheat grew. Wheat grown in colder climates contains more gluten and so makes strong flour - good for yeast doughs. Wheat grown in warmer climates makes plain flour - good for soda doughs.
There is no such thing as strong and plain flour in Sweden, it's all strong, and so all three times I tried to make the saffron buns I had bought plain flour - thus they didn't rise.
Butter
This is pretty much the same everywhere, and it comes usually as slightly salted or unsalted variety. What bothers me is that I'm never sure which one to use in baking. Particularly when making something sweet - what's the chance of tasting salt in it if I use the slightly salted butter? Mostly I use butter for the bread that I make in the bread machine, so I get the unsalted one, but when I need it for flavour, it doesn't taste as nice as the slightly salted one. The tricky bit is to resist putting it on your toast.
Yeast
I haven't been able to find fresh yeast for baking in the UK and I really miss that, I think it works so much better, particularly for saffron buns and the like. They do fresh yeast in Sweden in 50 g packets, which is what most recipes require.
So if anyone knows where fresh yeast can be found, please let me know.
Tosca pears
This is a very simple Swedish dish, children learn to do it at school and because it's pretty much just sugar, it's always popular.
8 pear halves, either canned or very ripe fresh ones
50 g almond flakes
50 g butter
0.75 dl sugar
1 tbsp flour
2 tbsp double cream
8 pear halves, either canned or very ripe fresh ones
50 g almond flakes
50 g butter
0.75 dl sugar
1 tbsp flour
2 tbsp double cream
- If you are using fresh fruit, peel it and scoop out the pips. If using canned pears, let the liquid run off well.
- Place the pear halves into an oven safe dish, flat side down.
- Melt the butter in a saucepan with a tick bottom.
- Add remaining ingredients and bring to the boil. This is the Tosca mixture.
- Pour the Tosca mixture over the pears.
- Bake in the oven for 10 minutes at 225 degrees C, or gas mark 7 (actually 7.5)
- Serve when the dessert is lukewarm with whipped cream or vanilla ice cream
Daim
The UK have Cadbury, Germany have Milka, Sweden have Mmm...Marabou and Mmm...Marabou make Daim. Or Dajm as it used to be in Sweden and Dime in the States.
There's a plethora of recipes using Daim - either in form of little balls or just a Daim bar broken up. But I managed to find a recipe on how to make Daim, I haven't tried it yet, but I will soon.
This should make about 25 pieces
2 tbsp flour
2 tsp cocoa
2 tbsp light syrup
2 tbsp butter or margarine
4 tbsp sugar
0.5 dl peeled and chopped almonds
100 g milk chocolate
- Mix everything except the chocolate in a deep saucepan, preferably one with a thick bottom.
- Cook on low heat until the mixture thickens.
- Spread the mixture on a greaseproof paper and leave to cool.
- Melt the chocolate and spread on top of the crunchy.
- When it's cooled a bit, cut up into pieces.
Celebrity Master Chef
Some days ago, there was yet another reality show that had had "celebrity" stamped on it. Cheap programming made slightly more expensive and washed up/out celebrities get to show their sorry face once more.
But there were some interesting things in the show. I don't know anything about the judges, to me they seem to be two ordinary blokes that pretend that they know about food. But they really seem to know what they are talking about.
One of the contestants started frying and shoved a large lump of butter in along with some oil and got a telling off. The reason being that you should use oil for frying and butter for flavour. Butter burns easily, so should be added at the end and not too much of it.
This is good advice, I think, particularly if you've watched celebrity chefs generously only use butter in their show off cooking. I mean, you can really feel the veins clogging up when you watch the show. Well, I do anyway.
Another observation I've made is if you don't have fresh herbs - and I'm guessing quite a lot of people don't - dried ones work fine, but should be added maybe 5 - 10 minutes earlier in the cooking. This will give them a chance to soak up some of the liquid and release their flavour. Some chefs recommend that you soak them in hot water before putting them in, this is pretty much the same thing, but gives you an additional dish to wash up afterwards and also a sieve, not an item in everyone's kitchen. I have only recently started using one myself.
19 September 2006
Ratatouille
Today I made Ratatouille, based on my Mum's recipe. In Bulgaria they also call it Misch-Masch, if you add eggs and feta cheese at the end.

All vegetables are assumed to be medium sized, not that that means much. Just make sure you have a large enough pan for them.
3 onions, peeled and coarsely chopped
0.5 dl grapeseed oil
2-3 tsp water
2 aubergines, diced
3 courgettes, peeled and diced
4-5 peppers, diced
1 can of chopped tomatoes or 4 fresh ones, skinned and chopped
2 garlic cloves
2-3 tbsp savory
1 tbsp oregano
1 tbsp thyme
1 tbsp dill
salt and pepper to taste
Sometimes, I add about 250 g diced fresh mushrooms along with the vegetables.
Almost always, I add crushed chillies along with the dried herbs, I like it spicy.
Also, if you want more substance in it, break two eggs in a bowl, crumble 200 g feta cheese into it and whisk together, then stir in quickly into the Ratatouille.
Today I got the idea to add sliced ochra (ladyfinger) together with the tomatoes. I'll try that next time I make Ratatouille.
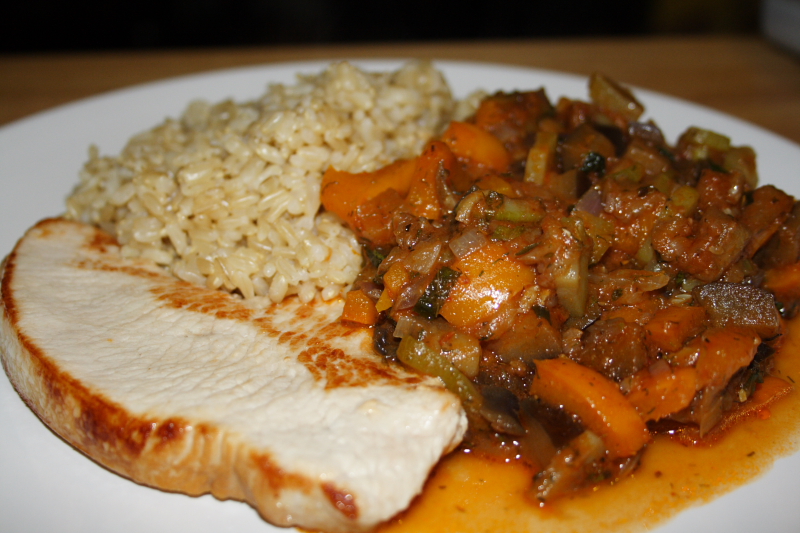
At the end of the cooking, the aubergines in particular look a bit mushy and gray, so if you're cooking for guests, I recommend you use peppers of differnt colours to make it look a bit nicer. In the photo, I used orange peppers, which went a bit yellow, but still look OK. I served it with turkey steak and brown rice.
When I was a child, I didn't like food to have texture, and so my Mum would liquidise the Ratatouille. I haven't tried doing that, I can't imagine that it would taste as nice.
Notice in particular that against all cooking tradition, I add the garlic at the end. This is because I don't like the taste and smell of fried garlic. Adding it at the end gives the dish a hint of raw garlic. Also I don't use olive oil for cooking, it changes when it's heated and I don't like that flavour. So I always use grapeseed oil for cooking, but add olive oil at the end, when the dish is ready. In this case I don't feel it's necessary.
Before I wrote this entry, I typed in "Ratatouille" into the German version of wikipedia, trying to find out what the difference is between that and the dish Misch-Masch, but couldn't find anything. However, the description of how to make Ratatouille was that the aubergines had to be fried separately, while the tomatoes and peppers were to be roasted under the grill, to make them easier to peel etc. Frankly, that's just unnecessary waste of time. I don't even bother with removing the liquid from the aubergines, the varieties they sell in the supermarkets are fairly bland anyway, I don't see any reason for squeezing them out even more.
I always peel the courgettes, that's how my Mum and Gran always did and it removes any bruises the courgettes might have sustained in the shop. Also some have prickly hairs on them, so that's another reason for peeling. Keep the skin on the aubergines though.
As for serving suggestions, the Ratatouille is sufficient on it's own for vegetarians, but is also very nice with grilled/fried chicken/turkey breast and rice.
Today I had forgotten to defrost the turkey breast, so we had it with Swedish meatballs and wholemeal bread.
All vegetables are assumed to be medium sized, not that that means much. Just make sure you have a large enough pan for them.
3 onions, peeled and coarsely chopped
0.5 dl grapeseed oil
2-3 tsp water
2 aubergines, diced
3 courgettes, peeled and diced
4-5 peppers, diced
1 can of chopped tomatoes or 4 fresh ones, skinned and chopped
2 garlic cloves
2-3 tbsp savory
1 tbsp oregano
1 tbsp thyme
1 tbsp dill
salt and pepper to taste
- Make sure all vegetables are ready before you start, but it works also chopping as you cook.
- Fry the onions in the oil on medium-low heat, when they start to sizzle, add the water to prevent them from burning.
- When the onions are soft, add aubergines, courgettes and peppers.
- Stir well, then reduce the heat a bit, cover and let cook for 30 minutes, stirring every now and then.
- If you are using dried herbs, add them at 25 minutes of the cooking time.
- Increase the heat a bit and add the tomatoes, press in the garlic, season and add fresh herbs, then cook for about 5 minutes, enough for the herbs to give off their flavour.
Sometimes, I add about 250 g diced fresh mushrooms along with the vegetables.
Almost always, I add crushed chillies along with the dried herbs, I like it spicy.
Also, if you want more substance in it, break two eggs in a bowl, crumble 200 g feta cheese into it and whisk together, then stir in quickly into the Ratatouille.
Today I got the idea to add sliced ochra (ladyfinger) together with the tomatoes. I'll try that next time I make Ratatouille.
At the end of the cooking, the aubergines in particular look a bit mushy and gray, so if you're cooking for guests, I recommend you use peppers of differnt colours to make it look a bit nicer. In the photo, I used orange peppers, which went a bit yellow, but still look OK. I served it with turkey steak and brown rice.
When I was a child, I didn't like food to have texture, and so my Mum would liquidise the Ratatouille. I haven't tried doing that, I can't imagine that it would taste as nice.
Notice in particular that against all cooking tradition, I add the garlic at the end. This is because I don't like the taste and smell of fried garlic. Adding it at the end gives the dish a hint of raw garlic. Also I don't use olive oil for cooking, it changes when it's heated and I don't like that flavour. So I always use grapeseed oil for cooking, but add olive oil at the end, when the dish is ready. In this case I don't feel it's necessary.
Before I wrote this entry, I typed in "Ratatouille" into the German version of wikipedia, trying to find out what the difference is between that and the dish Misch-Masch, but couldn't find anything. However, the description of how to make Ratatouille was that the aubergines had to be fried separately, while the tomatoes and peppers were to be roasted under the grill, to make them easier to peel etc. Frankly, that's just unnecessary waste of time. I don't even bother with removing the liquid from the aubergines, the varieties they sell in the supermarkets are fairly bland anyway, I don't see any reason for squeezing them out even more.
I always peel the courgettes, that's how my Mum and Gran always did and it removes any bruises the courgettes might have sustained in the shop. Also some have prickly hairs on them, so that's another reason for peeling. Keep the skin on the aubergines though.
As for serving suggestions, the Ratatouille is sufficient on it's own for vegetarians, but is also very nice with grilled/fried chicken/turkey breast and rice.
Today I had forgotten to defrost the turkey breast, so we had it with Swedish meatballs and wholemeal bread.
14 September 2006
Bean sprouts
Quite a few years ago, my Mum bought a book about growing different legume seeds into sprouts and living on them. She likes that sort of thing, but we could never get it right, and frankly it didn't taste very nice either.
These days it's great to be able to buy fresh bean sprouts for your stir fry, but the packets are always about twice as big as you'd need and they have a tendency to look a bit manky as soon as they leave the shop. So I thought, why not do my own? They are made of mung beans, cute little green things that you can also buy dried, so I did.
A recent visit to IKEA equipped me with a large glass jar - about 2.5 litre capacity. Take a black rubbish sack and wrap it around the jar and secure with sticky tape. The mung beans will only start growing in darknes, i. e. simulating that the beans have been planted in the ground.
Take your dried mung beans and remove any broken or mis-coloured ones. Put 2 dl of them in the jar, then half-fill it with water. Put a piece of straining cloth on the opening and secure it with a rubber band. Leave overnight to soak.
Drain the next morning, then place at an angle upside-down. I have a jam funnel, which turns out to be perfect. I put the funnel in a plastic box (from a distant Chinese take-away), then put the jar on top of the funnel, leaning it agaist the wall in the kitchen.
For the next three days, rinse the beans once or preferably twice (I kept forgetting) a day. After that they are ready for eating.
They should keep in the fridge for a week. Some recommend blanching if you want to use them in salads, but I'm never really sure what blanching means, so I never bother with that. Anyway, 2 dl dry mung beans will fill up the jar.
I found these instructions on a vegan web site. I don't approve of the concept, but this one was surprisingly well informed.
The sprouts are very high in vitamin C, and also A and some Bs and is a very good idea towards the end of Winter, when vegetables tend to get more plasticky tasting than ever before if you buy them from the shop or run out of fresh vegetables if you grow your own.
I'll try alfa alfa seeds next, as soon as I locate a health food store, where the shop girl speaks sufficient amount of English to understand me. In the case of the seeds, 2 tbsp should fill up the 2.5 l jar.
Chicken with Curry Rice
This is a traditional Bulgarian dish, which my Mum has spiced up with curry powder.
Ingredients
1 large onion, coarsely chopped
2-3 tbsp water
250 g mushrooms, cut in 1 cm cubes
2 dl rice
4 dl water
2 chicken breast fillets, each cut in 3 -4 smaller pieces
salt, pepper and curry powder
a little oil for frying
Method
- Brown the chicken in the oil lightly to seal it and place in deep baking dish.
- In the same oil, fry the onion. Add a couple of tablespoons of water, this will prevent the onion from burning.
- When the onion i soft, add the rice, stir well, to get it coated with the oil, then add the 4 dl water. Bring to the boil and let simmer until all liquid has been absorbed.
- Pre-heat the oven to 200 °C (not fan).
- Add the mushrooms, salt, pepper and curry powder to taste and stir well.
- Cover the pieces of chicken with the rice mix, add a bit more water if it looks too dry.
- Cover the baking dish with aluminium foil and bake for 30-40 minutes.
This dish can be frozen. For a vegetarian version, add peas, carrots and courgettes instead of chicken. It can also be nice if baked with cheese on top, au gratin.
My Müsli
I came up with this recipe a few years ago, when Lundulph decided there's too much sugar in the stuff you get in the shops. My Mum used to mix her own müsli many years ago, but living in health-obsessed Sweden, they sell unsweetened müsli in the shops these days, so there's no need to mix your own.
I don't really like imperial measures, but my Pyrex pint/half litre measure is excellent for this.
1 pi puffed rice
1 pi corn flakes
1 pi high fibre bran
1.5 pi Scottish porrige oats
130 g sultanas
200 g dried, diced apricots
150 g dried cherries
100 g sunflower seeds
75 g sesame seeds
5 - 6 dried figs, chopped
100 g chopped pecans
100 g chopped walnuts
I have a plastic 5 litre box with a close fitting lid, where I mix all these ingredients, close the lid and shake vigorously until they are mixed. It helps if the box is transparent in this case.
This lasts for 2 weeks for two people. No sugar, but ever so tasty.
Yogurt
Parents tend to make their children drink milk. Makes sense, calcium is needed to build up a skeleton. I never liked the taste of milk. So my parents tried yogurt with a bit of honey. I've loved yogurt as long as I can remember.
Here's how to do it yourself, it's much cheaper than buying ready made stuff.
2 l full milk
4 tbsp natural yogurt with living culture
The living culture is the important bit, that's the bacteria that transforms the proteins of the milk into yogurt. I use greek style yogurt, particularly strained varieties are good. But any yogurt type will do. There are different bacteria that perform a similar thing, but gives a variation on the taste and texture of the yogurt.
- Put the milk in a deep sauce pan and bring it to the boil. Note that when milk boils, it rises quite rapidly, so keep an eye on it, or spend time cleaning the cooker. As soon as the rapid rise starts, take the sauce pan off the heat.
- Cool the milk, by either leaving it on the side (takes long time) or putting the sauce pan in a cold water bath in the sink. Cool only to the point where you can stick your finger in without it being painful, or about 55 degrees C.
- Place the yogurt in a deep bowl/jug, add some of the warm milk and stir until well mixed.
- Then pour the mix into the sauce pan with the rest of the milk and stir well again. This ensures that the yogurt culture gets well distributed throughout the milk.
- Pour the warm milk into glass jars.
- Wrap the jars in a duvet/towels to keep warm and leave overnight (at least 5 h). If you are lucky to have an electrical oven, set it on 50 degrees and put the jars in for 3-4 h.

- Afterwards, if the jars are still warm, let them cool down completely and put in the fridge.
- The yogurt stores well around 1 week.
- Use the last bits of it for the next batch.
- Ever so often, a batch will fail. This is mainly due to the bacteria changing. So get some yogurt from the shop and start from the beginning.

Crunchie Bar
Found this on the web, will try it very soon:
1.8 dl caster sugar
4 tbsp honey
1 tbsp baking soda
I've just done this and it seemed to work. Possibly I kept it on the hob for a bit too long. Once the baking soda, which is also called bicarbonate of soda, has been stirred in, the whole lot behaves a bit like egg whites when whisked to the stiff peak stage. Also the soda seems to increase the temperature and I think that's where it started burning. I tasted a bit from the spoon I used - it's ok, but leaves a very long lasting aftertaste of soda, pretty much like when you take it for indigestion. Must experiment with the quantities also, maybe I can do it with less soda.
1.8 dl caster sugar
4 tbsp honey
1 tbsp baking soda
- Grease an 8 inch square pan with butter.
- Off the heat (that means on the counter), mix the sugar and the syrup in a heavy-bottomed saucepan (use a pretty big saucepan, you'll thank me later).
- Now put the pan over a medium to low heat and simmer for 3-4 minutes (Nigella bases this on using an 8-inch diameter saucepan).
- The mixture is ready to come off the heat when it's a thick, bubbling bunch of gook, the color of light sand and no darker -- don't let it get any darker than that, or you'll end up with burnt and smelly sugar goop!
- Take the stuff off the heat and quickly whisk in the baking soda.
- Watch the caramel foam up like something out of a sci-fi film (this is the part where you thank me for telling you to use a large pot).
- Pour the foamy stuff into the pan and leave it to set.
- This will take several hours.
- Be patient.
- You can try and cut it into squares, but it will be a fruitless task.
- Best bet is to just bash it into a bunch of different shaped pieces.
- This is good frustration therapy.
- You can dip the pieces into melted chocolate to make your own Cadbury's Crunchy bars, or you could fold splinters of this into either homemade or bought vanilla icecream for honeycomb ice cream.
I've just done this and it seemed to work. Possibly I kept it on the hob for a bit too long. Once the baking soda, which is also called bicarbonate of soda, has been stirred in, the whole lot behaves a bit like egg whites when whisked to the stiff peak stage. Also the soda seems to increase the temperature and I think that's where it started burning. I tasted a bit from the spoon I used - it's ok, but leaves a very long lasting aftertaste of soda, pretty much like when you take it for indigestion. Must experiment with the quantities also, maybe I can do it with less soda.
Diet food
It seems I've found the magic combination that causes weightloss for me.
Breakfast
25 g of my homemade Müsli + 170 g of my homemade yogurt
220 ml Tropicana orange juice + 110 ml water
Mid-morning snack
1 apple
Lunch
Homemade salad: 10 cm cucumber, 1 medium tomato, 5 radishes, 3 tbsp sweetcorn, half of roasted pepper, 1 small onion, 1 handful chopped lettuce, 30-50 g cheese, 1 tbsp pine kernels, 2 tbsp sunflower seeds, 1 tsp capers. This is just an example, generally I put in what I have. Note no dressing, no creamy stuff, no meat.
Afternoon snack
1 Crunchie bar
Dinner
Vegetable soup: water, fried onions, green peppers, mange tout, sweetcorn, carrots, potatoes, broccoli, vegeta seasoning, thyme, oregano, parsley, savory, black pepper. This is again an example, I've no idea what proportions I used. I also have a pita bread with that.
11 September 2006
Roasted Chantenay carrots
Yesterday I roasted Chantenay carrots from raw. I had them in for 30 minutes, but this is not enough, 35-40 would be better.
Ice cream cake
I got this recipe from a friend who got it from Good Food:
225 g blackberries
85 g caster sugar
1 dl water
1 squeeze of lemon juice
150 ml creme fraiche
icing sugar to taste
750 g blackberries
260 g caster sugar
3 dl water
1 tbsp lemon juice
500 ml creme fraiche
icing sugar to taste
This results in just over 2 l ready ice cream and is quite yummy.
The first lot I did was with full fat creme fraiche and there was no need for icing sugar. The second lot was with reduced fat creme fraiche, which tasted and looked like strained greek yogurt, so the resulting ice cream had a lot more sourness to it and a lot less fat, so I had to add a tbsp of icing sugar, which made it a bit too sweet.
Also the top tip for the scaled up version is to do the berry simmering the evening before and start the freezing process early in the morning. In both lots I did, I didn't get going until after lunch and had to stop the stirring by bedtime (around 21) and the ice crystals formed and the ice cream went hard.
Now part two - the cake.
I'm using ready bought sponges as they don't freeze (I ignore thinking of why they don't). It should be thick enough to cut in three layers. Towards the end of the ice cream stirring process, place the bottom sponge on a large plate, then put a thick layer of the thickened ice cream, about 1 cm thinck. Then put the next sponge, then a second thick layer of the ice cream, then the final sponge. This requires quick work, or the ice cream will melt, so keep everything ready at hand when starting. When done, put in the freezer for 24 h.
For the decoration, I melt 300 g of white chocolate and quickly cover the cake, both on top and the sides. The ice cream makes the chocolate go solid rather fast, so the decoration may take several go's. Actually 300 g is not quite enough for the sides and they are very difficult, particularly when the melted chocolate meets the ice cream, in fact it ends up in a mess. So a wide bow might be in order, to cover it up. Actually, another thing just crossed my mind. Edible paper is readily available now. Maybe cut out strips and stick onto the sides, then cover with chocolate. I'll give it a go next time I make this cake.
Actually, any ice cream will do, you need to let it soften to a stage where it can be spread on the sponges.
Note: Having the blackberry ice cream in the middle may give the impression of having put something very bloody in the cake, but hopefully people who make this association will forget it once they've tried the cake.
225 g blackberries
85 g caster sugar
1 dl water
1 squeeze of lemon juice
150 ml creme fraiche
icing sugar to taste
- Gently simmer the berries, caster sugar and water for 7-8 mintes, until the berries are soft, then let cool, add the squeeze of lemon juice and blend until smooth.
- Push through a sieve to get rid of the pips.
- Stir in the creme fraiche and add icing sugar if it's not sweet enough.
- Put in the freezer for 1 h, then take out and stir well. After that repeat the stirring every 45 minutes, this prevents ice crystals forming and makes it smooth and soft.
- Or if you are a lucky owner of an ice cream maker, freeze it in there.
750 g blackberries
260 g caster sugar
3 dl water
1 tbsp lemon juice
500 ml creme fraiche
icing sugar to taste
This results in just over 2 l ready ice cream and is quite yummy.
The first lot I did was with full fat creme fraiche and there was no need for icing sugar. The second lot was with reduced fat creme fraiche, which tasted and looked like strained greek yogurt, so the resulting ice cream had a lot more sourness to it and a lot less fat, so I had to add a tbsp of icing sugar, which made it a bit too sweet.
Also the top tip for the scaled up version is to do the berry simmering the evening before and start the freezing process early in the morning. In both lots I did, I didn't get going until after lunch and had to stop the stirring by bedtime (around 21) and the ice crystals formed and the ice cream went hard.
Now part two - the cake.
I'm using ready bought sponges as they don't freeze (I ignore thinking of why they don't). It should be thick enough to cut in three layers. Towards the end of the ice cream stirring process, place the bottom sponge on a large plate, then put a thick layer of the thickened ice cream, about 1 cm thinck. Then put the next sponge, then a second thick layer of the ice cream, then the final sponge. This requires quick work, or the ice cream will melt, so keep everything ready at hand when starting. When done, put in the freezer for 24 h.
For the decoration, I melt 300 g of white chocolate and quickly cover the cake, both on top and the sides. The ice cream makes the chocolate go solid rather fast, so the decoration may take several go's. Actually 300 g is not quite enough for the sides and they are very difficult, particularly when the melted chocolate meets the ice cream, in fact it ends up in a mess. So a wide bow might be in order, to cover it up. Actually, another thing just crossed my mind. Edible paper is readily available now. Maybe cut out strips and stick onto the sides, then cover with chocolate. I'll give it a go next time I make this cake.
Actually, any ice cream will do, you need to let it soften to a stage where it can be spread on the sponges.
Note: Having the blackberry ice cream in the middle may give the impression of having put something very bloody in the cake, but hopefully people who make this association will forget it once they've tried the cake.
8 September 2006
My Cook Book and other useful things
Well, this is yet another attempt at getting my recipes online and as usual the main problem would be that I actually have to type them in. There's no way there's any SW on this planet that can decipher my handwriting. Well, some are already digitised, so I'll try and copy them across at some point.
The main thing this week is that my cooker was plumbed in on Monday and I've just tried it out. A bit rusty after having managed without a cooker for about a year and a half. Now I have a brand spanking new Cannon Professional. In the UK, "professional" seems to mean stainless steel and 60 cm wide. Most regular cookers seem to be 50 cm, which I personally think should be made illegal or called "novelty" at the very least. But if people don't tend to cook and just need it for when they sell the house, then 50 cm is perhaps fine.
Mind you, it is quite possible to live with two evil electric hobs from Argos for at least a year and a half, I've just done that.
Oops, moving into grumping territory, so will continue on the grumpy blog.
Subscribe to:
Posts (Atom)