Showing posts with label Starter. Show all posts

19 April 2020

Crispy Tofu

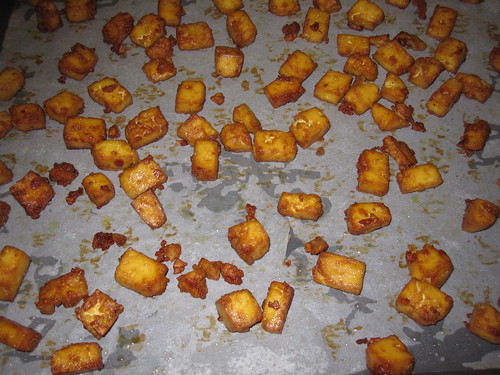
IMG_5933

It's been ages since we had stir-fry and in last week's online food shop, I added a couple of bags of ready cut vegetables. But what to do along with them. Normally I'll get tiger prawns for Lundulph or some nice fillet steak, but I forgot to do that this time. Then it struck me, we have several packets of extra firm tofu in the fridge, on Lundulph's request. The intention was for him to have tofu as protein replacement, but he did some searching on the internet and established that tofu seems to have a lot lower protein content than the soy beans themselves, so I think he's now gone off the idea. Besides, he feels the texture is too close to cheese, which he still disapproves of.

But a look at the packets indicated that they were about to go out of date, so I searched for how to make crispy tofu and the recipe I decided to try is this one. I converted the amounts to metric and also had to make some adjustments as the two packets I wanted to use were 280 g each. Otherwise, I was determined to follow the recipe as closely as possible.

Ingredients

560 g extra firm tofu
2 tbsp olive oil
2 tbsp soy sauce
2 tbsp cornflour

Method

  1. Pre-heat the oven to 205°C (not fan) and line a large baking tray with baking paper.
  2. Drain the tofu, if it is in liquid, then cut into cubes, about 1.5 cm and lay out on a clean and lint-free tea towel with a little space around each cube.
  3. Fold the towel over the pieces,then place a large chopping board on top and press down, I actually sat on top for a couple of minutes.
  4. Place the cubes in a large bowl and drizzle the oil and soy sauce over, then using one hand turn the cubes gently to get them coated.
  5. Sprinkle the cornflour and turn the cubes further to get them coated. Don't worry if some of the cubes crumble and break.
  6. Tip the tofu into the baking tray and spread them out, again so they don't touch each other. Then place in the oven.
  7. After 15 minutes, stir the cubes to turn them and bake for a further 15 minutes. They are now ready to serve.

IMG_5932

Both Lundulph and I loved these, the texture was very good, they were nicely crispy on the outside, but soft in the middle and worked really well with stir-fried vegetables and quinoa. Lundulph thought they were a bit on the salty side and possibly the tofu itself was salty and adding soy sauce took them over the top a bit. We ate most of them for our dinner, there's about a handful left and as I was putting it away, I ate one piece that looked particularly crunchy and it was tasty still, even though it was cold. I suspect they would be very nice in a Thai curry too, instead of chicken.

Next time, I'll swap the olive oil and soy sauce for green masala, I've used it with silky tofu before and it's been very nice, so I have good hopes for this.

6 April 2020

Leek and Potato Soup

With the UK lockdown now in its third week, I find myself buying slightly random greens with vague ideas of what to do with them rather than a firm plan. This is not a good idea, but for some reason I keep thinking that I shouldn't make specific plans, since I don't know if I'll be able to get hold of the right ingredients at the supermarket. This is very silly, since there doesn't appear to be any shortages in the vegetable section, at least not in my local shops.

But buying greens, they have a limited lifespan and must be used. Last week I bought a packet of leeks. They then had to live in the salad drawer at the bottom of the fridge, until Lundulph dug them out the other day and commented that they are going manky. Indeed, the outer leaves were yellow. Thus, I made sure to get potatoes when I went to the shop this week with the aim to make leek and potato soup. Oddly enough, this seems to be the only canned soup that's left on the shelf - no one is buying it.

After some research in my cook books, I settled on Delia Smith's recipe, but decided to increase the amounts and also spruce up a little with some chilli.

Ingredients

430 g leeks
1 kg potatoes
145 g onions
2 cloves of garlic
100 g salted butter
1 small scotch bonnet chilli
1 l chicken and/or vegetable stock
½ dl chopped curly leaf parsley
salt and pepper to taste

Method

  1. Trim the green edges and the root plate of the leeks, cut them in half length-wise and make sure to wash any grit stuck between the layers. Then slice finely and set aside.
  2. Wash the potatoes well and peel if needed. Dice into 1 cm cubes and add to the leeks.
  3. Peel and wash the onion(s), then dice into 1 cm cubes and add to the other vegetables. Peel the garlic.
  4. Heat up the butter in a large stock pot and when it's bubby, add the vegetables and press in the garlic. Stir through to get them coated with the butter, then cover and turn down the heat somewhat and leave to fry/sweat for about 15 20 minutes, stirring occasionally.
  5. In the meantime, using a glove, halve the chilli and scrape off the seeds and pith and discard, then chop finely, taking care to protect your skin.
  6. Prepare/heat up your stock (I used 1 cube chicken stock and 4 cubes vegetable stock, as that's what I had).
  7. Wash and chop the parsley.
  8. Once the frying time is up, add the chilli, stock and parsley and season to taste. Stir everything, cover and let simmer for another 15 - 20 minutes until the potatoes are soft.
  9. Using a stick blender, blitz to achieve the consistency you prefer or leave as is if you'd rather, then serve.

Delia recommends blending smooth, but both Lundulph and I prefer a little bit of texture in this type of soup, so I just did a little pulse blitzing.

The amounts above also result in loads of soup. Lundulph and I had a generous portion each for lunch. The rest was left to cool down completely and I divided into 3 x 600 g portions which I've frozen. What I discovered, however, is that I was rather hungry a lot sooner after lunch than I expected, but I guess this is the standard thing with having mainly potatoes in a meal. They fill you up, but are processed quite quickly and you feel hungry after a couple of hours.

25 March 2016

Russian Easter Egg Hors D'Oeuvres

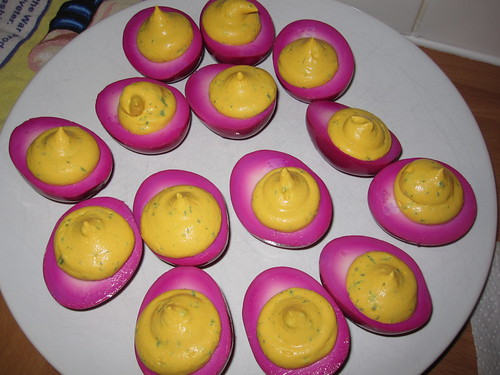
IMG_4938

This is yet another recipe that I've come across thanks to Lundulph watching shows that I wouldn't normally watch. This time it was Mary Berry's Easter Feast. What caught his eye was a fish dish cooked by a lovely lady from the West Indies, which Lundulph thought looked very pretty. I went back and watched the whole episode and I'm not sure I want to try it out, not being a fan of fish and seafood in general, but I persisted in watching the whole episode, because Mary Berry was visiting people from different cultures with different Easter traditions and that was very interesting to me. One of the people she visited was from the large Russian community in London and they cooked something wonderfully eye-catching: hard-boiled egg, pickled with beetroots and "deviled", i. e. the yolks scooped out and blended with other things then piped back in.

So the episode barely over, I was tapping away on the computer to find the recipe on the BBC website, sadly it wasn't published, so I watched that segment a couple of times and jotted down what they said and what I saw and here is the result, which I made for the traditional family Easter gathering at our house. The result was very good.

Ingredients

12 eggs, hard-boiled, cooled down and peeled

For the marinade/pickling liquid

3 beet roots, slightly larger than an egg each
4 shallots
3 cloves of garlic
10 corns of allspice
20 black peppercorns
5 whole cloves
5 cm stick of cinnamon
1 pinch of chilli flakes
1 tbsp clear honey
5 dl water
2.5 dl white wine vinegar

For the filling

12 hard-boiled yolks from the eggs
2 tbsp chives
1 tbsp dill
1 tsp Dijon mustard
8 tbsp crème fraîche
salt and pepper
yellow food colouring (optional)

Method

  1. Trim, peel and rinse the beet roots and use gloves to avoid getting your fingers stained. Cut into chunks of around 2 cm and place in a large saucepan with a lid.
  2. Peel the shallots, halve or quarter if large and add to the saucepan.
  3. Peel the garlic and cut in half, then add to the saucepan and follow with the allspice, black peppercorns, cloves, cinnamon and chilli flakes.
  4. Drizzle over the honey, add the water and vinegar and stir. Then bring to the boil and simmer for a few minutes.
  5. Remove from the hob and sieve into a glass bowl, which is large enough for the 12 eggs and the marinating liquid. If it looks a bit transparent you can add the pieces of beet root back in, but it's not necessary.
  6. Leave the liquid to cool completely, and cut out a circle of baking paper to fit the top of the glass bowl.
  7. When the liquid has cooled, add the whole peeled eggs in, making sure they are fully covered. Place the baking paper on top to make sure the eggs stay under and cover with cling film. Place in the fridge overnight for about 12 h.
    IMG_4932
  8. Remove the eggs from the marinade and pat dry, then cut in half lengthwise and carefully scoop out the yolks with a small spoon. Set the now bright pink whites aside, cover and put back in the fridge.
    IMG_4933
  9. Put the yolks in a food processor and add the other filling ingredients, then blend until as smooth as possible. If the mixture looks a bit pale, add some yellow food colouring.
  10. When ready to serve, place in a piping bag with a round nozzle. Line up the whites with the flat sides up on your serving dish, then pipe some of the filling into each hole where the yolk used to be. At this point they are ready to serve, but you can decorate with e. g. small pieces of salmon, ham or brightly coloured peppers.
    IMG_4935

As the family turned up on Good Friday, I spent the evenings of the week before preparing all the food and I made these on the Tuesday already. This was fine, but I discovered that the beet root colouring continues to move inwards into the egg white as time passes. So the whites looked like I wanted them to look on Tuesday when I cut them, but were almost completely pink through and through by Friday when I was ready to serve them. So the effect of pink outside and white inside was a bit lost. But the beet root flavour did come through, which was rather nice I thought.

I also put some lettuce leaves around the eggs on the plate, mainly to make sure they were stable and didn't glide around and topple over. My idea of having each egg on a spoon for everyone to grab one didn't quite work out the way I'd imagined it, which was like a flower, but I didn't have time to go to the local restaurant supply shop to look for suitable spoons for this purpose.

But the eggs were very tasty and very visually appealing. I had some left-over filling mixture and it was a bit on the runny side, so could only be piped with a round nozzle. I think the amount of crème fraîche could be reduced to make a stiffer mixture for a star nozzle. But as I put some cold smoked salmon pieces on top, it didn't really matter much.

IMG_4937

7 May 2015

Szechuan Asparagus

Finally it's May and asparagus season has started. I went to my local PYO armed with my mushroom knife and a silly smile on my face. Apparently I wasn't the only one, there were quite a few other enthusiasts already there, but there was plenty to go round and I picked enough to last us a week or so.
And I had another recipe lined up from my YouTube sessions - Szechuan Green Beans. Watching the video made me think that the recipe would work just as well with asparagus. However, I forgot to get salad onions required for this recipe and I had no onion in the house, so I skipped it. It still turned out quite nice.

Ingredients

1 tbsp sesame seeds
1 tsp cornstarch
2 tbsp water
285 g thin green asparagus, trimmed and washed
1 tbsp grapeseed oil
1 tbsp toasted sesame oil
1 tbsp minced fresh ginger
1 tbsp minced garlic
1 tbsp chilli sauce
1 tsp white wine vinegar
1 tsp granulated sugar
3 tbsp soy sauce
chilli flakes (optional)

Method

  1. Heat up a pan and briefly toast the sesame seeds, stirring constantly, until they start popping, then remove from the heat and transfer to a bowl and set aside.
  2. Stir the corn starch into the water and set aside.
  3. Then heat up the grapeseed oil and fry the asparagus until it caramelises here and there, about 15 minutes. Remove to a side dish.
  4. In the same pan, heat up the toasted sesame oil and add the ginger and garlic and fry for a minute or so, stirring vigorously.
  5. Add the chilli sauce, vinegar, sugar, soy sauce and chilli flakes and stir through, then give the dissolved cornstarch a quick stir and pour into the pan, then return the asparagus and stir to get it well coated.
  6. Serve warm.

Now the recipe was for a pound of green beans, i. e. about half a kilo. My asparagus was just over half of that and the result was quite a lot of sauce to go round, so next time I'll definitely aim for the half a kilo mark. It'll also probably make the asparagus look more attractive.

I was also suprised that the sauce first appeared to be so thick - of course the cornstarch did do this, but I expected it to be a bit runnier.

Finally, I wasn't quite sure what sort of chilli sauce to use - in the YouTube video it appeared to be the sweet chilli sauce, but that has no heat at all almost and I thought it can't be right as sugar is added as well. So I used the Korean chilli paste/thick sauce I bought for my dolsot bibimbap recipes. And I added some really hot chilli flakes just to be on the safe side.

Overall I'm very pleased with the result and Lundulph and I gobbled them up pretty quickly. However, for the remaining asparagus, we'll go back to boiling them, as it's possibly a bit healthier...

27 April 2015

Vegetable and Smoked Salmon Terrine

Yesterday our lovely neighbours came over for dinner and I thought I'd try my hand at a terrine. After finding a recipe that seemed simple enough, I started looking for a terrine mould. This turned out to be easier said than done and after looking for something suitable at a couple of local cookery shops and finding some disappointing reviews online, it occurred to me that I invested in food rings last year and I've not really used them much since. So I decided to use these instead. Of course with food rings, there is no bottom, so cooking the terrine in a bain marie was not an option, though I did try this out by placing the empty food rings in a flat deep baking tray and pouring water outside them - it just seeped through them, so much for flatness.

Now the recipe implied that the mixtures would be fairly runny, which meant that they would seep out as soon as I'd poured them into the rings too. Hmmmm...

So I thought, why not put some smoked salmon at the bottom and press it in to act as a sealant? And so I did.

Ingredients

115 g cauliflower florets
115 g carrots
115 g frozen peas
180 ml double cream
3 large eggs
salt, pepper,nutmeg,dill
butter for greasing
hot smoked salmon

Method

  1. Peel, wash and slice the carrots. Wash the cauliflower and divide up to be roughly the same size as the carrots.
  2. Steam the vegetables until done, but make sure to keep them separate.
  3. When done, rinse under cold water to stop the boiling and prevent them from going too pale.
  4. In a deep bowl, place 60 ml of the cream and one egg, then add salt, pepper, nutmeg and the cauliflower. Blend until smooth, then set aside.
  5. Rinse the blender well, then repeat with another 60 ml of cream, egg, salt, pepper and the carrots. Blend until smooth and set aside.
  6. Rinse the blender again, then use the final 60 ml of cream, the last egg, salt, pepper and some dill along with the peas and blend until smooth.
  7. Taste the mixtures and adjust the seasoning if needed.
  8. Butter 4 food rings (7 cm diameter, not aluminium!) well on the inside and place on a baking tray lined with baking paper. Pre-heat the oven to 125 °C.
  9. Using two forks, "shred" some salmon and press into the bottom of each food ring, to make sure the edges are well covered and the salmon is about 1 cm thick.
  10. Carefully spoon the pea or cauliflower purée over the salmon.
  11. Now spoon the second purée and then the last one, then carefully place in the oven and bake for 1 h 15 minutes.
  12. Keep an eye on them, if they puff up too much, turn down the heat. Check for readiness with a toothpick.
  13. Remove from the oven and allow to cool, then move them to a plate, cover the whole thing with cling film and chill until ready to serve.
  14. The food rings should be taken off just before serving, to make sure the terrines keep their shape.

I followed the original recipe with the baking temperature and the terrines puffed up quite a lot, I had to turn down the oven heat twice and possibly they overcooked a bit. Once they cooled down, they split away from the side of the food rings. Unfortunately I forgot to butter the rings before using them.

When it was time to serve, I thought a whole terrine would be too much as a starter, so I ran a knife around each, carefully removed the metal ring, then cut out a slice from the middle of each, about 1.5 cm thick. Sadly the colours had gone quite pale too and I'm tempted to add some food colouring next time or alternatively add fresh basil or parsley to the pea purée to make it greener and some roasted red pepper to the carrot purée to make it more orange.

Curiously the pea purée turned out the thickest, which is why I used it next to the salmon, just to be on the safe side, in case I hadn't managed to cover the bottom edge and the whole thing would just drizzle out before it had set.

But on the whole the terrines tasted very nice. The salmon I had was covered with herbs, and was fairly salty, so I was careful with the seasoning and was a bit worried that it would just taste bland, but it was actually quite nice, both taste and texture. I did make the mistake of piping it into the food rings, so the two thinner purées did mix a little. But on the whole, I'm very pleased with the result and I think so were the guests.

12 April 2015

Mini Oeufs en Cocotte Starters

To start off the festive Easter meal, I decided on oeufs en cocotte after finding these nice looking and inspiring recipes, here and here.

However, rather than make brioches, I decided on petits choux and with salmon and quails' eggs. And this was quite straight forward, using this version of choux pastry, but completely omitting the sugar. I had some lovely hot smoked salmon covered in herbs and I made the creme fraiche sauce.

But as so often happens, things don't quite work out as I imagine them. In this case, I piped the choux buns double the size I normally would do and this resulted in that there were no large cavities inside them, even though they puffed up lovely. So I had to carve out the middles.

IMG_4581

I then put a little salmon and carefully cracked the quails' eggs into the choux buns, leaving no space for the sauce at all. But luckily, the sauce doesn't need to be cooked.

IMG_4582

So in under the grill they went for about 15 minutes until the quail eggs had cooked and the salmon had warmed up. Then each little choux bun was placed on a nest of rocket leaves. I then served the sauce on the side for everyone to drizzle.

Only one of the crowd doesn't eat salmon, so instead I placed a piece of roast pepper.

The very tricky thing was to crack the quail eggs - they are so tiny and have such thin shells, I used a small knife to carefully crack a lid off at the top, just enough for the white and yolk to get through. I think a couple of pieces of the shell went along too, but I don't think anyone noticed, even being careful resulted in the shell just shattering.

10 November 2014

Cauliflower soup

This is a recipe from our local magazine, which this month had three warming recipes for warming up after having been to see the fireworks at Bonfire Night. Normally it's cold and wet and Lundulph and I will sit with our feet in warm water drinking whisky, however this year we've had a heat wave and it was 17 °C! Absolutely no need to warm up at all.

IMG_4429

But I decided to try this recipe anyway, since I really do need to improve my soup making and we've been having canned soups for way too long. And I'm glad I did, this turned out quite nice.

Ingredients

1 large head of cauliflower (mine was 1157 g)
3 tbsp olive oil
salt & pepper
1 large onion
15 g butter
1 tbsp olive oil
1 l water
4 vegetable stock cubes
1 tbsp chanterelle stock concentrate (optional)
1 dl boiled arborio rice
1 large clove of garlic
fresh parsley and chilli sauce to garnish

Method

  1. Pre-heat the oven to 200 °C fan.
  2. Cut up the cauliflower into florets, wash and drain.
  3. Place in an oven pan, drizzle olive oil and sprinkle salt and pepper, then stir round to coat the florets.
    IMG_4426
  4. Bake the cauliflower for 30 - 40 minutes until it start going golden brown and begins to soften.
  5. Peel and dice the onion, then fry it in the butter and olive oil until it goes translucent.
  6. Peel and finely dice the garlic.
  7. Bring the water to the boil and stir in the stock cubes and the chanterelle stock concentrate.
  8. Add also the onions, rice and garlic and stir through while simmering.
  9. When the cauliflowers are ready, add them to the soup and let simmer for a further 15 minutes.
    IMG_4427
  10. Allow to stand for a few minutes, then using a blender, carefully blend the soup.
  11. Serve with fresh parsley and chilli sauce on top.

This is very little effort for a very nice flavour. After blending, the soup was quite thick, which Lundulph seemed very happy about. I would have preferred it a little runnier. So a bit more water next time. I think the original recipe stated that the garlic should be fried together with the onion and I forgot that, but I don't think adding it later made too much difference. The original recipe didn't include the rice, but I had some left over from the cabbage rolls I made the other day and I wanted to use it up.

29 January 2014

Look-a-like Tabbouleh

Continuing on my challenge from Lundulph to clear out the freezer, tonight it was time for some hot smoked salmon. However, I very pointedly didn't buy potatoes to go with it. Instead I had a vague idea of making a tabbouleh salad, which I've had on a couple of occasions in the past and rather liked it.

IMG_3785

However, I didn't prepare by looking up recipes and making a list of ingredients to buy. Instead I just bought a large bunch of coriander leaves.

Once I got started, I did briefly consult the internet, but stopped when I realised that I needed bulgur wheat for the salad - all I had was pearl barley. Still, the mixture looks like tabbouleh and ended up tasting quite nice and worked really well with the salmon.

Ingredients

350 g (boiled weight) pearl barley
60 g fresh coriander leaves
2 tbsp fresh dill
75 g roasted and peeled red pepper
1 tsp dried mint
1 tbsp lemon juice
2 tbsp olive oil
salt and pepper

Method

  1. Wash the pearl barley and simmer according to instructions on the packet, about 45 minutes.
  2. In the mean time, wash the coriander leaves and dill and cut finely, then place in a large bowl.
  3. Dice the pepper finely (I recommend using an alligator cutter) and add to the bowl.
  4. When the pearl barley is ready, drain the excess water and rinse under the water tap to cool it down somewhat, then add to the bowl.
  5. Add the mint, lemon juice, olive oil, salt and pepper and stir through until everything has mixed well.

It looks like tabbouleh and although it doesn't taste like it, it did taste rather nice. I need to get some fresh mint next time, the dried mint kind of got lost somewhere. I must also point out that the roast peppers I use are from a jar and slightly pickled, though freshly roasted ones should do fine as well I think.

26 January 2013

Uovo in Raviolo

While browsing over the New Year's holidays, I came across an article about a ground-breaking innovation - the uovo in raviolo or the egg yolk ravioli. I'm guessing this is some time ago as Google comes back with a plethora of recipes for this dish. Although I wasn't too impressed with the article itself, the concept seemed far too appealing to ignore.

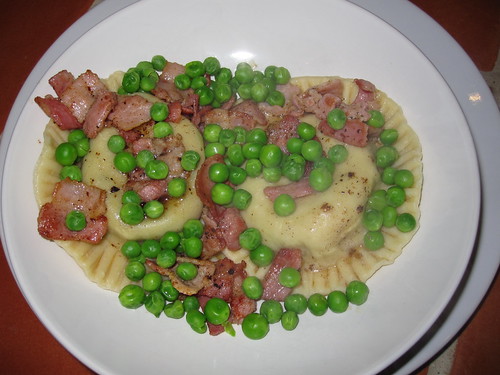
IMG_1985

Thus as it is Friday today and traditionally calls for a nicer dinner to start off the week-end, I decided to give this dish a go.

Reading back in the blog, it's been almost two years since I made ravioli and I'd forgotten that it is quite time consuming to make "free hand".

I read through a few recipes, before working out my own thing - they all called for ricotta and parmesan and that is out of the question in our household. When I mentioned to Lundulph that I would use mascarpone instead, he got a bit upset, as he associates this with tiramisu and desserts in general. I tried to explain that mascarpone is fairly neutral in flavour and can be used for both sweet and savoury dishes, but he didn't agree. Not that this stopped me, I'd already bought it.

Ingredients

Cheese filling
250 g mascarpone
20 g spinach, weight after wilting and thoroughly draining the liquid
1.5 tbsp finely cut chives
1.5 tbsp finely cut parsley
1 tsp dried dill
0.5 tsp salt
0.5 tsp ground black pepper

Pasta dough
250 g pasta flour
3 eggs
1 egg for sealing
2 tbsp water for sealing

Filling 6 egg yolks

Toppings
6 rashers of streaky bacon
3 dl peas
50 g unsalted butter

Method

  1. Starting with the cheese filling, if using fresh spinach, steam for a few minutes to wilt it, chop finely and place in a piece of cheese cloth and squeeze out as much as possible of its liquid. If using frozen spinach, thaw it and squeeze out the liquid with a cheese cloth.
  2. Stir together all the ingredients for the cheese filling, then transfer to a piping bag (but don't cut the tip), tie it up and place in the fridge.
  3. Make the pasta dough by mixing together the pasta flour and 3 eggs. If it's not coming together, crack the egg for the sealing and take a teaspoon or two from the white. Knead for a few minutes until it stops sticking and feels pliable. Cover with cling film and let rest for 15 - 20 minutes.
  4. Add 2 tbsp water to the egg for sealing and stir together.
  5. Heat up a frying pan. Cut the streaky bacon into small pieces and fry it for a few minutes. Remove onto kitchen tissue. Keep the frying pan nearby, but discard some of the bacon fat, if it's too much.
  6. Divide the dough into smaller pieces. Roll out one at a time, while keeping the others wrapped up. Try to use as little additional flour as possible and roll out as thinly as possible.
  7. Take the cheese filling out of the fridge and cut the tip to get a 1 cm diameter hole.
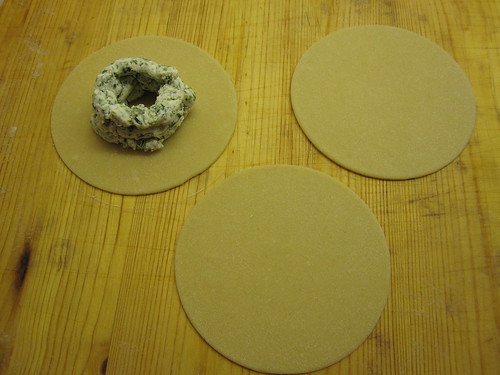
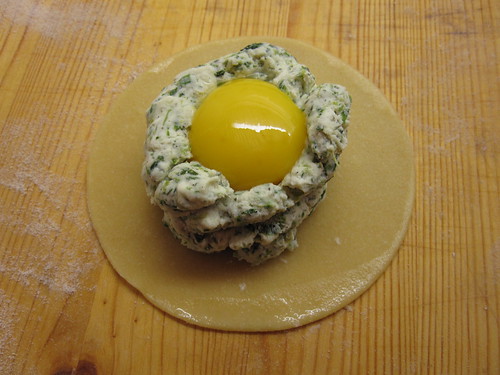
  8. Using a large cookie cutter, 9 - 10 cm diameter, cut out a round near the edge of the rolled out dough. Then pipe a circle of the filling, about 3 cm diameter. Pipe a second circle on top of the first one and a third one on top of the second one. This forms a cup for the egg yolk.
    IMG_1983
  9. Carefully separate a yolk and pour it into the "cup" of cheese filling, taking care not to break the yolk.
    IMG_1984
  10. Brush the dough outside the cheese "cup" with the egg wash, then using the remaining piece of the rolled out dough, carefully cover the yolk and cheese filling and press down to seal with the bottom layer. Then cut the top layer with the round cutter, matching the edges of the bottom layer.
  11. Repeat with the remaining five yolks.
  12. When the ravioli are ready, fill a large pot with two-thirds water, add a pinch of salt and bring to the boil.
  13. In a smaller pot, steam the peas.
  14. Heat up the frying pan again and add the butter. Let it bubble and go lightly brown, then take off the heat.
  15. Carefully drop two or three ravioli into the large pan with boiling water and cook for no more than 3 minutes.
  16. Take out the ravioli with a slotted spoon and place on the serving plates. Sprinkle some of the bacon and peas over and drizzle a little of the browned butter and serve immediately.

The steps are many and may seem complicated, but there are lots of videos on YouTube on how to make them.

There are a lot of things to do at the last minute, but it was well worth it. Once you cut into the ravioli, the yolk runs out and makes everything wonderfully creamy. The Mascarpone also melted during the cooking, I'm not sure if this would happen if using ricotta and parmesan.

I had a spot of luck with the bacon - the packet I got was very different from the others - the fat layer was missing completely from the rashers, like it had been removed before the bacon was sliced and packaged. This meant that there was no fat to throw away after the bacon had been fried and very little needed to be drained off on the kitchen towel. All the other packets in the shop looked "normal", so I guess it was not intentional, but in the future, it might be worth removing the fatty rind before cooking the bacon.

I had planned to have one raviolo for me and two for Lundulph, but he liked it so much, he had a third one. On the whole, I think this dish would be good as a starter.

I could have continued making the ravioli, I had a couple of eggs to spare, but my arms were a bit tired from re-rolling the pasta dough. I wasn't really sure how the construction of the ravioli would go and ended up with a lot of off cuts. In hindsight, I should have just cut them in strips and set them aside to dry out.

But instead I tried to get some pliability back into the off cuts by adding droplets of the egg wash. It didn't help much and a couple of my ravioli ended up a bit thicker and chewier than intended. The trick is to roll each piece of dough to a rather oblong shape, just wider than the cookie cutter and slightly longer than double the cookie cutter diameter, that should reduce the off cuts substantially. I think.

I also ended up pressing the edges with the tip of a fork, just to be on the safe side, as I made the first cheese "cup" a bit too small for the egg yolk and as I tried to get it to sink in, I punctured it and it ran out. I rescued it though. That's why it's better to do each raviolo one at a time, if something goes wrong, it's less stressful to deal with it, rather than also worry about the other ravioli in progress.

Timing-wise, I started at 4 o'clock and was ready as Lundulph wandered in through the door at quarter to seven. However, I noticed that once the ravioli are assembled, they stay that way quite happily on the side. So they could be done in advance, perhaps up to a day, and kept in the fridge.

The six ravioli used up about two thirds of the pasta dough, so I'm using this opportunity to freeze the remainder and see what happens. I also used about half of the cheese filling and I've wrapped it up air tight in a plastic bag and will need to think of a way to use it up. A further issue is also that I how have 6 egg whites to deal with, along with a lot of the egg wash. Hmmmm...

5 November 2010

Salmon Roll Starter

Wanting to keep the Saturday dinner party Autumnal, I decided to so something with Caviar of Kalix. This is a delicacy called löjrom in Swedish and is produced in the region of Kalix in the far North of Sweden.

And searching for interesting recipes, I stumbled across this one. It is a roll made of gravlax and the caviar is placed on the side. Seemed pretty nice and could also be made up to 3 days in advance, so that would be one thing less to do on the day.

IMG_1072

The recipe claims to be for 12 people, but it's nearer 15 portions, so the number of slices may need to be adjusted.

Ingredients

3 leaves gelatine
450 g thinly sliced gravad lax
3 dl créme fraîche
300 g strained Greek yoghurt
3 tbsp grated horseradish
3 tbsp chopped chives
4 tbsp chopped dill
salt and pepper
12 slices bread
60 g rocket salad
15 g chives
dill for decoration
250 g Caviar of Kalix

Method
  1. Soak the gelatine in some water.

  2. Place a long (70 cm) piece of cling film onto the work surface, then lay the slices of salmon so that they cover a rectangle of 20 x 50 cm. Make sure there's a good amount of overlap so everything holds together.

  3. In a bowl, whisk together the créme fraîche, yoghurt, horseradish, herbs, salt and pepper.

  4. Squeeze out the gelatine and melt it on low heat, then stir into the herb mixture.

  5. Spread the herb mixture over the salmon, leaving a cm uncovered along one of the 50 cm edges.

  6. Now pick up the cling film from the other side and roll it up like a Swiss roll, so you end up with a 50 cm long sausage. It'll be fairly runny, so try to roll as tightly as possible.

  7. Place in the fridge to set.

  8. When ready to serve, toast the bread and cut out circles of about the same diameter as the salmon roll.

  9. Chop together the rocket and chives

  10. Place a toast circle on each plate, then cut up the salmon sausage about 5 cm thick and place on top of the toast. Decorate around it with the rocket mixture and the caviar and add a small sprig of dill on top and serve.


I had massive trouble rolling things up and then it sort of kept going flat, so I ended up rolling baking paper around it in the hopes of giving some stability. It did, but not much.

I also ended up using 400 g of the salmon, so during rolling the filling came through here and there, so the remainder was used for patching up just before serving. The roll didn't set very hard, so could be re-shaped during plating. Or so I thought. I could just about slice the roll, but a lot of the cream mixture just kept coming out and all I could do was just about place it on my pieces of toast. Which I couldn't cut into circles, as I didn't have a cutter, so they became triangular instead.

So, once again I botched up gelatine work, I should have used a lot more. See, the original recipe states ricotta cheese, which perhaps is stiff enough so that 3 leaves of gelatine are enough, but as Lundulph won't eat cheese, I swapped it for strained Greek yoghurt and so I should have adjusted the gelatine. Perhaps I should have used mascarpone instead, which is pretty stiff and is acceptable to Lundulph as he doesn't believe it really is cheese.

When it comes to rolling, a cm should be left free of the mixture along both long sides of the salmon rectangle. One of them should then be folded over the mixture and then the whole lot should be rolled. This way, you won't end up with lots of mixture in the middle of the roll and lots of salmon on the outside and it'll look esthetically more pleasing, like a real roll.

Now I tried some of the caviar on it's own and although it didn't feel too fishy for me, it was still not something I'd eat, but combined with the salmon and the creamy mixture and the toast, this was a perfect flavour match, most likely made in heaven.

As you can see from the photo, my plating leaves a lot to be desired, I ended up with some sort of sad/angry clown face, very far from what the picture in the original recipe looked like.

One of my guests doesn't actually eat fish and so I decided to fry some halloumi cheese for her on a bed of rocket, pea shoots and colourful cherry tomatoes. When I spotted them in the shop, they made me smile.

IMG_1074

I realise just now that I completely forgot to dress her salad and it must have been terribly dry to eat, she was so very polite not to complain. I'm ashamed, there is no excuse for such forgetfulness.

8 May 2010

A New Sauce

Yes, despite sleeping in this morning, I made my way to the PYO, while Lundulph was getting his hair cut. And although the skies were about to open, there were lots of people picking. I had to go to the farthest rows, but still managed to get a full basket of the lovely things - a kilo and a half of asparagus.

Again, some thins, some middles and some fats. But unlike last week, I had done some advance planning and had purchased a number of fresh herbs and some eggs in an attempt at replicating the "sauce" I had with white asparagus when I was studying in Munich.

In Germany, they seem to prefer the white asparagus, i e the ones that aren't allowed to see daylight. They also need peeling and I'm not too keen on them. Don't taste as nice and seem to be a lot more effort.

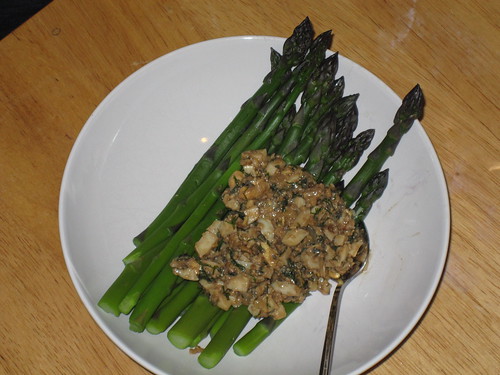
But they make a nice sauce thingy to go with them - it has a mixture of fresh herbs, hard boiled eggs, balsamic vinegar and olive oil. I think. Impossible to actually dip in, but oh so tasty.

IMG_0756

So here's my attempt at recreating this stuff.

Ingredients

2 tsp finely cut tarragon
2 tsp finely cut basil
2 tsp finely cut mint
2 tsp finely cut dill
2 tsp finely cut lemon thyme
2 tsp finely cut oregano
0.5 tsp salt
0.5 tsp pepper
3 tbsp olive oil
3 tbsp balsamic vinegar
1 dl toasted and ground pine nuts
2 hard boiled eggs

Method

  1. Cut the herbs finely with scissors, add salt, pepper, olive oil and balsamic vinegar and stir to mix.
  2. Toast the pine nuts, then grind in a mortar and pestle.
  3. Chop the eggs and stir in as well and let stand for an hour.
  4. If it looks too dry, add more vinegar and oil.
  5. Serve with the steamed asparagus.

This is the first time I've used tarragon, I'd no idea what it smelt and tasted like. A bit like anise, quite pleasant. I didn't measure the amounts precisely either. And I let it stand for 5 h, I should have refrigerated, but it was fine anyway. I didn't want it cold, as it would chill the asparagus too quickly and I like it when it's warm.

It was also not really dippable, both Lundulph and I had to use a spoon to balance a few pieces onto the asparagus and it was tricky at best. So Lundulph suggested I blitz it for the next lot of asparagus, to make it more creamy. Otherwise the flavour was really good, the tarragon dominated a bit and gave it a sweet tinge. Would probably work with other things, even on a piece of toast. We ate the lot, it was barely enough for all the asparagus I steamed (about 500 g).

As dessert, we had semla. From the 10 buns I froze back in February, along with the marzipan filling. I just bought some whipping cream. I allowed the buns to thaw at room temperature in the morning and this turned out not to be a good idea, as they were fairly dry by the evening when we had them. I'll try defrosting in the microwave just before they're needed next time. Also, I'd whipped the cream the day before to hard peaks. And it had collapsed and gone quite runny, very disappointing indeed. I've left whipped cream overnight before and it has been fine, but then I've used double cream and even extra thick double cream, both of which have higher fat content, which perhaps makes it possible to keep its fluffiness. A thing to keep in mind in the future. But other than that, the freezing had been successful. I suspect the marzipan filling won't last for all the buns though. I'll have to improvise.

Update on the blitzed sauce, 9th May 2010:
Well, I made some changes to the amounts of the herbs. Blitzing made a difference too, the asparagus could be dipped, so a definite improvement, however the balsamic vinegar made it go beige, so perhaps not appetising to look at.

Ingredients

2 tbsp finely cut tarragon
2 tbsp finely cut basil
1 tbsp finely cut mint
1 tbsp finely cut dill
2 tbsp finely cut lemon thyme
2 tbsp finely cut oregano
0.5 tsp salt
0.5 tsp pepper
4 tbsp olive oil
3 tbsp balsamic vinegar
1 dl toasted and ground pine nuts
2 hard boiled eggs

I also had to increase the olive oil and balsamic vinegar in order to get the blender to blend. The flavour was close to the first version, though I missed the texture a bit.

1 May 2010

Posh Nosh

It is the 1st May and this means our local Pick-Your-Own is open for business - asparagus.

Lundulph and I went, armed with a basket and a knife, and picked thin ones and picked thick ones and picked really fat ones too.

I've never picked asparagus before, it was quite enjoyable, especially since we were the only enthusiastic pickers at the farm and had the choice of two large fields of the stuff. The raspberries are looking pretty good too and the strawberries were full of big dark green leaves, it'll be a good year I think.

Anyway, we took a turn through the farm shop, just to be on the safe side, then went straight home. While the kettle was boiling the water, I trimmed and washed the thinnest of the spears and boiled them for 5 minutes and we gobbled them up with mayonnaise.

IMG_0752.JPG

Extremely tasty and with a wonderful texture to them.

We then spent the afternoon in front of my computer - I've installed Linux and it's sort of working.

We had the thick asparagus for dinner (6 minutes boiling time, a bit too long and it went yellow at the bottom) along with some unbelievably expensive Scottish smoked venison and salad. The venison tasted like cardboard with some really old spices on it. Yuck! Lundulph thought it was sort of OK, but I beg to differ.

IMG_0753.JPG

We now have the really fat asparagus spears left, which we'll have tomorrow. So very very tasty, I'll be going back for more and soon.

15 April 2010

Spanatchnik With Salmon

Dealing with left-overs once more, this time a piece of lovely hot smoked salmon, that just wasn't big enough for a meal for the two of us. So I decided to make spanatchnik and put the salmon in it as well.

IMG_0743

However with one significant difference to my original recipe, I swapped some of the grapeseed oil with butter and I have a nagging suspicion that made the big difference, because this time it tasted really nice. Or it could be that I grow impatient and don't bake it long enough or I don't know.

I also had different proportions on the greens, so here's the recipe.

Ingredients

250 g frozen spinach
2 large leeks
3 tbsp grapeseed oil
5 sprigs fresh thyme
1 dl chopped fresh parsley
2 tbsp dried mint
2 tbsp dried dill
2 tsp sage
salt and pepper to taste
25 g butter
200 g hot smoked salmon
75 g butter
540 g filo pastry (2 packets as it happens, there was some left over)

Method
  1. Thaw the spinach over a sieve to remove excess liquid.

  2. Trim and wash the leek, then slice it thinly.

  3. Heat up the grapeseed oil on medium heat and add the leek to get it soft.

  4. Once it's softened, add the spinach and the herbs and stir in to mix well. Then season and continue to cook until it feels a bit dry.

  5. Take off the heat, then stir in a knob of butter (about 25 g) until it's melted completely. At this point you can put a break into this dish.

  6. About an hour and a half before you want to serve the dish, pre-heat your oven to 200 degrees C, then melt the 75 g butter on very low heat, just until it's melted, it should not bubble.

  7. Crumble the salmon into the greens and stir to mix well./li>
  8. Brush some of the butter on an oven-safe dish.

  9. Unpack the filo pastry and lay it out. If the pastry seems too thin, use two layers at a time. Also if it's in an awkward shape, overlap pieces to get a decent shape to roll.

  10. Brush melted butter onto the whole filo sheet, then dab teaspoon sized pieces on two thirds of it, leaving a third to form the outermost of the roll. Then carefully roll it up and place in your baking dish.

  11. Repeat until all the filo and filling have been used up. Any left-over pastry can be used as crunchy decoration. It still needs to be brushed with butter though.

  12. Finally brush the spanatchnik with the remaining butter and bake for about 45 minutes, until the filo turns golden brown.

  13. Note that if you run out of butter early, just melt some more, it may seem like a bad thing all this butter, but it's necessary to bake the filo pastry and make it crunchy.


The salmon we had was a new type, which in addition to being hot smoked also had chilli flakes and crushed pepper on top, which made it very tasty.

The spanatchnik was accompanied by white sauce, made with whipping cream and chives, instead of double cream and spring onions. I made it in the morning and let the flavours develop in the fridge.

On the whole extremely tasty.

22 December 2009

Bird of 2009

Well, once again it's close to the end of the year, with Christmas in a couple of days and time for Lundulph and I to have our private romantic Christmas Dinner. This year's bird is

Ostrich

IMG_0377


A few weeks back, I started googling for ostrich meat. Our local butchers could only do steaks, but the internet revealed that there are more possibilities, one of them being a roast. And so I found a farm up in Lincolnshire called White House Farm. They do a variety of cuts and offer the possibility of paying via paypal which I found very appealing. On the day I placed my order, paypal had done something to their interface, which didn't accept my password and the lady at White House Farm very kindly called me and let me know that the purchase hadn't gone through. Not to mention that I had managed to generate two identical purchases. In fact, I ended up having to change the paypal password. Shame on you programmers and testers on not picking this one up!

But the next day my order went through. The ostrich was to be delivered on the 18th December. As many UK residents will know, it snowed on the 17th and I was worried that my order wouldn't be delivered, so I called them and again the very helpful lady I spoke with confirmed that my roast had gone out and should arrive on time. And it did, shortly after lunch, packed in a polystyrene box and taped to an ice pack. Very impressive. And I got a few tips on how to cook it too. It was pricey, though, £26 per kg. I bought their largest fillet roast which was 600 g and went for £15.60, but I think Christmas is only once a year and it's a festive occasion which is worth spending some extra money to make extra special. The fillet steak looked so tiny, once I put it in the fridge though.

Spices and meat

The recipe I'd chosen was the simplest possible - the fillet roast coated in a mixture of spices and I found it on recipezaar. I also made the suggested sauce, which sadly was missing the unit for the amount of water, so I made a guess it should have been a cup. To be on the safe side, I'm writing both up below.

To accompany this special piece of meat, I chose potatoes, Savoy cabbage and mushrooms.

Ready to go in the oven

Roast Ingredients
2 tsp coriander seeds
2 tsp black pepper corns
2 tsp juniper berries
1 tsp cardamom seeds
3 cloves garlic
600 g ostrich fillet roast
3 tbsp grapeseed oil

Roast Method
  1. The spice seeds need to be ground. Recipezaar recommended mortar and pestle or blender. I decided to try the mortar and pestle and 30 minutes of work resulted in rather tired hands and squashed juniper berries, but nothing further. I transferred the mixture to my blender, which after about 5 minutes on high speed reached "cracked" stage, but I thought it should be finer still, so I ended up putting the whole lot through my coffee grinder (also manual!). I recommend doing this on the day before, while watching TV.

  2. Pre-heat the oven to 200 degrees C (gas mark 5).

  3. About 2 h before roasting, pat the fillet roast dry, then rub in the spice mixture along with the pressed garlic. After rubbing, I placed it in a bag, tied securely and rubbed it several times during the 2 h of standing.

  4. When the 2 h are up, heat up the grapeseed oil and brown the ostrich roast on all sides. Be careful as this is extremely lean meat, about 30 - 45 seconds on each side on medium high is enough. Then transfer to an oven safe dish.

  5. Bake in the middle of the oven for 15 minutes, then take out and check the middle by cutting into it. If it seems too pink, give it another 5 minutes, the check again. For me it seemed still a bit too red, so I gave it another 15 minutes at gas mark 3 which corresponded to 150 degrees. It seems that ostrich meat can be eaten rare to medium rare, like beef. I went for medium rare and after it had baked, I let it rest for some 10 minutes. The roasting will vary with the size of the fillet - mine was long and fairly thin, but if it's thicker, it might need longer. Thus keep checking by cutting into it.


Resting

Cream Mushrooms Ingredients
250 g fresh chestnut mushrooms
salt to taste
1 tbsp butter
1 dl double cream

Medium rare

Cream Mushrooms Method
  1. Peel the mushrooms and cut off the edge of the stem if it looks dry, but keep intact for visual impact.

  2. After browning the ostrich meat, add a bit more grapeseed oil to it if needed, then fry the whole mushrooms for a few minutes, stirring so they pick up the flavours from the meat. Add the salt to help release the juices.

  3. Transfer to the oven safe dish with the ostrich and bake together. I recommend making sure the mushrooms are placed so that they stand on their stems, that way whatever juices they release, it'll run to the bottom of the dish, rather than stay contained in the mushroom cups.

  4. When the meat is ready and out of the oven. Heat up the butter in a frying pan on medium heat, then add the mushrooms and the cream and stir around for a few minutes so they take up the flavour. Transfer to a serving dish and keep warm until serving, if needed.


Mushrooms

Gravy Ingredients
2.5 dl red Merlot wine
0.5 dl port wine
3 tbsp cranberry sauce
1.25 dl water
2 Oxo beef cubes
2 tbsp fine balsamic vinegar
the liquid from the ostrich roast and the mushrooms.
1 tbsp butter
1 tbsp Bisto beef gravy granules


    Gravy Method
    1. Put together all ingredients except the juices from the meat/mushrooms, butter and gravy granules, into a sauce pan and bring to the boil, stirring occasionally. Reduce to about half the original size, then set aside until the meat is ready.

    2. When the ostrich and mushrooms have baked, pour the liquid into the gravy sauce pan and just before serving, bring it to the boil, then add the butter.

    3. Once the butter has melted, add the gravy granules and continue to simmer for a few more minutes until they have dissolved.


    Spicy Savoy Cabbage and Peas Ingredients

    350 g Savoy cabbage
    3 tbsp grapeseed oil
    3 tbsp finely grated fresh ginger
    1 tsp hot chilli powder
    1 tsp turmeric
    2 dl frozen peas
    2 tbsp water if needed

    Spicy Cabbage

    Spicy Savoy Cabbage and Peas Method
    1. Shred the Savoy cabbage.

    2. Heat up the grapeseed oil in a deep-ish saucepan on medium and add the cabbage, stirring vigorously to prevent it from burning.

    3. Add the ginger, chilli and turmeric and keep stirring to get it well blended.

    4. After frying for a few minutes, add the peas and fry for 3 - 4 minutes more. If it seems too dry, add water and keep stirring.

    5. Transfer to a serving dish and keep warm until serving.


    The potatoes are my usual Hasselback style, but with goose fat, instead of grapeseed oil. Using a different oil didn't result in a big difference, like when doing regular roast potatoes, oddly enough. I only buy goose fat for the Christmas roast potatoes, so didn't want to drop this tradition.

    Hasselback potatoes

    Et voilà, le tout ensemble:

    Fully laden plate

    As a starter we had Veuve Clicquot But with a wild hibiscus flower to accompany our salad made of 500 g grated carrots, 500 g grated mooli and 1 dl sesame seeds. There was quite a bit left over. This is a fairly traditional Bulgarian Winter salad, no extremes in flavour, just juicy and crunchy. We dressed it with rice vinegar and toasted sesame oil, both of which were a bit overpowering, so will probably skip them next time.

    For dessert, I went for the lovely Margarita ice cream from Nigella Lawson. We had this a couple of weeks ago at our friends' Stephen and Kerry of Dinnerdiary. I don't really like Nigella, not sure why exactly and catching glimpses of her Nigella Express show, put me off food for some time, but this recipe is really good and very easy.

    Margarita ice cream

    I made an alteration of course, I added 150 g dessicated coconut and it worked a treat! For serving I used chocolate cups and I dusted the plate with coconut flavoured cocoa powder from Whittard of Chelsea. Regular drinking chocolate cocoa powder.

    Round up:

    It was wonderful. All of it, Possibly best Christmas dinner since we started these in 2002.

    Lundulph concurs by saying "It was right tasty!".

    Of course, spending about an hour before lunch watching the birds in our back garden helped - it had snowed overnight again, but it was sunny and we counted 27 different birds! The special treat being the bullfinches and blackcaps - both males and females!

    In particular the ostrich was great - no gritty bits, just pure muscle meat and I was lucky to get it just right. The texture was great, the pepperiness of the spices combined perfectly with the sweetness of the gravy and the heat of the cabbage meant the whole meal felt hot throughout. This is a thing with Lundulph, he likes his food piping hot and sadly even pre-warming our plates doesn't make much difference, they cool down pretty quickly. The chilli powder provided the spicy heat to give the impression of temperature heat. Brilliant!

    It was hard to resist having seconds, but I managed just. After all there was dessert coming.

    I'm definitely going to cook ostrich again, it may well be the perfect meat for me. I've always been fussy when it comes to meat and generally I need to see the meat in order to decide if I'll eat it or not and grisly and crunchy bits are a big no. I can't even force them down. But the ostrich fillet roast was completely free from these.

    Merry Christmas Everyone!

    22 September 2009

    Home Made Paté

    My original post is here, but the link to the recipe seems to have disappeared, so I'm entering the recipe into the blog.

    Ingredients

    400 g chicken livers
    25 g butter
    1 large clove of garlic
    1 sprig rosemary
    1.5 dl double cream
    0.5 dl muscadet wine
    salt and pepper

    Method
    1. Fry the chicken livers in the butter together with the crushed garlic and the rosemary for 7 - 8 minutes until the livers are done.

    2. Remove the rosemary and put everything else into a blender. Add the double cream, wine, salt and pepper and blend until smooth. It'll have the texture of mousse.
    3. Pour into a jar, leave to cool, then place in the fridge overnight. It'll go solid, but will remain spreadable.

    4. It is possible to freeze as well.

    13 September 2009

    Aioli

    We (my parents, Bip and I) first made our acquaintance with aioli in Spain (and there they call it alioli). This is many, many years ago and a few years back, my Mum worked out how to make it and would always make loads and it would run out really fast.

    Well, finally I've got round to making this myself, it's a lot easier than you might think. OK, so I used technology - the blender attachment on my trusty Kitchen Assistent.

    I also had a couple of elephant garlics from a visit to this year's Chili Fiesta at West Dean. It's from the stand of The Garlic Farm and it's the first time I've seen these in real life - They are massive - think grapefruit size and each had "only" five cloves, but each was the size of a golf ball. They said the elephant garlic is milder flavoured and that it was ideal for roasting. I planted the cloves from one of the bulbs and used 2/3 of a clove to make aioli. That seemed to be about 2-3 regular cloves of garlic.

    Ingredients

    2-3 cloves of garlic
    1 medium egg
    about 400 ml grapeseed oil
    2-3 tbsp water (if needed)
    1 tbsp lemon juice
    salt to taste

    Method
    1. Peel and cut the garlic in chunks and place in a blender, along with the egg and some salt.

    2. Blend on high and slowly start pouring the grapeseed oil.

    3. If it gets too thick, add water a tbsp at a time.

    4. Depending on how strong garlic flavour you want, you can stop blending before the 400 ml oil has been added, or you can keep adding more.

    5. At the end, add the lemon juice and more salt if needed.

    I served these with the wonderful bread sticks from my Dough book by Richard Bertinet. I made two types from the dough batch recipe - one with sesame seeds and one with poppy seeds. I didn't follow the instructions of folding in three, but only folded in two. I got about 20 sticks out of that and they worked ever so well for dipping. I also made hummus and had some of the now very spicy olive oil from the pickled roasted chillies. I also put some olive oil, but that didn't quite compete with the other dips.

    Hottest tip from my Mum - do not use olive oil! It goes solid in the fridge and can cause the aioli to separate and go funny.

    And sorry no photos, things disappeared way too quickly for that.

    27 July 2009

    Fried Courgettes with Yogurt and Garlic

    Yesterday I had a bit of a cooking day. Especially since Lundulph decided to challenge himself earlier in the week and bought random ingredients to see what he could make of them and me going for PYO early on Saturday and coming home with wonderful courgettes and plums. So I had to make the most of things yesterday, now that I no longer have a house husband.

    IMG_0072

    Following on the wonderful weather we had on Saturday, I thought we could do a really Summery dish - fried courgettes with yogurt and garlic. This is a very popular dish in its own right in Bulgaria, very easy to make and perfect when it's hot and you don't have much of an appetite. And it works as a side dish or a starter.

    Ingredients
    500 ml Greek style yogurt, preferably strained
    garlic, salt and dill to taste
    1 kg courgettes
    1 dl grape seed oil

    Method
    1. Put the yogurt in a bowl, peel and press in as much garlic as you fancy and season with salt and dill to taste. Stir in well and put in the fridge to chill.

    2. Wash the courgettes and trim off the stalks and the flower end, then slice thinly lengthwise, about 0.5 cm thick.

    3. Heat up the oil in a flat non-stick frying pan. It'll look like lots of oil and that's how it should be, almost like deep frying, but not quite.

    4. Fry each slice for a few minutes on each side, just so they get a bit of colour, don't keep them in too long, though, or they'll taste a bit burnt.

    5. Serve immediately with the cold yogurt sauce. If there are any left over, mix them in with the left over yogurt sauce, they work quite nicely this way too.


    Actually Lundulph and I gobbled down the lot, there was no room or dessert even. Then we had an afternoon of happy feelings.

    27 May 2009

    Oeufs en Cocotte

    Once again Angi of Rice and Wheat has been my inspiration when she made oeufs en cocotte. I've seen this before, but never really given it much thought and it sounded very easy to make.

    Besides, a couple of weeks ago, I boiled a couple of eggs for breakfast, but sadly overdid them and we couldn't dip in the runny yolk. This method seemed a bit more easy to control.

    IMG_0003

    So I buttered the ramekins, cracked an egg in each, poured a little bit of milk, sprinkled salt, pepper, paprika, sage and thyme and put in a few small pieces of reindeer salami that I bought during a recent visit to IKEA. And into the oven for 10 minutes. Well, at that point, there was a lot of still transparent egg white, so I left them in for another 10 minutes. Now they seemed to be ready and Lundulph and I sat down with our buttered bread sliced into strips - soldiers he calls them.

    And still the eggs were way too runny. Another 8 minutes and the whites were at a good stage, but the yolks had gone a bit hard.

    So I thought I'd look up what Delia had to say about it. She'd decorated with asparagus tips, so that's a thing to try. But mainly she recommends a bain marie in the oven for these, this will give a quicker heat transfer, but hopefully also ensure that the yolk remains runny.

    Overall, it was very tasty and a definite repeat.

    11 November 2007

    Party Preparations 4


    The Friday was the last day for preparations and was entirely dedicated to the pièce de résistance, a Swedish smörgåstårta or sandwich cake. This is the standard Swedish party food and is very good when a large number of people are invited. It's fairly easy to make and looks very impressive. Everyone has their own recipe, the following one is one that my Mum has developed over the years and I don't think I've changed it that much. Also it represents what I most like about my Mum's recipes - you can stop at some point and it's ready, or you can continue to add things to it to turn it into a different dish. In fact it epitomises this concept.

    I made two - one larger one for the meat eaters and one smaller one for the vegetarians. I also ended up with some of the creamy stuff to spare, it would have been enough for two large cakes.

    Ingredients

    Creamy stuff

    500 g canned sliced carrots
    500 g canned garden peas
    1.5 l strained Greek yoghurt
    1 l crème fraîche
    0.5 l extra thick double cream
    400 g mayonnaise
    salt and finely ground pepper
    50 g fresh chives or finely chopped leek
    25 g fresh dill

    Cake base

    4 x 800 g sliced white bread loaves

    Decoration (suggestions)

    smoked salmon
    ready to eat king prawns
    thinly sliced salami
    thinly sliced ham
    lettuce leaves
    thinly sliced cheese
    olives
    Swedish meatballs
    hard boiled eggs
    cucumber
    peppers of various bright colours
    lemon
    fresh dill

    Method
    1. Open the carrots and peas and leave to drain well.
    2. Whip the cream, ignoring that it says it's not for whipping on the packet, it works just fine, but be careful not to over-do it, very easily done.
    3. Combine the yogurt, crème fraîche, the whipped cream and the mayonnaise. Add salt and pepper to taste.
    4. Set aside one third of this mixture and put in the fridge.
    5. Cut the chives and dill with scissors into the creamy mixture.
    6. Chop the carrots to pieces of approximately the same size as the peas.
    7. Add carrots and peas into the creamy mixture and stir in well and leave for an hour to allow the flavours to blend.
    8. In the mean time, if you don't have a cake board, cover a large chopping board with aluminium foil and sello tape it on the back. Make sure to have the matt side up.
    9. Now, take two slices of bread at a time and with a sharp knife, cut off the crusts, as close as possible.
    10. Lay out one layer of bread on the cake board, so there are about 3 cm on either side to spare. The slices should be close together, any gaps should be filled with suitably cut pieces of bread.
    11. Take some of the carrot and pea cream and spread on top as evenly as possible, making sure to cover up to the edges.
    12. Lay a second layer of bread on top, making sure that the edges do not coincide with the ones of the bottom row or the cake may split.


    13. Cover with another layer of the carrot and pea cream. Repeat with another layer of bread and cream and finish with a fourth layer of bread.
    14. Now take out the smooth cream from the fridge and cover the top layer of bread fairly generously and also cover the sides, to hide the layers of bread. Make sure to have a little left over from the smooth cream. Wipe off any spillage along the edges, this is where the matt side of the aluminium foil is handy, as it won't be as obvious as if wiping the shiny side.

    15. At this point it should be put in the fridge for a few hours, preferably over night.
    16. The next day, take out the cake and inspect it, to make sure that parts of the cream haven't been absorbed to the extent that the bread is visible. If this is the case, use the left over to touch it up. Also this is the state it should be transported in, if necessary, again the extra smooth cream can be used for repairs at the destination.
    17. Decorate as close to the beginning of the party as possible, particularly if there is no fridge to store the cake in. And here it's entirely your imagination that sets the limits. Here is what I did yesterday afternoon for the party, but every time it's different.


    You may possibly recognise the creamy stuff from before, it's pretty much the recipe for white sauce, but with some yoghurt added as well, to make it a bit lighter. In fact, all of the ingredients can be "light" or "diet" varieties, apart from the yoghurt, which must be full fat and strained, or it'll be too runny and the bread will go soggy.

    As for the peas and carrots, in Sweden you can get them ready mixed in cans, with the carrots suitably diced, but I couldn't find any, so had do get them separate. Again, draining is vital. But you can use other things instead, like canned diced mushrooms or diced cooked ham. In addition to adding interest in flavour and texture, they serve the purpose of preventing the cake sinking in at places, should the bread soak up the cream at different rates.

    Also what struck me the other night is that if you add mushrooms and ham and boiled potatoes (all diced) to the creamy mixture, you'll pretty much end up with a Russian salad, as it is done in Bulgaria.

    I was lucky in that the cakes hadn't sunk in anywhere and didn't need much repairing after the transport, so the leftover smooth cream went in a bowl to be used as a dip.

    Party Preparations 1

    It may appear as we haven't eaten this month, but in fact, I've been so busy cooking this past week, that I haven't had time to update the blog. That and the possibility that Lundulph's Mum might have a peek and spoil some of the surprise. Lundulph's parents celebrated their 40th wedding anniversary this week-end and so a party was called for, a party with lots of food. I made a very precise schedule, which I managed to follow just as precisely.

    On the Tuesday, I made hummus and chicken liver paté, having never made either before. But I'd planned on trying the hummus ages ago and had a jar of tahini in the larder in preparation. The recipe is one that I'd written down on a small piece of paper, so have no idea where I got it from. As an aside, I have done this for many years and have a large collection of post-it notes and shopping receipts with recipes scribbled down on the back.

    Ingredients

    2 x 400 g cans chick peas
    2 large cloves of garlic
    3 tbsp tahini (sesame paste)
    2 tbsp olive oil
    2 tbsp lemon juice
    salt and pepper to taste

    Method

    1. Put the chick peas and 120 ml of their liquid in a blender along with the rest of the ingredients and blend until smooth.

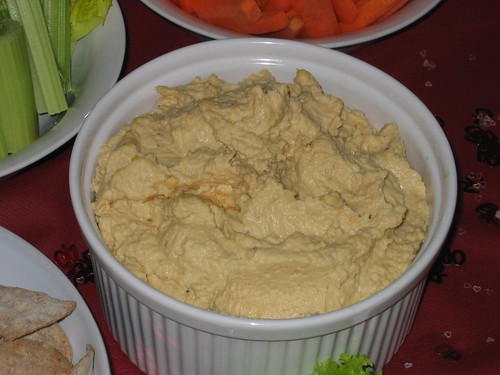
    IMG_3076_small

    That's all there's to it. On the whole, I think I used a bit too much tahini and not enough olive oil, it felt a bit dry. Also it's a good idea to leave the hummus over night, to allow the flavours to develop. Very nice to dip, that's for sure.

    The second thing I made that evening was chicken liver paté, mainly inspired by Fred & Ginger who had made some for us the other week. I had a recipe from Waitrose from ages ago, which seemed simple enough.

    Ingredients
    25 g butter
    400 g chicken livers
    1 medium clove of garlic
    1 large fresh sprig of rosemary
    150 ml double cream
    50 ml sweet white wine (optional)
    salt and pepper to taste

    Method
    1. Trim the livers and cut into smaller chunks. Peel the garlic and wash the sprig of rosemary.
    2. Heat the butter in a large frying pan and fry the livers for 5 - 8 minutes, press in the garlic and add the whole sprig of rosemary and stir around occasionally to get the livers evenly cooked.
    3. Turn off the heat and leave to rest for 5 more minutes, then remove the sprig of rosemary.
    4. Scrape the contents of the pan into a food processor and start blending. Pour in the double cream and the white wine.
    5. When the paté is completely smooth, season with salt and pepper.
    6. Transfer into the serving dish, cover with cling film and make sure it touches the surface of the paté, so that it doesn't discolour, and leave to set for at least 1 h.

    The recipe recommends Muscat de Beaumes-de-Venice and unfortunately that's the only thing I forgot to get, so I used a Syrah Rosé instead. Very intrigueing this paté thing, when it was ready in the blender, it had the consistency of chocolate mousse, but tasted of liver. I transferred it to a box and put it in the fridge, hoping that it would go a bit solid at least. It did and it was really good and had the nice smooth texture that you'd expect too and tasted lovely. It went particularly well together with the knäckebröd I made last month.

    IMG_3074_small