30 April 2015

The Creamiest Ice Cream Ever

Yes indeed, I once again fell under the hypnotic power of YouTube and came across this video. As I watched it the first time, I thought what a load of nonsense, ice cream without an ice cream machine. Ridiculous!

IMG_4637

And yet, something compelled me to watch it again and then go and get the two ingredients required - cream and condensed milk. And last night in a burst of energy I went ahead and made it. I didn't follow the amounts listed in the recipe and the condensed milk is the weird 397 g because that's what it said on the can, I've no idea why the manufacturer thought this is a good idea.

Ingredients
Makes about 1 litre

450 ml cold double cream
397 g chilled sweetened condensed milk

Method

  1. Whisk the cream to stiff peaks stage
  2. Pour in the condensed milk while still whisking
  3. When the mixture looks homogenous, transfer to a lidded tub and freeze overnight.
IMG_4635

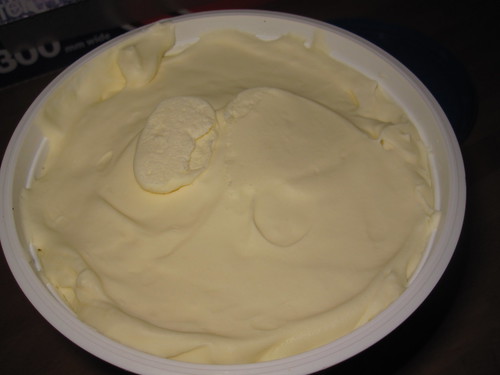
That's all and because of all the fat in the cream and the sugar in the condensed milk, this mixture doesn't freeze rock solid, but can be scooped, especially if you take it out for a few minutes from the freezer first. It also doesn't form any perceivable crystals, the texture looks and feels like regular ice cream, though a bit on the luxurious and dense/heavy side. There really is no need for stirring every hour.

But one small scoop is enough and Lundulph commented that it tastes like really fancy clotted/dairy cream ice cream. And so I've given him the task to come up with interesting flavourings, because the above is the basic recipe, from here on, one can create a lot more advanced stuff.

One thing I'll try next time is to use whipping cream, which has a lower fat content and I suspect will whip better with more air in. I'd also like to add loads of toasted chopped hazelnuts, I think they would work really well. Given how sweet the basic mixture is, I think that any additional flavourings should not be sweet as well. For example, I have a jar full of Daim sprinkles, which are really nice on an ice cream, but they are caramel droplets covered in sweet milk chocolate, so adding them to this ice cream would be a massive overkill. I think puffed rice coated in dark semisweet chocolate might give a similar crunch.

But not just this, as is often the case with YouTube, when a video ends, you get a load of recommendation of other similar things and I'll be spending a few more hours still while going through all of them.

Update 2020-05-13:
Now that we're in lockdown and we've had a heat wave during April, I decided to make this ice cream once again, so that we have something nice to round off our meals. So far I've made 3 batches:

Batch 1: Add 2 dl of rhubarb purée to the basic recipe, but use whipping cream instead of double cream. It tastes lovely. I poured it into ice lolly moulds, sadly the ones I have are of very poor quality and I wasn't able to get the lollies out. The reason is that the lids have built-in sticks, but these are too short to provide the necessary hold to the ice cream in order to get it out. I'll need to try and get hold of some wooden ones, because the moulds are the perfect size for "afters" (Lundulph's term). I suspect this will result in more than 1 litre of ice cream, I haven't measured my ice lolly moulds.

Batch 2: Place a double layer of clean cheese cloth in a bowl and infuse 300 ml of whipping cream with 50 g of Earl Grey tea overnight in the fridge. The next day, gently heat up the infusion and squeeze out as much as possible of the cream. I managed to get some around 225 ml, which I topped up with more whipping cream, then followed the recipe above. Quite tasty, but also intensive, so should be combined with a chocolate and/or hazelnut ice cream.

Batch 3:Add 1 dl of blueberry jam and 1 dl of frozen blueberries to the basic recipe, again using whipping cream. Stir through a little, but not fully, to create a ripple effect. This resulted in more than a litre of ice cream and I wasn't able to put the lid on the tub, so had to cover it with cling film. I did use my Kitchen Assistent to whip the cream and I added the condensed milk from the beginning, which worked absolutely fine. I'm also thinking that I should perhaps go back to double cream, as these three batches have frozen a bit more solid than I remember.

I also had some info from my dear friend Dr Cutie, who made this recipe with a goosberry compote of hers. The result was that it was also very tasty with the gooseberry sourness and the crunch from the seeds combining very nicely with the sweetness of the condensed milk. She also said they'd eaten the whole lot over the week-end. Sadly, we're now down to only one gooseberry bush and I've only seen a couple of fruits on it this year. I'll need to try and nurse it back to health and size, but it is very old, so might not be possible.

Update 2020-06-03:
Batch 4: 2 dl "white hot chocolate". This is a curiosity I bought from Whittard on a trip to London with my sister a couple of years back. I'm guessing it's powdered cocoa butter and sugar and I was looking to use it up. It had all lumped together, so I had to scrape it out of the jar and sift it a couple of times. I wasn't too impressed by this, but it seems Lundulph quite liked it.

Batch 5: 2 dl mashed fresh raspberries and 2 tbsp liquorice powder resulted in a heavenly combination, though the liquorice was very subtle, so possibly up the amount to 3 tbsp. I've also gone back to double cream, but the amount of fresh raspberries made the ice cream go a bit more solid than the bare bones recipe. Lundulph didn't like this one though.

Batch 6: 100 g toasted coconut flakes. This seems to be quite a lot, but I think this is the nicest one yet. Though Lundulph thought the flakes were too large and gave the whole thing a too chewy texture, so I'll try the finely grated coconut that my local supermarket has started selling recently. It's definitely worth toasting it before using.

27 April 2015

Potato Roses

The other day, as I was clicking around for interesting ideas for plating, I came across this website and I just had to try them out, it looked so easy to do.

Basically, select a number of oblong and round waxy potatoes and slice them thinly across. Boil for 3 - 4 minutes to make them pliable. Then pour out the boiling liquid, rinse in cold water and drain well. Season with salt.

Whisk together one large egg with a pinch of salt for every 6 roses, then line up muffin cases or brioche tins and measure up 2 tsp of the mixture and pour into each.

Starting with the larger potato slices, arrange along the edge of the cases so that they overlap slightly. Continue with smaller and smaller potato slices in circles into the centre.

Distribute the remaining egg over the potato roses, then bake in a pre-heated oven at 200 °C for 10 minutes until they start turning brown, then reduce the heat and bake for a further 20 minutes until they are completely cooked.

I prepared these on the morning of our dinner party and then let them stand on the side until it was time to bake them, they were absolutely fine.

And an idea that Lundulph came up with is to use other root vegetables to make roses of different colours or even mix them up. Must try that next time.

Vegetable and Smoked Salmon Terrine

Yesterday our lovely neighbours came over for dinner and I thought I'd try my hand at a terrine. After finding a recipe that seemed simple enough, I started looking for a terrine mould. This turned out to be easier said than done and after looking for something suitable at a couple of local cookery shops and finding some disappointing reviews online, it occurred to me that I invested in food rings last year and I've not really used them much since. So I decided to use these instead. Of course with food rings, there is no bottom, so cooking the terrine in a bain marie was not an option, though I did try this out by placing the empty food rings in a flat deep baking tray and pouring water outside them - it just seeped through them, so much for flatness.

Now the recipe implied that the mixtures would be fairly runny, which meant that they would seep out as soon as I'd poured them into the rings too. Hmmmm...

So I thought, why not put some smoked salmon at the bottom and press it in to act as a sealant? And so I did.

Ingredients

115 g cauliflower florets
115 g carrots
115 g frozen peas
180 ml double cream
3 large eggs
salt, pepper,nutmeg,dill
butter for greasing
hot smoked salmon

Method

  1. Peel, wash and slice the carrots. Wash the cauliflower and divide up to be roughly the same size as the carrots.
  2. Steam the vegetables until done, but make sure to keep them separate.
  3. When done, rinse under cold water to stop the boiling and prevent them from going too pale.
  4. In a deep bowl, place 60 ml of the cream and one egg, then add salt, pepper, nutmeg and the cauliflower. Blend until smooth, then set aside.
  5. Rinse the blender well, then repeat with another 60 ml of cream, egg, salt, pepper and the carrots. Blend until smooth and set aside.
  6. Rinse the blender again, then use the final 60 ml of cream, the last egg, salt, pepper and some dill along with the peas and blend until smooth.
  7. Taste the mixtures and adjust the seasoning if needed.
  8. Butter 4 food rings (7 cm diameter, not aluminium!) well on the inside and place on a baking tray lined with baking paper. Pre-heat the oven to 125 °C.
  9. Using two forks, "shred" some salmon and press into the bottom of each food ring, to make sure the edges are well covered and the salmon is about 1 cm thick.
  10. Carefully spoon the pea or cauliflower purée over the salmon.
  11. Now spoon the second purée and then the last one, then carefully place in the oven and bake for 1 h 15 minutes.
  12. Keep an eye on them, if they puff up too much, turn down the heat. Check for readiness with a toothpick.
  13. Remove from the oven and allow to cool, then move them to a plate, cover the whole thing with cling film and chill until ready to serve.
  14. The food rings should be taken off just before serving, to make sure the terrines keep their shape.

I followed the original recipe with the baking temperature and the terrines puffed up quite a lot, I had to turn down the oven heat twice and possibly they overcooked a bit. Once they cooled down, they split away from the side of the food rings. Unfortunately I forgot to butter the rings before using them.

When it was time to serve, I thought a whole terrine would be too much as a starter, so I ran a knife around each, carefully removed the metal ring, then cut out a slice from the middle of each, about 1.5 cm thick. Sadly the colours had gone quite pale too and I'm tempted to add some food colouring next time or alternatively add fresh basil or parsley to the pea purée to make it greener and some roasted red pepper to the carrot purée to make it more orange.

Curiously the pea purée turned out the thickest, which is why I used it next to the salmon, just to be on the safe side, in case I hadn't managed to cover the bottom edge and the whole thing would just drizzle out before it had set.

But on the whole the terrines tasted very nice. The salmon I had was covered with herbs, and was fairly salty, so I was careful with the seasoning and was a bit worried that it would just taste bland, but it was actually quite nice, both taste and texture. I did make the mistake of piping it into the food rings, so the two thinner purées did mix a little. But on the whole, I'm very pleased with the result and I think so were the guests.

20 April 2015

Coconut Cupcakes

It was my original intention to bake some cupcakes for Easter, but there were so many other things, I dropped this idea. But now that Easter is over and we've started running out of chocolate eggs, I thought I'd extend the sugar period for a bit.

IMG_4594

So I had a quick shufty through all my recipe cards and found one that was quite near enough, however I didn't read it through before going shopping, so didn't have all the right ingredients and ended up improvising. However this turned out a good thing, because I think these are the nicest ones I've made by far - moist and soft, but not too crumbly and not too sweet.

Ingredients

Makes 13

Muffins
125 g unsalted butter at room temperature
225 g golden caster sugar
finely grated zest from 1 small lemon
4 large eggs
225 g plain flour
3 tsp baking powder
100 ml semi-skimmed milk

Icing
100 g unsalted butter at room temperature
150 g icing sugar
30 g desiccated coconut
2 tbsp kefir Filling and decoration
Lindt chocolate pralines with coconut filling
desiccated coconut for dipping

Method

  1. Pre-heat the oven to 170 °C fan and line a muffin tin with paper cases.
  2. Place the butter, caster sugar, lemon zest and eggs in a bowl.
  3. Sift together the flour and baking powder together, making sure to mix well, then add to the bowl with ingredients.
  4. Add the milk, then whisk together everything until light and fluffy and homogeneous.
  5. Pour the batter into the muffin cases, filling them to about two-thirds.
  6. Bake until golden brown and set, about 25 minutes, check them with a tooth pick - it should come out clean.
  7. Remove from the oven and place on a wire rack to cool down completely
  8. Make the icing by first stirring together the butter and icing sugar.
  9. Once the icing sugar has been incorporated, add the coconut and the kefir and whisk until soft and fluffy.
  10. When the muffins have cooled down, carefully cut out a hole in the middle, but keep the "lid".
  11. Place one praline in the middle of the muffin, trim the "lid" and put a little of the icing on it, then replace on the muffin.
  12. Spread icing on the muffins, then dip in the desiccated coconut.

Now the recipe called for medium sized eggs and I used large ones, so that might have increased the overall amount of batter, but I stubbornly divided it up into 12 muffin cases, which almost filled to capacity, with the usual result that there was a significant overflow during baking. I had to do some extensive trimming before I could start the decorations.

IMG_4589 IMG_4590
IMG_4591 IMG_4592
IMG_4593 IMG_4594

So I recommend the traditional approach with filling the cases about two-thirds before baking. I had some icing left over, just enough for a 13th cupcake.

Lundulph's thoughts are that the cupcakes were really nice and the praline in the middle was just soft enough to bite through, if it had been harder, it would have been weird. But the butter cream was a bit heavy for him and I think it'll need some further adjusting or perhaps just using mascarpone instead of butter.

12 April 2015

Egg Painting 2015

A couple of years back, my Mum came across a method of painting eggs using silk ties and so we decided to try it out this year.

I asked my lovely nieces to bring along some colourful printed silk ties from charity shops. The uglier the better really. I'd also found a few and so we set about to rip them up. This needs to be done fairly gently and the idea is to open them up and remove the stiff fabric inside and just have the thin silk left.

Once this is done, we cut off pieces large enough to cover one egg, we wet the silk under the tap, then covered one egg, making sure to have the front side of the fabric towards the egg shell and also making sure it stuck to the surface with no gaps.

The next thing was to wrap in a piece of cheese cloth and tie tightly using wire ties I have left over from various food bags I've bought in the past.

Once all eggs were covered like that, we placed them in a a casserole dish, poured hot water onto them to cover completely. I added a bout 1 dl of white wine vinegar put the lid on and put the casserole dish to boil. I also fired up the extractor fan and also opened the windows and closed the kitchen door.

20 minutes later, I took the casserole dish off the hob and put under the cold water tap to speed up the cooling.

Once the eggs were cool enough, Lou, Falbala and Lou's boyfriend came over to unwrap the eggs and inspect the results. I tried one chicken egg and one duck egg and curiously enough, the duck egg didn't take to the silk paints as well.

IMG_4572

It could be because I might have wrapped the duck egg with the inside side of the silk, but I don't think so. I had a couple of other ties, which had a woven effect and they didn't transfer well at all. So it must be a flat printed pattern and 100% silk and I suspect a silk scarf would work just as well. The cheese cloth can be swapped for pieces of old pillow cases, but should be white and the purpose I think is to prevent the silk colours from mixing up. Just make sure the kitchen is well ventilated while boiling because it smells really bad. But this was good fun and very easy and there are plenty of ties left over for next year. I'll just have to make sure to take a photo before they all disappear off.

Easter Dessert

To finish off our lovely meal at Easter Sunday, I'd picked out one from my recipe card collection (which is still growing a lot faster than I can try things out). IMG_4573

I had to make some adjustments of course - I opted for vege-gel, rather than gelatin and I had to make two alcohol free ones. The recipe card was for 4 portions, I re-calculated for 11, and ended up with spare jelly, which Lundulph and I gobbled up a few days later.

Ingredients

Alcoholic version for 9
900 ml sweet rose wine
225 g golden caster sugar
2 sachets vege-gel 2 pinches of dried lavender
450 g raspberries

Non-alcoholic version for 2
200 ml pink soft drink
40 g golden caster sugar
small pinch dried lavender
100 g raspberries
half a sachet vege-gel

To serve
whipping cream
icing sugar, 1 tbsp/dl cream

Method

  1. Place the rose wine and the sugar in a saucepan and heat up gently to dissolve the sugar, but not to boil.
  2. Distribute the raspberries into serving glasses, 50 g per person.
  3. Turn the heat up a little and stir the vege-gel powder into the wine/sugar mixture and just bring to the boil, then remove from the hob and quickly distribute over the raspberries to just about cover them, but use a strainer to catch the bits of dried lavender.
  4. Allow to cool completely, then cover and chill.
  5. Whip the cream with the icing sugar, then pipe it over the jellies and serve.

The non-alcoholic version is exactly the same, I've just reduced the amount of sugar as the soft drink tends to be fairly sweet to begin with. Also to keep in mind, Vege-gel sets very quickly after it's been heated up, so everything must be ready as you'll have to work fast.

The whipping cream was my Mum's suggestion, I just whipped it and put on the table for people to add as much as they wanted, rather than fiddle with piping. The rose jelly on its own had quite an odd after taste and I think this is a combination of not using a sweet rose and the lavender. But with the raspberries it was quite different and with the whipped cream, even better.

For The Vegetarians...

Of course there are vegetarians in the family, so I was looking at alternatives to the beef in the Beef Wellington. Unfortunately I didn't find anything that appealed, so decided to try out one of the very impressive pies from the Danish Bake Off from 2013(in Danish), a carrot and courgette pie.

IMG_4585

As I have vast amounts of left-over doughs of all kinds in the freezer, and the recipe called for a dairy product that seemed to be an Icelandic staple (and I couldn't quite find a good translation for what it was), I opted to defrost some of the shortcrust pastry and use that instead. What I was very pleased with was that I got to use my mandolin a lot and I managed to slice everything without any injuries!

Ingredients

shortcrust pastry for a 30 cm pie dish
1 egg 6 - 7 carrots
3 - 4 dark green courgettes
5 eggs
5 tbsp milk
salt, pepper and thyme

Method

  1. Pre-heat the oven to 200 °C. Separate the egg white and yolk.
  2. Roll out the pastry to about 3 mm thickness, then transfer to a pie dish, making sure that it's well fitted into it and goes a little over the edges.
  3. Cover the edges with strips of aluminium foil, prick the bottom surface to prevent it from bubbling up, then bake until it goes golden brown and begins to look dry.
  4. Take out of the oven, remove the edge protection strips and brush the whole inside with egg white, making sure nothing is missed out. Then return to the oven for a couple of more minutes before taking out and allowing to cool completely. This will protect the crust from going soggy from the vegetables.
  5. Peel and wash the carrots. Then trim the edges off the courgettes and scrub and wash clean, but do not peel.
  6. Using the thin slice setting on a mandolin and being very careful, slice carrots and courgettes along their length. Start with the courgettes, to get the hang of it as they are softer and easier to cut.
  7. Starting from the outer edge, line alternating courgettes and carrots, with the slices standing up on their edge.
    IMG_4578
    IMG_4579
  8. Continue until the whole pie shell has been filled, making sure to fit in as much as possible.
    IMG_4580
  9. Lightly whisk together the eggs, milk, salt, pepper and thyme. If you feel the liquid is too little, add more milk and adjust the seasoning, then drizzle over the pie to make sure it gets everywhere between the carrots and courgettes.
  10. Bake for 45 minutes and serve.

Next time I'll make more of the liquid, though it was quite nice as it was. I also think aubergines could add some extra colour or perhaps using light green and yellow skinned courgettes.

As for the amounts of carrots and courgettes, I wasn't really sure how much I'd need, so I sliced quite a few more than was necessary. A couple of days later, I cut them in chunks and made ratatouille, as I had some peppers that needed using up as well.

I also recommend showing the pie to the guests before cutting it, for the full effect, though even the cut pieces do look rather nice.

IMG_4586

My niece Lou actually asked to have some of this pie instead of the Beef Wellington and I'm quite pleased that she liked it. For the pie, I made the lovely cold white sauce and I also served with Dauphinoise potatoes. What I liked about it was that the vegetables had retained some of their crunch, though they were cooked. The original recipe also had bacon in it, but obviously I skipped it here.

Mini Oeufs en Cocotte Starters

To start off the festive Easter meal, I decided on oeufs en cocotte after finding these nice looking and inspiring recipes, here and here.

However, rather than make brioches, I decided on petits choux and with salmon and quails' eggs. And this was quite straight forward, using this version of choux pastry, but completely omitting the sugar. I had some lovely hot smoked salmon covered in herbs and I made the creme fraiche sauce.

But as so often happens, things don't quite work out as I imagine them. In this case, I piped the choux buns double the size I normally would do and this resulted in that there were no large cavities inside them, even though they puffed up lovely. So I had to carve out the middles.

IMG_4581

I then put a little salmon and carefully cracked the quails' eggs into the choux buns, leaving no space for the sauce at all. But luckily, the sauce doesn't need to be cooked.

IMG_4582

So in under the grill they went for about 15 minutes until the quail eggs had cooked and the salmon had warmed up. Then each little choux bun was placed on a nest of rocket leaves. I then served the sauce on the side for everyone to drizzle.

Only one of the crowd doesn't eat salmon, so instead I placed a piece of roast pepper.

The very tricky thing was to crack the quail eggs - they are so tiny and have such thin shells, I used a small knife to carefully crack a lid off at the top, just enough for the white and yolk to get through. I think a couple of pieces of the shell went along too, but I don't think anyone noticed, even being careful resulted in the shell just shattering.

Family gathering for Easter

Now that we have a fancy dining room with a table that can stretch to fit in the whole family, Lundulph and I invited the whole crowd over for Easter.

IMG_4577

My original plan was to make a nice big gyuvetch, however a quick look in the blog showed that I did this last year already, so I had to change my plans.

Instead, I decided on Beef Wellington. I've done this before, but with pork. And I thought I'd do some searching on the internet for more advice, since my previous attempt wasn't that good. Unfortunately I once more opted not to bother with the thin crepes required to wrap the meat in before wrapping with puff pastry, which meant I couldn't prepare everything in advance. I regret skimping on this. But I did skip the creme fraiche in the mushroom/onion mixture and tried to get it as dry as possible. This mixture is referred to as duxelle by the way. This one was made with two onions, some 900 g button mushrooms and about 2 dl parboiled yellowfoot mushrooms from my frozen stock. All finely chopped and fried together with salt, pepper and thyme, until most of the liquid had boiled off and I also squeezed out as much of the remaining liquid as I could and saving the liquid for later.

The meat itself was a large piece of beef tenderloin, which came to over 2 kg and seemed to cost a fortune, however when divided up between the crowd, it's not bad at all and well worth the expense. Lundulph declared that in future this is the only type of meat he'd like to eat. Because the piece of meat was quite large and thick, I cut it in two, so that it would fit in the oven, then browned each with a little butter and then pre-roasted both pieces at 220 ° for 15 minutes. I then let the pieces cool completely, covered in cling film and then put in plastic bag and put in the fridge. I also saved the liquid that had been released for the Madeira sauce.

Because I saved the duxelle and roasting liquids, I was able to make the Madeira sauce in advance, it's slightly different to the one I've done before:

Madeira sauce ingredients

30 g butter
2 onions, peeled and diced
1 litre Madeira wine
liquid from the mushroom duxelle and roasting juices - about 3.5 dl
1 dl water at room temperature
3 tbsp corn flour
6 tbsp whey butter
salt, pepper and thyme

Method

  1. Heat up the butter in a frying pan and fry the onions until they go soft and translucent.
  2. Pour in the Madeira wine and simmer until it's reduced by almost half.
  3. Add the liquid from the mushrooms and roasting juices and simmer for a few more minutes
  4. Dissolve the corn flour in the water, then stir into the sauce to thicken it.
  5. Add the whey butter, salt, pepper and thyme and stir through to make sure everything is well combined.
  6. Serve if ready, or let cool down and keep in the fridge until needed, then re-heat.

Wrapping the beef Wellington was once more quite tricky. I used two packets of puff pastry, but I hadn't thought through how to wrap, so ended up with a lot of folds and it didn't look very pretty. I cut of where I could, while making sure the meat and duxelle were well sealed in. I used a whisked egg to seal and also to brush on top for colour. I then chilled for an hour before baking.

For the final bake, I placed the two Beef Wellingtons on a roasting rack, quite thoughtlessly with a vague idea to prevent soggy bottoms. Of course the pieces sank through the grid, what a silly thing to do! And I also followed the recommendation of only baking for 20 minutes at 200 °C, which was not enough and I had to let things bake for a further 30 minutes until the puff pastry looked like it should. I was worried that this would mean the meat wouldn't be pink in the middle, however this wasn't the case - it turned out rather nice. And my poor guests had to sit with a massive long wait between starter and main course.

IMG_4587

But it was not possible to move the Beef Wellingtons off the roasting grid and it was really hard to cut them up.

To go with the meat, I made dauphinoise potatoes, which went down a treat. This time I didn't fill the tray to the brim and so it didn't spill over. I did bake them on the day before and re-heated before serving.

There was plenty to go round and quite a bit for me and Lundulph to eat in the week after, I think Lundulph's had enough of fancy fillet for a while now.