20 June 2020

Summery Swiss Roll

IMG_5991

Since the lockdown, my good friend Dr Cutie and I have started having Zoom-fika ever now and then and have been asking ourselves why we've not thought of doing this before now, it's really good to chat about this and that and discuss our latest bakes and ideas. Last time we spoke, I mentioned we always get massive jars with jam from my Mum and it takes us forever to get through, so she suggested using them on Swiss rolls. She says that's a staple for when you get unexpected guests, as it takes very short time to complete. So I decided to make a Swiss roll, it's been ages since the last one.

Following the double batch of strawberry custard I made, I decided to use it as filling instead of jam. When I asked Lundulph if he'd fancy this, his eyes sparkled and his smile went from one ear lobe to the other. And since I've not used my Cordon Bleu book for a while, I decided to use its sponge recipe. This also reminded me why I so rarely use this book, it focuses on cooking techniques, but is relatively vague with the recipes.

Ingredients

4 large eggs
1.5 dl icing sugar
1.25 dl plain flour
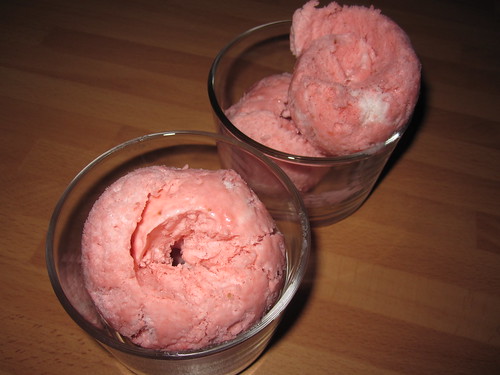
2 dl strawberry custard

Method

  1. Butter and line two shallow rectangular baking trays with baking paper. Each should measure 23 x 33 cm and be about 1.5 cm deep. It is easier to get the sponge out if the paper comes up around the edges.
  2. Place the eggs and icing sugar in a large glass bowl and place this bowl over a saucepan with simmering water. The glass bowl bottom should not touch the water.
  3. Whisk until the mixture goes thick and you can drizzle the figure "8" when you lift the whisk.
  4. Remove from the heat and keep whisking until the mixture cools down.
  5. Sift in the flour and carefully fold in.
  6. Divide the mixture between the two baking trays and carefully level each with a dough scraper.
  7. Bake for 4 - 5 minutes until golden brown. Then, take out of the oven, cover with a second piece of baking paper and a cooling rack, then flip out of the baking tray.
  8. Allow to cool, then prize off the baking paper from the tray. While keeping the sponge on the second baking paper, place it on a towel.
  9. Spread the strawberry custard evenly across the sponge, except 2 cm along one of the longer edges - this will be the outer edge of the roll.
  10. Now use the towel to carefully roll up as tightly as possible while making sure you don't get the baking paper included inside the roll. Place so that the outer edge ends up under the roll.
  11. Wrap with the baking paper and refrigerate to get it to keep its shape, then it's ready to decorate further or serve as it is. You may want to trim the edges, there will likely be custard oozing out from the rolling.

The recipe in the book actually stated that the above amount should be for one baking tray, but it was definitely twice more than it should have been. Unfortunately I'd only prepared one baking tray, so one it had to be and I ended up baking it for some 15 minutes due to its thickness. It also was very difficult to roll. Didn't correspond to the photos in the book at all. But it was very tasty and I think with half the thickness in the sponge, it would have been better. Perhaps heat up the custard and add some gelatin to it and prevent it from oozing out too much. Of course this isn't Dr Cutie's quick recipe, it takes a bit more work, but it's well worth the effort to make and serve guests.

Plus, Lundulph was happy and so was I, because it was very tasty and although it seemed to be massive, we got through it quite quickly. Another bonus with 2 Swiss rolls for a larger dinner party.

18 June 2020

Another No-churn Ice Cream Recipe

IMG_5986

A few weeks into our lockdown, I started making ice cream as a treat to Lundulph and myself and also to cool ourselves a little in the sweltering heat. But after 7 batches back-to-back, I've been wondering if there is another way of achieving a tasty ice cream with less fat and sugar, but which still freezes relatively soft. My Mum and my Sister experimented with oat whipping cream and reduced amount of condensed milk, which they reckon worked pretty well, though it did need some 15 minutes to "relax" a bit before it was scoopable. I've not come across oat whipping cream in the UK, so it's not something I've tried, but having made two batches of meringue recently, my thoughts spun onto the fabulous properties of aquafaba.

IMG_5994

I had some in the freezer (purposefully put there to test the statement that it will not lose its capabilities) and since Veggie-wannabe-Lundulph is working his way through various types of canned beans and chickpeas, there's always lots of this liquid in the house at the moment. Thus a search on the internet resulted in this recipe, which I used as inspiration for ice cream batch number 8.

Ingredients

Makes about 2 litres
3 dl strawberry custard
red gel food colouring
3 dl unsalted aquafaba
½ tsp cream of tartar
1 tbsp vanilla essence
120 g icing sugar

Method

  1. Measure up all the ingredients. Place the custard in a large bowl.
  2. Place the aquafaba in a stand mixer and sprinkle the cream of tarter over it, then start whisking on the highest speed for about 4 minutes.
  3. Add the vanilla essence, while the mixer continues to beat.
  4. In the meantime, using a whisk, stir through the custard to loosen it and add some red food colouring as it'll get very pale.
  5. After 2 more minutes of mixing the aquafaba, start adding the icing sugar, a spoon at a time, while the stand mixer continues to work for another 3 minutes until stiff peaks have formed.
  6. Start transferring the foam into the bowl with the custard in 4 - 5 parts, and fold each well before adding the next one, being careful not to know out too much of the air out of the mixture.
  7. Transfer to a plastic container and place in the freezer overnight.

Well, I think we have a winner. This was definitely soft scoop, I had no trouble dishing out our lunch dessert today. It wasn't too sweet, but also not too bland, the strawberry flavour came out very nicely and I thought it tasted a little like a sorbet, but fluffier.

IMG_6002

In addition, it seems that indeed aquafaba works fine for whipping even after freezing. I had some doubts as to it's lack of flavour. The "fresh" part was a little cloudy and the thawed part was very cloudy, but once there was air inside, the foam was white and looked silky and smooth. The inspirational recipe states that the aquafaba should be whipped for 9 minutes, which is why I've given the minutes in the instructions. It didn't mention the speed of whipping and the speed would depend on the size of the engine of the machine, but run on max should be a good bet. The idea is to reach "stiff peaks" stage when everything has been incorporated. Looking back when I first tried using aquafaba, I have a vague memory that it did take quite a bit longer to reach the desired stage, compared to egg whites, so a stand mixer is strongly recommended. I have a mixer attachment for my Kitchen Assistent and the bowl is very sadly plastic, so I've not used it for making meringue with egg whites, however, aquafaba worked absolutely fine.

IMG_5982

Of course, the aquafaba can't have any flavourings in it, so beware cans of beans in salted water or such. I believe any canned beans would work, but keep in mind that some beans will also release some colour into the liquid, so might not be suitable all times. I generally buy unsalted cans and have now instructed Lundulph not to throw the liquid away, but to start thinking of flavourings. The custard seems to be a decent base to use for a variety of fruit I should imagine. I also suspect we'll get through this ice cream a lot faster than the other one, there's just so much air in it.

IMG_5985

Lundulph thought it was very light and fluffy and agrees that there was a bit of a sorbet taste to it, but agrees it's a winner.

Update 12th June 2020:
Since the original batch, I've made 3 more, all of which I swapped out the strawberry custard with something else and omitted the vanilla essence.

Batch 1: 3 dl of puréed mango and strawberries. This was even more like a sorbet.

Batch 2: A ganache from 200 g Valrhona passion flavoured white chocolate and 90 g condensed milk. Melt the chocolate gently. Scald the condensed milk and stir the two together, this goes quite thick. I also only had 2 dl of aquafaba, so ended up with a smaller amount. This resulted in quite a tangy ice cream.

Batch 3:A ganache made with 438 g single cream, 62 g granulated sugar and 200 g 70% bittersweet chocolate. Scald the cream together with the sugar, chop the chocolate if needed, then pour the hot liquid over the chocolate and let stand for a couple of minutes until the chocolate melts. Stir together until it becomes smooth, cover the surface with clingfilm and let cool down to room temperature. This makes about 5 dl, so only use 3 in the ice cream recipe. I also added 1 tsp of ground cinnamon to the part I used for the ice cream. Lundulph didn't like this one much. My intention was to get a creamier feel to the ice cream, but it felt kind of coarse and I suspect was closer to a granita in texture. Still, I quite liked it and I'll try to incorporate chilli in the next batch. I've also run out of chocolate pencils, so I'll need to make some more of those too.

Batch 4:334 g ripe raspberries, 256 g granulated sugar, 1 red Thai chilli. Wash the raspberries well, then place in a large bowl and add the sugar. Wash and slice the chilli lengthwise, but keeping the stalk intact and add to the bowl. Stir through, then refrigerate for 24 h until the sugar has melted. Stir through every now and then. Remove the chilli and taste the mixture to decide if you want to remove the chilli or keep it in. If keeping it in, cut off the stalk, then blend the whole lot and push through a sieve to remove the pips. In the meantime whip 4 dl of aquafaba with 160 g icing sugar, then fold together and freeze. This amounts to almost 4 litres of ice cream.

Batch 5:200 g white caramel chocolate calets and 200 g single cream. Heat the cream to about 65°C, then add the chocolate and leave for a couple of minutes to let it melt, then stir until it all comes together into a fairly runny ganache, leave to cool to room temperature. Mixed with the whipped up aquafaba, this gives the usual 2 litres of ice cream.

15 June 2020

Strawberry Custard

Over the past few weeks, my Mum has very dilligently read the recipes in her weekly magazine, selected ones she believes are good and has got my Dad to scan and e-mail to me. The magazine usually has a theme or ingredient each week, so in the strawberry recipe leaflet, there were several good ones. One was for "a simple strawberry ice cream", which frankly is the basic recipe I've been using over the past month and a half, with some strawberry jam added and frozen in a bundt cake tin to make it prettier.

On the same page, there was a second recipe for what they called "strawberry curd". I've had several very positive experiences with curd in the past, so was quite keen to try this one, though it looked like pink yoghurt in the photo. Indeed, I'd say this is a custard, not a curd, but it was very tasty and combined brilliantly with home made yoghurt - one of Lundulph's favourite afternoon snacks. I made a double batch straight away last week and I've now made a second one, with the aim to try an idea for another no-churn ice cream.

Ingredients

Makes about 600 ml
500 g washed and trimmed strawberries
2 dl granulated sugar
4 large eggs
2 tbsp corn flour
50 g butter

Method

  1. Blend the strawberries and if you want a smooth custard, sieve them to remove the pips.
  2. Whisk together the strawberry purée, sugar, eggs and corn flour in a saucepan.
  3. Bring to a simmer slowly, while stirring constantly and let simmer until the mixture thickens.
  4. Remove from the heat and whisk in the butter, then transfer to an air-tight container, cover the surface with clingfilm and let cool to room temperature, then store in the fridge.

This should last 2 - 3 weeks in the fridge and I've frozen some to see how that works. I think it would make a good cake filler and as I mentioned above, mixed with yoghurt it is very tasty. If the frozen one is fine after thawing, I will try using it as a filler for chocolate bonbons.

The only thing is that the strawberries tend to lose their colour when cooked, so the custard will be pale pink with a tendency towards grey. This doesn't bother me for home use, but if it'll be served to guests, I'd add a little red colour to make it a bit more appealing to the eye.

Lundulph thought it was quite nice too and was speculating that it would be very nice on top of some sort of sponge cake or inside a Swiss roll. We'll try that next.

4 June 2020

Failed Meringues

IMG_5978

Following my lovely fruit basked cake for my birthday, I had 4 egg whites to be used up. Originally I planned to make them into marshmallow, but some research resulted in the realisation that marshmallows do not contain egg whites at all. So the next thing to do is meringues and I had a vague idea of trying to make them flavoured. I had some lovely orange flavouring and yellow food colour that should have done the trick.

As it turned out, they didn't. I made the Swiss meringue, following a recipe from Lenôtre's book and I strongly suspect the orange flavouring is what did it. It looked quite oily and probably contributed to the collapse of the egg whites. So I urgently started searching for what to do when a meringue mixture just doesn't happen and came across this, which I used as inspiration, in particular the Chewy Almond Macaroons recipe.

Ingredients

4 large egg whites
250 g granulated sugar
1 tsp orange flavouring
yellow food colour
2 dl sesame seeds
2 dl plain flour
1 tsp baking powder

Method

  1. Pre-heat the oven to 180 °C (not fan).
  2. Place the egg whites and the sugar in a glass bowl and place this bowl over a saucepan with gently simmering water. The water must not touch the bottom of the glass bowl.
  3. Whip the mixture over the water bath until it reaches 50 °C.
  4. Remove from the heat and continue to beat on high speed for about 5 minutes, then lower the speed and beat for a further 5 minutes until the mixture is very stiff.
  5. Towards the end add the flavouring and the food colour and watch the mixture deflate and go runny.
  6. Fold in the sesame seeds, then sift in and fold the flour and baking powder.
  7. Line a couple of baking sheets with baking paper, then pipe small blobs onto it.
  8. Bake until the biscuits puff up and just begin to get a colour on top.
  9. Remove from the oven and carefully transfer to a cooling rack and allow to cool down completely.

What I learned in addition from this exercise is that just using sesame seeds is way too intensive a flavour. This was surprising, because whenever a recipe uses sesame as a spice, I barely notice it and always thing there should be more, but in this case it was way too much, so mixing with sunflower seeds or using ground or finely chopped nuts might be better. The combination with the orange wasn't super, but not too bad either.

Lundulph quite happily ate the lot, I filled up a biscuit tin and put next to his desk and they did go over the following few days. His suggestion was that they should be covered in dark chocolate, so I might try that next time my meringues fail.

2 June 2020

Birthday Under Lockdown

IMG_20200524 cropped

We've now been in a lockdown for some 2 months and I've found a wondeful baker whose videos are just mesmerising. She publishes videos as Boone Bake and I believe she's from Korea and after spending a few hours watching her lovely creations, I decided to try this one for my birthday.

Ingredients

Pastry

125 g strong flour
125 g plain four
150 g unsalted butter
55 g water
6 g sugar
1 g salt
1 large yolk

Mould

grapeseed oil

Glazing

1 large yolk
5 g full milk

Strawberry compote

200 g strawberries
60 g granulated sugar
1 tbsp lemon juice

Vanilla cream filling

4 large yolks
60 g granulated sugar
20 g plain flour
10 g corn starch
400 g full milk
2 tsp vanilla essence
50 g white chocolate
60 g condensed milk
280 g double cream,whipped to stiff peaks

Decorations

selection of colourful fruit

For each part of the recipe, I measured up each ingredient in its own bowl and lined them up in the correct order before starting. I pretty much followed the video instructions, however, I split up the different parts and made them on different days, since I didn't want to go tired and mess up my cake by doing a shoddy finish.

IMG_5964

With regards to the pastry, one thing that isn't clear from the video is how long it takes to get the butter mixed in with the flours, I think I chopped and chopped around in the bowl with the dough scraper for ages, changing hands as they got tired. I tried using both hands with two scrapers and I also tried holding two scrapers in one hand with a finger inbetween, but still I didn't manage to get things well incorporated. So I think pinching with my fingers next time will be the way forward, as long as I can keep the kitchen and my fingers reasonably cool. It's been hot this week in the UK, so I've had difficulties keeping the kitchen below 25 °C. What I must remember to do is to use glass bowls for the mixing and chill them as well overnight before starting.

IMG_5965

What I really liked is that once the egg mixture had been stirred into the dough, it was just pushed down to the bottom of the bowl to form a lump and then moved to cling film, shaped into a square and wrapped tightly before chilling. It clearly was still very much in a crumbly state, but the three rolls and folds made it turn into a lovely smooth dough, so I'll keep this in mind for other shortcrust pastries I make. I did notice that when I made the basket handle at the end, having rolled out all the offcuts from the previous rolling, the dough had become elastic, so it developed gluten fairly quickly, thanks to the strong flour. But I think it is important to have it there, to make the basket sturdy enough to be filled with things.

IMG_5966

I was most nervous about the weaving part, but this turned out to be easier than expected. For the basket shape, I used one of our soup bowls, which has a diameter of 19.5 cm and is possibly a bit deeper than the one used in the video. It is important to make sure to have everything ready and organised and also to make space in the fridge for the basket, if it's a hot day, so that it can be placed there while rolling the dough and cutting new strips. Another thing to keep in mind is to try and weave as tightly as possible and have a small container with water and a small brush handy, to glue together the dough strips as required. During baking, the dough shrunk quite a bit and left largish holes in the basket and it came apart in a couple of places where new strips had been added.

IMG_5967

I had severe doubts about how long this contraption would hold, given that its filled with a pastry cream and fresh fruit, so I chose to be cautious and baked the basket for 40 minutes, which is almost twice as long as the video recommends. Of course the pastry wasn't as melt-in-the-mouth, but it tasted OK to me. The handle and the remaining dough were baked for 23 minutes as per the instruction.

IMG_5968

So on the morning of my birthday, I finished the vanilla custard cream, which is extremely tasty and ended up a bit firmer than it looks in the video, which was good. But bacause my basket ended up a bit larger than the one in the video, there wasn't enough vanilla custard cream. It barely filled half the basket and I struggled to cover the strawberry compote, so I've doubled the amounts in the ingredients above. It was so tasty, any left-over will not go to waste for sure.

IMG_5969

The baked fruit basket was ready just after lunchtime, so I was able to show it to my parents and my sister when it was looking its best. They were impressed. Lundulph then managed to get the barbecue going and we spent the early afternoon grilling a lot of meat and veggies before having a leisurly festive meal in the late afternoon. The fruit basket had started sagging a little, but was holding together OK. If I manage to make a tighter weave next time, it should hold even better.

IMG_5972

The only thing is, this pastry is not possible to cut in a gracious manner. So as soon as I stuck the knife into it, it collapsed, but it was extremely tasty and light, with a very good balance of crunch from the pastry, vanilla custard and fruit. A perfect dessert for a Summer's day and it did hold together for the 4 hours between completing it and cutting it up, though it had started to sag a little. Since I had lots of fruit left over, I had placed some underneath the basket and that added a little support.

I suspect we have at least 2 more portions each to work through, so I'd say this makes enough for 6 - 8 people and for anyone who wants some extra crunch, they can take a piece from the basket handle.

I how have 4 egg whites left over, so I will be making meringues in the coming days.