This year my little sister Bip turns 30 and I wanted to surprise her with a very special cake to fit with her new lifestyle as a vegan. Well, an occasional one anyway, she's been going out a lot lately and has also fallen for the odd seafood temptation.
I saved this recipe when I watched the Danish bake-off (Den Store Bagedyst) last year, it was just so very perfect in every respect. The original recipe in Danish can be found here.
Now there is no actual baking taking place here, so strictly speaking it shouldn't perhaps have formed the technical challenge on a bake-off show. But there is complexity to bringing it all together, and I decided that a dress rehearsal was in order and made this as dessert for when we threw a dinner party for our neighbours. I weighed most of the ingredients, but not all of them unfortunately. The original recipe says to taste each part and adjust as necessary.
The cake has a base, two mousses and toppings and requires quite a lot of ingredients, which might be tricky to get hold of and a cake ring or spring form of 18 - 20 cm diameter is required. It should be some 8 - 10 cm tall too. And make sure there is room in the fridge as it requires chilling, preferably overnight.
Ingredients
Chocolate crunchy base
110 g (8 pcs) medjool/mozafati/bam dates without stone
3 tbsp coconut oil
75 g (1 dl) Brazil nuts
75 dl (1 dl) coconut flour
45 g (1 dl) raw cocoa powder
1 tsp vanilla extract
1 ml salt
1 dl mulberries (white, dried) or raisins/sultanas
Strawberry mousse
385 g (6 dl) cashew nuts, soaked in water for at least 2 h
4 tbsp soft brown sugar
400 g (3 dl) strawberries
3 dl coconut oil
2 tbsp psyllium husks
1.5 dl water
Red food colouring
Runny honey or golden syrup to taste
Mango stars
1 firm, but ripe mango
small star cookie cutters, no more than 5 cm length
Mango mousse
2 dl fresh chopped mango
1 dl dried mango, soaked in water for 5 h
100 g (1 pc) ripe banana
1 tbsp coconut oil
2 tsp psyllium husks
Yellow food colouring
Decorations
2 dl dessicated coconut
Red food colouring
Yellow food colouring
Large star cutter to match the small ones. It should be some 15 - 19 cm long
Method
- Make sure to soak things that require this - better too long than not long enough.
- Start with the chocolate crunchy base and combine all the ingredients in a food processor and pulse until a coarse "dough" forms.
- Grease the cake ring and place on a baking sheet which has been lined with greaseproof paper. Cut out strips of grease proof paper, that are 15 cm wide and line the cake ring sides, making sure they stick without any bubbles.
- Pour the crunchy base into the cake ring and level it out at the bottom, gently but firmly pressing down - use the flat bottom of a glass or such to get a level surface. Place in the fridge to firm up.
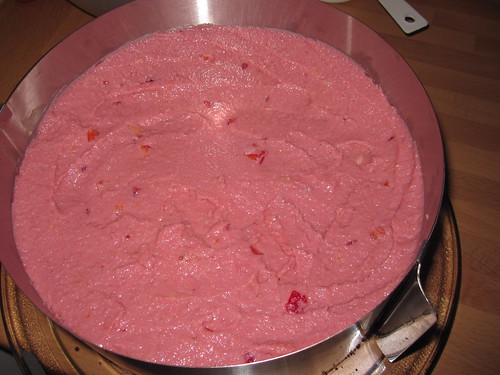
- Now make the strawberry mousse by draining and blending the cashew nuts together with the brown sugar, half the strawberries, coconut oil, psyllium husks and water until very smooth.
- Add red food colouring a little at a time to enhance the colour. Taste and if needed, add runny honey or golden syrup to taste, it should be on the sweet side. The sweetness sensation tends to feel less when the cake is ready and chilled.
- Dice the remaining strawberries and stir into the mousse.
- Take the cake base out of the fridge and pour in a little of the strawberry mousse, to form a 1 cm deep layer, then return the cake to the fridge.
- Next make the mango stars by washing the mango and cutting it into thin slices, just under ½ cm thick. I strongly recommend a mandolin cutter for this and make sure to keep the skin on for stability.
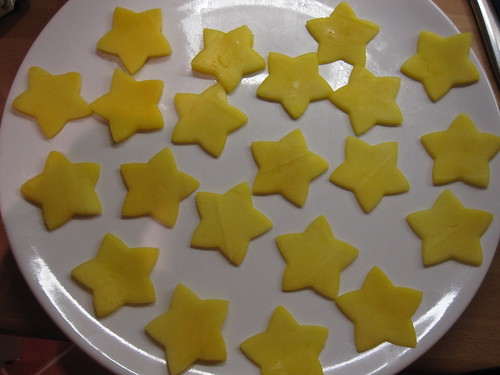
- With the small star cutter, cut out 12 - 13 stars and set the leftovers from the mango aside for later.
- Take the cake out of the fridge and carefully arrange the mango stars around the edge of the cake - stick them to the wall of the cake ring so that they rest on top of the thin layer of strawberry mousse.
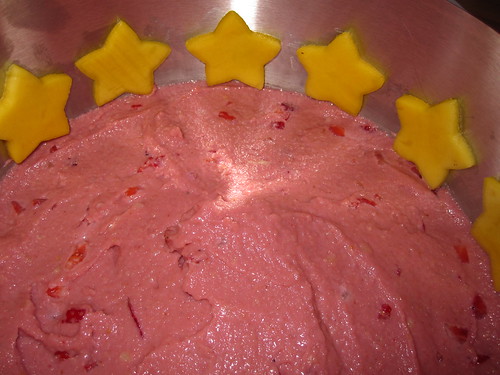
- Pour in the remainder of the strawberry mousse and make sure all the stars are completely covered by the pink mousse. You may need to push the mousse towards the edges with a spatula for this. Then back in the fridge for chilling.
- Then make the mango mousse by dicing the remainder of the mango and measuring up 2 dl of it and placing in the blender.
- Drain and add the dried mango, the ripe banana, the coconut oil and the psyllium husks and blend smooth.
- Add some yellow food colouring to enhance the yellow of the mango mousse. Take the cake out of the fridge and pour the mango mousse on top, it should be fairly runny and level itself.

Now the cake can go into the fridge for the overnight chilling.
- Finally make the decorations by dividing the dessicated coconut in two equal parts and placing each part on a baking tray with edge and lined with baking paper.
- Add a some yellow food colouring to one part of the dessicated coconut and carefully rub together until all the flakes go yellow. Spread out on the tray and leave overnight to dry out.

- Repeat with the other part and the red food colouring, so it goes pink.
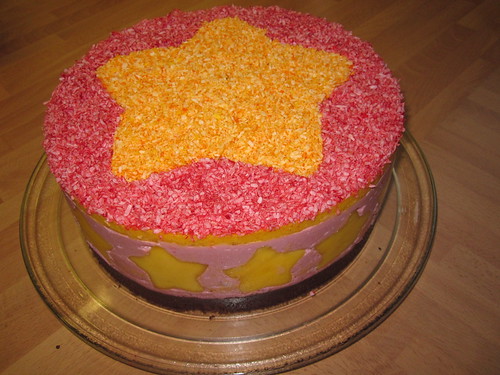
- About an hour before serving the cake, take it out of the fridge and carefully place the large star cutter on top. Pour in the yellow dessicated coconut inside the cutter and spread it evenly so the cake surface is completely covered.
- Carefully spread the pink dessicated coconut outside the cutter and spread so the cake surface is covered. Very carefully remove the large cutter and leave the cake out so it softens a little (unless it's a very hot day/room).
- Just before serving, carefully remove the cake ring and peel off the greaseproof strips of paper. If this is a birthday cake, not that you can't use candles on it, as all the dessicated coconut will fly off the cake when they are blown out. Also take care when serving, gently lay down the pieces, if you let them fall over, again the coconut will fly all over the place.
So there you have it - a raw and beautiful cake. Both times, I had to use the mini-blender that sometimes forms as part of a handheld blender set. These are a) not big enough and b) not powerful enough for making the base, but it can be done as long as it's done in parts - do the dry ingredients first, then do the dates with some of the dry ingredients and remove, then the mulberries/raisins/sultanas with some of the dry ingredients and remove. Finally stir/knead the whole thing through in a bowl, it should be coarse enough to give texture and crunch.
The mousses are wonderfully creamy and are well worth doing on their own, I think. The important thing is to remember to soak the dried mango for some 5 h, the pieces really need it. In my first trial, I forgot to soak the cashew nuts and rescued this by pouring boiling water over them and leaving them for about 30 minutes. However, I don't think this would work with the dried mango.
In my first attempt I also forgot to add the cashews to the strawberry mousse. So as I was blending the other ingredients, it looked horrible as the coconut oil and the water aren't really good friends and the strawberries were pretty juicy too, but I kept at it and ended up with a wonderful "mayonnaise"-like emulsion which was so very delicious in itself, I was almost sorry to add the cashews when I realised my mistake. I like cashews normally, not sure why I kept forgetting them. But I might explore what can be done with the strawberry mayo some time.

The colouring in of the dessicated coconut was interesting. I'd read about it, but never tried it before. In the general rehearsal, I used my new paste colours and they didn't work that well. The second time I used liquid colours and they were very much better, so for next time I must remember to dilute the paste colours before using them in this way. The original recipe called for beetroot crystals and turmeric, but having tried turmeric as colouring a few years ago and producing some very pale and horribly-tasting macarons, I'm not falling for that one again. I also found out that beetroot crystals are very expensive, when I searched for them.
I wasn't able to get hold of dried mulberries the first time round, so went for sultanas. They have more moisture than mulberries it seems and are heavier - I measured them to 75 g, but I didn't measure the mulberries when I made the cake for my Sister. I don't think there was too much difference in taste though.
The second time I made the cake, I'd had my parents drive around, hunting for all sorts of exotic ingredients weeks in advance and the plan was that Lundulph and I would arrive on the day before Bip's birthday and I'd make the cake and we'd surprise her. As it happened, she invited herself over to my parents' place after finishing work. Not ideal, but I got going on the cake and was lucky in that Bip turned up some 2 h later than she'd planned. I was half-way through and somehow, my Dad and Lundulph managed to keep her busy, so she didn't notice me and Mum finishing things off. Quite a miracle, the cake was chilling in the top shelf of the fridge and Bip had a good rummage around, but didn't notice it.
As I mentioned above, this is not a cake where you can stick candles in - you can't blow on it, so instead we put in some sparklers in the shape of letters, forming Bip's name. They sort of worked, more of a novelty really, but Bip seemed pleased. I also cut out "30" for the sides, rather than stars and any shapes will do really as long as they are about 5 cm across and if the top of the cake can match up to the shapes on. And don't be tempted to buy too many mangoes - one large one is quite enough if you cut the slices thinly. The slices require that the mango is firm, whereas the mousse that it is ripe, so take care when choosing a fruit - you may have to get two. When my parents first started gathering the ingredients, they thought the mangoes looked way too firm, hard even, so they bought one and kept it on the window sill in the apple basket. This softened it a bit, but it took a long time. Luckily my Mum bought two more mangoes just to be on the safe side and they turned out to be better.
 |
 |
On the whole this has been a very interesting and inspiring experience and well worth repeating. It was also very tasty and Lundulph had seconds on both cake occasions. I've frozen a couple of the left-over pieces from the first cake, I think it will survive this rather well. It's also very fresh tasting and can give a false sense that this is healthy. But there is a lot of coconut oil in it, especially in the strawberry mousse and even if it's the oil to eat these days, I think moderation or "lagom" as they say in Sweden is a key word here.


