31 December 2013

Last Baking Day 2013 Continued...

The second thing I planned to make was a Swedish twist on an Italian dessert, saffron pannacotta with gingersnap crumbs.

IMG_3747

Again a Swedish recipe I stumbled across while looking for something else. We'd run out of gingersnaps, so I had to make some more. Despite two gingersnap baking sessions in December, I still had quite a lot of dough left and I'd frozen it in two chunks. I took one out and let it thaw in room temperature, while I was working on Falbala's cake.

As the number of vegetarians in my family keeps growing, I have to make adjustments to recipes I cook, as we're not talking about "regular" vegetarians here. Lundulph's younger brother eats dairy, but no fish. Lundulph's older brother's girlfriend however does eat fish and shellfish as does my Mother (who also eats turkey at New Year's Eve). My older niece went quickly from meat eater to vegetarian to vegan a few months ago and my sister Bip has been trying to go vegan for a few weeks, with the resolution to do 20 days in January. So things are getting complicated to say the least, but in a good way.

Thus, the thing I had to take out is the gelatin and I bought the only alternative available in the supermarket - Vege-gel from Dr Oetker. The instructions on the packet clearly stated that it is not a substitute, but an alternative and that one would need to experiment to get things right. Well, I didn't have the time for this. Out of the 3 sachets in the packet, I opted to use 2, which would set about 1 litre of liquid. Now I also checked the webpage and here some confusion appeared. One set of instructions said to dissolve one sachet in 200 ml water, heat up and mix it into the recipe. The other set said to dissolve into 200 ml of liquid, heat up and add to the recipe. Hm... well, I didn't want to dilute my pannacotta with water, so I set aside 200 ml of the cream and heated up with both sachets, before stirring into the rest of the mixture. This worked OK. One piece of crucial information that both the packet and the website provided was that the vege-gel sets quickly, so one needs to have everything ready beforehand. Let's say, I just about managed to distribute the liquid into the moulds, the last one only looked like scrambled eggs, but that was OK.

IMG_3733

This is good to know - the first time I played with gelatin, I didn't realise it would take hours to set, so all my ideas of making fancy jellies have not come to fruition simply because I'd need days to get them made.

I didn't replace the cream as my vegan niece wouldn't be at the meal, I would have otherwise. So here we go:

Ingredients
Makes 14 - 15 portions

1.2 litre whipping cream
0.5 g saffron
1.5 dl caster sugar
2 vanilla pods
1.5 sachets (6.5 g each) vege-gel
5 - 6 gingersnaps

Method

  1. Set aside 200 ml of the cream and place the remainder in a saucepan.
  2. Place the saffron in a pestle and mortar together with some of the sugar, then grind as finely as possible and add to the cream along with the remainder of the sugar.
  3. Split the vanilla pods in half and scrape off the seeds, then add both seeds and pods to the saucepan.
  4. Stir things through and bring to the boil.
  5. In a smaller saucepan, heat up the saved cream and stir in the vege-gel and bring to the boil.
  6. Pour over the dissolved vege-gel to the main saucepan and stir through to distribute.
  7. Pour into serving glasses or moulds and chill in the fridge for at least an hour.
  8. Put the gingersnaps into a sturdy food bag and break into crumbs with a rolling pin. Alternatively place the gingersnaps in a food processor and pulse for a few seconds. Sprinkle before serving.

I recommend that you taste the mixture as it's cooking and make adjustments. The flavours will intensify after the pannacotta has set, especially the saffron. It might also feel rather rich, so perhaps using 6 dl of single cream and 6 dl might make it a little lighter. It reminded me of kulfi in its creaminess.

Lundulph's comment was that this pannacotta didn't pass the "zero resistance test", namely that when you put your spoon through it, it should feel like it's moving through the air - no resistance. But, it should hold its shape and wobble when wobbled. I must have been particularly lucky with my previous attempt with this fabulous dish. Perhaps I should have used that recipe and just added saffron and vanilla. Anyway, I've tried to make adjustments in the ingredients' list above.

The plan was to have the pannacotta as dessert for our first family meal in 2014. Sadly this was not to be, Lundulphs parents had to leave before the dinner was ready and our first family dinner for the year was a bit subdued.

One thing I did however is tag onto a new fashion in gingersnaps. It was a joke-gift from my Mum for Christmas, but I thought I'd give them a try and after a couple of mishaps, they actually worked. Here are the basic shapes - a Christmas tree, a star and a Yule Goat.

IMG_3724

I worked out that I need to use a bit more flour during rolling out of the dough, so that the shapes don't get deformed when moving them to the baking tin. Another thing to be careful with on the Christmas trees in particular was that the two slots open out a bit. I'd placed the first pair of Christmas tree parts so that the slots were too narrow and I couldn't put them together. But the ones after that worked fine.

IMG_3725

I didn't have time to decorate them, it was just to try out the new cutters. They are from IKEA, if anyone is interested.

Even more surprisingly a couple of them stood up after several days, absolutely amazing in the UK, especially given that it hasn't stopped raining for many days and half the country is under water.
30 December 2013

Last Baking Day 2013

So there we are, another year has passed and fairly quickly too. It feels like I've cooked and baked a lot more than previous years, but I'm nowhere near the early years of the blog.

P1010613

My last baking day was going to be very busy, but I had it all worked out, wore my comfy slippers and made sure to keep a good posture so that my back wouldn't start hurting at lunchtime.

My main item was a birthday cake for my younger niece Falbala. She's turning 15, so obviously she has other things on her mind than cakes, but I'd stumbled over this website and was dying to try out the technique, so I asked if I could make her a birthday cake and she agreed.

I got up fairly early and went shopping for all ingredients, then sent off Lundulph to buy cookie cutters - my original idea was for the number 15 to be baked into each piece of cake. I followed the recipe for the sugar cookies, using the metric amounts. I also used the extra fine sponge flour as it's been quite good in my recent cookies. It all started well, I even remembered how dusty icing sugar can get when you cream it with butter, so I worked it carefully by hand. I swapped 50 g of the flour for cocoa powder as I wanted the hidden design to be chocolate inside a white sponge cake.

Ingredients

Sugar cookie dough
565 g unsalted butter at room temperature
700 g icing sugar
2 large eggs
1 tbsp vanilla essence
670 g plain flour
50 g cocoa powder
1 tsp salt

Sponge cake mixture
One batch of good old trusty recipe from Lou's swimming pool cake.

Decorations
1 packet (450 g) of ready made Chocolate Fudge frosting.
Large white chocolate stars
Daim sprinkles

Method for the sugar cookie dough

  1. Cream the butter and icing sugar carefully not to incorporate too much air.
    IMG_3721
  2. Add the eggs and vanilla and incorporate well, finally add the flour, salt and cocoa powder and stop mixing as soon as they have been incorporated.
    IMG_3722
  3. Line a round cake tin (15-16 cm) with cling film, then transfer the dough to it and push in so that the tin is filled without bubbles. Cover with more cling film and chill in the fridge for an hour or two.
    IMG_3723
  4. Once the dough has chilled, take it out.
    IMG_3729
  5. Then using a long sharp knife, cut into 32 equal wedges.
    IMG_3730
  6. Using the chosen shape for the hidden design, cut out a piece from each wedge and place on a sheet lined with baking paper.
    IMG_3731
  7. Continue until a shape has been cut out from each wedge and place on baking sheets. Then chill the shapes for a further hour or so.
    IMG_3734
  8. Pre-heat the oven to 175 °C, then bake for 7 minutes just enough to set the cookies.
    IMG_3736
  9. Allow to cool completely. In the mean time, pre-heat the oven to the cake baking temperature, butter and flour a larger round cake tin and prepare the cake mixture. Then arrange the cut shapes into a circle in the large cake tin.
    IMG_3738
  10. Pour the cake mixture around and over the cookies
    IMG_3739
    then bake until it's ready.
    IMG_3740
  11. Allow the cake to cool, remove from the baking tin and decorate.
    IMG_3742
    The hidden design appears when the cake is cut.

As you can see, something went horribly wrong when I baked the cookies. The second sheet fared a little better, but nowhere near good enough to use. I dropped the temperature to 150 °C for it, so perhaps what I need to do is to bake them at an even lower temperature.

IMG_3737

Cutting out the numbers turned out to be very time consuming, so I couldn't do yet another round of these. Instead I rolled out some of the cookie dough and cut out stars, which I froze for an hour before arranging in a circle in the large cake tin. I also made one batch of the cake mixture, not being sure if it would be enough, but hoping for the best. And it was, luckily, but just about. Once the cake was baked and out of the springform, its bottom gave an indication of what we'd find inside...

IMG_3741

A blob most likely. Dang! What did I do wrong? Did I confuse °F and °C? Hang on, this fine sponge flour is self-raising! Why didn't it say so with big letters on the front of the packet? But I've used it on other cookies and they were fine. Curses! Too late to do anything about it. In fact, the cake was not cool enough in the evening, so I went to bed and got up really early on the 31st and iced it, before we set off to celebrate the birthday girl.

P1010617

It's a good thing Falbala is a very tolerant and laid back person and I must say the cake was quite tasty with a blob of fudge in the middle. It seems I will need to work out how to do this twice baked hidden design thing myself.

I didn't throw away the blobs, they make rather tasty and chewy cookies, very good for a sneaky snack every now and then. I've put them in the fridge and they've sort of stuck to each other a bit. I gave some of the left-over dough to Lou and Falbala, in case they want to make cookies and I still have quite a lot left as well. I'd better freeze it, we won't be needing it anytime soon.

28 December 2013

Almond Roll

IMG_3720

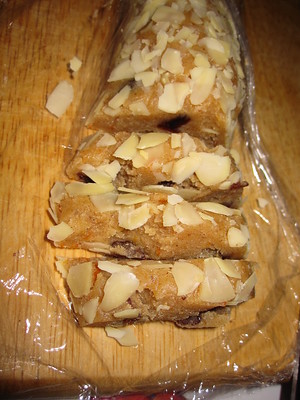
Among the recipes my Mum has given me, there were a few under the theme "quick Christmas sweets" and one just seemed too appealing not to try out at the earliest opportunity.

It's a Swedish recipe for "mandelrulle", which translates to almond roll. Very good for using up left-over marzipan.

Ingredients
500 g marzipan at room temperature
one orange
1 tsp ground cinnamon
1 tsp ground ginger
0.5 tsp ground cloves
1 dl raisins
flaked or chopped almonds for coating

Method

  1. Depending on the type of marzipan, if it feels hard at room temperature, then dice it or grate it first and place in a bowl.
  2. Finely grate the orange zest and add to the marzipan, along with the cinnamon, ginger,cloves and raisins.
  3. Using your hand, mix together the ingredients well, ensuring that the spices are as evenly distributed as possible.
  4. Transfer the mixture to a long piece of cling film, wrap tightly and shape to a sausage, about 5 cm diameter.
  5. Spread out the almonds on a piece of baking paper, then carefully unwrap the marzipan sausage and transfer to the almonds and roll so that it gets coated.
  6. Return the roll to the cling film and wrap tightly, then place in the fridge for an hour before slicing.

The marzipan I used was 38% almonds and fairly soft even out of the fridge. The orange zest was quite juicy, so I should have squeezed it out a little before stirring in. But I didn't and so the mixture was rather sticky and it took me a long time to shape into a sausage. I also halved the amount of cloves on my Mum's request and this was a good thing, because it was quite strong.

We had a little taste of this and it was yummy, but very, very sweet and even after a couple of hours in the fridge, it hadn't hardened much and went flat when I tried to slice it. I think using a marzipan with a higher percentage almonds might work better. I really liked it and there's room to experiment with the spices. Lundulph said all this was unnecessary and eating the marzipan as it comes is quite enough, but then he does like marzipan. In fact he went to the point of saying that it was a waste of good marzipan. I disagree and Lundulph didn't say no to a piece either.

Of course the mixture can be shaped differently, it just occurred to me that I could use my meatball maker, which I used with such success for making cake pops. Wrapped in nice paper, they would make a nice gift. Well, there's plenty of it to eat now...

Trying out Bip's Christmas Presents

This year, my Sister Bip wished for an ice cream maker, which she got and so after freezing the bowl for some 24 h, tonight we were ready to try it out.

Unfortunately she'd planned to improvise a recipe and had hoped that my Mum and I would have enough know-how to help out, but we've never had an ice cream maker, so we ended up googling for something quick and easy, bearing in mind that the maker would need to churn for 30 minutes or so.

IMG_3716

What she found was this (in Swedish). It is a vegan recipe, so both yoghurt and cream were soy based and from a particular brand and the yoghurt was bilberry flavoured. We didn't have that particular brand and flavour of yoghurt, nor the cream, so we used what we had instead, as you'd normally do. This wasn't entirely good, we really should have read the whole blog entry. Still, here goes.

Ingredients
Makes about 900 ml
3 dl soy yoghurt natural
250 ml oat-based whipping cream alternative
1 tsp lemon juice
3 tbsp icing sugar
2 dl frozen bilberries
1 dl chopped walnuts

Method

  1. Stir together yoghurt, cream (no need to whip it first), lemon juice and icing sugar.
  2. Run in an ice cream maker as per manufacturer's instructions.
  3. After about 5 minutes of churning, add the berries and nuts, then let churn until the ice cream is ready.
  4. Transfer to a plastic box with an air tight lid and keep in the freezer until needed.

Now the original recipe didn't contain any sugar, I realised that there wasn't any and we added it shortly after we'd started up the ice cream maker, it kind of incorporated OK, but we only added 2 table spoons and one more would have been good. Reading the original blog entry, it comments that the bilberry soy yoghurt was watery and very sweet to eat, in fact sugar had been second in the list of ingredients, which is why the blog writer suggested using it for ice cream instead, so that the sweetness is toned down.

Bip's second Christmas present was a silicone mould for breadsticks.

IMG_3715

It was from me, so I got to try it out, while Bip was making the ice cream. Here, I'd read the booklet that came with the mould, so I felt fairly confident that it would work. The only thing I was a bit disappointed with was that the booklet stated that it contained 30 delicious recipes, but I could only count 8. The website did have some, but they weren't too easy to find. I made the basic sweet breadstick recipe to use together with the newly made ice cream.

Ingredients
Makes 78
40 g natural soy yoghurt
40 g vegetable oil
1 medium egg
75 g granulated sugar
65 g wheat flour
1 tsp baking powder
Oil or melted butter for greasing the mould

Method

  1. Stir together all ingredients to a thick-ish batter,
    IMG_3714 then transfer to a piping bag.
  2. Grease the mould, then cut a small hole in the piping bag and pipe the breadsticks. The batter makes "two and a half moulds", i. e. 30 + 30 + 18.
    IMG_3717
  3. Place the mould in the microwave oven, set it to half strength or nearest below and bake for around 5 minutes. For the oven I used, I set to 360 W for 6 minutes, which resulted in some of the breadsticks burning a little and some not going crispy, but on the whole very tasty.
    IMG_3718
    For the last 18 sticks, 3 minutes would have been enough, but I set it to 4 and a half and burnt them almost to the point where it was tempting to throw them away.

So, we had yoghurt bilberry ice cream with sweet and crunchy breadsticks, which was really nice, though I would have preferred the ice cream to be a bit sweeter.

IMG_3719

Of course I won't be able to repeat these recipes, at least not the breadstick one, the ice cream could be made without a machine, but instead freezing in a bowl and stirring through once an hour for 6 - 7 hours until ready. In this case, the cream should be whipped, it'll help make it fluffy. I've made such ice cream before and it can be done, but takes time and patience, that's the tricky part.

25 December 2013

Festive Christmas Bread

IMG_3711

Well, it's time again for a festive Christmas Bread. I don't know if I've mentioned it before, but in a Bulgarian tradition, the Christmas bread is round and a coin is hidden in it, somewhere along the edge. When the dinner starts, the bread is cut in the same number of pieces that there are people present. Then you spin the bread, and each person gets the piece in front of them - the person who gets the coin gets the luck. Yadda, yadda. There are similar traditions in England and Sweden - in England the coin goes into the Christmas pudding and as Lundulph points out, you need to be careful not to break your teeth. In Sweden, an almond goes in the Christmas porridge.

Anyway, when I found the festive bread last year, I found a number of other interesting bread shapes as well. So here's working my way through these. The original blog entry I found is here (in Bulgarian) and with pictures of how to shape it here (in Rumanian). The Bulgarian recipe for this bread was similar to the one I made last year, but wasn't as precise - quite a few "a little" and "some" in the ingredients list, so I decided to follow last year's recipe and just make the new shape.

One major difference in the ingredients was that I used soy milk, as my Sister Bip has almost completely cut out dairy from her diet. I was highly suspicious of how this would work, but frankly my feelings were unfounded. A more minor worry was that the kitchen scales were playing up a bit, so there is a good chance things weren't measured entirely correctly, but it seems they were close enough.

Ingredients

Pre-ferment
1 dl warm soy milk (about 40 degrees)
1 tbsp honey
20 g fresh yeast

Main dough
500 g strong flour + lots more for kneading
0.5 tsp salt
2 tbsp vegetable oil
2 medium eggs + 1 egg white
0.5 tbsp cider vinegar
1.5 dl warm soy milk (about 40 degrees)

Between the layers
50 g butter

Glazing and decoration 1 egg yolk
2 tbsp soy milk
seeds - poppy, sesame, sunflower, pumpkin etc.

Method

  1. Stir together the pre-ferment in a bowl and let bubble up, about 20 - 30 minutes.
  2. In the mean time stir together the ingredients for the main dough as far as possible, the mixture will be very dry.
  3. Add the pre-ferment and mix together to a very sticky dough, almost a thick batter.
  4. Generously flour the work surface and turn out the dough, then work it until the gluten develops.
  5. Place back in the mixing bowl, cover with cling film and let rise to double size, about an hour.
  6. Line a large tray with baking paper, then gently melt the butter.
  7. Weigh the dough and divide in two equal parts.
  8. Divide one of the halves into five equal parts.
  9. From the other half, cut a quarter of it and set aside, this will be the middle. Divide the remainder into five equal parts.
    IMG_3707
  10. Starting with the five larger parts, roll each one to a circle, about 5 mm thick. Place the first one on the prepared baking tray and brush with melted butter before adding the next circle.
  11. Roll the last circle a little larger so that it will cover the layers below. Don't brush with butter.
  12. Now using a sharp knife or a pizza cutter, cut a star through the five layers, taking care not to cut all the way to the edge. Then carefully fold out each wedge.
    IMG_3708
  13. Next, repeat the same thing with the five smaller pieces of dough. I recommend they are stacked on a plate or a separate piece of baking paper.
  14. Once they are done, gently place them in the middle hole of the bread and with the knife cut another star into the new round. Make sure that each cut lines up with the middle of the bent out wedges. Then carefully bend the new wedges outwards.
    IMG_3709
  15. Finally shape the middle piece to a flat circle and place in the middle.
  16. Pre-heat the oven to 200 °C (fan assisted). Whisk together the yolk and milk and brush the bread, then sprinkle seeds over. I arranged the pumpkin seeds one by one, which took so long, there was no need to leave the bread for a second rise, it kind of happened on its own.
    IMG_3710
  17. Bake for about 30 minutes, but keep an eye on it, so it doesn't burn on top. If it starts browning too fast, cover with a piece of aluminium foil.

I'd planned to have poppy seeds in the middle, then sesame seeds on the inner wedges and sunflower seeds on the outer wedges, but unfortunately it turned out there were neither poppy seeds, nor sunflower seeds around. I found lots of pumpkin seeds and so had to make do with them and sesame seeds. There were onion seeds as well, but they are black and I thought wouldn't be suitable for Christmas.

There was kyopoolu of course and as it turns out, this bread is particularly suitable for dipping as the layers come apart quite easily and are perfectly shaped for scooping up dips.

One thing is that because there are so many pieces that need to be rolled out, you need to work fast, because the yeast dough doesn't wait, it keeps rising while you work on the shaping. My first few pieces were far from round, I figured out that if I shaped each piece to a ball first, it was easier to roll into a circle. Also I kept adding flour to prevent it from sticking to the surface. In the photo above, the dough pieces look almost the same size and they sort of were - the whole dough weighed about 1 kg, so the larger pieces were 100 g each, then the middle piece was 125 g and the smaller pieces were 80, but again thanks to the crazy kitchen scales, who knows what things really weighed. In rolling out the circles it was more obvious to see that the larger pieces resulted in larger circles.

On the whole very nice bread. My Sister Bip was the lucky one this year and got the coin. The whole family quite enjoyed the bread too, so this shape will be worth repeating. To drink, we had a very nice Italian wine, which my Dad had bought especially.

IMG_3712

15 December 2013

Bird of 2013

After racking my brains for some time, I announced to Lundulph that this year's bird would be a mallard.

This year I didn't bother with filling out the butcher's order form. As I found out last year, the form is so that they can make sure to have the right number of turkeys/geese for Christmas Day. But since we generally do our Christmas Dinner a week early, there's no risk of not being able to get hold of what we need.

With recent cooking success in mind, I wandered into the High Street and the butcher's and politely asked if they could secure me a mallard. I was well surprised when the chap serving me said they had one in the freezer and warned me that it would be a small one. I thought, it's just for me and Lundulph, it'd do, but when I saw it, I thought that's a pigeon and said, that perhaps I'd need a second one as well. So out came a second frozen thing. I paid and went home.

IMG_3693

This was on Tuesday, so into the freezer they went. I put them in the fridge on Thursday evening so that they could defrost slowly. I showed them proudly to Lundulph. He was also surprised that they were so small and wondered why there were no labels on them. This should have been my first alarm bell and it should have rung in the shop already.

Anyway, Saturday morning came and I got started on my preparations. On the whole I was doing some carbs, some proteins, some fungi and some greens, all fairly easy, but also all to be done more or less last minute before serving.

Again I'd done some research on duck and mallard recipes and was very annoyed that most of them seemed to involve fruits. Now after our initial disappointment with goose and prunes all those years ago, both Lundulph and I are highly suspicious of this - after all we're making a main course here, not a fruit salad. So I settled on a small paragraph in Larousse Gastronomique (2001) - season and roast.

When I opened the packages, both birds released quite a lot of blood, so I rinsed them under the tap and managed to get a heart and a throat out from one of them. The other one had had both wings and legs brutally torn off. And it was at this point I noticed that one of the birds had quite a pungent smell about it. Now, the book said, of all the wild ducks, mallard is the best and it should be cooked and eaten fresh, unlike a lot of other birds, which need to be hung for a while.

IMG_3694

Here, I should have taken the executive decision to just throw away the smelly bird, but unfortunately I didn't. Instead I pre-heated the oven to 220 °C, placed a wire rack in a pan with a lip, seasoned the two birds as best I could and placed them on the rack and into the oven. Now even if wild ducks aren't as fatty as farmed tame ducks, they still have quite a lot of fat on them, so using a roasting pan which will be able to contain the fat as it melts and drips down is crucial. And of course the wire rack inset, to keep the birds away from the fat. Of course cooking the smelly bird resulted in an even more pronounced unpleasant smell.

IMG_3698

The Larousse Gastronomique talked about a mallard of about 1.25 kg weight and stated that roasting for 35 minutes would do. I'd weighed both my birds and they were just over 600 g each. At this point Lundulph expressed some doubts as to whether we'd really got mallards or something else. I decided that I'd roast the birds for 15 minutes on their backs and a further 15 minutes on their fronts. Of course by this point it was quite obvious that they'd dried out substantially, but I just plodded on with other things and left the birds at the bottom of the oven, covered with aluminium foil to keep them warm - this probably made them even drier.

The next thing I made was Duchess Potatoes - it was right before the article on duck in Larousse Gastronomique, and I've made several attempts in the past at working out the secret behind these, without success. This time, it worked and I took the liberty of "improving" the recipe.

Duchess Potatoes Ingredients 500 g peeled potatoes
50 g butter
salt and pepper
a little grated nutmeg
1 egg + 2 yolks
2 tbsp finely cut chives

Method

  1. Cut the potatoes in thick slices and boil in salty water.
  2. Drain well, then put the saucepan back on the hob on low heat and mash up the potatoes finely or push through a potato press, then stir to dry out for a couple of minutes.
  3. Stir in the butter, the spices and the eggs and keep stirring for a few more minutes.
  4. Transfer the mixture to a piping bag with a star tip. Lightly grease a baking tray, then pipe rosettes of the mixture. It's easier to pipe while it's hot.
    IMG_3695
  5. Bake under the grill until the surface of the rosettes had dried out and turned golden in colour.
    IMG_3697

Next I found some inspiration from Anne's Food blog for Cognac-creamed funnel chanterelles (yellow foot) mushrooms. I have small portions of these mushrooms, parboiled and in the freezer. Oddly enough, I was only able to find one of these packets and I didn't fancy emptying the freezer to search for more, so I bought a large punnet of chestnut mushrooms, which I peeled and parboiled. This way I ended up with a lot more than the 250 g Anne mentions and used about 50 g butter and 1 dl French brandy for the frying, then 1.5 dl of whipping cream. They tasted quite nice and Lundulph declared that this is the only way he wants his funnel chanterelles cooked in the future.

IMG_3699

Finally for greens, I picked out a card from Ye Olde Recipe Collection, "Heston's Warm lettuce, peas & beans salad", which is from June 2012 and no longer listed among Waitrose's recipe collection. I did intend to follow the recipe since it required making an emulsion from beurre noisette, but I just wanted to get things ready for our Christmas Dinner and made it up as I went along. It turned out quite all right anyway.

Ingredients
100 g beurre noisette
500 ml chicken stock (not concentrate)
300 g frozen broad beans
200 g frozen garden peas
2 Romaine lettuces
salt and pepper
60 g pickled onions

Method

  1. Place the beurre noisette in a large saucepan on low heat to melt.
  2. In another large saucepan, bring the chicken stock to the boil, then add the frozen broad beans and garden peas and let simmer for a few minutes.
  3. Cut off the stalk of the Romaine lettuces, then take off the larger leaves, wash and shake off excess water.
  4. Add the lettuce leaves to the boiling chicken stock for a minute or so, then using a slotted spoon or tongs, remove along with the beans and peas and place in the saucepan with the beurre noisette and stir everything around to get it well coated with the butter.
  5. Serve immediately.
IMG_3696

This salad turned out to be very tasty. Lundulph guessed that the leaves were pak choi and in hindsight, this would have worked better. Lettuce is too delicate to heat up and a few of the leaves went brownish while I was making the salad and the ones that didn't went brown when I re-heated them a couple of days later. The original recipe states that 200 g of beurre noisette should be melted together with 80 ml of chicken stock. Then once the butter has melted, it should be blitzed with a hand-held blender to form an emulsion into which the vegetables should be stirred in. It seemed insane to use this much butter, even it it is lightened up by turning it into "mayonnaise", but I might give it a try as an alternative salad dressing or a dip perhaps.

Christmas Dinner table

So, we were finally ready for our Christmas Dinner. At this point I couldn't stand the stench of the rancid bird and threw it in the food bin. One bird would have to do us. But it was so dry, it was hard to carve.

IMG_3700

Lundulph also started theorising that this might have been a pheasant and not a mallard. I wasn't able to find out anything useful on the internet either. So we ate some bird-based meat and the bird of 2013 is a

???

On the whole the meal was good, if only I'd managed to get better birds and not roasted them into oblivion...

And finally, once again all the lead shots ended up with Lundulph. We found 6 - 7 of them.

IMG_3701

Lundulph has started campaigning to stick to goose from next year onwards, since we get at least one turkey around the festive time, depending on where we celebrate Christmas - see in the UK most people have turkey for Christmas, but in my Bulgarian family, turkey is eaten at New Year. So a goose is a good and sustainable choice. I personally would be happy to roast a chicken one year, simply because we never do this anyway, but it's not festive enough for Lundulph. We'll see next year, when the time comes.

12 December 2013

Beurre Noisette

One more thing needed to be prepared in advance of our Christmas Dinner and I made it on the same day as the pears. It's called beurre noisette, i. e. brown butter, though it sounds nicer in French I think. Basically, take a lump of butter, say 100 g, place it in a pan on medium heat. Let it melt and even bubble a little. The milk solids will float up to the surface and go golden brown and it'll smell nicely of fried. Remove the pan from the heat and carefully skim off the milk solids, then pour the remaining melted butter into a jar and allow to cool down, then close with a lid and store in the fridge until needed. Or use straight away in small doses over e. g. steamed vegetables. This gives them a nice shiny gloss and enhances the flavour. It will go solid in the fridge and will have a light golden colour. Just melt as required. I also discovered that the milk solids part is tasty on a slice of toast. Because I used unsalted butter, the milk solids tasted sweet. Yummy!

Christmas Dinner Preparations

It is the time of the year once again, to prepare our Christmas Dinner and this year I spent a fair amount of time ploughing through my recipe collection for interesting things to do.

One thing I decided some time ago was the dessert - Pears in Wine. This dish was very appealing to me, both visually and on a conceptual level, plus that it seemed kind of fitting to do for a Christmas meal, since in making it, wine is effectively mulled.

After reading through a few recipes, I decided to follow the one in my Larousse Gastronomique of 2001. In fact, the dessert "Poirissimo" was very appealing, it constitutes of pear compote, pear conserve, pearts in wine, pear tart and pear granita. So far from practical, unless I decide to just do that as a meal on its own. Pears in Wine it would have to be, and with some involuntary changes - I couldn't get hold of the suggested Williams peara and couldn't be bothered to wander around the shops just for that. Finding a place to park outside each shop is plain impossible in December.

Ingredients
1 lemon
4 - 8 (depending on size) Comice pears without blemishes
1 litre red wine (Côtes du Rhône or Madiran)
100 g honey
150 g soft brown sugar
0.25 tsp white pepper
15 - 20 whole coriander seeds
0.25 tsp grated nutmeg
3 vanilla pods
whipping cream and icing sugar (optional, for serving)

Method

  1. Wash the lemon and the pears well and dry off the water.
  2. Grate the lemon zest finely and place it in a deep saucepan which is large enough for all the pears to stand. Cut the lemon in half.
  3. Cut the bottom of each pear, so that it can stand up, then peel them, but leave the stalks intact. Using the lemon halves, rub the peeled pears, squeezing the lemon as you go. This should prevent them from discolouring.
  4. Place the peels and the cut off bottoms into the pan, add the wine, honey, sugar, white pepper, coriander seeds and nutmeg. Cut the vanilla pods in two, then slit each half lengthwise and add to the saucepan.
  5. Bring to the boil and let simmer for about 10 minutes, stirring a couple of times to make sure the spices and sugar are mixed through.
    IMG_3690
  6. Now add the pears to the saucepan. Ideally they should be covered by the liquid up to the stalks. Now cook slowly for 20 - 35 minutes, depending on pear size. If the pears can't be fully covered, place them on their sides and if they still stick up, turn them a couple of times during the cooking.
    IMG_3692
  7. Remove from the heat and allow to cool down completely, transfer to a deep dish with a lid or cover with clingfilm and chill in the fridge along with the cooking liquid for at least 24 h. This dish is served cold with some of the cooking sauce and some sweetened whipped cream.

The book didn't mention cutting off the bottoms of the pears so they can stand up and so I didn't do this, but it's important, especially for presentation when serving. The recipe stated 8 Williams pears, but Comice pears tend to be quite a bit bigger, so I bought 4. I could possibly have fitted two more in the casserole but I wasn't sure and didn't want to risk it, I very much regret this, now that I've tasted this fabulous dessert.

It's quite fascinating to watch the pears get infused with the dark red of the wine and in fact, storing them in the cooking liquid continues this process and you can always see which parts of the pear haven't been in the liquid. The book implied that the cooking sauce would gel after the chilling and perhaps it might do that if Williams pears are used. It remained as thin as when it started in my case, which didn't really matter. However I can see two solutions to this - heat up some of the sauce with ground arrowroot and then brush the pears before serving or add some peel and pieces of quince, which is so full of pectin, it will give the same result. And with the added bonus of some of the delicate quince flavour.

I was also very careful with the white pepper, the coriander seeds and nutmeg, I should have been more generous and I've accounted for that in the ingredients' list above. Some experimentation here would be good too - perhaps use some cloves, star anise, cinnamon or orange zest.

As for serving, I had about 1.5 dl whipping cream left over and I added 1.5 tsp of icing sugar and whipped it. As it turns out it was a good combination.

Eating the pears provided a slight challenge - you definitely need a fork and knife. Care is also required or the pear could easily shoot across the table and stain something badly. Again, cutting the bottoms might prove helpful here. I quite liked that the red wine hadn't penetrated through too deep, so the pear looked rather pretty while eating it as well.

IMG_3702

I also have plans for the remaining wine juices - heating them up with a little brandy should result in a quite nice mulled wine I think.

Needless to say, I was pretty pleased with myself after this.

7 December 2013

Ischoklad

Here is another Swedish classic for Christmas - ischoklad, which translates to ice chocolate. It's readily available to buy in Sweden of course, but there is also a great attraction in making it at home.

IMG_3688

I have vague memories of trying to make this lovely sweet years ago with my Mum and it was lumpy and split and horrible. But I think I know what the problem was - we used butter and we must have got water into the mixture causing the chocolate to clot.

Actually this thing is massively easy to do, to the point of running the risk of having it readily available throughout the year. Massive danger to any diet.

I had prepared by buying coconut fat from Sweden - this is sold in 500 g blocks, like any other solid fat. It is white in colour and if I remember what I learned at school correctly, is a saturated fat, making it solid at room temperature. A quick gander at Wikipedia confirms this and lately I've seen jars of coconut oil in our local supermarkets. I must get some and see if the ice chocolate works as well with that.

Basically the ice chocolate is a kind of ganache, but making it with coconut fat, means it's melting temperature is lowered from around 35 °C to 25 °C, which gives the sensation of ice melting on your tongue.

It can be made with any type of chocolate, my brief googling indicates that you use 2 parts of your choice of chocolate to 1 part of coconut fat. I recommend you start with this and experiment to find a combo that suits your taste. I decided on milk chocolate and white chocolate.

Ingredients
100 g coconut fat
100 g milk chocolate
100 g white chocolate
honeycomb crumbs
dessicated coconut
chocolate chilli sprinkles
chopped nuts
mint essence
etc...

Method

  1. Divide the coconut fat into two equal parts.
  2. Melt each part separately in a bain marie until completely melted.
  3. Measure up the chocolates and break up into chunks or chop.
  4. Remove each of the bowls from the heat, then add the milk chocolate into one of the bowls and the white chocolate into the other.
  5. Stir each mixture until the chocolate dissolves completely. The resulting mixture will be fairy thin.
  6. Line up mini muffin cases (preferably aluminium) on a tray (which will fit in your fridge), then add a small amount of filling - I used honeycomb crumble, dessicated coconut and chocolate chilli sprinkles.
    IMG_3687
  7. Transfer the mixtures to a small piping bag, preferably plastic and disposable. Then carefully fill each case to the top.
  8. Leave to cool down to room temperature, then transfer to the fridge and chill for a couple of hours.
  9. The ice chocolates are now ready to eat, or can be transferred to a box to save space. Keep in the fridge as much as possible though, so they don't melt.

I used "baking" chocolate and the milk chocolate wasn't sweet enough for this, so I'd recommend adding some sugar to the mixture or using a regular milk chocolate bar, which tends to be sweeter. The white chocolate was OK, but as Lundulph commented, the added flavourings didn't quite come through, except the dessicated coconut. In fact the chilli chocolate was pretty whimpy, but it was a ready mixture I got from my Mum. I'll just add chilli powder next time.

The honeycomb crumbles weren't identifiable as such, but did give a nice crunchy texture to the sweets. I might try adding more next time.

I also think roasted, chopped hazelnuts would be good - some sort of praline even. Sadly I'd used up my last bag in the müsli the other week.

Or you can mix the white and milk chocolate varieties, but then you'll need to do one first, let it set, then top up with the other. My original plan was to pipe in parallel into each case, but with the mixture this thin, they wouldn't have stayed separate. So some planning ahead is needed.

Many of the recipes I looked at recommend adding some mint essence, which will enhance the sense of "iciness". I'm not entirely sure about this, it would have to be very little, so as to just enhance the sensation, rather than taste of mint.

The shop-bought variety is plain milk chocolate, so I recommend making it yourself, there's so much that can be varied, it's brilliant.

Lundulph's thoughts - some of the flavours were quite lost. The coconut was coconutty and overall the milk chocolate ones could have been sweeter, but then sugar isn't too good for you in large amounts.

Actually a word of warning - the cases are about 2 cm in diameter and do not eat too many! They're full of fat and it's very easy to get carried away. The above amounts should give around 50 pieces. I got just under 40 I think. And it just occurred to me - miniature marshmallows or meringues for decorating on top would work rather nicely too.