Showing posts with label Confectionery. Show all posts

12 February 2017

Butter cookies

It's been ages since I've cooked anything new to put on the blog. The long Christmas break I was expecting didn't turn out as long and my to-do list is now shifting to later and later in the year.

IMG_5257

But I have a new job and I'm still working out a routine for everything. I've also picked up two new hobbies - knitting and crocheting. My Sister Bib got me started over the holidays, she's been crocheting for years. I now have several projects on the go, with Lundulph smiling bemused and wondering how long this fad will last.

I also want to start taking something to work, my new colleagues take turns in bringing cakes in to the team meetings. I pushed in last week and brought in some Swedish cinnamon buns, which did go down a treat and a couple of colleagues even asked for the recipe. Following on this success and feeling the urge to use my cookie press, I did a quick search on the internet and found this recipe for butter cookies, which seemed rather good. Here, the amounts converted to metric.

Ingredients

6.32 dl plain flour
¼ tsp salt
227 g butter at room temperature
2.37 dl white caster sugar
1 large egg
2 tsp vanilla extract
sprinkles and icing for decoration

Method

  1. Place 2 - 3 baking sheets in the freezer to chill.
  2. In a bowl, stir together the flour and salt.
  3. In another large bowl, cream together the butter and caster sugar until fluffy.
  4. Beat in the egg and the vanilla extract.
  5. Stir in the flour/salt mixture, just enough to combine.
  6. Form the dough into a ball and wrap in cling film, then place in the fridge for 1 h to chill.
  7. Pre-heat the oven to 200 °C and prepare the cookie press with the pattern of your choice.
  8. Take the dough out of the fridge and fill the cookie press.
  9. Take a chilled sheet from the freezer and stamp it full of cookies. Do not use baking paper or grease the sheet or the cookies won't stick.
  10. Bake in the oven for 8 - 10 minutes until golden brown, then remove and immediately transfer to a cooling rack and replace the sheet in the freezer.
  11. Repeat with the other chilled trays until the dough has been used up.
  12. Decorate with icing and sprinkles of your choice - some sprinkles can be done before baking, some after, in which case they'll require icing to stick.

9 October 2016

Sea buckthorn

While watching Den Store Bagedyst (Danish Bake Off) a few years ago, it seemed that there is a bright orange berry that was highly appreciated by the Danes. I'd not come across it previously, but some looking up on the various language versions of Wikipedia gave the impression that this is a berry used in Sweden too. It's called havtorn in both Swedish and Danish, which would translate to sea thorn. But the English common name appears to be sea buckthorn or sea berry.

IMG_5218

As the berry picking season in the Stockholm area seemed to be coming to a close, my Mum mentioned that she'd seen people picking some orange berries from the shrubs along the promenade and wondered if I knew what they were. She'd taken a somewhat fuzzy photo of them, but they were quite easy to recognise as sea buckthorn and I got excited. How about that - the promenade is part of the estate and the shrubs were planted as decoration, not for picking. So I asked her if she could pick a few so we could try them out. And not only did she do that, she even got my Dad to help out and they picked over a kilo of these and froze. My Mum even tried them fresh and said they were extremely tart.

So when I went to visit them in October, I took the opportunity to try one of the Danish Bake Off recipes that I'd saved - Macarons with curd from sea buckthorn. For the macarons, I used my usual recipe, but swapped the almonds with sesame seeds.

Ingredients

1 leaf of gelatine
100 g juice from sea buckthorn (~150 g whole berries)
4 yolks
150 g granulated sugar
75 g unsalted butter, diced

Method

  1. Place the gelatine in some water to soften it up.
  2. Make the sea buckthorn juice by placing the berries in a sieve over a bowl, then with a fork or a spoon mash them and squeeze out the juice.
  3. Place the juice with the yolks, sugar and butter in a saucepan and heat up at a medium heat, while stirring constantly until the mixture thickens.
  4. Remove from the heat when the cream is thick enough to stick to the spoon when you try to pour it out.
  5. Squeeze out the water from the gelatine and stir into the cream.Let cool completely.
  6. Pair up the macaron halves to matching sizes, place the curd into a piping bag with a small round nozzle, then sandwich each pair with the curd and serve.

The sea buckthorn was interesting, but not entirely to my taste, there was something about it that gave the feeling that I'd used a flavouring usually used in savoury dishes. Admittedly, the berries I used had been frozen and I'm not sure in what state they were when my parents picked them. But they have this wonderful, vivid orange colour, which just makes you smile when you see them. Once the juice has been squeezed out, it looks like carrot juice.

IMG_5219 IMG_5220
IMG_5221 IMG_5223

The all sesame macarons were a bit in the hard side, freshly made, but I think sandwiching them and leaving overnight would have made the texture quite good. The sesame flavour was a bit intensive, I think I'll try a mixture of sesame and sunflower seeds next to make it more neutral and get more focus on the filling.

I now have a large bag of sea buckthorn in the freezer and I might try it as stuffing for a roast bird of some sort. Or maybe one of my muffin recipes. The Swedish Wikipedia states the berries are used for juice, jelly, marmalade and liqueur. The last one of which I'm tempted to explore, that might work rather nicely.

16 July 2016

Whipped ganache

I've been racking my head for ages about a filling for French macarons - one that will not make them soggy within the hour, so that I can make some and give away as presents and I've come to the conclusion that it needs to be based on ganache or on marshmallow mixture. And as we were once again invited to a barbecue this week-end, I decided to make some macarons and try out my theory with a ganache.

I wasn't sure if there would be nut-intolerant people around, so I played it safe and made sesame-based macarons.For the cream, I decided to try out a ganache based on white chocolate and flavoured with raspberries, I thought it would work well with the sesame meringue of the macaron shells. The raspberry pureé is the raspberry liqueur pureé I discovered a few years ago, and remembering to sieve it this time.

The macarons were also a tried and tested recipe from way back as well, but with sesame seeds instead of almonds. So here comes the new bit.

IMG_5032 IMG_5034

Ingredients

155 g white chocolate
80 g double cream
120 g sieved raspberry pureé
pink food colouring if needed

Method

  1. Chop the white chocolate as finely as possible and place in a heat-proof bowl.
  2. Scald the double cream and pour over the chocolate.
  3. Let stand for a minute, then stir through to mix the chocolate and cream.
  4. Stir in the raspberry pureé and some pink food colouring, if the mixture is too pale or too yellow-y.
  5. Leave to cool down and store in a cool place, but not the fridge.
  6. Before the ganache is required, whip with an electric whisk for a minute, it'll go a little lighter in colour. Do not over-do because it can go lumpy.
  7. Transfer to a piping bag with a small round nozzle and put the macarons together.

My theory for ganache filling worked - the macarons we kept for home use kept for several days without any sign of sogginess, nicely tucked away in an air-tight box.

And I also came up with a good way of transporting macarons as we took some with us to the barbecue. I cut the cardboard tube from a roll of kitchen paper in half length-wise. I then wrapped each half with aluminium foil and placed both halves in a plastic food box. I placed the macarons on their sides, I was able to fit 9 in each half. I covered with kitchen paper to cushion the macarons, in case of any bumps during transportation and put the lid on. The plastic box is one of Lundulph's old lunch boxes and I have a cooler lunch bag into which it fits, so I placed the box there and put a couple of small frozen cooler blocks on top as it was looking like it'd be quite a hot day. This all worked a treat, all macarons arrived uninjured.

Incidentally, I did find some suitable macaron boxes on the internet, but I've yet to buy some and try out. I'm not sure I'm keeping to the standard macaron size yet.

IMG_5035 IMG_5036

There was quite a lot of ganache left, so I made a second batch of macarons a few days later, this time from sunflower seeds. These had a more neutral flavour compared to the sesame version and didn't combine as nicely with the raspberry ganache. Besides, I made a mistake. The mixture was stiffer than I expected it and once I'd piped them, they wouldn't sink down, but kept the peaks from the piping nozzle. The mixture was sticky, so I used a greased up palette knife to level them out. This left some grease on each macaron and when they were baking, this heated up too much and caused almost all macarons to puff up on top, many looked like miniature volcanoes.

8 March 2016

International Women's Day Bake Off

It seems this year the International Women's Day on the 8th of March is the thing to celebrate and some of the women at work got together and arranged a bake-off. As some of the men did last year for Movember, the baked goods was to be sold and the proceeds were donated to Your Sanctuary. The bake-off winner was the person whose bake sold out first.

IMG_4912

Again I thought I'd bring along something Swedish, and as we'd recently finished off Lundulph's Christmas crop of "hoovers", I thought I'd do that. I'd also recently come across a new recipe (in Swedish) for them and wanted to try it out. I also made vanilla dreams to cater for people with nut allergies.

Ingredients
Makes 24

Rolling marzipan
150 g icing sugar
300 g marzipan (50-50)
60 g glucose
green food colouring
yellow food colouring
icing sugar for rolling

Filling
350 g cake crumbs or ground digestive biscuits
120/140 g unsalted butter at room temperature
60/80 g icing sugar
20 g cocoa powder
1 - 2 tbsp dark rum

Decoration
200 g dark chocolate

Method

  1. First make the rolling marzipan, as it needs to rest for a couple of hours at least. Start by sifting the icing sugar into a bowl.
  2. Warm up the marzipan in the microwave to get it to around 30 °C. Do this in short bursts with a little kneading between each.
  3. Add the marzipan and the glucose to the icing sugar and knead carefully together until well combined. Add the food colourings at the end and knead to get it evenly spread through and get a pale warm green.
  4. Wrap the rolling marzipan in double layers of cling film and leave to rest.
  5. Place the cake crumbs in a food processor. If using digestive biscuits, break them up into pieces first.
  6. Place the butter in a bowl and stir with a spoon until creamy and soft. Use 120 g if using cake crumbs and 140 g if using digestive biscuits as they are drier.
  7. Stir carefully in the icing sugar, cocoa and rum. Again use the smaller amount of sugar if using cake crumbs and the larger if using digestives. Finally add the crumbs and knead together into a dough.
  8. Divide into four equal parts and carefully roll each one out to a sausage of about 30 cm length and about 2 cm diameter. Place on a baking tray lined with baking paper. Cover with cling film and chill in the fridge for at least 30 minutes.
    IMG_4903
  9. Divide up the rolling marzipan into four equal parts. Keep the parts not being used well wrapped up. Roll out one part at a time, dust with icing sugar to make sure it doesn't stick to the surface. Roll out to a rectangle, 2 - 3 mm thick, just over 30 cm long and wide enough to cover the filling and overlap a little.
    IMG_4904
  10. Brush off excess icing sugar, then place a filling roll onto the marzipan and roll it up. Brush a little water along the edge, to help it stick together in the overlap. Return to the fridge and repeat with the remaining three parts.
    IMG_4905
  11. Once all four parts are "dressed", take out of the fridge and divide each one of them into six pieces. First mark up and when you're happy that they are all equal, cut through with a sharp knife.
    IMG_4909
  12. Finally, melt the chocolate either over a water bath or in short bursts in the microwave with lots of stirring between. Make sure to use a narrow, deep bowl, to make dipping easier. The chocolate doesn't need to be tempered.
  13. Now dip each end of the rolls, to cover the edges. Carefully shake off excess chocolate and place on a baking tray lined with a clean piece of baking paper and leave to set. If they are well chilled, this won't take long.
    IMG_4910
  14. Store in an airtight container, with baking paper between layers in the fridge until ready to eat.

The filling here was a bit on the pale side and I think this is because of only using cocoa. There are other recipes where also melted chocolate is involved. Now the original recipe says using cake crumbs, as form a sponge cake, so I'm guessing they would be a bit more moist to start with. I used digestive biscuits, which were bone dry and so the filling barely kept together with 120 g butter, which is why I've made the adjustment above. I guess if some melted chocolate is added, that will help with binding as well, I might try that in my next batch. I've increased the amount of cocoa, to get more flavour into the filling. Finally I thought it could also be sweeter - again, I'm assuming crumbs from a sponge cake would be sweeter than the digestive biscuits.

A word of warning - dipping the first end of each roll is easy, but not so the second one without nudging the still liquid chocolate. So it's very important to make sure the dipping fingers are clean, or you'll end up with ugly chocolate marks on the next roll.

The rolling marzipan is well worth making, rolling is so much easier. And as long as it's well wrapped, it can stay in the fridge for a while. It will generally stay pliable, but should be brought up to room temperature before use.

What is good about this recipe is that any leftover cake crumbs can be saved in the freezer and when there's 350 g of them, a batch of these lovely hoovers can be made to use them up.

With the left-over melted chocolate, I thought I'd try my hand at decorations:
IMG_4911
Quite pleasing thing to do. I've layered these with small pieces of baking paper in between and put in the freezer for when I need them. There was quite a bit more chocolate left, but it had started to go solid, so I've put it away for my next bake.

I didn't win this bake-off, but all the rolls sold out as did the vanilla dreams and my manager actually put in a request for more "hoovers", which pleased me immensely. Lundulph was not happy as he didn't get to taste these, I took them all along to the bake-off. One of the other participants had made Chocolate Tiffin and I need to ask about the recipe, because I've not had this before and it was fabulous and tasty. At first sight the pieces looked well small, but it's so sweet, you really don't want them bigger. All in all, it was a fun event and we were all sugared up for the whole day.

29 December 2015

Pepparkaka macarons

This one has been on the back of my mind since Doctor Cutie was such a sweetie and gave me a book on how to make macarons a few years ago and this year, I managed to get around to that, since we spent a record 10 days in Stockholm over Christmas. Mostly eating and sleeping, with a couple of breaks for bird watching, since it was the hottest Winter/December on record ever. Many thanks to my Sister Bip for navigating us to a great nature reserve she found a few months ago nearby.

In Sweden they sell ready made gingersnap spice mixture and I found this recipe that seemed good, so I followed it as far as the macarons went.

Ingredients

110 g finely ground almonds (almond flour)
170 g icing sugar
2 tsp gingersnap spice mixture
90 g egg whites (from 3 medium eggs)
2 tbsp granulated sugar

Method

  1. Weigh up a bit more of the ground almonds than required, then sift twice and weigh the end result - that should be 110 g.
  2. Place the almond flour in a large bowl and sift in the icing sugar and the gingersnap spice mixture. Stir through to incorporate well.
  3. In a separate bowl (ceramic, glass or metal), whisk the egg whites to soft peaks, then gradually add the granulated sugar and keep whisking until they go glossy and stiff.
  4. Carefully fold in the dry mixture into the egg whites in three parts, make sure everything is well mixed. If it feels a bit stiff, continue to fold a few more times, it should loosen up.
  5. Prepare a couple of baking sheets with baking paper, then transfer the meringue mixture into a piping bag with a large round nozzle and pipe blobs onto the prepared sheets. The blobs should be about 2.5 cm diameter, flow out a bit and be fairly flat. They won't swell much during baking, so can be done fairly close to each other.
  6. Once a tray has been filled, lift 10 - 15 cm off the work top and drop onto it. Repeat a few times, this will make the macarons settle and any tops that had formed from piping should disappear. This can be a bit noisy, alternatively hold the baking sheet with one hand and tap underneath with the other.
  7. Leave the trays to rest for at least 30 minutes, more if the air is humid. A skin needs to form on the surface of the macarons to ensure they remain flat during the baking.
  8. Pre-heat the oven to 125 °C and bake for 12 - 15 minutes, watching so they don't start getting colour. If they do, turn down the temperature a bit.
  9. Remove from the oven and leave to cool completely. They should come off the baking paper easily, if not, bake for a bit longer.
  10. Once completely cooled, place in an airtight container and keep sealed until needed.

Filling
100 g unsalted butter at room temperature
100 g icing sugar
100 g marshmallow fluff
1 tsp vanilla extract
food colouring of choice (optional)

Method

  1. Stir the butter vigorously with a spoon to make it fluffy, then add the sugar and mix in well.
  2. Add the marshmallow fluff, vanilla extract and colouring and incorporate to get a homogenous mixture.
  3. Transfer to a piping bag, snip off the tip for a small hole (~5 mm) and pipe onto half of the macarons, placing the other half on top of them to form a sandwich.
  4. The above amounts make a lot more filling than the macarons. The filling can be kept in the fridge for a few days or frozen even for longer. It also works nicely on other biscuits or cupcakes. It keeps its shape fairly well and won't go solid over time.

The frosting recipe comes from this site and is for a much larger amount, but the key point is that each of the butter, sugar and marshmallow fluff are to be used in equal amounts per weight, so should be fairly easy to scale up or down as required. I used the basic vanilla flavouring and I didn't use any colouring, but I think I should have perhaps tried with yellow to make them more visually appealing, as the macarons were quite pale too. And don't get put off by the photo on the original website - I almost was and I know I'm pretty crap at taking attractive food photos myself, but this frosting is really good. My Sister Bip even tried it on pancakes and said it was absolutely yummy.

Sadly I went the lazy route (as I tend to for this delicacy) and skipped the sifting of the ground almonds, so my macarons were quite knobbly and seemed a bit crunchier than the fancy shop-bought ones. My Mum's oven is already madly uneven in baking, so most of the macarons ended up quite slopey, even though I turned the trays around half-way through baking.

I now also know that the ready gingersnap mixture is very heavy on the ginger, so this was quite dominating, too much for my liking, but this didn't prevent me from gobbling down a couple of macarons after each meal during the holidays. Lundulph also thought that there was a bit too much ginger, but said that they were quite a nice Christmas treat. I've also taken home the remainder of the gingersnap mixture and will try it out in next year's gingersnap batch, to see if it tastes differently in the cookies.

It also seems I forgot to take photos of my knobbly macarons. Oh well...

26 August 2015

Birthday Kransekake

This year Lundulph's Mum (like my Mum earlier this year) is turning 70, so big celebrations are in the making, more on this later. But we also decided to have a small family get-together on the actual day and Lundulph kindly volunteered me to make a cake.
IMG_4779

Now times are busy at work at the moment, so I opted to work from home during the birthdays, as Lundulph's Dad also had his birthday a few days before his Mum. Thus we stayed at their place for a few days and while Lundulph was helping out with the party plans, I sat in the guest bedroom working.

This also meant that increasingly Lundulph got more and more nervous about the cake - he hadn't seen any signs of a cake, other than some odd looking biscuity rings that had been in the freezer and had meant he wasn't allowed to rummage around for food. This because I'd decided to make it a surprise for everyone and I was quite worried that Lundulph would get upset because I hadn't made a "real, traditional" cake. But I decided to plod on with my plan.

It all started of course when I went in to Lakeland for ideas and spotted a kransekake pan set. I couldn't resist it, it's as simple as that.

And while Lundulph was enjoying the Ashes for a couple of days, I used the opportunity to make the kransekake rings.

Ingredients

1 kg "50/50"-type marzipan
300 g icing sugar
80 g egg whites (2 eggs approximately)
50 g butter
2 dl ground almonds

Royal icing
2 dl icing sugar
1 egg white

Method

  1. Grate the marzipan coarsely into a large bowl.
  2. Add the icing sugar and stir together with your hand until the marzipan and sugar are mixed through.
  3. Whisk the egg whites lightly, then start adding to the marzipan mixture a little at a time, while kneading the marzipan.
  4. The mixture is ready when you can roll out a sausage of about 2 cm diameter and bend it into a circle without it cracking anywhere.
  5. Melt the butter and brush the moulds well, then sprinkle generously ground almonds and tap off the excess.
  6. Pre-heat the oven to 180 °C and start rolling the marzipan mixture to about 2 cm diameter lengths.
  7. Gently lay onto each ring mould, splicing the two edges with diagonal cuts.
  8. There should be some marzipan mixture left over, use about a ping-pong ball sized piece and shape into a cone for the top of the kransekake.
  9. Bake all in the oven for about 10 minutes, keeping an eye on them and removing as soon as they start getting a bit of colour. Bake the top on an oven safe dish lined with baking paper.
  10. Leave to cool down complete on the moulds, before carefully removing the rings. If they've puffed up too much and stuck together, carefully first separate in the moulds with a knife.
  11. Place the rings on a large plate, with smaller rings inside the larger ones, perhaps 3 - 4 stacked. Place in plastic bags and freeze until the day before they're needed.
  12. The day before serving, remove from the freezer and let thaw in room temperature.
  13. A few hours before serving, make up royal icing by mixing about 2 dl icing sugar with some egg white. Add the egg white a little at a time into the icing sugar and keep stirring through before adding more. Continue until the consistency is such that it can be piped , but it won't drip or run.
  14. To put the kransekake together, start by stacking all the rings, with the largest at the bottom and the smallest at the top, to make sure you have the right order as it can be difficult to tell, the size difference between neighbouring rings is small. Then remove them one at a time and lay them out in order.
  15. Put the royal icing into a piping bag fitted with a small round nozzle, then pipe four small blobs at the bottom of the largest ring and place it securely onto the serving plate.
  16. Pipe waves around the top of the large ring, always starting and ending in the inside of it, as this will get hidden with the next layer.
  17. Once the whole ring has completed, carefully place the next one on top, making sure it's centered and repeat the icing waves all around, before placing the next ring on top of that.
  18. Continue until the whole pyramid has completed - you may need to stand on a chair to reach the top layers. Finish with the little cone.
  19. The kransekake is eaten, by working your way down through the layers.
IMG_4776 IMG_4777 IMG_4778

And indeed it was a great success - it's simple, yet impressive as it's so tall once assembled. It was also very sweet, so I'll try to reduce this next time. The idea with the freezing is that it will make the kransekake crunchy on the outside and chewy in the middle. What happened was that the 4 - 5 rings Lundulph and I took home with us, got chewier and chewier with every day they stayed in the larder. It was very nice to have a little nibble after lunch or dinner. And Lundulph was not at all upset, but how could he with all the marzipan to munch on.

Some will also melt dark chocolate and make fancy filigree decorations which are stuck in between the rings. It was my intention to do this as well, however I ran out of time and as I don't trust myself to be able to temper the chocolate, I thought I'd better not bother. Next time I will and I'll also try the alternative traditional shape - a cornucopia, with small petit fours or such spilling out of it. This, however, requires the rings to be glued together with caramel and looking at some professionally made ones, they even have special stands for support, like here from a Danish brand of marzipan, it's in Danish, but just look at the photos.

Key thing to keep in mind - there must be at least 18 rings and preferably more. At the Danish Bake-Off in 2012, the kransekake (Norwegian) or kransekage (Danish) was one of the technical challenges and had to have 20 rings. I highly recommend doing an image search on Google for ideas on how to decorate.

Finally a word on the "50/50"-type marzipan. The numbers indicate the proportions of ground almonds to icing sugar if you're making it yourself. Rather go for a 50% marzipan, which tends to be more expensive and is not as soft to work with, but that's how it should be. I actually baked my kransekake at 200° and thanks to the egg white, it puffed up. I think in my Swedish baking book, it's recommended to shape everything and then let stand for 24 h to form a dry crust, before baking. A bit tricky in the UK, especially when moving towards Autumn and there's lots of rain and moisture in the air. Might be worth a try.

21 August 2015

Cake pop success!

And so the long-planned birthday celebrations neared and I baked cake-pops and was quite successful this time, very pleased indeed and discovered new things too.

IMG_4797

Ingredients

Cream cheese frosting
160 g unsalted butter
80 g cream cheese
400 g icing sugar
2 tsp vanilla extract

Cake pop mixture
860 g leftover cake sponge
646 g cream cheese frosting

Decorations
3 x 340 g blue Wilton Candy Melts
vegetable shortening
icing lace from Lakeland's magic icing powder
paper lolly sticks
large piece of polystyrene, fixed to the work surface, to push the cake pop sticks in while they set

Method

  1. To make the frosting, cream together the butter and cream cheese, then gradually add the icing sugar and finally the vanilla.
  2. Beat until light and fluffy,
    IMG_4787
    then cover and chill for 30 minutes at least.
  3. Make sure the cake crumbs are as fine as possible,
    IMG_4786
    then add the cream cheese frosting a little at a time until the mixture texture is a bit like fudge.
  4. Wrap in cling film and chill for at least an hour.
  5. Make sure there is space in the fridge before starting the next step.
  6. Roll small balls, about the size of a walnut,
    IMG_4789
    place on a tray, cover with cling film and chill again for an hour until they are firm.
  7. Melt some of the candy melts in the microwave, 10 s at a time and stirring after each burst until completely melted.
  8. Take the cake balls out from the fridge, dip a lolly stick in the melted candy and carefully push into one of the balls, to reach the centre.
  9. With your finger, wipe the melted candy around the lolly stick and put back on the tray.
  10. Repeat with the other cake balls, then cover with cling film and chill in the fridge until they are quite firm.
  11. Melt a couple of tbsp of vegetable shortening in the microwave and allow to cool down a bit.
  12. Now place a whole packet of candy melts in a narrow, deep bowl and melt in the microwave, again at 10 s intervals and stirring in between.
  13. When the candy melts have melted completely, add the melted vegetable shortening and stir in well, this will make the mixture a bit thinner.
  14. Take the cake pops out of the fridge, a few at a time, then dip each in the melted candy and tap the lolly on the edge of the bowl, to remove the excess.
  15. While you tap, also rotate the cake pop. When the excess has mostly been removed, gently place a piece of icing lace and push the lolly into a piece of polystyrene that has been secured to the work surface.
  16. Proceed with the remaining cake pops, only taking a few out from the fridge at a time, so they don't go soft in room temperature and fall off the sticks when dipped.
  17. If the candy melt starts setting, whizz in the microwave for another 10 s burst and if necessary add more melted vegetable shortening.
  18. Once the cake pops have set, keep in the fridge.

The cream cheese frosting recipe comes from here, where there are step by step instructions on how to make the cake pops with very useful tips and tricks. I used Philadelphia cheese, which worked very nicely.

Some time ago, I also came across this website. It offers a wide selection on various online video courses, though it requires registration and there are several free courses as well, one of which is on cake pop basics. It's quite good for decoration ideas, though I think their "standard" cake pops were too large for my liking. The ones I made were more of what was termed "mini" cake pops. The above amounts resulted in 75 cake pops.

Now for the icing lace. There are several brands out there and YouTube has plenty of videos on the topic. I bought the ones in Lakeland, which are their own brand and consists of two silicone mats and a tub of "magic icing". The instructions for the icing mixture are on the silicone mat packaging, but I took the precaution of reading all the comments on the Lakeland website, where it seems about 50% of the buyers had failed miserably and were understandably upset, whereas the other half had had great success and some of them had also written what they'd done. Now the packet instructions didn't quite match the instructions in the comments, so I decided to follow the instructions on the packet as a first attempt. But I scaled up the amounts a bit, as I don't think my kitchen scales are sufficiently precise for the minuscule amounts suggested.

Magic icing for lace
50 g magic icing powder
45 g boiling water
silicone mould mat with suitable patterns
firm plastic dough scraper

  1. Stir well with a spoon, it'll go quite stretchy and gloopy, but keep at it until the mixture is even.
  2. Wrap tightly in double cling film and leave for a few hours before using.
  3. Place the silicone mat on the work surface, unwrap the magic icing, cut a piece off with the dough scraper, then cover up the magic icing again.
  4. Now firmly run the dough scraper with the piece of magic icing over the silicone mat, pressing down so the mixture gets into the lace mould. The mixture should feel a bit like silicone sealant - pliable, but sticky.
  5. Continue to fill the silicone mat. Any left-over magic icing can be wrapped in double cling film for later.
  6. Leave the mould to dry for about 12 h, then carefully prise off the pieces of lace and store in an air-tight container.

My original intention was to use the round laces to form petals with each cake pop being the middle of a flower. Unfortunately, I wasn't able to make them stick to the cake pops and they kept falling off. So a quick adaptation was to cut out the middle of each piece of lace and stick on top of each cake pop. I did try a few cake pops with sprinkles, this worked quite well, but must be done before the candy coating sets.

IMG_4796

Needless to say that for 75 cake pops, I spent a lot of time in the days before the party, making icing laces. And as it took me a couple of silicone moulds to get the knack, I made well over 100 of the laces and there were quite a few left over.

One of the most interesting things the cake pops resulted in was that when Lundulph's Mum and Aunt tried them, there was a rush of childhood memories that came back to them - of a type of cake their Mother used to make. Some search on google came up with Russian Cake. I'm not sure how true the history of this is, but it's a very nifty way of using up scraps of sponge cake, however in this cake, jam is used as the binding agent, rather than cream cheese frosting. The texture is the same, and that's what triggered the memories.

As an aside I can also mention that Lundulph had no issues eating these either, even though there was cheese in them.

4 May 2015

Rice Krispies Treats

I have come to realised that YouTube is a lot more "dangerous" than Wikipedia, when it comes to clicking around and losing several hours by watching fascinating videos. Following on from the ice cream discovery the other day, I came across a very talented lady from Canada, who has so many inspiring videos, it's hard to decide what to try first and I've once again ended up with loads of browser tabs open, so that I don't forget the wonderful creations she does. The easiest one was watermelon shaped Rice Krispies treats, they were so pretty and seemed so simple to do, I decided to try them first. Besides I had marshmallows in the larder already, originally intended for popcorn balls. I translated the amounts to metric. I'm beginning to think that my Sister Bip did the right thing in buying herself a set of American measures, to make it easier to do recipes she finds on American websites. Perhaps I should get a set? But it just doesn't feel right, having grown up in a metric environment. I'll try to hold off for a little longer. Besides, in converting the amounts, I noticed that an American cup is not the same as a Canadian cup and it's a good thing read the "about me" section and used the Canadian cup measure.

I was also not able to find Kool-Aid powder in my neighbourhood, so instead I purchased Robinsons Squashd instead, it seemed to be along the right lines.

I strongly recommend watching the video before doing the recipe here.

Ingredients

510 g marshmallows
16 dl Rice Krispies
106 g unsalted butter
Robinsons Squashd Citrus
Robinsons Squashd Summer Fruit
green food colouring paste
red food colouring paste
tiny chocolate buttons
butter for greasing pan, fingers and spatulas

Method

  1. Grease a round springform cake pan, about 23 cm in diameter (9 inches).
  2. Weigh up 141 g of marshmallows and place in a large glass bowl, then add 28 g of butter.

  3. Place in the microwave and whizz on high for 1 - 1.5 minutes, depending on how powerful your microwave oven is. Watch the marshmallows as they balloon and stop once they have all puffed up and the butter has melted, then remove from them microwave oven.

  4. Add 1 - 2 short squirts of the citrus flavouring and some green food colouring paste to the melted marshmallow mixture and stir through until well combined and you're happy with the colour.
  5. Now add 4.5 dl of Rice Krispies to the mixture and stir until all are well coated in the green goo. It will get very sticky, so be careful.
  6. Once all is coated, transfer to the greased cake pan, making sure to arrange it along the sides.
  7. Now grease up your hands with butter and carefully and gently push the green mixture against the walls of the pan, making sure that it's level thickness and height all around.
  8. Next wash out the glass bowl and the utensils well and dry them.
  9. Measure up 85 g of marshmallows and place in the glass bowl together with 21 g of butter.
  10. Whiz in the microwave as before, it should require slightly shorter time.
  11. Stir together and then add the Rice Krispies and stir them in to get them coated.
  12. Grease up your hands with butter, then transfer the white mixture into the pan, along the green mixture and again press it into the green.

  13. Now add the final 284 g of marshmallows to the glass bowl along with 57 g butter and melt in the microwave.
  14. Once puffed up, add 6 - 7 short squirts of the summer fruit flavouring and some red food colouring paste and stir through until well combined and you're happy with the colour.
  15. Add the remaining 8 dl of Rice Krispies and stir in to coat them completely, then transfer some of it to the pan and using a greased spatula or your greased fingers press down firmly. Repeat in a couple of more steps, to ensure that there are no air pockets anywhere. Make sure the pink/red part is on the same level as the other two.
  16. Now press in a few chocolate buttons in the pink/red part randomly - these will be the watermelon seeds.
  17. Allow to cool completely, then place in the fridge overnight to firm up.

  18. The next day, remove from the pan and cut into wedges and push a lollipop stick through the wide part of each wedge.

As I said, the melted marshmallows form a very sticky substance and I had to constantly grease my fingers to work it. I ended up cutting off a small piece of butter and using it as if it were soap. And as I kept getting bits stuck to my fingers, I ended up eating some of it and boy was it tasty! What was surprising was that it didn't go completely solid, even after a night in the fridge, but the surface dried and it stopped being sticky.

However, the proportions between green, white and pink/red were still not quite good, the white needs to be reduced and the green increased. And I did end up with some spare of the pink/red mixture which I formed into a patty and cut into squares once it had set. I also didn't have the right sized cake pan, so I used my extendible cake ring, which isn't as solid as might be useful for this particular use. I placed it onto a baking tray lined with baking paper and only greased the cake ring. So I ended up with some strips of green where it had landed before I pushed it all to the sides.

Finally the pieces ended up a bit bigger than I expected them, not that it stopped me and Lundulph from eating a whole piece each. We could probably have had seconds. But I think it would work better as bite-sized cubes for day-to-day purposes.

Lundulph's comment was that they were very nice and that basically anything that will stick Rice Krispies together is a good thing. The ballooning of the marshmallows was quite interesting to watch, it might well be worth microwaving a few just to watch that and they are quite edible afterwards too.

14 February 2015

Mochi Ice Cream

After my Sister Bip and I tried the mochi ice creams, she's been wanting to try and make some at home. We did try over the Christmas holidays, but hadn't prepared properly and used rice flour we found in our Mum's cupboard. This was not a good idea, it wasn't the glutinous kind and so the gloopy mixture we concocted went straight to the bin. And Bip was well disappointed and upset. But she wrapped all the ice cream balls in a bag, ready to be wrapped in mochi dough.

However, this time she'd prepared and bought the fancy glutinous rice flour and we found our way back to the recipe we'd chosen. This is a very good web page, it has step-by-step photos and is very easy to follow.

The two things we did was to do our own measurement conversions to be on the safe side and also ignored the instructions for cooking the dough in the microwave - short bursts and keep an eye on it is the way to go.

The mochi dough is a very interesting thing. Lundulph looked up about the word glutinous in this context - it doesn't have gluten like wheat flour, but instead it refers to its stickiness like glue. Here's where the photos step-by-step proved really useful, because if I hadn't seen how much corn starch to use, I would have glued together half the stuff in the kitchen to myself.

What I mostly liked about the mochi was how it felt to the touch - like really soft and feather-light velvet. I was also surprised that even though I'd covered the mochi dough with so much corn starch, it quite happily combined back to a ball and allowed itself to be rolled out a second and a third time. But it's messy work and Bip didn't want to get too involved and wandered off to play with her phone towards the end of the mochi rolling.

IMG_4523

There was a lot of cling film involved and I felt bad about it and I wonder if there is an alternative that can be used instead.

IMG_4522

Once all the pieces were done, she helped in making the mochi ice creams by handing me the ice cream balls one at a time, while I rolled them up and gave back to her to place in the freezer.

IMG_4525 IMG_4531
IMG_4528 IMG_4530

We couldn't wait to try them and did so a couple of hours later after lunch. This was a bad idea - despite working as fast as we could, the room temperature mochi dough had melted the ice cream balls substantially.

The next day we tried again and this time the mochi ice creams had firmed up nicely. What I didn't like was that the mochi dough felt rather bland - I'll try to add more sugar next time. And I think a sweeter ice cream would be worth using as well. Or perhaps nutella or dulce de leche or gianduja. It would be nice to trim off some of the overlap of the mochi dough as well, will need to think about that.

Lundulph kindly acted photographer as I was up to my elbows in cornstarch and although my camera has had its share of food splatter, I felt this would kill it for sure.

25 November 2014

Nutty Chewy Treats

Another recipe I came across in going through my recipe collection is the following. It's really easy and massively tasty, yet I'd managed to miss it completely in the 20 odd years I've had it.

IMG_4456

Ingredients
Make 18 large pieces

100 g pecan nuts
1.5 dl icing sugar
2 large egg whites
pecan halves for decoration (optional)

Method

  1. Pre-heat the oven to 150 °C fan and line two baking sheets with baking paper.
  2. Place the pecans and the icing sugar in a food processor and blend together as finely as possible, but without the pecans releasing their oil.
  3. In a separate non-plastic bowl whisk the egg whites to stiff peak stage.
  4. Carefully add the nut/sugar mixture a bit at a time and fold in.
    IMG_4454
  5. Transfer the mixture to a piping bag with a fairly open star nozzle and pipe lengths of about 7 cm onto the baking paper, making sure to leave a lot of space between them as they'll swell during baking. Decorate with a pecan half on top if using these.
    IMG_4455
  6. Bake for about 25 - 30 minutes, then remove and allow to cool on a wire rack. Store in an air tight container.

Once the nut/sugar mixture has been folded into the egg whites, the whole thing will appear to collapse a bit, this is OK.

The original recipe said hazelnuts, but it seems I forgot to buy these, so used pecans instead. I also forgot to put a pecan half on top of each. It also said to bake for 15 minutes, however at this point the treats were firmly stuck to the paper. Now since these are basically meringues with nuts, just like macarons, I resorted to the rescue method and baked for a further 15 minutes. They'd sunk in a little by then, but given how ugly my piping was, this didn't really matter.

For next time, I'll pipe round rosettes instead, so that they can be eaten in one bite as they are fairly crumbly along with the lovely chewiness in the middle. Lundulph and I gobbled ours up way too quickly.

I'd also like to try them with different nuts, in which case the decoration on top is a good way to know which one you're eating.

7 February 2014

Råbollar

Yes, I'm getting inspired by my lovely Sister Bip. Not only did she manage 20 days of veganism, she managed so well, that she's continued with it and has started buying kitchen appliances in order to make interesting food concoctions.

IMG_3817

Her latest thing is the so called "råbollar" or raw balls, which is a really tasty and hopefully fairly healthy sweet/snack. So when I last spoke with her (she's very busy these days), I pushed her to let me know the recipe and the other day I got to work.

Ingredients
Makes around 35

55 g walnuts
50 g pecans
50 g Brazil nuts
55 g cashews
50 g almonds
50 g pumpkin seeds
2 tbsp water
200 g Mozafati or Bam dates, pitted
20 g coconut fat at room temperature
dessicated coconut for rolling

Method

  1. Use a food processor to grind all the nuts and seeds as finely as possible, but don't let them turn into butter.
  2. Add the water, dates and coconut fat and whizz until it comes together to a dough
  3. Roll small bite-sized balls, then coat with dessicated coconut.
  4. Chill in the fridge for at least an hour.

Now I don't have a food processor, only a hand held blender with a number of attachments, among which is a mini-processor. So what I did was grind each type of seed on its own, because I didn't think all would fit in.

IMG_3816

Well aware how thick the mixture would be, I added the water, dates and coconut fat and changed to the liquidizer attachment. Needless to say, it wasn't able to cope, went hot and started smelling of burnt. I stopped, packed everything up, put in the fridge and decided to call it a day. The blender took forever to cool down, so I almost wrote it off. But the next day, I decided to try again, and even managed to squeeze the whole mixture into the mini-processor. The blender still worked, miraculously, and eventually I managed to get the mixture to a paste, but had to give it a lot of help on the way, by carefully removing the parts that had the right consistency and then pushing the non-ready parts down to the blades.

IMG_3818

So, eventually with a lot of care, I reached a point where the mixture/dough seemed to be of the right consistency and I rolled the balls and coated with coconut. When Lundulph came home and had a look in the fridge, he exclaimed joyfully that there were secret fancy things in there. And he really liked them! Not too sweet, nice texture, a bit like some Indian sweets we've tried in the past. He tried to work out what sorts of nuts I'd used - he got 3. Personally I would have liked them a little sweeter.

On the whole, I'm very pleased with this recipe - it allows for plenty of variation - basically use the nuts/seeds you have at hand and I believe raisins or sultanas or other dried fruit would work just as well. Lundulph did some research on nuts a couple of years ago and commented that I should try to cut out the cashews and Brazil nuts, apparently they are not as healthy as walnuts, pecans and almonds. Also he was wondering if I could skip the coconut fat as well. Maybe it's possible - I'd need to increase the amount of fruits.

A brief word on dates. When we went to Dubai last year, we bought a box of dates from the market. In fact there was a whole section dedicated to just dates there. Now I've never been a fan of dates, I always found them gritty, so was highly reluctant when the seller tried to almost force-feed us in order to get the sell. But I'm glad he was so insistent, because I had an epiphany and immediately bought the box, vaguely wondering if I should get a second one, so I wouldn't have to share with Lundulph, who was also very pleasantly surprised about the taste. Well back home, I investigated the box and discovered that the dates were called "Mozafati" and were the sweetest, creamiest thing ever. I used them for my carrot and date cupcakes last year. Since then, I've been searching for this type of dates in the UK, without success and came to the conclusion that these aren't exported to the West and the chap that sold us these dates knew exactly what he was doing. However, after having given up, I spotted a stack of boxes in our local farm shop and couldn't believe my eyes when I saw the magic word "Mozafati" printed on them. Needless to say, I bought 6 boxes, any more would have attracted way too much attention, I suspect. Now we're rationing them, to make them last as long as possible. In my research, I managed to find out that these are mainly produced in Iran and around the city of Bam, thus they are also known as Bam dates. The tricky thing with them, which also makes them expensive is that they are picked when they are half-dried, meaning each date palm needs to be harvested several times, as opposed to other types of dates, where the whole bunches are picked in one go. On occasion, I've also come across Medjool dates, which come close to the Mozafati, and Medjool are more readily available too.

Speaking with my Dad the other day, he told me he'd been treated to these lovelies twice and said that Bip had added agave syrup to the second batch and then they'd tasted nicer. When I told Lundulph, he said no to additional sugar. Oh well, we'll see. At least my first batch is almost gone now, it's quite nice to have a couple of so along with a cup of tea. And speaking of variations, I'm getting the idea of perhaps even hiding a whole nut or a piece of dried fruit in the middle. I'll try that next time. I might also see what appliance I can get rid of and get myself a proper food processor...

28 December 2013

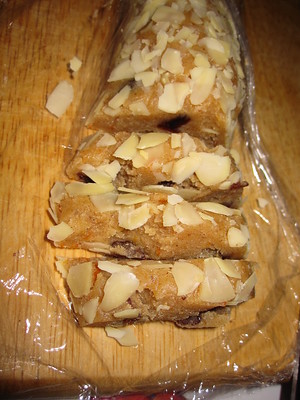
Almond Roll

IMG_3720

Among the recipes my Mum has given me, there were a few under the theme "quick Christmas sweets" and one just seemed too appealing not to try out at the earliest opportunity.

It's a Swedish recipe for "mandelrulle", which translates to almond roll. Very good for using up left-over marzipan.

Ingredients
500 g marzipan at room temperature
one orange
1 tsp ground cinnamon
1 tsp ground ginger
0.5 tsp ground cloves
1 dl raisins
flaked or chopped almonds for coating

Method

  1. Depending on the type of marzipan, if it feels hard at room temperature, then dice it or grate it first and place in a bowl.
  2. Finely grate the orange zest and add to the marzipan, along with the cinnamon, ginger,cloves and raisins.
  3. Using your hand, mix together the ingredients well, ensuring that the spices are as evenly distributed as possible.
  4. Transfer the mixture to a long piece of cling film, wrap tightly and shape to a sausage, about 5 cm diameter.
  5. Spread out the almonds on a piece of baking paper, then carefully unwrap the marzipan sausage and transfer to the almonds and roll so that it gets coated.
  6. Return the roll to the cling film and wrap tightly, then place in the fridge for an hour before slicing.

The marzipan I used was 38% almonds and fairly soft even out of the fridge. The orange zest was quite juicy, so I should have squeezed it out a little before stirring in. But I didn't and so the mixture was rather sticky and it took me a long time to shape into a sausage. I also halved the amount of cloves on my Mum's request and this was a good thing, because it was quite strong.

We had a little taste of this and it was yummy, but very, very sweet and even after a couple of hours in the fridge, it hadn't hardened much and went flat when I tried to slice it. I think using a marzipan with a higher percentage almonds might work better. I really liked it and there's room to experiment with the spices. Lundulph said all this was unnecessary and eating the marzipan as it comes is quite enough, but then he does like marzipan. In fact he went to the point of saying that it was a waste of good marzipan. I disagree and Lundulph didn't say no to a piece either.

Of course the mixture can be shaped differently, it just occurred to me that I could use my meatball maker, which I used with such success for making cake pops. Wrapped in nice paper, they would make a nice gift. Well, there's plenty of it to eat now...

Trying out Bip's Christmas Presents

This year, my Sister Bip wished for an ice cream maker, which she got and so after freezing the bowl for some 24 h, tonight we were ready to try it out.

Unfortunately she'd planned to improvise a recipe and had hoped that my Mum and I would have enough know-how to help out, but we've never had an ice cream maker, so we ended up googling for something quick and easy, bearing in mind that the maker would need to churn for 30 minutes or so.

IMG_3716

What she found was this (in Swedish). It is a vegan recipe, so both yoghurt and cream were soy based and from a particular brand and the yoghurt was bilberry flavoured. We didn't have that particular brand and flavour of yoghurt, nor the cream, so we used what we had instead, as you'd normally do. This wasn't entirely good, we really should have read the whole blog entry. Still, here goes.

Ingredients
Makes about 900 ml
3 dl soy yoghurt natural
250 ml oat-based whipping cream alternative
1 tsp lemon juice
3 tbsp icing sugar
2 dl frozen bilberries
1 dl chopped walnuts

Method

  1. Stir together yoghurt, cream (no need to whip it first), lemon juice and icing sugar.
  2. Run in an ice cream maker as per manufacturer's instructions.
  3. After about 5 minutes of churning, add the berries and nuts, then let churn until the ice cream is ready.
  4. Transfer to a plastic box with an air tight lid and keep in the freezer until needed.

Now the original recipe didn't contain any sugar, I realised that there wasn't any and we added it shortly after we'd started up the ice cream maker, it kind of incorporated OK, but we only added 2 table spoons and one more would have been good. Reading the original blog entry, it comments that the bilberry soy yoghurt was watery and very sweet to eat, in fact sugar had been second in the list of ingredients, which is why the blog writer suggested using it for ice cream instead, so that the sweetness is toned down.

Bip's second Christmas present was a silicone mould for breadsticks.

IMG_3715

It was from me, so I got to try it out, while Bip was making the ice cream. Here, I'd read the booklet that came with the mould, so I felt fairly confident that it would work. The only thing I was a bit disappointed with was that the booklet stated that it contained 30 delicious recipes, but I could only count 8. The website did have some, but they weren't too easy to find. I made the basic sweet breadstick recipe to use together with the newly made ice cream.

Ingredients
Makes 78
40 g natural soy yoghurt
40 g vegetable oil
1 medium egg
75 g granulated sugar
65 g wheat flour
1 tsp baking powder
Oil or melted butter for greasing the mould

Method

  1. Stir together all ingredients to a thick-ish batter,
    IMG_3714 then transfer to a piping bag.
  2. Grease the mould, then cut a small hole in the piping bag and pipe the breadsticks. The batter makes "two and a half moulds", i. e. 30 + 30 + 18.
    IMG_3717
  3. Place the mould in the microwave oven, set it to half strength or nearest below and bake for around 5 minutes. For the oven I used, I set to 360 W for 6 minutes, which resulted in some of the breadsticks burning a little and some not going crispy, but on the whole very tasty.
    IMG_3718
    For the last 18 sticks, 3 minutes would have been enough, but I set it to 4 and a half and burnt them almost to the point where it was tempting to throw them away.

So, we had yoghurt bilberry ice cream with sweet and crunchy breadsticks, which was really nice, though I would have preferred the ice cream to be a bit sweeter.

IMG_3719

Of course I won't be able to repeat these recipes, at least not the breadstick one, the ice cream could be made without a machine, but instead freezing in a bowl and stirring through once an hour for 6 - 7 hours until ready. In this case, the cream should be whipped, it'll help make it fluffy. I've made such ice cream before and it can be done, but takes time and patience, that's the tricky part.