Showing posts with label Snack. Show all posts

15 June 2020

Strawberry Custard

Over the past few weeks, my Mum has very dilligently read the recipes in her weekly magazine, selected ones she believes are good and has got my Dad to scan and e-mail to me. The magazine usually has a theme or ingredient each week, so in the strawberry recipe leaflet, there were several good ones. One was for "a simple strawberry ice cream", which frankly is the basic recipe I've been using over the past month and a half, with some strawberry jam added and frozen in a bundt cake tin to make it prettier.

On the same page, there was a second recipe for what they called "strawberry curd". I've had several very positive experiences with curd in the past, so was quite keen to try this one, though it looked like pink yoghurt in the photo. Indeed, I'd say this is a custard, not a curd, but it was very tasty and combined brilliantly with home made yoghurt - one of Lundulph's favourite afternoon snacks. I made a double batch straight away last week and I've now made a second one, with the aim to try an idea for another no-churn ice cream.

Ingredients

Makes about 600 ml
500 g washed and trimmed strawberries
2 dl granulated sugar
4 large eggs
2 tbsp corn flour
50 g butter

Method

  1. Blend the strawberries and if you want a smooth custard, sieve them to remove the pips.
  2. Whisk together the strawberry purée, sugar, eggs and corn flour in a saucepan.
  3. Bring to a simmer slowly, while stirring constantly and let simmer until the mixture thickens.
  4. Remove from the heat and whisk in the butter, then transfer to an air-tight container, cover the surface with clingfilm and let cool to room temperature, then store in the fridge.

This should last 2 - 3 weeks in the fridge and I've frozen some to see how that works. I think it would make a good cake filler and as I mentioned above, mixed with yoghurt it is very tasty. If the frozen one is fine after thawing, I will try using it as a filler for chocolate bonbons.

The only thing is that the strawberries tend to lose their colour when cooked, so the custard will be pale pink with a tendency towards grey. This doesn't bother me for home use, but if it'll be served to guests, I'd add a little red colour to make it a bit more appealing to the eye.

Lundulph thought it was quite nice too and was speculating that it would be very nice on top of some sort of sponge cake or inside a Swiss roll. We'll try that next.

19 April 2020

Crispy Tofu

IMG_5933

It's been ages since we had stir-fry and in last week's online food shop, I added a couple of bags of ready cut vegetables. But what to do along with them. Normally I'll get tiger prawns for Lundulph or some nice fillet steak, but I forgot to do that this time. Then it struck me, we have several packets of extra firm tofu in the fridge, on Lundulph's request. The intention was for him to have tofu as protein replacement, but he did some searching on the internet and established that tofu seems to have a lot lower protein content than the soy beans themselves, so I think he's now gone off the idea. Besides, he feels the texture is too close to cheese, which he still disapproves of.

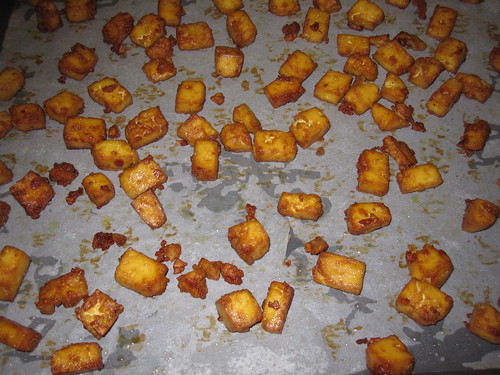
But a look at the packets indicated that they were about to go out of date, so I searched for how to make crispy tofu and the recipe I decided to try is this one. I converted the amounts to metric and also had to make some adjustments as the two packets I wanted to use were 280 g each. Otherwise, I was determined to follow the recipe as closely as possible.

Ingredients

560 g extra firm tofu
2 tbsp olive oil
2 tbsp soy sauce
2 tbsp cornflour

Method

  1. Pre-heat the oven to 205°C (not fan) and line a large baking tray with baking paper.
  2. Drain the tofu, if it is in liquid, then cut into cubes, about 1.5 cm and lay out on a clean and lint-free tea towel with a little space around each cube.
  3. Fold the towel over the pieces,then place a large chopping board on top and press down, I actually sat on top for a couple of minutes.
  4. Place the cubes in a large bowl and drizzle the oil and soy sauce over, then using one hand turn the cubes gently to get them coated.
  5. Sprinkle the cornflour and turn the cubes further to get them coated. Don't worry if some of the cubes crumble and break.
  6. Tip the tofu into the baking tray and spread them out, again so they don't touch each other. Then place in the oven.
  7. After 15 minutes, stir the cubes to turn them and bake for a further 15 minutes. They are now ready to serve.

IMG_5932

Both Lundulph and I loved these, the texture was very good, they were nicely crispy on the outside, but soft in the middle and worked really well with stir-fried vegetables and quinoa. Lundulph thought they were a bit on the salty side and possibly the tofu itself was salty and adding soy sauce took them over the top a bit. We ate most of them for our dinner, there's about a handful left and as I was putting it away, I ate one piece that looked particularly crunchy and it was tasty still, even though it was cold. I suspect they would be very nice in a Thai curry too, instead of chicken.

Next time, I'll swap the olive oil and soy sauce for green masala, I've used it with silky tofu before and it's been very nice, so I have good hopes for this.

10 April 2020

Кифли с мармалад

These are one of my favourite breakfasts in Bulgaria. It is read as "kifli s marmalad" and is a curious take on croissants in that they are shaped in the same way, but not from puff pastry. The name comes from German I think - "Gipfel" which means tip/peak of a mountain. The traditional filling is marmalade made from rosehips, though I've seen chocolate and other things lately and it's probably nice too, though I wouldn't try it, if there's rosehip marmalade to be had. Google translates these as "marmalade muffins".

IMG_5928

Lundulph has wanted me to make these for ages, since he always has these when we go to Bulgaria and after trying out the recipe for the super fluffy bread rolls, I felt I've found the right type of dough for these delicacies. Though searching for recipes on the internet indicates dough for kozunak should be used, I disagree, eggs have no business in there. It is key to follow the initial recipe I wrote up, with 4 tbsp of sugar, possibly even 5 or 6, but skip the salt.

I had a jar of 380 g rosehip marmalade and used about ⅔ of it. It was set quite hard, so I stirred it through with a fork, then put in a piping bag for easier distribution.

IMG_5925

I used the proofing function of the oven again, both for the first rise and for the first tray of kifli, to make sure they would rise nicely. The second tray of kifli would have longer to rise, so I left them on the work surface, the kitchen had become fairly warm at this point anyway.

I divided the dough into 2 equal parts, then rolled each out to a circle just under 1 cm thick and cut into 6 wedges. I squirted about a tbsp of rosehip marmalade on each and rolled them up, then placed onto a baking tray lined with baking paper and left to proof.

IMG_5926

I pre-heated the oven to 180 °C fan and just before baking, I brushed the kifli with a whisked up egg and sprinkled granulated sugar on top. I baked for 30 minutes, then took out of the oven, left the kifli to cool a few minutes in the baking tin, before carefully moving to a cooling rack.

I let Lundulph try one while it was still warm and his eyes started sparkling, which is a sure sign he liked them. What he did forget to mention is that the dough tasted a bit salty for some reason and I wonder if I'd forgotten to add the salt the first time I made the fluffy soup buns, because this was quite a dramatic difference. So should skip the salt next time.

IMG_5928

Also, I'll cut the dough circles into 8 pieces, it's so much easier, than to try and do 6, even if the kifli will end up slightly smaller.

Lundulph's final comment was that these are like jam doughnuts, but not deep fried, which is good and also a disappointment that there were holes in the middle where the marmalade was. His view is that more marmalade is never wrong. I'm guessing these holes are due to the steam in the marmalade expanding during baking, then shrinking back/escaping after the dough has set during the baking. I suppose I could sneakily syringe in some extra jam after baking, just like for jam doughnuts. My Mum kindly bought me two filling nozzles for precisely this reason at the chocolate festival last year.

I kept a couple for us for breakfast the following day, the rest went into the freezer, but I suspect will get eaten fairly quickly though.

2 August 2019

Sesame Snacks

P8020464

My Mum regularly sends me recipes she comes across and this one I received a while back and haven't taken the trouble to make. Which is a pity, because it was rather good and very easy too. Lundulph's eyes went sparkly when he tasted these.

Ingredients

150 g sunflower seeds
50 g sesame seeds
50 g finely chopped sultanas
1 small or medium egg
2 tbsp honey

Method

  1. Pre-heat the oven to 140 °C (or 120 °C fan) and line a baking sheet with paper.
  2. Mix together all the ingredients in a bowl.
  3. Either pour the mixture onto the baking sheet and gently flatten out to a large thin patty or use a table spoon to create bite-sized pieces. If you do the latter, make sure to flatten them out.
  4. Bake for 30 - 35 minutes until the surface starts developing a little colour, then remove from the oven and leave to cool completely.
  5. If you made the large slab, cut it into squares or rectangles, then carefully peel off from the paper and store in an air-tight container.

I used a large egg and I think this was a bit too much, so the snacks didn't go completely solid and were still sticky at the bottom, even after cooling. So I layered them with baking paper in the cake box.

They were not too sweet and the combination of sunflower and sesame seed is really good. The honey I used has a pretty strong flavour, so the sultanas weren't too noticeable. They did taste a bit of the egg, again, I suspect it's because I used a large one, but this didn't detract from the overall experience at all.

I think this base recipe can be varied quite a bit with using different dried fruits and even replacing some of the sesame seeds with other seeds or nuts. As I said, Lundulph was well pleased and I suspect these are a lot less unhealthy than shop-bought sesame snaps and such like.

5 August 2017

Vietnamese Salad Rolls

We recently went to Australia and while at Brisbane Airport early in the morning of our return, Lundulph and I went our separate ways to hunt for breakfast. The food court we were in, didn't seem to cater much for breakfast. While Lundulph ended up queueing at three different food outlets just to put together something in the vicinity of a sandwich and a tea, I marched straight to the corner where the Vietnamese street food outlet was located and bought a lovely looking roll thingy with tofu and greens and opted for a spicy Hoisin sauce to go with it.

IMG_5389 IMG_5390

This turned out to be a revelation and a flood of ideas in my head for various fillings. So nice and fresh and filling and no guilty feelings of gobbling an unhealthy item!

Therefore, I set off for my two nearest supermarkets and their "special ingredients" sections, only to find disappointment - there was no rice paper to be found. Luckily there are a couple of Asian food markets in my nearest town, so as the heat wave kicked off in the South East of England, I armed myself with a Frappucino and went in search of rice paper. I struck gold in the second of the two shops and bought two packets, just to be on the safe side.

I'd also bought several fresh herbs that I like - basil, tarragon, dill, mint and chives. And a packet of stir-fry veg because it's a good mix of things and cut at the right size; some ready cooked and peeled king prawns for Lundulph and halloumi for myself. I'd also been to my local Pick-Your-Own and brought home a back of broad beans. So I searched on google about how to fold the rolls and got to work, following one of the many the instructions available.

After de-podding the broad beans, I fried them with a little butter and salt. I cut the halloumi into slices and fried in the same pan as the broad beans, then cut into strips and had everything else ready. Using my large pie dish, I half-filled it with room-temperature water. Using a large chopping board as base, I dampened the surface about the size of one of the rice paper rounds. I then dipped one of the rounds into the pie dish and "massaged" it a bit to get it pliable - this took only a few seconds. Then quickly onto the damp circle on the chopping board, line up a selection of the broad beans, stir-fry veg and herbs, then fold. For Lundulph, I lined up 3 prawns on per roll, and for me a couple of halloumi sticks for me. Then a couple of chives before completing the final fold of each roll.

It's good to work reasonably fast in putting the rolls together, or the rice paper wrappers will tear I found, so no photos of the folding process. I also found that the rolls would happily stick together, so I tried to keep them in one row only and not touching too much. I covered them with cling film and kept in the fridge until lunch. Lundulph and I ate 4 rolls each and Lundulph was surprised at how filling they were. At which point I realised that they were also very low carb, since I'd not used any rice or noodles inside. This of course made it difficult to dip and we ended up using tea spoons to drizzle sauce instead.

For dipping, I'd bought a ginger-chilli sauce and a Hoisin sauce and we also tried a satay sauce as well. Lundulph liked the ginger-chilli sauce best, while the Hoisin worked best for my spring rolls with the salty halloumi. We tried the satay sauce, but weren't too impressed with it in this instance.

Some further googling has revealed a lot of other ideas for rice paper wrappers that I'd love to try.

24 December 2016

Roasted Gingersnap Nuts with Chilli

As in the UK, cookery shows appear to be popular in Sweden too. Having watched some of them, I went to look for the recipes of the stuff that seemed good. Things are organised somewhat differently in this respect though and not entirely to my liking, but it resulted in finding this recipe (in Swedish) that seemed very intriguing.

IMG_5242

Now my family do like nuts, so they are always readily available in the house. I showed the recipe to my Sister Bip and we decided to give it a try.

Ingredients

20 gingersnaps
¼ tsp hot chilli powder
1 dl aquafaba or 2 egg whites
4 dl mixed whole raw nuts

Method

  1. Pre-heat the oven to 175 °C or 165 °C fan.
  2. Crush the gingersnaps into crumbs with a pestle and mortar or food processor. Mix in the chilli powder.
  3. Place the aquafaba or egg whites in a glass or metal bowl and whisk to stiff peaks stage.
  4. Stir in the nuts into the foam, then add the crushed crumbs and stir around to coat the nuts well.
  5. Spread the nuts out on a large shallow baking tray and roast for no more than 40 minutes, stirring occasionally.
  6. Remove and leave to cool down before serving.

Now I managed to burn these slightly unfortunately and I also added some salt as per the original recipe and the result wasn't very good. I used shop-bought gingersnaps and they were perhaps a bit on the mild side, spice-wise. I'll try with my own gingersnaps to see if it works better. Or even just the spice mixture I use.

IMG_5243

The really interesting bit of this recipe was the aquafaba. I thought it meant waterbean and indeed a quick google confirmed this - it is in fact the liquid from a can of beans or chickpeas. Weird.

What's even weirder is that it can foam up like egg whites do and seems to be a viable alternative for vegans and people allergic to eggs.

My Sister Bip hadn't heard of this before and she's well into her experimental foods, so we played it safe and used 2 egg whites that Mum had in the freezer. They whipped up very nicely.

But I kept on googling about this curious aquafaba, especially since I've always felt bad about draining it in the sink every time I open a can of beans. The wikipedia entry is here.

I've yet to try this out, I found this recipe for meringues, which also helpfully indicates that some brands of canned chickpeas give better results than others and mentioned Lidl in particular, so I've bought one to try out on meringues or macarons. But when I made chilli con carne the other day, I couldn't resist saving the liquid from both cans of kidney beans. I whisked them up while the chilli was cooking and although there was a lot of liquid, so took ages to reach the soft peak stage, reach it it did! it was reddish-brown like the kidney beans, and Lundulph thought it smelt like beans, so really not suitable for anything sweet, but the fact that it whipped up was amazing and I was sorely tempted to just add sugar and go ahead with the meringues.

24 September 2016

GBBO Jaffa Cakes

I'm aware of Jaffa cakes and what they mean to a lot of people in the UK. I've eaten them and failed to understand this meaning. But watching this year's version of the Great British Bake-Off, I started looking at them in a somewhat different light - the home-made ones look so much nicer and inviting, so I decided to move them high up on my to-bake list.

IMG_5195

I watched the GBBO episode carefully and noticed that the recipe seemed quite wasteful with regards to the jelly, something I think is a bit out of character for Mary Berry. I also thought the amounts for the sponge were so tiny, I'd struggle to actually make it, so I doubled the sponge, but kept the jelly as per the recipe.

Not everything worked out as seen on TV, so I've tried to adjust for this in the recipe below:

Ingredients

Makes around 24

Jelly
2 x 135 packets orange jelly
150 ml boiling water
juice and zest from half an orange

Sponge
unsalted butter for greasing
2 large egg
50 g caster sugar
50 g self-raising flour

Topping
200 g dark chocolate

Method

  1. Starting with the jelly, break up the jelly. Bring the water to the boil and remove from the heat, then add the jelly and stir until it's completely dissolved. Stir in the orange juice and zest.
  2. Line a shallow 30 x 20 cm tin with aluminium foil, taking care to keep it as flat as possible. Pour in the jelly liquid, it should form a layer of about ½ cm. Place the tin in the fridge until it has set.
  3. Pre-heat the oven to 160 °C fan and grease very generously a 12-hole mini tartlet/mince pie tin. Very generously!
  4. In a large bowl, whisk the eggs and sugar with an electric whisk for 4 - 5 minutes until it's really light and fluffy, almost on its way to a meringue.
  5. Sift in the flour and fold it in gently, then pour about 10 ml (2 tsp) into each hole. Smooth the tops, then bake for 7 - 9 minutes, until they have risen nicely and are pale golden brown.
  6. When the cakes are done, remove from the oven and allow to cool in the tin for a couple of minutes. Then carefully remove from the tin and transfer to a wire rack to cool.
  7. Wipe the tin clean and grease well once more for the remaining batter, then repeat the procedure.
  8. When the cakes have cooled down, break up the chocolate and melt over a water bath. Place a piece of baking paper under the wire rack with the cakes.
  9. Take the orange jelly out of the fridge. Take a round cookie cutter with diameter about 1 cm smaller than the cakes and cut out circles from the jelly.
  10. Place a jelly circle in the middle of each cake, then carefully spoon some chocolate over, up to the edges of the cakes. Use a knife to spread the chocolate, so the layer stays as thin as possible.
  11. Place the cakes in the fridge so the chocolate sets. Once it's set transfer to an airtight container and keep in the fridge.

Well, this was a very pleasant surprise, these home-made jaffa cakes were scrumptious. Unfortunately I over-filled the first bake a bit, so they were a bit too big to eat, I thought. The second bake was a better size. I thought I'd been generous with greasing the tin, but there were still a few bits that stuck. Again, I did better in the second round, by greasing the tin almost to the point where I couldn't see the colour of the tin.

IMG_5183 IMG_5184
IMG_5186

Also another "unfortunately" - the jelly didn't set throughout the pan, so only about half of it could be cut into neat circles with the cookie cutter. The other half, I had to sort of scrape off and spoon onto some of the cakes. In hindsight, I should have tried to level it out - there's so much the chocolate can hide. So in the above list of ingredients, I've doubled the jelly packets.

IMG_5187 IMG_5188
IMG_5190 IMG_5191

A third "unfortunately" was that I spooned the chocolate too thickly at the start. But I rescued the situation in that I completed two of the cakes only and served one to Lundulph. He's the one that established that the chocolate was too thick. Thus, all the other cakes were done with a thin layer of chocolate. I think also it's probably worth tempering the chocolate, even if Mary Berry doesn't specify this. And when I finally suss how to temper chocolate, I'll give it a try. As it was, some of the jaffa cakes stayed in the fridge all night and there were still spots of melted chocolate, i. e. not set, the next day. Bah!

IMG_5192 IMG_5193
IMG_5194

Finally, Mary Berry says to cross over the chocolate with the back of a fork. I tried this on a few of the jaffa cakes lucky enough to get a jelly circle. It didn't look pretty at all, so I recommend skipping this bit.

31 July 2016

Courgette chips

As so many other times, when looking for recipes on the internet, I came across this one which seemed really promising and since I had some surplus courgettes, I decided to try them out.

IMG_5046

Ingredients

450 g dark green courgettes with good skin
2 tbsp olive oil
2.35 dl breadcrumbs
1.55 dl grated parmesan
salt and pepper

Method

  1. Wash the courgettes and trim the ends, then slice thinly on a mandolin and place in a large bowl.
  2. Pour over the olive oil, then carefully turn the courgettes until all have some olive oil on them and set aside.
  3. In another bowl, mix together breadcrumbs, parmesan, salt and pepper.
  4. Line a couple of baking sheets with baking paper and pre-heat the oven to 220 °C.
  5. Dip each courgette slice into the crumb mixture and place on the baking sheet.
  6. Bake in the oven for a few minutes, then take out, flip all slices over and bake for a further few minutes. Keep watch as they burn very easily when thin.

It seems I'd been quite successful in using up all various jars with breadcrumbs, so I had to open a packet of watercrackers and blend. The crumb mixture turned out to be way too much for the courgettes, I've put it in a bag and frozen for another day, though in hindsight, I might use it as a soup thickener or something.

These didn't end up as crispy as I'd expected them and not as cheesy either, which I would have liked. And I burned almost a whole tray of them too, which had to be thrown away.

But the concept was good, I'll just need to work on it a bit. Possibly I need larger proportion of parmesan in the mixture and also more coarsely grated too. Or perhaps mature cheddar or such, which isn't as dry, but might melt in the oven a little.

Finally, rather than turning the courgettes to get coated with the olive oil, I think I might brush them with it instead. Obviously Lundulph sniffed out the parmesan straight away, so didn't try them.

17 August 2015

Spiral Potatoes

IMG_4785

Sometime in July there was a food festival in our village and there was one stall I'd not seen before. They did one thing only - spiral potatoes and I just had to have one, despite Lundulph's tut-tuts.

Basically what it is, an oblong baking potato is run through a spiraliser and a bamboo skewer is stuck through the middle at the same time. It is then deep-fried. Finally, the hungry buyer gets to choose a sauce or spice mixture to sprinkle on top and off she goes.

Unfortunately until we buy a new and bigger house, a spiraliser is completely out of the question, so I bought a tiny little gadget which allegedly would do the same thing, albeit with a bit more elbow grease. I carefully selected narrow baking potatoes as well, since I don't have a deep fryer either, but would need to bake the potatoes. Sadly, the two parts of the little gizmo had been put together backwards, making it completely useless, so I had to throw it away, there was no way to fix it.

Instead, I searched YouTube and found several instructional videos on spiral potatoes and also on Hasselback potatoes, so was able to create the spirals and also use the baking instructions for Hasselback potatoes. Let's face it, they are in effect the same.

So, the skewer went in through the middle of the potatoes and then carefully with a small knife, I cut the spiral. It wasn't as thin as the spiraliser at the stall, but was thin enough.

IMG_4782

Once the full length of the potato has been spiralled, carefully stretch along the skewer. I used metal skewers with the thought that they would heat up in the oven and help bake the centre of the potatoes.

IMG_4783

While preparing the potatoes, pre-heat the oven along with a deep baking dish to 220 °C. The baking dish should be such that the skewers can be rested on it's edges, so the potato spirals are suspended.

IMG_4784

Brush the potatoes with a little oil when you put them in the oven and repeat a few times while they're baking. I also turned the skewers around, though I'm not sure that was actually necessary.

I don't remember how long it took to get them baked, but they were ever so tasty, I almost burnt my tongue trying to eat straight out of the oven. Lundulph was out that evening and got to try one the following night, reheated. This wasn't as good, so he wasn't very impressed, but they were looooovely!

18 July 2015

Baked Churros

While spending a number of evenings watching youtube recipes, I came across the wonderful channel of Ann Reardon of How to Cook That and one of the recipes was for churros, which I think of as the Spanish version of mekitzi.

IMG_4753

I've had churros a couple of times and really enjoyed them, but never really thought about making them at home and when I found the tutorial video, I decided to try them out.

The basic dough is very similar to the choux dough, but with fewer eggs and I was a little concerned that they would puff up, but they didn't and perhaps that's down to the smaller amount of eggs in the mixture.

Ingredients

Churros dough
250 ml water
115 g butter
160 g plain flour
3 large eggs
1 tbsp granulated sugar
1 tsp vanilla extract
Cooking oil spray

Cinnamon sugar
54 g caster sugar
1 tbsp ground cinnamon

Nougat dipping sauce
1 part nougat
1 part semi-skimmed milk

Method

  1. Line a couple of baking sheets with baking paper and pre-heat the oven to 200 °C.
  2. Put the water and butter in a saucepan and melt on the hob.
  3. Stir briskly in the flour and once the dough starts thickening and comes together into a ball, remove from the hear.
  4. Add the eggs, one at a time and incorporate well in between.
  5. Finally stir in the sugar and vanilla and transfer to a piping bag with a fairly narrow star nozzle.
    IMG_4752
  6. Pipe straight lines, a couple of cm apart onto the prepared trays and spray with a little cooking oil.
  7. Bake each tray until the churros go golden brown on the ridges.
  8. Stir together the caster sugar and ground cinnamon to mix well.
  9. Remove from the oven and transfer to a cooling rack and sprinkle immediately with the cinnamon sugar.
  10. Make the dipping sauce by dicing the nougat and placing in a heat proof bowl.
  11. Bring the milk to the boil, then pour over the nougat and stir until the nougat has melted and has become a homogeneous mixture.

I also used a nozzle that was too wide, so my churros were a bit on the thick side, but I wasn't sure if I'd be able to pipe the dough, it felt a bit thick and I didn't want to get a smaller nozzle clogged up. In the past I've mostly used too small nozzles and had tremendous problems with piping things well. This meant I had to bake my churros for 25 minutes and I also upped the temperature to 220 °C as they seemed to be taking forever to develop colour. I also had some cinnamon sugar left over, but that can be used when I make cinnamon buns next.

IMG_4751

But they were crunchy on the outside and soft on the inside and worked very nicely with the nougat sauce. In fact the reason I made it was that I didn't have any chocolate in the larder and thought I could make a "ganache" with the nougat, but rather than using cream, I used semi-skimmed milk. This resulted in the mixture not setting like a ganache would, even after being chilled in the fridge, so it's a good one for ice cream as well I think.

This was a surprise for Lundulph and a very tasty one too. We ate almost all of the churros for breakfast, so if I make this for more people, I definitely need to increase the recipe. Hopefully I'll remember to use a smaller nozzle next time too, that should shorten the baking time considerably. Lundulph liked that they weren't greasy like deep fried ones and of course you could tell the difference, but it wasn't a bad one at all.

5 May 2015

Fröknäcke

After Easter, I've realised that my clothes have gotten a bit tight and so I've decided to reduce my calorie intake. Of course this doesn't ring well with my previous two posts on ice cream and Rice Krispie treats. In fact, I have a nasty feeling that it's an unconscious reaction to dieting - I go into an overdrive of baking...

But I had a gander at the itrim website. This is a Swedish company who have been very successful in helping people lose weight and change habits for the better and they also have some of their recipes online. I thought this one seemed particularly appealing. I've put their cookbooks on my wishlist for the Swedish side of the family.

Fröknäcke translates to seed crispbread and the cooking instructions weren't quite correct, below what worked for me.

Ingredients

60 g golden linseed
65 g pumpkin seeds
30 g sesame seeds
50 g porridge oats
25 g chia seeds
¼ tsp salt
2 tbsp olive oil
2 ½ dl water

Method

  1. Stir together all the ingredients and place in the fridge to soak overnight.

  2. Pre-heat the oven to 130 ° C fan and line two baking trays with baking paper.
  3. Divide up the "dough" into two and place each half on a tray, then gently spread it as thinly as possible.
  4. Bake for 1 h, then remove from the oven and carefully cut it into pieces, then return to the oven, turn it off and leave the crispbread to dry out further as the oven cools down further.
  5. Store in an air-tight container.

The original instruction stated either chia seeds or poppy seeds. Now I've done chia seed dessert and I know that chia seeds do swell quite a bit and release some sort of gelatine-like substance around them. I haven't soaked poppy seeds, but I have a suspicion that they don't behave in the same way and as there was very little in the ingredients list to provide "binding", I opted for the chia seeds.

The other thing I completely missed was that I needed rolled buckwheat. Annoying as I took Lundulph to the health food shop to show him around and didn't get this ingredient, so instead I used some of the porridge oats I normally use for my müsli.

The last thing that I had to change was the baking time - the original recipe stated 15 minutes, at which point my bake was pretty moist still, so I have it another 15 minutes, and then another and then another. And because I very rarely utilise the residual heat of the oven, I completely forgot the two trays in there until it was almost bed time.

Lundulph's comment was that it was a bit on the salty side and I agree, so I've halved the amount in the ingredients list above.

15 March 2015

Another Cookie Press Fun Evening

Not only was it fun to use my new cookie press, I'm quite pleased that my Mum's also re-discovered how much fun it is too. But she opted for savoury versions with different types of cheese. In fact, for her birthday she made so many, I wouldn't be surprised they'll eat them for weeks to come. To begin with, my Dad had been very suspicious about them, but then ended up eating 6 in one go and my Mum had to hide the box.

IMG_4565

However, in my searches to find a recipe for my Mum, I came across this one which seemed to be a bit less unhealthy than many others and I decided to make a batch and take to work as thank you to some of my colleagues.

Ingredients

Makes about 80

115 g unsalted butter at room temperature
1.2 dl + 3 tbsp icing sugar
0.6 dl + 3 tbsp corn flour
½ tsp vanilla extract
¼ tsp lime zest
a pinch of salt
2 tbsp coconut milk drink
2.4 dl + 3 tbsp wholemeal flour
colourful sugar sprinkles

Method

  1. Pre-heat the oven to 170 °C fan and place 3 cookie trays in the freezer to chill.
  2. In a large bowl, add the butter, icing sugar and corn flour and whisk together. The mixture should be crumbly.
  3. Next add the vanilla, lime zest and salt and whisk until well combined.
  4. Add the coconut milk drink, followed by the wholemeal flour a little at a time.
  5. Fill up the cookie press and stamp away onto one of the chilled trays, straight onto it, without lining or greasing.
  6. Sprinkle colourful sugar sprinkles and bake for 10 minutes until the cookies just begin to get some colour.
  7. Repeat until all the dough has been used up. You might need to place the cookie trays back in the freezer and use again.
  8. Once the cookies are out of the oven, transfer to a cooling rack.
  9. Store in an air-tight box.

Now, I had to convert the amounts from American to metric and I thought I'd weigh everything while I was at it, but I kept forgetting to include the additional tablespoons when weighing, so will have to weigh again next time. This of course meant I had to add things as I realised I'd forgotten them, so frankly the above instructions can probably be boiled down to "mix everything together, add the wholemeal flour at the end".

The dough was sweeter than the previous recipe I used, but adding the sugar sprinkles made them just right and they were well popular at work - people had seconds and thirds. There were still a few to take home and Lundulph was massively pleased.
IMG_4564

And I have ideas for next time - swap the butter for coconut oil to make completely vegan and also swap some of the wholemeal flour with ground nuts. And perhaps skip the sprinkles and dip in chocolate.

21 November 2014

Coconut Onigiri

When my Sister Bip came to visit back in September, the last thing we did was to try two new desserts from Wagamama - the sweet onigiri and the mochi ice cream. Both turned out to be really tasty and I set about to try my hand at these beautiful and tasty delicacies from Japan. It took me a while to get all the ingredients, mainly because I kept forgetting to put them on my shopping list, but finally today I got my act together and made the onigiri.

IMG_4460

Obviously Wagamama haven't published the recipe, but a quick search on coconut onigiri gave resulted in this recipe with instructions, which seemed to be on the right line. I made some minor adjustments and converted to metric amounts.

Ingredients

2.5 dl sushi rice
5 dl coconut milk drink
0.7 dl granulated sugar
3 tbsp maple syrup
1.25 dl dessicated coconut
white drinking chocolate (optional)

Instructions

  1. Place the rice in a sieve and rinse well under running water.
  2. Transfer the rice to a casserole dish, add the coconut milk drink, granulated sugar and maple syrup. Stir through and bring to a boil.
  3. Put the lid on and let simmer gently for about 15 or so minutes, stirring occasionally.
  4. Place the dessicated coconut in a pan and toast for a few minutes under constant stirring - some of the flakes should go golden brown. Once this happens, remove from the heat and set aside.
    IMG_4459
  5. Once the time is up on the rice, turn off the heat and leave the rice to stand for a further 10 - 15 minutes. The liquid should have soaked into the rice and it should have the consistency of a thick porridge.
  6. Transfer the rice to a bowl, add the toasted coconut and mix well.
  7. Sprinkle white drinking chocolate on a large plate and also place some in a small bowl. Using latex gloves, form small balls from the rice, about the size of walnuts. Then roll these in the white chocolate in the bowl and place on the plate.
  8. The chocolate will likely melt/soak in, so they'll end up just as sticky as before, however it adds a nice flavour to the onigiri.

Actually, talking through these with Lundulph we thought that dipping the onigiri in melted white chocolate would work nicely. This would mean we'd need to eat them cold of course. So far, we've whizzed a few in the microwave and had them warm, which is really nice and I'm not sure if cold would be as nice. Perhaps if I make them a little smaller.

Using ganache as a filling would probably also be quite nice and I'm trying to work out how to achieve the ones at Wagamama, which had been battered and deep fried very briefly, adding an extra crunch.

Update 2023-07-22: Sadly the original recipe inspiration seems to have disappeared, as have the lovely Wagamama onigiris from their menu. But when my good friend Doctor Cutie came to visit with her family this year, I decided to make these, since she can't eat gluten anymore. I also wasn't sure if the dessicated coconut and the coconut milk would be gluten free, so I skipped the former and swapped the latter for single cream and semiskimmed milk. Here is the tweaked recipe:

Ingredients

150 g sushi rice
4 dl single cream
2 dl semiskimmed milk
0.7 dl granulated sugar
4 tbsp maple syrup
white or ruby chocolate
whole lingonberries, fresh or frozen

Instructions

  1. Soak the rice in cold water overnight, then drain and place in a deep saucepan.
  2. Stir in the cream sugar and maple syrup and simmer until the rice is soft and starts going mushy, stirring occasionally and adding skimmed milk if it starts going dry.
  3. Remove from the heat and leave to cool down completely.
  4. Roll into small bite-sized balls, make a hole and put one lingonberry inside and close up carefully so as not to burst the berry.
  5. Temper the chocolate, then dip each ball to cover well and leave to set. Store in an airtight container in the fridge.

I didn't decorate as I wasn't sure my decorations were gluten free, but there are loads of possibilities. The lingonberry gives just the right amount of tanginess to the very sweet rice. I suspect coating with white chocolate would make things even sweeter, the ruby chocolate has a bit of fruity tanginess to it, but worked very nicely too and our guests liked them too.

20 April 2014

Thai Beef Patties

Once again I'm lagging well behind my blogging, to the point where I'm on the verge of completely forgetting what I've done.

IMG_3939

A couple of weeks back, I made another recipe from my card collection, and it completely doesn't balance the fact that I've accumulated another batch of recipe cards already.

This card is from Waitrose and turned out to be a rather good one. The original recipe is here, but I made some changes as usual.

Ingredients
4 portions

4 Portabello mushrooms
3 carrots
2 courgettes
2 large cloves of garlic
2 red chillies
1 stick of lemon grass
20 g fresh coriander
salt and pepper
8 salad onions
500 g lean beef mince
25 g sesame seeds
toasted sesame oil
1 Romaine lettuce

Method

  1. Peel and chop the mushrooms, carrots and courgettes and set aside.
  2. Pre-heat the oven to 100 degrees and place an oven-proof dish to heat up inside as well.
  3. Peel, wash and cut into chunks as appropriate the garlic, chillies, lemon grass, coriander and 5 of the onions.
  4. Place the garlic, chillies, lemon grass, coriander and onions into a blender along with salt and pepper and blend until smooth.
  5. Mix the paste together with the mince and make 12 - 14 patties.

    IMG_3938
  6. Heat up a little sesame oil in a large pan and fry the patties, making sure not to crowd them. Fry just enough to give them a nice colour, then transfer to the oven to keep warm.
  7. Heat some more sesame oil if needed and stir fry the mushrooms carrots and courgettes until they soften.
  8. In a small dry pan, toast the sesame seeds. Slice the remaining 3 salad onions finely.
  9. Serve the patties on a bed of Romaine lettuce with the stir fried vegetables on the side and sprinkle the sesame seeds and onions over them.

These turned out to be really tasty and with a good kick to them. They were also so very easy to do, no need to make the mixture on the night before to allow the flavours to develop, so a great recipe for weekday night. And we managed without the carbs too.

Actually there were a lot more stir fried vegetables than beef patties, I had them for lunch a couple of times on their own.

7 February 2014

Råbollar

Yes, I'm getting inspired by my lovely Sister Bip. Not only did she manage 20 days of veganism, she managed so well, that she's continued with it and has started buying kitchen appliances in order to make interesting food concoctions.

IMG_3817

Her latest thing is the so called "råbollar" or raw balls, which is a really tasty and hopefully fairly healthy sweet/snack. So when I last spoke with her (she's very busy these days), I pushed her to let me know the recipe and the other day I got to work.

Ingredients
Makes around 35

55 g walnuts
50 g pecans
50 g Brazil nuts
55 g cashews
50 g almonds
50 g pumpkin seeds
2 tbsp water
200 g Mozafati or Bam dates, pitted
20 g coconut fat at room temperature
dessicated coconut for rolling

Method

  1. Use a food processor to grind all the nuts and seeds as finely as possible, but don't let them turn into butter.
  2. Add the water, dates and coconut fat and whizz until it comes together to a dough
  3. Roll small bite-sized balls, then coat with dessicated coconut.
  4. Chill in the fridge for at least an hour.

Now I don't have a food processor, only a hand held blender with a number of attachments, among which is a mini-processor. So what I did was grind each type of seed on its own, because I didn't think all would fit in.

IMG_3816

Well aware how thick the mixture would be, I added the water, dates and coconut fat and changed to the liquidizer attachment. Needless to say, it wasn't able to cope, went hot and started smelling of burnt. I stopped, packed everything up, put in the fridge and decided to call it a day. The blender took forever to cool down, so I almost wrote it off. But the next day, I decided to try again, and even managed to squeeze the whole mixture into the mini-processor. The blender still worked, miraculously, and eventually I managed to get the mixture to a paste, but had to give it a lot of help on the way, by carefully removing the parts that had the right consistency and then pushing the non-ready parts down to the blades.

IMG_3818

So, eventually with a lot of care, I reached a point where the mixture/dough seemed to be of the right consistency and I rolled the balls and coated with coconut. When Lundulph came home and had a look in the fridge, he exclaimed joyfully that there were secret fancy things in there. And he really liked them! Not too sweet, nice texture, a bit like some Indian sweets we've tried in the past. He tried to work out what sorts of nuts I'd used - he got 3. Personally I would have liked them a little sweeter.

On the whole, I'm very pleased with this recipe - it allows for plenty of variation - basically use the nuts/seeds you have at hand and I believe raisins or sultanas or other dried fruit would work just as well. Lundulph did some research on nuts a couple of years ago and commented that I should try to cut out the cashews and Brazil nuts, apparently they are not as healthy as walnuts, pecans and almonds. Also he was wondering if I could skip the coconut fat as well. Maybe it's possible - I'd need to increase the amount of fruits.

A brief word on dates. When we went to Dubai last year, we bought a box of dates from the market. In fact there was a whole section dedicated to just dates there. Now I've never been a fan of dates, I always found them gritty, so was highly reluctant when the seller tried to almost force-feed us in order to get the sell. But I'm glad he was so insistent, because I had an epiphany and immediately bought the box, vaguely wondering if I should get a second one, so I wouldn't have to share with Lundulph, who was also very pleasantly surprised about the taste. Well back home, I investigated the box and discovered that the dates were called "Mozafati" and were the sweetest, creamiest thing ever. I used them for my carrot and date cupcakes last year. Since then, I've been searching for this type of dates in the UK, without success and came to the conclusion that these aren't exported to the West and the chap that sold us these dates knew exactly what he was doing. However, after having given up, I spotted a stack of boxes in our local farm shop and couldn't believe my eyes when I saw the magic word "Mozafati" printed on them. Needless to say, I bought 6 boxes, any more would have attracted way too much attention, I suspect. Now we're rationing them, to make them last as long as possible. In my research, I managed to find out that these are mainly produced in Iran and around the city of Bam, thus they are also known as Bam dates. The tricky thing with them, which also makes them expensive is that they are picked when they are half-dried, meaning each date palm needs to be harvested several times, as opposed to other types of dates, where the whole bunches are picked in one go. On occasion, I've also come across Medjool dates, which come close to the Mozafati, and Medjool are more readily available too.

Speaking with my Dad the other day, he told me he'd been treated to these lovelies twice and said that Bip had added agave syrup to the second batch and then they'd tasted nicer. When I told Lundulph, he said no to additional sugar. Oh well, we'll see. At least my first batch is almost gone now, it's quite nice to have a couple of so along with a cup of tea. And speaking of variations, I'm getting the idea of perhaps even hiding a whole nut or a piece of dried fruit in the middle. I'll try that next time. I might also see what appliance I can get rid of and get myself a proper food processor...

1 December 2013

Advent 2013

Well, here we are once more in December. This year I'd not made any particular plans, but I did have a list of ideas to try out.

I made a batch of my standard ginger snap dough and a batch of the punishments dough. They were left in the fridge for 48 hours, since I'm now well into my second week of plaster chipping and made a push to get that job finished. Let's just say that today I wasn't quite sure if I'd be able to bake and I didn't get started until after lunch.

IMG_3667

My first idea is actually nothing original - the brand Anna's ginger snaps/thins now come in a variety of flavours and I thought orange and chilli would be good to add. So, after mixing the ginger snap dough, I took out two lumps, about the size of an orange each and added 0.5 tsp of orange essence to one and 0.75 tsp of hot chilli powder to the other one, stirred in and put in the fridge next to the big bag of "regular" ginger snap dough.

IMG_3666

My second idea was inspired from this year's Danish Bake-off, "Den Store Bagedyst" (in Danish). Here, during the crisp bread stage, one of the contestants cut the dough into strips and weaved it, before cutting into rectangles and baking. I thought this was a brilliant, if massively fiddly, idea. But how to give it a Christmassy twist? Well, there's the Scandinavian tradition of woven paper hearts... And that's what I decided to do. Comparing the ginger snap recipe with the one for the French punishment biscuits, I noticed that they bake at almost the same temperature and for a similar amount of time, so this would be perfect to get the colour contrast.

IMG_3662

The first thing to do for the woven hearts is a template. For a woven heart, the top rounded bit is half a circle. Then there's the straight part, which is cut up into strips, that should be the same length as the diameter of the circle. I decided a 7 cm diameter would be good and 4 strips would be best. So I rolled out a piece of the light dough and cut out five pieces according to the templates. All I can say is that it's a right old hassle. Then I repeated with the dark dough, which turned out even flimsier than the light dough and kept catching on the knife. Maybe I should have washed it between cuts, I don't know.

IMG_3664

After the first heart was woven, with quite a few breaks, I tried using a couple of knife handles, this helped significantly, but still I had to add bits to the end of the strips, they were too short. I guess, I need to go back to the drawing board and account for this in my next template. I'm also seriously tempted to look for someone who can make a cookie cutter for this purpose, otherwise the whole process takes forever. I almost lost patience after the second heart already!

IMG_3663

And I discovered the problem with the woven ginger snap hearts - the woven part is twice the thickness of the rounded bits, so that it needed quite a bit longer to bake. I had to go mid-way to get the woven part sort of baked through, while not burning the thinner, rounded bits too badly. So another exercise for the drawing board. The lack of gluten is an issue as well. Perhaps it would be worth doing in two parts - the woven bit and then thicker rounded bits and then somehow stick them together, perhaps. Will be easier to weave for sure.

An additional bonus was that I got to try out two new cookie cutters. I got them from my Sister Bip last Christmas - a puzzle piece and a miniature house. A couple of years ago, I spotted these on the internet and thought this would be a good opportunity to try out. Well, not to make the entire houses, that seems way too fiddly, but perhaps to be able to hang a biscuit on the rim of the mug... So I cut out a piece of the house shaped cookies for this purpose. As it turned out, the piece was too shallow and wide, so not working at all as I'd thought. Looking at the website from where I got the inspiration, the very fact that it is a 3D-cookie makes it possible to hang on the rim of a cup. Way too wobbly when in 2D. Oh well, maybe I can experiment with the weight distribution or something.

23 November 2013

Mushroom Crispbread

IMG_3553

A while ago, my Mum sent me a new recipe for crispbread, which she thought seemed interesting - instead of water, it used tomato juice.

Since we ran out of crispbread a few weeks ago, I decided to give this recipe a try. However, Lundulph has developed reservations towards tomatoes, he reckons they are a bit too acidic for his stomach. Besides, tomato juice is not something I keep in the house on a regular basis. What to do, what to do, hmmmm...

Mushroom juice! Well not quite, there's no such thing, I don't think. But I always save the liquid from cans of mushrooms and freeze with the hopes of making risotto or such. But I don't make risotto too often and the frozen blocks of this liquid are slowly filling up the freezer. I'm well pleased that this substitute worked, now I can clear up the freezer, ha!

Ingredients
7 g dry instant yeast
3 dl mushroom liquid
0.5 tsp whole fennel seeds
2 tbsp sesame seeds
1 dl wholemeal flour
3 dl rye flour
3 dl strong white flour
1.5 tsp salt

Method

  1. Dissolve the yeast in the liquid, then add the remaining ingredients except the salt.
  2. Stir together either with a spoon or your hand until it come together into a dough.
  3. Turn out onto the work surface and work for a few minutes, then add the salt and work it in well.
  4. Shape into a ball, place back in the bowl, cover with cling film and let rest/proof for about an hour.
  5. Divide the dough into 6 parts. Pre-heat the oven to 250 degrees and line a couple of trays with baking paper.
  6. Dust liberally with flour and roll out one part of dough at a time as thinly as possible.
  7. If you have a knobbly rolling pin, then use it at the end of the rolling, otherwise prick the dough with a fork. Then cut up into pieces as desired and place on a baking tin with a little space apart.
  8. Bake for about 5 minutes and keep an eye on the crispbreads so they don't burn!
  9. Remove to a wire rack and allow to cool completely. Repeat with the remainder of the dough.
  10. Store in an air-tight container with a piece of kitchen tissue to keep the breads dry. Will last for weeks or even longer.

The original recipe called for 2.5 dl of liquid, but this just wasn't enough and the dough was impossible to work, so I ended up adding another half a decilitre while kneading. It was still a fairly stiff dough and even after two hours, it hadn't risen much, but such is the nature of rye I think. And the reason I left it for two hours is that I was busy with other things.

A hot tip in the recipe was to use a pasta machine for the rolling. I don't have one, but it's a good idea for people who do.

The fennel was very subtle as were the sesame seeds and the mushroom flavour from the liquid, but it got me searching the internet for more interesting recipes and I've found one, which I'll try when this batch runs out. This time I cut the dough into squares of about 5 cm sides and I had quite a few for lunch, so I don't think they'll last very long.

Now rolling a stiff dough very thinly takes some effort and I spent the afternoon chipping plaster off the walls in our future bedroom, so my arms feel rather sore, but it was well worth it.

On a side note, a few days ago I noticed that my beloved butter knife has worn down dramatically over the past 20 years that I've had it and so I bought a new one and this time I splashed out on luxury - one hand crafted out of juniper wood, which is nice to hold and also smells nice. Hopefully it'll last at least as long as the old one.

IMG_3545