28 January 2020

Beetroot Falafels

Lundulph has decided to reduce the amount of meat he eats and to replace the proteins, he's eating pulses like nobody's business. Today we decided to try out one of the cards I picked up some time ago from Waitrose.

IMG_5897

Ingredients

1 tbsp grapeseed oil + extra for brushing
1 onion
2 cloves of garlic
2 tsp ground cumin
250 g cooked whole beetroots
400 g can of chickpeas
125 g breadcrumbs
1 large egg

Method

  1. Pre-heat the oven to 200 °C (not fan). Peel and chop the onion. Peel the garlic.
  2. Heat up the oil in a frying pan, add the onion and press in the garlic, then fry gently until softened.
  3. Add the cumin and stir through to mix well, then remove the pan from the heat.
  4. Drain the beetroots and pat dry, then cut up in chunks.
  5. Drain and rinse the chick peas.
  6. Add the onion mixture, beetroots, chickpeas and the remaining ingredients to a food processor and blitz into a firm paste.
  7. Using an ice cream scoop, large spoon or dampend fingers, form 20 large balls and place onto a non-stick baking sheet.
  8. Brush each falafel lightly with oil, then bake in the oven for 25 minutes.
  9. These can be eaten cold and even frozen.

The photo above seems to be the only one I made and even using non-stick foil didn't help, but they got firmly stuck to it. We were hungry, so ate straigt away, but what I discovered afterwards is that once cooled, the falafels also lost their grip on the foil.

As you may have noticed, the recipe is missing salt and pepper, so overall didn't taste much and was almost a little on the sweet side, thanks to the beetroots. At least the falafels kept their shape, unlike the veggie burgers I made the other day. But the recipe needs some work and some research into regular falafels. Luckily Lundulph isn't the complaining kind and ate his portion without grumbling.

Gateau au Chocolat

This year is a year of big round birthdays and anniversaries. Various parents are turning 75, various siblings are turning 50, 40 and 35 and my parents are celebrating their golden anniversary. First up is Roger, my Brother-in-law and it was going to be big - a long week-end away at a manor house with the extended family, some 25 people or so. I had the honour of making the birthday cake.

20200207_194047

I already had ideas about this, and decided to make a practice run, just to be sure. This dove-tailed nicely with the fact that one of my lovely colleagues took pity on me last year and supported me with one very tricky server set-up for weeks on end and I really wanted to thank her for all that help. I made the smaller size for the practicing.

For the cake base, I decided to use a very old recipe for a gateau au chocolat, which my Mum has been using for some 30 years. The original is very stylish and simple and is actually supposed to be a sticky cake, but instead my Mum bakes it through, since my Dad strongly disapproves of uncooked things. Over the years, my Mum has made size adjustments and she sent across both of them. The cake base is best done a few days in advance and should be wrapped tightly in clingfilm once cooled down. Decorate the day before serving.

Below are the two sizes, with slightly different proportions, but overall the results are the same.

Ingredients

20 cm diameter
150 g unsalted butter
200 g milk chocolate (~35% cocoa solids)
1 tbsp instant coffee
3 large eggs
1 dl granulated sugar
1 dl chopped walnuts or hazelnuts
1 tbsp vanilla sugar (halve the amount if using vanilla extract)
1 dl plain flour
½ tsp baking powder

25 cm diameter
150 g unsalted butter
200 g milk chocolate (~35% cocoa solids)
1 tbsp instant coffee
4 large eggs
2 dl granulated sugar
1½ dl chopped walnuts
1 tbsp vanilla sugar (halve the amount if using vanilla extract)
1½ dl plain flour
½ tsp baking powder

Method

  1. Pre-heat the oven to 180 °C (not fan) for the smaller size and 150 °C (not fan) for the larger size. Butter a round springform cake tin and line the bottom with baking paper.
  2. Melt the butter gently in a saucepan, then break up the chocolate into small pieces and add to the butter, allowing to melt at very low heat while stirring.
  3. Add the instant coffee and stir through to dissolve fully and remove from the heat.
  4. In a large bowl, whisk together the eggs and sugar until light and fluffy, about 5 minutes.
  5. Then stir in the walnuts, vanilla and the melted butter/chocolate mixture.
  6. Sift the flour and baking powder together in a separate bowl, making sure they are well mixed, then add to the batter and bring together to form a homogeneous mixture.
  7. Pour into the cake tin and bake for 1 h for the smaller size and 1 h 30 min for the larger size.
  8. Test with a skewer through the middle, if it comes out clean, remove the cake and leave in the tin for a few minutes before turning it out onto a cooling rack and removing the paper lining.
  9. Once completely cooled, wrap in clingfilm and store in a cool place or fridge. It can be frozen at this point as well.

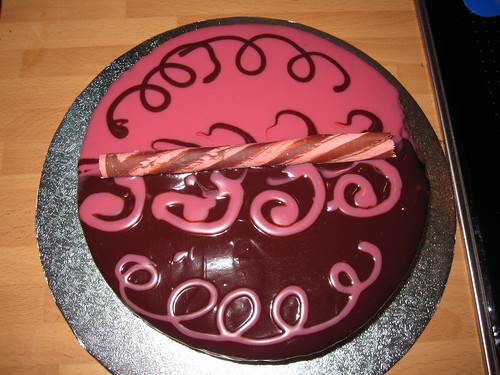
Now the recipe recommends a pouring ganache from dark chocolate for the decoration and walnut halves arranged in a circle around the edge, then served with a blob of unsweetened whipped cream or creme fraiche on the side. But having recently discovered the concept of water ganache, I wanted to use that instead, as the cake is quite rich to begin with. I also wanted to try my hand at fancy decorations as well, so I made two water ganaches, one with dark chocolate (54.5% cocoa solids) and one with ruby chocolate. I've never tried this cake with hazelnuts unfortunately, though I do like them, but I like walnuts more.

And this is where my practice run was really useful, because it turns out, like for any other ganache, the proportions of chocolate to water yields differently runny ganache, depending on the chocolate used. So whilst the dark ganache was ready to pour immediately, the ruby ganache was way too thin and I had to put it in the fridge to get it to thicken. So overall, the practice decoration ended up a bit odd, because I couldn't pour both ganaches simultaneously to get the two halves and be able to blend them by pulling one ganache into the other. But the principle worked and I used my two-coloured chocolate pencil to cover the wonky middle. I did make adjustments for Roger's cakes and knowing what to expect and have everything ready, made decorating them a lot easier.

IMG_5898 IMG_5899

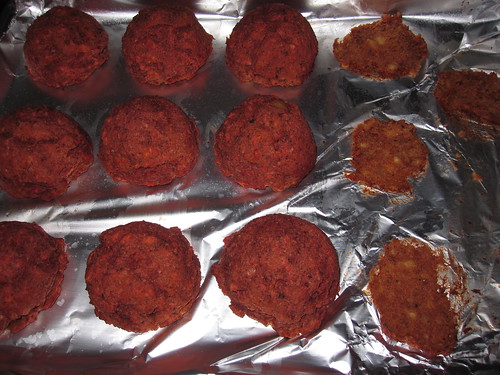
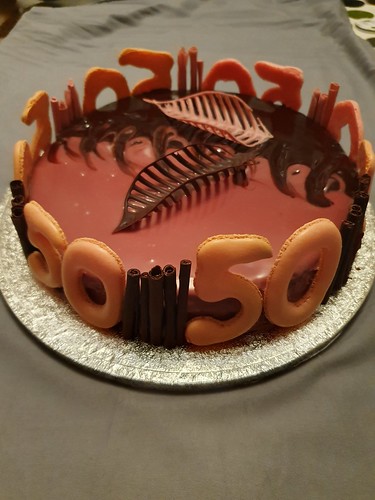
For Roger, I made 2 large cakes because we were going to be so many people. My Mum said she gets 12 pieces out of the large one, but they are generous sizes and after the large meal we had, one cake would have been enough. However, people did work through the second one in the following day, so nothing was lost. I also made several batches of this recipe, which has really good explanations, photos and videos, along with a trouble-shooting guide. But rather than tranditonal round ones, I wanted to make them in the shape of a 50, which sadly didn't quite work out too nicely and I suspect it's down to my oven baking unevenly and not using the correct temperature.

Finally a word on transport. I put the cakes on silver cake drums and I used a little of the chocolate ganache to glue them securely onto the drums. Once the ganaches have set, things are pretty solid and fully capable of coping with a long drive. Both the small cake for my colleague survived over an hour in the rush hour to the office and the two larger cakes survived over 3 h drive to the manor house where we all gathered to celebrate Roger.

22 January 2020

Green Omelette

In the past few years, I've been able to go and visit my parents in Sweden several times per year and they very kindly collect recipes, which might be interesting, so I always bring home a thick bundle of paper. Lately, I've started to go through the bundles before going back, weeding out the ones that don't appeal. This recipe is from last January.

Ingredients
Serves 3 - 4

5 large eggs
2 handfuls of baby spinach
½ water or milk
½ tsp salt
½ milled black pepper
small fresh chilli(optional)
2 salad onions
15 g butter
1 - 2 sprigs fresh basil
2 dl cottage cheese (optional)
1 ripe avocado
½ dl pumpkin seeds

Method

  1. Blend together the eggs, half of the spinach, water/milk, salt, pepper and chilli with a hand-held blender.
  2. Trim and wash the onions. Heat up the butter and fry the onions and the remaining spinach for a couple of minutes.
  3. Turn down the heat to medium and pour in the egg mixture, then cover the pan and fry until it's set.
  4. Halve the avocado, peel it and dice. Shred the basil.
  5. When the omelette is ready cut into portions and transfer each to a plate. Sprinkle the avocado, cottage cheese, basil and pumpkin seeds and serve straight away.

This is a really nice "middle of the week" freshly cooked meal and probably works for lunch as well as dinner. I've made this twice now, the first time with water and the second time with milk and I didn't notice much difference between the two. Obviously I skipped the cottage cheese, since Lundulph doesn't eat that and also I've managed to stock up on feta cheese lately, so I'm working my way through that. It would probably work as a topping as well, now that I think about it.

One very important note, mostly for myself is that I should use my cast iron pan for this. Depending on the size of the pan, this is quite a thick omelette, almost like a frittata, so takes a while to cook through. I used the cast iron pan for the first omelette as I thought it would be the larger one. On the induction hob, it heated up very evenly and although it took quite some time to get the full omelette cooked through, it didn't burn. However, as I established, it is the same size as my teflon pan, so for the second omelette, I used that instead because it has a lid. My teflon pan doesn't have a full steel base,so tends to heat up quite unevenly on the induction hob and thus things invariably burn here and there, as happened this time. But with a lid on, the omelette cooked a lot quicker, since the heat was kept in. I'll need to work out a lid for my cast iron pan. And the teflon one should perhaps be disposed of, I don't use it very often, so it doesn't matter much, but still, I was surprised what a difference that made.

Lundulph quite liked it, especially now that he's on a super healthy streak after the holidays and also is trying to go a bit more plant-strong in his food intake, this dish hits the spot. Sadly, I missed the photo opportunity on both occasions.

15 January 2020

Plant-stong Burgers

IMG_5894

I've been racking my brain on what to cook to make sure that Lundulph gets enough food, now that he's almost stopped eating meat and I remembered that my Sister told me about the "Engine2Diet" website, which she was very keen on a few years ago and I searched for it. It seems to still exist, however has been re-named to "Plant Strong" and still provides a selection of recipes and other stuff, which I didn't bother reading, but a scan through the photos yealded plant-strong burgers which looked really good, so I set about making these. Below are my choices of ingredients:

canned chickpeas
cooked amaranth
carrots
onions
mushrooms
garlic
thyme,salt and pepper

I followed the instructions on how to blend everything together, but I wasn't able to mash up the chickpeas and so ended up putting everything in food processor and ended up with a fairly runny and homogeneous "mince", so I had to use a food ring in order to make the burger patties.

Once in the oven, they flowed out as if they were chocolate chip cookies and I ended up baking them for longer than the recipe stated and also there was no way I could flip them. Thus the messy lump on the plate in the photo at the top.

IMG_5892 IMG_5893

The patties did taste quite nice, I just didn't manage to get them to stay in a burger shape and blending in a processor removed a lot of the texture, which probably helps achieve the burger shape, not to mention makes it even tastier. But both Lundulph and I agreed that this "mince" would probably work very well in a vegetarian lasagne. If so, I'm guessing the carb part of the ingredients can probably be skipped. Thinking about it, it would work in a moussaka too.

12 January 2020

Warm Kale Salad with Chilli and Ginger

IMG_5891

Following another lovely New Year's holiday at my parents' place in Sweden, we are back with a new bundle of recipes. Lundulph is following the lead of his older brother, not by becoming vegetarian, but dramatically reducing the amount of meat he eats. So yesterday, I took the train in to our nearest larger town and did a full circle around the various food shops that cater for a more vegetable-strong diets and filled up my rucksack with interesting ingredients.

First up is this warm kale salad, which I spotted on the website of one of the Swedish breakfast shows. Lundulph has recently read that kale is one of the best vegetables to eat, so here goes. Unfortunately the recipe doesn't give the number of portions. The original recipe can be found here in Swedish. Also unfortunately whoever wrote the recipe, didn't bother with giving useful measurements on the vegetables, so below is what I got out of the packets I purchased from the supermarket, after washing and trimming. For the black cabbage and curly kale, I removed the stalk as it tends to be quite fibrous, then I cut in chunks. I shredded the red cabbage.

Ingredients

160 g black cabbage
160 g curly kale
160 g red cabbage
2 fresh red chillies
40 g fresh ginger
6 shalotts
½ dl sesame oil
½ dl grapeseed oil
½ dl soy sauce
6 tbsp sesame seeds
black pepper

Method

  1. Peel and slice the shalotts; peel and grate the ginger; wash and finely slice the chillies.
  2. Toast the sesame seeds in a dry pan, then transfer to a bowl.
  3. Heat up the oils in a large wok pan. Fry the shalotts until soft and translucent.
  4. Add the red cabbage and fry for a couple of minutes, then add the kale and black cabbage and stir until it starts wilting. You may need to do this in 2 - 3 parts.
  5. Add the chillies and ginger and stir to distribute evenly.
  6. When everything has started to soften, add the soy sauce and the toasted sesame seeds and stir through and it's ready to serve.

For carbs, I cooked quinoa and for proteins I steamed tuna steaks, very much like I've done previously, but without the marinating etc - I didn't have the ingredients, so I just sprinkled salt, pepper and 7 Thai Spice mixture on top of the steaks.

The combination worked really well. The chillies were graded at 2 out of 5, and were quite long in size, they were very tasty, but can be adjusted to what's available and the level of heat required.

The grated ginger didn't spread through as well for some reason, but formed a couple of lumps, inspite of my stirring, so maybe better to dice it very finely rather than grate.

Lundulph seemed to enjoy this meal very much, he ended up having his tuna steak and half of mine, though they were quite small, I thought. Also they were quite expensive, so we might use a different fish next time. But I'm pleased that I didn't over-cook them this time, they remained juicy and eaten in small pieces with the salad and quinoa, it was very tasty indeed.

As we're looking to move back to a better diet after Christmas, I saved all the stalks and used to make a vegetable soup, along with various other vegetables I'd saved, diced and frozen over the past few months. Another of our initiatives is to reduce our waste, so soups are very good in this respect.