Showing posts with label Breakfast. Show all posts

25 March 2021

Fluffy Japanese Pancakes for Waffle Day

After holding off for a few years, I'm back watching Ann Reardon's wonderful videos and when I saw this one, I just couldn't resist trying it out.

Fluffy Japanese Pancakes

The video actually looks at a fake video on how to make these fluffy things at home and also provides a recipe that really works.

As today is Waffle Day in Sweden, Lundulph and I are following our tradition of eating pancakes and although this type of pancake requires serving immediately after cooking, we had a 30 minute break after dinner, while I made these. But I'd prepared as much as I could before dinner and made sure to let the oven pre-heat while we ate our main course, so it was definitely a success.

Additionally, today Lundulph got his first injection of the Corona vaccine, so this was an extra treat for him and his cheeks did go rosy and his eyes went all sparkly.

I pretty much followed the recipe and the video. It calls for egg white powder, which I've never used before, so it was quite interesting. Ann Reardon also recommended using baking powder to help with stabilising things, if you're a beginner baker. I'm not, but I used it just to be on the safe side. I'll try without it next time.

Ingredients

Makes 4

2 egg yolks
1 tbsp milk
1 ¾ tbsp plain flour

2 egg whites
1 ¼ tbsp granulated sugar
1 tbsp egg white powder
1 tsp baking powder (optional)

Sweetened whipped cream
Blueberries, strawberries, banana slices
Maple syrup or honey

Method

  1. Place a thick-bottomed baking sheet in the oven and pre-heat the oven to 10 °C.
  2. Prepare a piece of baking paper by brushing lightly with a neutral oil.
  3. Whisk together the yolks, milk and flour until a smooth batter.
  4. In a large glass or metal bowl, whip the egg whites together with the sugar, egg white powder and baking powder if using. They should reach to stiff peaks stage.
  5. Using a rubber/silicone spatula, scoop out some of the egg white foam and gently whisk into the yolk batter to loosen it up a bit.
  6. Then pour the yolk batter into the whites and with the spatula fold in very gently and just until the two have combined and there are no streaks visible.
  7. Turn down the oven to 160 °C, take out the baking tray, place the prepared baking paper and pour 3 - 4 blobs using an ice cream scoop. Leave plenty of room between them.
  8. Place back in the oven and set a timer for 2 minutes 30 seconds.
  9. When the time is up, open the oven and add a second blob on top of each of the previous ones. Set your timer for 7 minutes.
  10. Prepare the whipped cream and fruit while the pancakes are baking.
  11. When the second timer is up, take out the tray and flip them over with a palette knife. Then bake for a further 4 minutes.
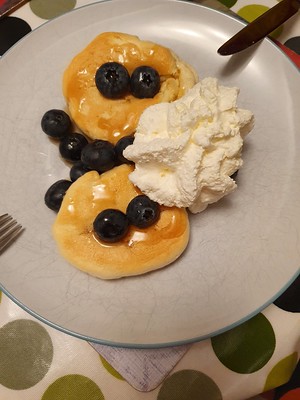
  12. Remove from the oven and serve immediately with the fruit, drizzled with syrup or honey and a generous blob of whipped cream.

Comparing to the video, my egg yolks were a lot paler and so the pancakes ended up paler and I was worried that they hadn't baked properly, but I was wrong, they were beautifully puffed up. Though I ended up with lots of left-over mixture when I used the ice cream scoop, so next time, I'll transer the whole mixture to a piping bag, so that I can control both shape and size more.

I only bought blueberries for these and I used maple syrup. It worked very nicely. When I served them, Lundulph wondered if these were Yorkshire puddings, because he thought they smelt a bit like that, but he cut them open, spread a lot of blueberries on top and covered with maple syrup and whipping cream. Since I got my whipping cream dispenser a couple of years ago, we've been having a lot more whipped cream than normal, because it's such fun to squirt onto our various desserts.

10 April 2020

Кифли с мармалад

These are one of my favourite breakfasts in Bulgaria. It is read as "kifli s marmalad" and is a curious take on croissants in that they are shaped in the same way, but not from puff pastry. The name comes from German I think - "Gipfel" which means tip/peak of a mountain. The traditional filling is marmalade made from rosehips, though I've seen chocolate and other things lately and it's probably nice too, though I wouldn't try it, if there's rosehip marmalade to be had. Google translates these as "marmalade muffins".

IMG_5928

Lundulph has wanted me to make these for ages, since he always has these when we go to Bulgaria and after trying out the recipe for the super fluffy bread rolls, I felt I've found the right type of dough for these delicacies. Though searching for recipes on the internet indicates dough for kozunak should be used, I disagree, eggs have no business in there. It is key to follow the initial recipe I wrote up, with 4 tbsp of sugar, possibly even 5 or 6, but skip the salt.

I had a jar of 380 g rosehip marmalade and used about ⅔ of it. It was set quite hard, so I stirred it through with a fork, then put in a piping bag for easier distribution.

IMG_5925

I used the proofing function of the oven again, both for the first rise and for the first tray of kifli, to make sure they would rise nicely. The second tray of kifli would have longer to rise, so I left them on the work surface, the kitchen had become fairly warm at this point anyway.

I divided the dough into 2 equal parts, then rolled each out to a circle just under 1 cm thick and cut into 6 wedges. I squirted about a tbsp of rosehip marmalade on each and rolled them up, then placed onto a baking tray lined with baking paper and left to proof.

IMG_5926

I pre-heated the oven to 180 °C fan and just before baking, I brushed the kifli with a whisked up egg and sprinkled granulated sugar on top. I baked for 30 minutes, then took out of the oven, left the kifli to cool a few minutes in the baking tin, before carefully moving to a cooling rack.

I let Lundulph try one while it was still warm and his eyes started sparkling, which is a sure sign he liked them. What he did forget to mention is that the dough tasted a bit salty for some reason and I wonder if I'd forgotten to add the salt the first time I made the fluffy soup buns, because this was quite a dramatic difference. So should skip the salt next time.

IMG_5928

Also, I'll cut the dough circles into 8 pieces, it's so much easier, than to try and do 6, even if the kifli will end up slightly smaller.

Lundulph's final comment was that these are like jam doughnuts, but not deep fried, which is good and also a disappointment that there were holes in the middle where the marmalade was. His view is that more marmalade is never wrong. I'm guessing these holes are due to the steam in the marmalade expanding during baking, then shrinking back/escaping after the dough has set during the baking. I suppose I could sneakily syringe in some extra jam after baking, just like for jam doughnuts. My Mum kindly bought me two filling nozzles for precisely this reason at the chocolate festival last year.

I kept a couple for us for breakfast the following day, the rest went into the freezer, but I suspect will get eaten fairly quickly though.

25 March 2019

Crepes for Waffle Day

Once again it is time for pancakes on Waffle Day. Last year I did some research and found this recipe, which seemed rather good. I even started a post about it. But last year was very unproductive, I've started crocheting and knitting again, after many years' break and as with the early years of the food blog, it has become a bit of an obsession, especially when there are so many beautiful yarns to buy.

2019-03-25_crepes

I've decided to try and do more cooking again and I thought I'd go back to last year's recipe. But I couldn't find it, because the post never got finished. So another search and I found another recipe, which also seemed rather good. Plus I wanted to try out my new crepe making tool, which I got for Christmas.

I originally thought that I should halve it, since it's just the two of us. The recipe didn't mention the number of pancakes it would give and last year, I froze the remaining pancakes for future desserts, which worked very well. So here is the full recipe in metric:

Ingredients
Makes 14, at diameter of 20 cm

3 dl semi-skimmed milk
3 large eggs
30 ml oil
3 tbsp granulated sugar
½ tsp salt
115 g plain flour

oil for frying

Method

  1. Place all ingredients in a large bowl and quickly whizz with a hand blender to get a very thin batter, almost like water.
  2. Leave to stand for at least 20 minutes, preferably longer, like overnight.
  3. Heat up a flat frying pan of about 20 cm inner diameter to medium-high heat and brush with a little oil.
  4. When it has heated up fully, stir through the batter and pour ½ dl into the pan, then swirl around to get the batter to spread across the whole pan. If you have a crepe making tool, this is when it should be used to spread the batter quickly and evenly.
  5. It shouldn't take too long for the crepe surface to go dry and then using a spatula, loosen carefully around the edges.
  6. By now the edges will have started to go brown a bit, so carefully lift the edge, slide the spatula under and turn the crepe over.
  7. Let fry on the second side for 10 - 15 seconds, then remove onto a large plate. If the pan looks dry, brush with a little oil again, stir through the batter and repeat the procedure with the next crepe.

As it turned out, in my "greed", I'd picked a crepe making tool that was a bit too large for my frying pan, so I couldn't use it and had to swirl to spread the batter. Still the crepes turned out reasonably thin and delicate, no toughness anywhere and I only tore a couple as I rushed to insert the spatula under them for the turning.

Sadly I can't remember my thoughts last year when I made the first recipe now, but this second one was good and easy. I will try to make them with butter next time, I think that will add a richer flavour. I'll see if I can find a smaller crepe making tool, so I can get the crepes really nice and thin.

I have no comment from Lundulph, but he happily put away 5 of the crepes, two savoury ones, with lovely Hungarian salami and baked beans, and for dessert, two with marshmallow fluff, milk chocolate crumbs and desiccated coconut and one with fig jam. I had two, though I probably should have stopped after the first one, it was surprisingly filling. The remaining seven crepes are now folded and frozen.

What I can say is that the batter turned out so thin, I was worried it wouldn't work at all, but it did!

23 May 2016

Chocolate and Raspberry Chia Pudding

On my last visit to Sweden just after Easter, I came across a fabulous blog, Zeina's Kitchen (in Swedish). She's not been going for long, but is very talented and her blog won the People's Choice Award in the Food Blog Awards of 2015. The thing that particularly appealed to me then was her recipe for chia pudding, very similar to the one I've been doing, but made with chocolate and raspberries and to a thicker consistency. Not to mention much more attractive than mine. So when my parents came to visit at the end of May, I decided to try this out and I even bought special glasses to serve it in.

IMG_5002

Actually they are disposable margharita glasses. But it was rather tasty, especially with some fresh strawberries and kiwi fruit diced on top.

IMG_5003

So without further ado, here is the recipe. I doubled the recipe and made one small addition to Zeina's recipe, I added sweetener to the chocolate pudding, as it wasn't quite sweet enough.

Ingredients

7 - 8 portions

12 tbsp chia seeds
8 dl almond milk (sweetened)
4 tsp vanilla extract
4 tsp honey
2 tsp xylitol sweetener
8 tsp cocoa powder
4 dl fresh raspberries
2 kiwi fruits
7 - 8 large strawberries

Method

  1. Place 3 tbsp chia seeds in one bowl, and the other 3 tbsp in another.
  2. Add 2 dl almond milk to each bowl and stir.
  3. Add 1 tsp vanilla extract and 1 tsp honey to each bowl and stir in.
  4. Add the xylitol and cocoa powder to one of the bowls and stir through.
  5. Measure up the raspberries, place in a deep dish and mash up with a fork, then transfer to the second bowl and stir through.
  6. Cover the two bowls with cling film and place in the fridge overnight.
  7. Spoon alternate layers of raspberry and chocolate in serving dishes.
  8. Peel and dice the kiwi, wash and dice the strawberries and decorate each serving.

It is also possible to use frozen raspberries, the same amount, but they need to be thawed before mashing and mixing in and the amount of chia seeds needs to be increased slightly as they contain more liquid than fresh ones.

IMG_4996

The chocolate chia pudding is a lot less than the raspberry chia pudding, so keep that in mind when preparing to serve. IMG_4997

What surprised me was the combination with the fresh fruits on top, that really made a difference I think. We had the first four portions as dessert and the rest I had for breakfast in the following days, which was very nice, but I didn't bother with the fresh fruit then, so not as tasty as the first dessert. I also noticed that the chia pudding with fresh fruit doesn't last as long and towards the end, there was a distinct fermented tinge to it, so I should probably have stuck to a single batch.

5 October 2015

Breakfast variation

I've been quite happy with my new breakfast, but I've been wanting to have a seasonal variation on this. Even with an unusually warm Autumn and availability of strawberries, I want something to see me through the Winter and decided to give this one a try.

IMG_4860

As it turned out, this didn't work well at all, for me at least, there was very little flavour to it, though that could be down to the butternut squash, I don't know.

Ingredients

1 large butternut squash
350 ml water
2 roiboos chai teabags
3 tbsp coconut oil
4 tbsp chia seeds
1 tbsp honey

Method

  1. Pre-heat the oven to 180 °C.
  2. Cut the butternut squash in two and scoop out the seeds. Then bake in the oven, cut side up for about 45 minutes until it has gone soft.
  3. Scrape out some 400 g of the baked squash and place in a large saucepan together with the water and the contents of the teabags and the coconut oil, then bring to a simmer. Remove from the heat and set a side for a few minutes to cool a bit.
  4. Stir in the chia seeds and honey, making sure that there are no lumps.
  5. Leave for an hour at least to allow the chia seeds to swell a bit.
  6. Warm up before serving.

The amounts above were enough for 5 breakfasts for me and I might need to experiment a bit to get the flavour right - I think there was too much coconut oil and not enough sweetness. Unfortunately I don't know how to determine how sweet a butternut squash would be, so some adjustments for each batch would be required.

I also didn't see much point in the roiboos chai - I think some cinnamon should do the trick and I think maple syrup works really well with butternut squash, so I'd swap that out for some of the coconut oil.

The really good thing is that one batch was enough for the whole week and I only needed a quick whizz in the microwave to warm it up, no other effort required, meaning possibly a few extra minutes' sleep.

I served with flaked almonds and blueberries, which was OK, but still not enough to make this a meal to look forward to.

28 July 2015

New Breakfast 2

IMG_4764

The second breakfast recipe I tried was for "fruit porridge" and there were a couple of things I decided to ignore from the outset - one of the ingredients was celery. Just say no, that's all I'm saying. The second one was to blend the fruit together into some sort of porridge consistency. Well, that would be fruit purée, and why do that, when it's nicer to have it diced and have some textures and colours as well? Not to mention that surely if the stomach has something to digest, it might prevent getting cravings a couple of hours later?

Of course diced fruit in a bowl is a fruit salad and that would take some time to do, not enough of that in the mornings, so I prepared it on the evening before. Lundulph came into the kitchen to see what I was up to and as he saw the kiwi fruit, he decided that he'd like to try this new breakfast as well, so I made a second portion for him too.

Ingredients

1 portion
1 apple
1 pear
1 large kiwi fruit
a handful of raspberries and blueberries
1 tbsp crushed linseed
1 peeled hard-boiled egg

Method

  1. Wash, peel and core the apple, then dice and place in a bowl.
  2. Wash, peel and core the pear, then dice and add to the bowl.
  3. Peel and dice the kiwi fruit and add to the bowl.
  4. Gently wash raspberries and blueberries and add to the bowl
  5. Finally sprinkle the crushed linseed over and stir through to get everything mixed and it's ready to eat along with the egg.

When I handed Lundulph his fruit salad, his only comment was that this is one big bowl of fruit, then he went off to the home office, where he tends to eat breakfast most of the time.

I had the fruit salad first and then ate the egg with a little salt. It was a bit of a struggle to eat everything and I felt rather stuffed afterwards. The idea is of course that the egg provides the protein and again, I got through up to lunch without experiencing any cravings at all.

I was telling my Mum about this too, as she's been having fruit salads with nuts for breakfast for years and she concurred that it's a very filling meal indeed.

But it is also a bit more effort than I have time for, so I only made it a couple of times. I think it would work as a dessert for two, just the fruit salad that is, minus the egg. Making it on the evening before and keeping wrapped with cling film in the fridge works quite well and if you're already cooking in the evening, this won't add too much effort.

And yes, the raspberries and blueberries were the replacement for the celery. The photo in the book actually had pomegranate pieces and I suspect that's rather nice too.

27 July 2015

New Breakfast 1

IMG_4763

Now, my new diet books have lovely recipes and I've tried to follow their concept of palm portions, but I have a bad feeling that's too much for me anyway, perhaps because I no longer feel hungry around elevenses. In the second book there were a couple of breakfast recipes that seemed very appealing and I tried both. Here is the first one, which I've ended up sticking to, as it's a little quicker to do.

Ingredients

1 portion
4 tbsp cottage cheese
½ banana
4 - 5 large strawberries
1 dl heaped with blueberries
1 tbsp flaked almonds
1 tbsp sunflower seeds
1 tbsp whole linseeds
¼ tsp ground cinnamon

Method

  1. Scoop the cottage cheese into a bowl and slice the banana thinly over.
  2. Remove the stalks of the strawberries, wash and dice into the bowl.
  3. Wash the blueberries and add to the bowl as well.
  4. Finally add the almonds, sunflower seeds and linseeds and sprinkle the cinnamon on top.
  5. Stir to mix and eat.

Now, the palm portion concept states that the meal should consist of protein of about the size of one's palm (minus the fingers and thumb), then two fist-sized portions of veg or fruit and a fist-sized portion of carbs. This will help you keep your weight. If you want to lose weight, then swap the third fist-sized portion for veg or fruit as well. The book then provides loads of ideas for what to use in each of the food groups.

In this breakfast recipe, the cottage cheese provides the protein part and 4 tbsp are about the size of my palm. The ½ of banana counts as one fist-sized portion of fruit, the strawberries a second and the blueberries a third. I believe the nuts and seeds provide protein and some fat as well, not to mention that linseed tends to get the system going. The cinnamon is not necessary and I've forgotten it on some days, and it was still tasty. I will need to make it more seasonal, I'll have to do some research on what I can swap the strawberries and blueberries with, to make it more interesting. But it's a really nice and filling breakfast that keeps me going well up to lunchtime, no cravings at all.

Of course this takes a little longer to put together in the mornings than say müsli and milk or yoghurt, but not too bad and I think it's time well spent.

18 July 2015

Baked Churros

While spending a number of evenings watching youtube recipes, I came across the wonderful channel of Ann Reardon of How to Cook That and one of the recipes was for churros, which I think of as the Spanish version of mekitzi.

IMG_4753

I've had churros a couple of times and really enjoyed them, but never really thought about making them at home and when I found the tutorial video, I decided to try them out.

The basic dough is very similar to the choux dough, but with fewer eggs and I was a little concerned that they would puff up, but they didn't and perhaps that's down to the smaller amount of eggs in the mixture.

Ingredients

Churros dough
250 ml water
115 g butter
160 g plain flour
3 large eggs
1 tbsp granulated sugar
1 tsp vanilla extract
Cooking oil spray

Cinnamon sugar
54 g caster sugar
1 tbsp ground cinnamon

Nougat dipping sauce
1 part nougat
1 part semi-skimmed milk

Method

  1. Line a couple of baking sheets with baking paper and pre-heat the oven to 200 °C.
  2. Put the water and butter in a saucepan and melt on the hob.
  3. Stir briskly in the flour and once the dough starts thickening and comes together into a ball, remove from the hear.
  4. Add the eggs, one at a time and incorporate well in between.
  5. Finally stir in the sugar and vanilla and transfer to a piping bag with a fairly narrow star nozzle.
    IMG_4752
  6. Pipe straight lines, a couple of cm apart onto the prepared trays and spray with a little cooking oil.
  7. Bake each tray until the churros go golden brown on the ridges.
  8. Stir together the caster sugar and ground cinnamon to mix well.
  9. Remove from the oven and transfer to a cooling rack and sprinkle immediately with the cinnamon sugar.
  10. Make the dipping sauce by dicing the nougat and placing in a heat proof bowl.
  11. Bring the milk to the boil, then pour over the nougat and stir until the nougat has melted and has become a homogeneous mixture.

I also used a nozzle that was too wide, so my churros were a bit on the thick side, but I wasn't sure if I'd be able to pipe the dough, it felt a bit thick and I didn't want to get a smaller nozzle clogged up. In the past I've mostly used too small nozzles and had tremendous problems with piping things well. This meant I had to bake my churros for 25 minutes and I also upped the temperature to 220 °C as they seemed to be taking forever to develop colour. I also had some cinnamon sugar left over, but that can be used when I make cinnamon buns next.

IMG_4751

But they were crunchy on the outside and soft on the inside and worked very nicely with the nougat sauce. In fact the reason I made it was that I didn't have any chocolate in the larder and thought I could make a "ganache" with the nougat, but rather than using cream, I used semi-skimmed milk. This resulted in the mixture not setting like a ganache would, even after being chilled in the fridge, so it's a good one for ice cream as well I think.

This was a surprise for Lundulph and a very tasty one too. We ate almost all of the churros for breakfast, so if I make this for more people, I definitely need to increase the recipe. Hopefully I'll remember to use a smaller nozzle next time too, that should shorten the baking time considerably. Lundulph liked that they weren't greasy like deep fried ones and of course you could tell the difference, but it wasn't a bad one at all.

17 November 2012

Milk Banitza

IMG_1876

While rummaging through the freezer, I noticed I have two packets of filo pastry that I'd forgotten about.

I also somehow managed to end up with a surplus of milk, so what better thing to do than a Milk Banitza (млечна баница in Bulgarian). This is quite a common breakfast dish in Bulgaria and I realised I haven't made it since before we moved into our house and thus not on the blog.

So yesterday I thawed a packet of filo pastry in the fridge and prepared the banitza in parallel to dinner.

Ingredients

50 g butter + some for the baking dish
250 g filo pastry
8 dl milk
5 - 6 medium eggs
2 dl caster sugar
2 tsp vanilla essence
icing sugar for sprinkling

Method

  1. Pre-heat the oven to 200 degrees C and butter an oven proof dish, preferably clear pyrex so you can see when it's done.
  2. Melt the butter on low heat, taking care that it doesn't start bubbling.
  3. Place a sheet of filo in the baking dish, making sure the bottom of it is completely covered,but doesn't go up the sides. Then brush with melted butter.
  4. Place a second sheet in the same way and brush with butter. Continue until all sheets have been used up.
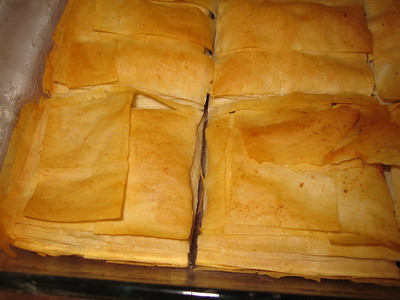
    IMG_1870
  5. Make sure to brush also the top sheet with butter, then carefully cut into squares or diamonds.
    IMG_1871
  6. Bake for around 25 minutes until the filo goes golden brown.
    IMG_1872
  7. Take out and let cool down and make the liquid mixture in the mean time.
  8. Whisk together milk, eggs, caster sugar and vanilla essence lightly until the sugar has dissolved.
  9. Once the filo pastry has cooled down, carefully pour over the liquid mixture. The top layers of the filo will probably float on top, just push them down to get them wet.
    IMG_1873
  10. Let the banitza stand for a while until the filo pastry has soaked up some of the liquid and swollen and doesn't float on top.
  11. Place back in the oven and bake for about 45 minutes, until all the liquid has been taken up. If the filo on top starts burning, cover with a sheet of baking paper or aluminium foil.
    IMG_1875
  12. Remove from the oven and allow to cool. Serve warm or cold, by carefully cutting along the pre-cut lines and take out the pieces. Sprinkle generously with icing sugar.

As usual I made a number of mistakes here - for starters I only had 220 g filo pastry and I used 1 litre of milk, so it was not possible for all the liquid to be soaked up. I also used only 5 medium eggs and I think I should have used 6. The amounts vary between recipes (I did a quick google), so I guess it also depends on the thickness of the filo pastry and how much it can absorb.

IMG_1877

Still, Lundulph and I had milk banitza for breakfast this morning and it was rather nice despite its runny-ness. I guess this dish is more for home use than to impress guests, but it is tasty.

Update 2021-02-27:
As this takes a bit of time to do and as it is a suitable dish for breakfast, I recommend doing everything up to point 9 in the evening before, then leaving the banitza in the fridge overnight to soak. Then just bake in the morning.

22 September 2012

Egg in the Basket

Work is getting a bit hectic again and I'm neglecting my cooking escapades. But during a casual and slightly distracted browsing session a few weeks back, my eye was caught by something called Egg in the Basket. What an intriguing twist on egg on toast, which I really like.

So when the whole clan packed themselves into two cars and went off to the English countryside for a long week-end of celebrating Lundulph's birthday, I decided to try this out and it was quite a success!

Unfortunately no fancy birthday cake this year for my darling Lundulph and the cupcakes I made together with Lou and Falbala didn't work out too well either, but at least everyone got a nice breakfast.

Traditionally when the whole family gathers, there is full English breakfast to be had and it is normally done by Lundulph's Mum. I just sneaked in with a hole cutter, and carefully cut out rounds from a few of the bread slices.

IMG_1751

After wavering for a few seconds on whether I should butter the bread or not and realising that it would be trickier still, since I'd already cut the holes, I opted for not buttering.

Instead, I headed up a little oil on medium in a pan and placed the bread slices, two at a time and cracked an egg into each hole. I also put in the cut out circles to give them colour.

IMG_1752

As you can see, the pan was a little too small, so the egg ran out under one of the bread slices.

Unfortunately, the circles were a little small and the egg would require longer to cook than the bread. I wanted to avoid burning it, so I had to flip each Egg in the Basket, which I feel ruined the visual appeal somewhat.

IMG_1753

But with a slice of bacon and a big mushroom, it was lovely and the yolk was nicely gooey too.

Next time, I want to try and improve on the visual aspect of this dish and have the eggs with a "sunny side up". I'll fry the toast as before, but instead of flipping it , I'll put it under the grill. I'm hoping this will do the trick. Update to follow.

Update 2012-09-23: As a special Sunday breakfast and to try out the rye loaves I made yesterday, I tried out my plan and it worked! I got to use my fancy cast iron pan, which works both on a hob and in the oven. But alas, it has been ages since I used it and I had forgotten how thick bottomed pans work and over-cooked the eggs. But they were "sunny side up", yay!

IMG_1796

22 November 2010

Brioche Roulée

In order to treat Lundulph and my parents to a special breakfast, I decided to finally try out Lenôtre's recipe for Brioche Roulée.

IMG_1087

His dough recipe is a bit different from Richard Bertinet's one, that I've been successful with, so I was a bit nervous, especially due to some of the instructions that didn't quite make sense in my head.

Besides, I've had trouble baking and cooking things in my Mum's kitchen for some reason. It's just not the same as at home, I can't quite put my finger on it. Maybe it's because my Mum is there and historically she's been the one to cook for the family, not me, whereas at home, I'm the one that does the cooking. Who knows. But I was determined to give this a try.

The original recipe is called Brioche Rulée aux Fruits Confits and is translated to Rolled Brioche with Candied Fruit. It would have almond or vanilla cream in it, along with candied fruit and raisins soaked in rum and be decorated with a sugar glaze. Problem nr 1: My Dad doesn't like dried fruit in yeasty breads. Now I had some mousseline cream left over, which I thought I'd use up. As it turned out, I had to throw it away, since it had fermented. I guess 3 weeks in the fridge is just really pushing my luck. That makes Problem nr 2. What were the alternatives? Well, there are 5 jars of jam in the fridge and by far the most popular is bilberry, so I decided to use that instead. Thus also the issue with the fruit was resolved and I decided to add some chopped walnuts for a bit of crunchiness.

I also decided to actually do the brioche properly, i. e. prepare it the night before and let it rest in the fridge, I generally skip that bit. The recommendation was to make in small amounts, rather than big. The roulée was supposed to be made from 400 g dough in a 20 cm cake tin. I didn't weigh my dough, but I knew it would be more than the required amount. This worked out OK, since my Mum's cake tin is 23 cm.

Brioche dough ingredients

9 g fresh yeast
1 tsp warm water
1 tsp salt
1 tbsp sugar
2 tbsp full milk
250 g strong white flour
3 eggs
225 g unsalted butter at room temperature

Brioche dough method
  1. In a small bowl, crumble the yeast into the water and stir to make a runny paste.
    IMG_1084

  2. Combine the salt and sugar in the bowl where the dough will be mixed and add 1 tbsp of milk to it and stir to dissolve as much as possible.
    IMG_1083

  3. Add the flour to the salt/sugar mixture, then add the yeast paste on top and mix to combine.

  4. Add 2 of the eggs and continue to mix the dough until it is firm and smooth and evenly blended. If it seems a bit dry, add the remaining tablespoon of milk.

  5. Add the remaining egg, then continue to knead for some 10 - 15 minutes (if using a machine, possibly longer if by hand). The dough should become light and soft, but not too sticky.

  6. Now divide up the butter into ice cube sized chunks and add to the dough and incorporate well, but don't over-work the dough.

  7. Cover the dough with a cloth and set aside in a warm place and let rise to double volume, about 2 h.

  8. Punch it down, fold a couple of times, then let rise a second time to double volume, another 2 h or so, then cover the bowl with cling film and place in the fridge overnight.


The bits I was wondering about was the almost ridiculously small amounts of water and milk in order to dissolve the dry-ish ingredients. But having done them, I realise that the point is to make it easier to blend them into the dough, rather than add liquid to it. Brioche dough generally only gets liquid from the eggs, so this is a very neat trick to incorporate yeast, salt and sugar and get them well distributed throughout.

From the instructions I got the impression that the dough would be soft, but not sticky. I didn't end up with anything near that. The eggs I used were on the small side and the overall amounts were a bit too small for the Kitchen Assistent, so I ended up kneading by hand and also adding the extra tbsp of milk in order to get it to come together.

The most disturbing thing was the amount of butter, I think I might have got it wrong, because it was way too much and the final dough that I put in the fridge was more of a very thick batter, than a dough. I just about managed to incorporate it all. I certainly struggled to punch it down and fold it between the two rises.

Roulée ingredients

unsalted butter
1.5 dl granulated sugar
1 dl water
2 dl jam
1 dl chopped walnuts
1 egg

Roulée method
  1. Butter a round cake tin.

  2. Take the brioche dough out of the fridge and take about a third of it and roll out to a circle, large enough to cover the bottom and walls of the cake tin. Then place it in the tin and spread some of the jam on the bottom of it. It must be a thin layer.

  3. Roll the remaining dough into a rectangle, about 60 x 20 cm and spread the remainder of the jam on it. Sprinkle the walnuts over the jam, then roll up to a 50 cm long sausage.

  4. Cut the roll into 12 pieces 5 cm thick and arrange in the cake tin, making sure they don't touch each other or the dough at the edge. Cover and let proof until the pieces begin to touch, about an hour.
    IMG_1085

  5. Pre-heat the oven to 200 degrees C.

  6. In the mean time bring the sugar and water to the boil to make a simple syrup. Let simmer for a couple of minutes, then set aside to cool.

  7. Just before putting the roulée in the oven, whisk up the egg and brush the surface well. Bake the roulée for about 35 minutes, until golden brown.
    IMG_1086

  8. Remove from the oven and immediately brush or drizzle the syrup over the roulée until it's all absorbed.

  9. Allow to cool a bit, then serve warm.


The night in the fridge did wonderous things for the brioche dough, it was very much like modelling clay than dough, but most definitely not like batter.

I tried to work as quickly as possible, and used copious amounts of flour when rolling.

I also baked it at 185 degrees and used the hot air fan. This mainly to save a few minutes on waiting for the oven to heat up, rather than anything else.

The result was fabulous, albeit on the greasy side. I also put in too thick a layer of jam at the bottom under the rolls. This is mainly due to the bilberries being whole in the jam, I should have prepared it and blended it beforehand.

On the whole, it was an interesting experience, but I think I'll stick to my original brioche recipe next time, it seems a bit less hassle.

I also suspect other types of jam would work just as nicely.

Everyone liked it and there's only a small piece left over. Dad and Lundulph even had seconds. So I'm happy too.

24 August 2010

Sausage Buns

A few weeks back I spotted some wonderful looking sausage buns on The Fresh Loaf blog, then I also spotted them in Bulgaria as part of the breakfast assortment in our local bakery and I just had to try them out.

IMG_0925

However, searching for a recipe on the internet didn't result in what I was after - a sourdough recipe for these buns. What I found called for instant dry yeast.

But I still have loads of starter to use up in order to come down to the regular level! OK, improvise once again.

The bun should be a bit on the sweet side, to balance the saltiness and smokiness of the Frankfurter sausage. It should also be very soft.

Thus, I needed a soft dough. Thus I changed the feeding habit of the starter - 2:1:2 and this was thinner than pancake batter. I left it to feed up for over 8 h, but of course with little food, it only rose about 50% in this time. In fact it reached this point after about 5 h, but I thought I'd give it some more time.

Then making the dough, the starter was 480 g, so I added the same amount of water and 880 g of super strong white flour. This was all I had left, as I also made 3 loaves of bread earlier. The dough was very sticky, I mixed it for a few minutes, then let it autolyse for 30 minutes, then about 10 minutes further mixing at medium speed, during which I added 45 g honey and 20 g salt.

I let it rise for 2 h 30 minutes and folded it at 50 min and 100 min. It was still very sticky, but had a bit of a backbone to it.

And sadly this is where I got sloppy - of all I've learned about bread making, I completely ignored most of it. That is to fold it again before dividing, then divide up and fold each piece again before rolling into a string to wrap around each sausage.

IMG_0920

I also realised that I had way too much dough for the 10 Frankfurters I had to hand, and thus didn't follow the recommendations not to wrap too much dough around each sausage. But it used up most of the dough and what was left, I made into knots.

IMG_0923

It all fitted on four trays and they ended up proofing for between 45 minutes and 2 h. And because I hadn't worked the dough properly, it all splodged out on the trays, rather than rise upwards like it's supposed to.

IMG_0922

However, I baked the sausage buns and the bread knots at 200 degrees C for 23 minutes and they were tasty and light, however the ratio bread to sausage was completely wrong. I think I'll try this again, with a smaller amount of dough, work it properly, add more honey, as it wasn't sweet enough and use big Frankfurters.

Oh, and I didn't have any eggs, so I brushed the bread knots with oil and sprinkled poppy seeds on top, and of course almost all of them fell off at the lightest touch. Lundulph had one of the knots as a sandwich with butter and cold Swedish meatballs and said it was very good.

Lots of things to keep in mind for next time.

27 June 2010

Sourdough Mekitzi

IMG_0818 balanced

A couple of weeks ago, I got the opportunity to visit Borough Market in London. And I took the opportunity to also visit the English branch of Poilâne and get a loaf of their famous bread for comparison with the one we got in France. I found the shop easily enough, but on first look, it seemed closed. I tried the door and surprisingly it was open, so I walked in, but no one was there. A minute or two later, a lady came out from the back and seemed very startled at finding me there. I asked for a loaf, paid for it and went on to the barbecue at a friend's place. This was a Saturday. Early the next day, the first thing I did was slice up the loaf. I did weigh it first and it was 200 g lighter than the one from Paris. OK, so variations happen. But as I was cutting it became obvious that this bread was a bit stale - there was no crunch left in the crust, it felt more chewy/sinewy sort of. Now the Parisian bread was fine for several days, so at the very least the loaf I got was baked on Wednesday. At least, probably earlier. So I was rather disappointed. But I froze it and having it toasted takes away the staleness and it was very good. I'd hoped to also taste the freshness of it when I got it in the first place. But this might have been a fluke, I've only been there once, not enough for statistics.

Anyway, there is still some of this loaf in the freezer, along with a loaf of my own sourdough bread, so I'm up to two weeks of feeding my starter, but not really needing to bake. I also refuse to throw any of it away, so I decided to have a go at the Bulgarian version of doughnuts - mekitzi. We get these from the local bakeries when we go to Bulgaria and we always get them when we visit my parents. They are greasy as all doughnuts are and so we've not really felt we need to do them at home and thus I've never made them before.

I have my Mum's recipe somewhere, I keep stumbling across it now and then and forget where I put it. She makes a massive amount and half of it is made into mekitzi and the other half she makes into regular bread, as it is just plain white yeasted dough after all.

But I needed to use up some of my starter, so as with pizza dough of late, I take out some of the starter and keep adding flour until I get a decent consistency.

This time I fed the starter a little bit in advance, I had 275 g starter which I fed 100 g strong white flour and 100 g water. After 5 hours, I made my dough and the starter was unusually runny and smelt a bit differently from normal. Not sure what was going on there.

I took 200 g of starter and added 200 g of strong white flour. This was too much for it and I had to add 50 g of water, to soften it up. I mixed it for about 5 minutes, then left it for a 30 minute autolyse. I then made the poor decision to knead by hand, in one of the hottest days of the year. True it was at 10 pm, but it was still 25 degrees in the kitchen and kneading for 20 minutes does make you break into a sweat. So the dough went back into the bowl and the bowl went into the fridge to rise overnight. I did add some salt at the beginning of the kneading, perhaps a teaspoon or so.

This morning I took it out from the fridge and let it warm up for about 20 minutes. I then took it out onto the work surface, dusted a little flour on it and rolled out to about 0.5 cm thickness. The dough was still sticky and happily stuck to the work surface. I cut it with one of my cooking rings into largish circles. Of course this results in lots of spare dough between each circle and I ended up scraping off all the circles and setting aside in order to re-roll the leftover dough and cutting more circles. My Mum has rationalised this process by rolling out once and cutting diamond shapes with a knife and the edge bits end up with funny shapes.

Either way, once the shapes were ready, I heated up oil in a large, deep, non-stick pan. Large in order to fit more in and deep in order to protect the cooker from splatter. Non-stick is not essential, but most of my pans are non-stick. I used grapeseed oil to a depth of about 2 cm, so not completely deep fried as such.

The dough resulted in 12 circles, which fried very quickly, so it's important to have them all ready before heating up the oil, or they'll end up burnt. In fact, my parents have worked out a team routine for making them, it's quite amusing to watch. I over-cooked the first four, mainly because I got transfixed watching them swell up like balls. A tip is once they've expanded, flip over, then pierce a hole in them and press down. Also, I think my Mum stretches them out just before putting in the pan. That might help getting them cooked more evenly.

Once done, I placed them on a rack to make sure they didn't sit in oil.

IMG_0819

By the time I'd made tea and coffee and Lundulph was out of bed, the mekitzi had gone cold, but were still wonderfully crunchy and tasted "like the real thing" we get at my Mum's.

Traditionally bakeries just sprinkle icing sugar, but I prefer with jam or maple syrup. Of the jam selection we had today, the best one by far was the runny blackberry jam. Lundulph devoured five in a quick succession, I managed two, the remaining five are now in the fridge and I'll have them for breakfast in the next couple of days. They do freeze very well and can be reheated in the microwave. Although they won't have the crunch like fresh ones do.

Before writing this post I also looked up recipes in my book on Bulgarian cuisine. There are several variations on them, some with yeast, some with baking soda, some with yoghurt or milk instead of water.

At the end though, I still have too much starter in the jar, so I've decided to try and modify my recipe for cinnamon buns to see if I can make sourdough version of them.

28 November 2009

Brioche à tête

It's been over a year since I made brioches, mainly because Lundulph thought they were way too fatty for our veins to cope with on a more regular basis.

The other day we were invited to my parents-in-law and I decided to make a batch as a present. They went down quite well. I mixed up the dough in the morning, folded and rested and took over to their place, where I shaped and baked it. Freshly baked brioche with strawberry jam and clotted cream, definitely a hit. And don't think about the fat, it's practically 100%, no point in worrying... And it was a very good dough, kept trying to escape the bowl, I had to do an extra emergency fold just before I left home. It survived the 2 h trip quite happily.

And when I asked Lundulph if he'd like me to make some more for us, he said yes. So I did. Last night I mixed it up and folded and left to rest overnight. This time the kitchen was a bit colder, so the dough didn't rise as much, but well enough. I've also made a slight change to Richard Bertinet's recipe, since I've stopped buying large eggs. Lundulph read somewhere that laying large and extra large eggs is a bit painful for hens, so I've stopped buying them. I buy only medium sized ones. See, I've seen an egg being laid, it doesn't look easy, so I think what Lundulph read is correct. Thus I use 6 medium eggs instead of the 350 g eggs which should be equal to 6 large eggs. In fact I don't bother weighing the eggs. And I do the first knead in my beloved Kitchen Assistent machine. I let it run on medium, but keep an eye on it and vary the speed, if it looks like it's not being worked. When it goes stringy, I give it another couple of minutes, then turn the dough onto the work surface and work it for a bit before adding the butter. I still used 250 g butter, which is "the rich man's" amount. The recipe is here.

IMG_0334

The other reason for making the brioches is that finally Amazon are selling proper brioche moulds. I've been looking for these for ages and had recently given up asking in every kitchen shop I'd pass. All I'd get is a vacant look as if I'd spoken Latin to them.

IMG_0335

So, this morning I woke up really early to make the brioches. Lundulph was supposed to sleep on, but the sun had gone up and he went to look at the morning rush at the bird feeder, while I was baking. The goldfinches have been back for two weeks now, after a couple of months' absence. Very exciting.

IMG_0338

Sadly my oven decided to play up today. Gas mark 5 which should be 190 degrees C was in fact 210 degrees and the brioches coloured up too fast. I turned it down to gas mark 4, no change. After 15 minutes, I wasn't sure if they were done, so I gave them another 15 minutes and on gas mark 3. At least it went down to 190 degrees C then. But they were frighteningly pale underneath.

IMG_0339

The problem with not having a fan assisted oven and baking with silicone moulds - heat just doesn't reach where it's needed. One thing that turned out a very nice and unexpected surprise is that the dough of 500 g flour makes exactly 18 brioches of 60 g each. Well, there's about 30 g left over, which I divide between the pieces of dough. So I need to buy one more of these moulds. In the mean time, I have to bake the last 6 in another dish.

IMG_0340

Slightly better looking at the bottom, but not much. That oven is going as soon as possible. Grrr!

30 October 2009

Poached Eggs

Last night was salad night and I thought it would be nice to combine our usual salad with a poached egg. I've read about these and Lundulph has been talking about swirling boiling water and such, I wanted to give it a go. I'd already done some research on this and YouTube is full of videos on how to do it. So I just had a quick check in Delia's Complete Cookery Course and also in my Bulgarian National Cuisine book, where these are called забулени яйца which translates to veiled eggs. On the whole, it looks like experience is the main thing, trying and tweaking until you're happy with the end result.

On the whole I think I did fairly well for a first time. And I'll write down what I did for reference for next time. I already have some tweaks in mind.

IMG_0216

Ingredients

2 medium sized very fresh eggs
5 dl water
2 tbsp vinegar
1 tsp salt

Method
  1. Place the water, vinegar and salt in a small-ish saucepan, it should be about 5 cm deep, and heat up on low, so that it's just under boiling temperature.

  2. Prepare with a slotted ladle and a bowl with kitchen tissue in order to drain the ready eggs.

  3. Crack one egg in a small bowl or ladle, then carefully pour into the water, keeping the bowl as close to the surface as possible.

  4. The egg white will solidify fairly quickly. I tried to keep it together with a spoon, but it still managed to spread quite a bit. I suspect my eggs weren't as fresh as I thought they were.

  5. Keeping an eye on the yolk, so it gets a bit of a skin, but remains runny, take the whole lot out after about 2 minutes and drain on the kitchen tissue.

  6. Serve immediately while it's still hot. Though it works well cold too, since our dinner got a bit delayed. Lundulph re-heated his in the microwave and the yolk was still runny and tasted very nice on top of our salad, in fact I cut mine up and stirred it in like salad cream.


In the photo, it is served with a few slices of some wonderful филе "Елена" (fillet Elena), which is a very fine cured, spiced and dried fillet from Bulgaria.

Now, tweaks. I had too much water in, that is the water was too deep and the egg sank to the bottom, thus stirring it up and that might have spread some of the white around. Delia recommends that it's shallow enough to need to baste over the yolk to get it cooked and I think that might be a good thing to try.

Then my eggs were not sufficiently fresh. Generally the fresher the egg, the thicker the white is and the closer is stays around the yolk, whereas an older egg has much runnier white, so the older the egg, the more likely the white will spread in shreds during the poaching. I've seen a couple of the shops in the village sell extremely expensive eggs, but dated with when they were laid. I'm guessing it's the owner's own hens in question, so that would be the next thing to try. I'm happy to spend a little bit extra money on two eggs, that'll make it feel even more luxurious.

And I'd also like to try out the swirling method, just for the heck of it, even if it doesn't work out. I'm not too old to play with food.

Finally, I've never really been too big a fan of egg white (unless it's in a meringue), so I might just try poaching a yolk on it's own.

27 May 2009

Oeufs en Cocotte

Once again Angi of Rice and Wheat has been my inspiration when she made oeufs en cocotte. I've seen this before, but never really given it much thought and it sounded very easy to make.

Besides, a couple of weeks ago, I boiled a couple of eggs for breakfast, but sadly overdid them and we couldn't dip in the runny yolk. This method seemed a bit more easy to control.

IMG_0003

So I buttered the ramekins, cracked an egg in each, poured a little bit of milk, sprinkled salt, pepper, paprika, sage and thyme and put in a few small pieces of reindeer salami that I bought during a recent visit to IKEA. And into the oven for 10 minutes. Well, at that point, there was a lot of still transparent egg white, so I left them in for another 10 minutes. Now they seemed to be ready and Lundulph and I sat down with our buttered bread sliced into strips - soldiers he calls them.

And still the eggs were way too runny. Another 8 minutes and the whites were at a good stage, but the yolks had gone a bit hard.

So I thought I'd look up what Delia had to say about it. She'd decorated with asparagus tips, so that's a thing to try. But mainly she recommends a bain marie in the oven for these, this will give a quicker heat transfer, but hopefully also ensure that the yolk remains runny.

Overall, it was very tasty and a definite repeat.

27 April 2008

Müsli bar challenge finshed

IMG_3640
The other day I made the third batch of müsli bars for Lundulph to take with him on his way to work. All according to the third version of the müsli bars. The second batch was done in a rush and I'd forgoten the honey and also I kept the bars in the oven too long and they went very dry.

This time, I remembered the honey, baked them for an hour and a half which dried out the surface, but left them fairly soft inside. Since I'm freezing them, they don't need to be completely dry.

I've also worked out a method on shaping them. The muffin tins are just too big. Instead I use my ice cream scoop to get 6 - 7 scoops onto a piece of cling film. I then roll it up into a sausage, compressing the mixture as much as possible. I use the empty cardboard roll of a kitchen paper roll, put the müsli sausage with the clingfilm into the cardboard roll and compress it even further. I then take the müsli sausage out and leave it to cool, after which I slice it with a serrated knife and then bake on low to dry out the pieces.

From the standard recipe, I got 7 of the sausages, so not too bad. In the old days when Lundulph would eat breakfast at home, we'd get through one batch in 2 weeks. I regret a bit that I thew away the dough hooks of my electric whisk, they would have been handy to mix the mixture for the müsli bars.

IMG_3639

11 March 2008

Müsli bar challenge 3

Yesterday it was time to finally put my original idea into practice - a whole batch of my regular müsli apart from the porridge oats, which were made into porridge with milk. I used 1.5 pi of porridge oats to 2 pi of semi-skimmed milk and boiled stirring on low heat. I also added 2 heaped tablespoons honey.

Once the porridge was ready, I added the müsli mixture and stirred it in as well as I could, which was difficult. This filled up my big pressure cooker pot quite nicely.

As the dry ingredients tried to suck up whatever available moisture there was, the whole thing went quite stiff.

I put most of it in one of the deep baking pans and again put the second one on top and weighed it down. What was left, I distributed over two muffin tins, again trying to compress the mixture. After about an hour, I removed the weights from the baking pan and left it together with the muffin pans to cool down overnight, covered with kitchen paper.


This morning I was almost late for work, as I had to cut up the big slab. It was still fairly moist and spongy to the touch. I cut it up and put it in my big cake tin, on layers of baking paper. The muffin shapes needed to be poked out, but came out in one piece. Lundulph took two pieces with him to work and said they were good. But since I made a whole batch of müsli, these should last him a couple of weeks and a worry is how this will work, if at all. Especially the milk is bound to go off. So after an e-mail discussion, we decided to bake this lot on low, just like meringues. Sadly I forgot to get this started when I got home, so there are some left to do tomorrow.

When I checked them half an hour ago, the pieces had definitely a dried feel to them. At that point they'd been in the oven for just over an hour.

Hopefully this will be the one good recipe.

Update 12 March: I had a bite of this version and frankly it didn't taste too nice, almost like eating bran flakes out of the box. But it's definitely the healthiest version.

Update 14 March: I've frozen most of this version of the müsli bars and a good thing too, Lundulph says that the ones he had this morning left a bit of an odd aftertaste. We're guessing that the milk in the porridge is going off.

3 March 2008

Müsli bar challenge 2

Due to an extremely busy week-end, I didn't manage to do a second attempt at a healthy müsli bar for Lundulph.

Ginger's suggestion about a bran muffin made me think. What if I make a muffin batter and mix in a lot of the müsli? So I did.

However, most batters contain eggs and I'm not sure it's a healthy thing to have lots of them, so I started with my cake recipe without eggs but with some modifications.

Ingredients

butter and flour
1.5 dl grapeseed oil
1.5 dl brown sugar
2 dl yoghurt
1 tsp bicarbonate of soda
2 dl plain flour
1.4 litre müsli mix

Method
  1. Butter a deep baking pan and dust with flour. Have all ingredients to hand.
  2. Mix together the oil and sugar.
  3. Stir in the soda into the yoghurt, bubbles will start to appear.
  4. Quickly whisk in the oil and sugar mixture, then the plain flour.
  5. Add the müsli mix and stir until well coated with batter. This needs to be done manually, when I ran the electric whisk, bits of oats flew in all directions.
  6. Pour the müsli blend into the baking pan, level and bake for about 30 minutes at 175 degrees C or gas mark 3. My pan is about 25 x 40 cm. The cooking time needs to be adjusted to the thickness.


It smelt fairly nice, but as you can see in the photo, it's far too crumbly for eating in the car.

Oh well, back to the drawing board again. I suspect my idea with porridge will give a similar result.

27 February 2008

Müsli bar challenge 1

A couple of days ago Lundulph challenged me to make him a müsli bar based on my own recipe. This in order to skip breakfast at home and beat the traffic on his way to work.

A quick google resulted in the following, extremely tasty creation, that's also probably quite unhealthy.

Ingredients

125 g unsalted butter
3 tbsp brown sugar
5 tbsp honey
1 litre müsli

Method
  1. Melt the butter on low heat in a fairly large sauce pan.
  2. Add the sugar and honey and stir until they are dissolved.
  3. Leave to simmer for 7 minutes. Do not stir or shake.
  4. In the mean time, line a deep pan with baking paper.
  5. Pour in the müsli mix and stir in well to get everything coated in the sugar/butter mixture.
  6. Cover with another piece of baking paper, then place as much weights on top as possible and leave to cool.


I have two identical deep pans, so I poured the sticky mixture in one and placed the second one on top. I put my big pressure cooker pot inside and filled it with water, along with the second pan. I left it to cool overnight.

This morning I cut the müsli slap with a knife. It was not as sticky as it looked and still fairly soft, so no risk of breaking any teeth. Lundulph said he liked it too, but was worried about the health factor.

So the challenge is not complete yet.