27 March 2010

Omelet and Bread Proficiency

Over the past couple of days, I've been successful in omelet making as well as bread making.

Again, a last minute dinner decision on the omelet, but I decided to try and make it a bit more special, by frying sliced onion in some butter and also slicing and frying some shiitake mushrooms also in butter. I kept them separate, as they'd take different times to cook.

IMG_0728

I whisked a couple of eggs together with a splash of milk, salt and pepper, then fried it in a little butter as well. When it was almost ready, I added some onions and mushrooms to one half, then managed to fold the omelet with the help of a couple of spatulas. I don't feel as confident as professional chefs to just flick it into folding. it was difficult to get onto the plate in a good way too, only one of the omelets worked. I decorated with a couple of slices of "Fillet Elena" (филе Елена), which is a Bulgarian cured and dried fillet meat - similar idea to billtong, but not as hard. Together with the tomatoes I bought from our new greengrocer's, it turned into a very yummy mid-week meal.

I've also had success with the latest batch of bread.

Having almost run out of flour (unheard of!), I took out 150 g of my starter "Monty", added to that 100 g strong white flour and 100 g wholemeal flour along with 100 g water, which turned into a fairly stiff starter. I closed the jar tightly and went off to the shops (to buy more flour among other things).

Back some 5 h later and there was pssst-ing and sigh-ing in the kitchen. Turns out, Monty was so happy about the feed, he'd fed intensely and generated such a pressure in the jar that the lid had bent and the starter had run over and was working its way on the work surface. So no time to lose.

I put the starter in the mixer bowl - it was 380 g in total. To this I added 150 g wholemeal flour (all I had left) and 800 g strong white flour. Then topped up with 410 g water. After almost full gluten development (i. e. 8 min kneading in the machine) I added 15 g salt and 0.5 dl olive oil. I let the machine run for another 6 minutes and still most of the olive oil had not been incorporated, so I stopped it before it burnt out the engine and started kneading by hand. This worked a lot better and all the oil went in fine. This is the first time I've added fat to a sourdough, very exciting.

The dough went into the bowl again for a rest of 1 h 30 min, while I took the opportunity to make a tepee over my tubs of potatoes, to protect them from filling up with water from all the rain we've been having.

The dough rose very nicely in the mean time. It weighed just over 1600 g, so I divided it into three and shaped into loaves that went into my three loaf tins. The dough was quite stiff this time, at about 50% hydration, so very easy to work with. I gently pushed each part out onto the surface into a rectangle, then rolled it into a loaf.

Once in the tins, I brushed with more olive oil and sprinkled a mixture of polenta, crushed oat bran, sesame and black onion seeds. Then covered with cling film and left to rise for about 4 h. I could have left it a bit longer, but it was nearing bed time and I didn't want to leave them overnight or the dough would try to escape again.

I baked the loaves for 20 minutes on 250 degrees C, then turned down to 200 degrees C and gave them another 30 minutes.

IMG_0730

Lundulph and I had some for lunch today and both texture and flavour was super. I must remember not to use as much water as I have up to now. My previous breads have worked out to some 90 - 100 % hydration, which has resulted in a sloppy dough and not too pretty loaves (though they were quite tasty too). I also resisted the temptation to slash the loaves, though I suspect I would have been more successful than before. Drooling over the photos in The Fresh Loaf, I've noticed that some breads had poor excuses for slashes, just like mine and it occurred to me that it might have to do with how wet a dough is.

So now we're set for another couple of weeks of bread and I'll have to try and make pancakes with the surplus of sourdough I'll end up with when I feed Monty next week.

By the way, Lundulph didn't like my tepee and I had to take it down today and made a more discreet looking poly tunnel. It rained really heavily in the afternoon with a fair bit of wind too, but the thing is still standing, so all is well in the garden, looking forward to some lovely tatties.
13 March 2010

Conchas for Mother's Day

Tomorrow is Mother's Day in the UK and to celebrate I decided to have a go at conchas. I first spotted these on Susan's YeastSpotting event on 5th February this year and they looked so intriguing, I put them up on the list of to bake. Quite high up too. Then Susan herself followed suit a couple of weeks later.

Both looked beautiful and reading through the recipes quickly, I decided for the first one, which seemed a bit easier. Sadly I ignored looking up the original recipe it was based on, however, I ended up with something really good anyway and know what I need to do next time to achieve an even better result.

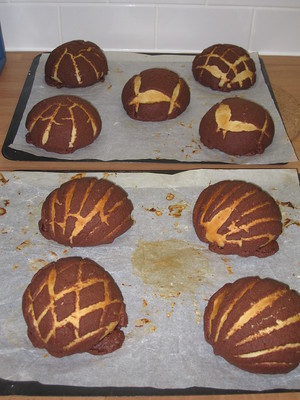
IMG_0727

I'm posting the recipe here in metric along with the couple of alterations I had to make on the fly to make things work.

Ingredients
Sponge
220 g warm full milk (2 dl + 1 tbsp)
7 g instant yeast
165 g strong flour

Dough
All of the sponge
290 g strong flour
120 g granulated sugar
1 medium egg
2 tsp vanilla extract
1.25 tsp salt
2 tbsp full milk (if needed)
45 g unsalted soft butter

Topping
120 g plain flour
110 g granulated sugar
106 g unsalted soft butter
0.25 tsp salt
1 tsp ground cinnamon
15 g unsweetened cocoa powder

Now, I pretty much followed the instructions in the recipe on how to make the conchas, but in hindsight there are a few tweaks to do. I've incorporated these below. I must also measure up the flour next time so I know the weight, rather than the volume.

Method

  1. Warm up the milk on low heat to feel warm on the fingers, but not hot, about 40 - 45 degrees C. In the mean time mix instant yeast and flour well, then pour in the milk and mix to combine. I recommend using the bowl of the machine that'll make the final dough. Cover and leave for an hour in room temperature until it bubbles up.
    IMG_0720
  2. Add the ingredients to the dough, except the butter, then mix to a shiny and elastic dough. It must be sticky, so if it isn't, add a couple of tablespoons of milk, one at a time, while mixing until it is sticky.
  3. When the gluten has developed, add the butter and mix in well, then scrape off the bowl sides and the mixing paddle, cover the bowl and set aside for an hour to rise and double in size.
  4. While the dough is rising, mix the ingredients for the topping - it should form a paste like for cookie dough. Then place in the fridge to firm up.
  5. Line three baking sheets with baking paper.
  6. Take out the dough on a well floured surface and divide into 50 g pieces.
    IMG_0721
  7. Take out the topping from the fridge and divide into the same number of pieces as the dough. It may seem like very small pieces, but it should be OK.
  8. Either use the palms of your hands to flatten a topping piece into a circle or place the piece between two pieces of cling film and roll with a pin.
  9. Roll a dough piece into a ball, then cover with the topping circle. The topping should cover the top and sides of the dough ball. Then place on a baking sheet and press down to flatten a bit. It'll spring back and rise even further during proofing later on.
    IMG_0723
  10. Repeat with the remaining pieces. Then use a sharp knife to cut patterns into the topping, reaching the dough.
    IMG_0724
  11. Let proof for 30 minutes, while pre-heating the oven to 200 degrees C.
  12. Bake the conchas for about 15 minutes, until the topping looks dry and the areas where the dough is visible begin to show a bit of colour.
  13. Take out and let cool on a rack, then store in an airtight container.

I made 14 pieces of 70 g each, which resulted in balls the size of a tangerine and after baking, buns the size of oranges, way too big. But they were very tasty and Lundulph suggested that they have some sort of creamy filling in the middle. I think perhaps some custard, I just need to work out how to get it in there, I'd like it to go in before baking, not afterwards. Will have to think about it and experiment.

IMG_0725

The dough was not too sweet, but combined very nicely with the topping. I'd expected the topping to be crunchier, though given how thin it was, that might just not be possible to achieve. Still the combination of textures and flavours was very good and I think a centre of custard would be grand. Besides, I rolled the topping into too large circles, so they were very thin and I wanted to cover the whole buns almost. Though with such a sticky dough, once I'd placed it on the baking sheet, I couldn't lift it up again without ruining the ball shape, so I just tucked in the topping as much as I could.

IMG_0726

It's very important to cut the patterns in before the dough has proofed too much, so that there is room for expansion without the topping cracking too much. It'll do that a bit anyway from the oven spring.

Lundulph also suspects they will go stale pretty quickly, so a quick whizz in the microwave just before serving would be in order too.

Oh and if you're wondering about why the baking paper looks so messy, that's because I originally tried to make the dough balls without flouring the work surface, but wetting my fingers instead. This became very messy, I couldn't really shape any balls at all and ended up scraping off the ones I'd made back onto the work surface, this time with lots of flour on it. The second attempt worked better.

Update on 2019-10-18:
I finally got round to measuring up the flour, mainly because I didn't have instant yeast and wanted to work out how much fresh yeast I should use instead.

7 dl of strong flour weighed 466 g, though I suspect there is variation depending on how packed together the flour is. For this I used 14 g fresh yeast. The resulting dough divided up really nicely into 18 pieces of 50 g each, which was very pleasing.

Further ingredient swaps were caster sugar instead of granulated, to make the dough a little bit sweeter and also using a large egg instead of a medium one.

Also dividing the dough into 50 g pieces, I reduced the baking time to 10 minutes. Finally, I got to use my new conchas cutters which I bought from Amazon a few months ago. A little bit disappointing, because they are made from hard plastic, which isn't sharp enough, so I had to press quite hard to get the patterns onto the buns and they weren't as defined as when I cut with a knife, but it's so much faster to do and there are some patterns I couldn't do with a knife, so definitely a good investment.

8 March 2010

Smoked Salmon Pie

As mentioned the other day, half of the ravioli filling was left over and so I decided to make a pie.

IMG_0714

This worked out very nicely indeed, the recipe for the pie crust is from my Cordon Bleu book.

Ingredients
3 dl plain flour
1 tsp salt
1.2 dl unsalted butter
1 egg
2 - 3 tbsp water

Method
  1. Mix the flour and salt in a bowl, then cut the butter into thin slices into the flour and rub in. The mixture should look a bit like pale polenta.

  2. Add the egg and water (a little at a time) to form a dough. Shape into a ball and refrigerate for at least 30 minutes. Do not over-work it or it'll become difficult to work with.

  3. Roll out to the size of the pie dish and transfer carefully to it. Careful not to stretch the dough during rolling, as that'll make it shrink during baking.

  4. Blind bake at 180 degrees C until it develops a bit of colour, duration depends on how thickly it was rolled.

  5. Remove from the oven and allow to cool a few minutes, then add the filling. Use any left-over dough for decoration or if the pie dish is small, as a lid for the pie.

  6. Bake at 200 degrees for 30 minutes until the pie has baked through.


IMG_0715

I only had one egg left and I used it in the dough, so couldn't brush the bottom crust with egg white before the blind bake. Otherwise it's a good idea to do this, it'll protect it from going soggy from the filling. Also the yolk can then be used either in the filling, if doing a quiche or brushing the dough decoration/lid of the pie, which again will make it more attractive visually.

We had it with pickled gherkins, roasted artichoke hearts and pickled roasted chillies. This last lot of the chillies was a bit of a disappointment, since the chillies in question had been picked way too early and had not developed any spiciness to speak of. However, the flavour of fresh chillies came out very strongly and they were still very tasty, I just fancied a bit of spicy heat as well.

Still, the pie turned out very nice and tasted great too and got me thinking that this would be a good way of using up left-overs, especially when there's not really enough for a full portion to freeze. I might just mix a couple of batches of the crust dough and freeze and have ready for such situations.

5 March 2010

Lingonberry And Hazelnut Bread

The inspiration behind this comes from TheFreshLoaf blog. Generally I look at the photos only, but ever so often there are interesting posts as well. One was on bread with blueberries and whole hazelnuts.

IMG_0713

Not really season for blueberries at the moment, but I have some lingonberry jam that I'm trying to use up. Lundulph wasn't taken with it and the jar is just too big for me to tackle on my own, though I am doing my best.

So this week's batch was to be wholemeal and have lingonberry jam and hazelnuts in it. Since I started my sourdough Monty, I've been improvising heavily, although generally using the same ingredients every time, but varying the amounts. However, I thought I'd write these down.

Ingredients
350 g white flour starter (100% hydration)
350 g strong white flour
150 g strong wholemeal flour
300 g water
12 g salt
150 g sweet lingonberry jam
100 whole roasted hazelnuts

Method
  1. Feed the starter a few hours in advance, so that it's at its peak when baking. Monty takes about 5 h.

  2. Add the starter, flours and water into the bread mixer and run for 10 minutes to get a nice dough. Or make by hand of course.

  3. Towards the end of the kneading, add the salt, then the lingonberry jam and incorporate well.

  4. Finally add the hazelnuts and mix just enough to get them evenly spread out in the dough. Then shape the dough into a ball and leave to rest for 2 h.

  5. Butter two loaf tins ("pound loaf" size).

  6. On a generously floured surface shape the dough into a long sausage, then divide in two and place in the loaf tins, cover with cling film and place in a cool place to proof overnight or a warm place to proof in 4 - 5 hours.

  7. Pre-heat the oven to 225 degrees C, then slash the loaves and bake in the middle of the oven for 45 minutes. If the crust goes dark, cover with aluminium foil and turn the heat down a bit.

  8. Remove from the loaf tins and let cool on a wire rack.


Lundulph had three slices for breakfast this morning and said it was very nice, though he couldn't notice the lingonberry, only the hazelnuts and mostly because they were whole. This is what I expected, the jam sweetens the bread a bit, so won't perhaps work in a ham sandwich, but mostly it makes it moist. The crumb feels almost a bit sticky.

I haven't had breakfast yet because I'm still full of ravioli from last night.

And yes, I still need to practice on my slashing. I actually went and bought razor blades, in the hopes that they'd work better than the knife I've been using so far, but no. I even tried to wet it, but water doesn't really stick to metal. I'll try dusting flour on the loaves first before slashing.

One thing about improvising with amounts is that I've always ended up with a very wet dough. When I first mixed up the ingredients for this batch, it seemed to turn out rather stiffer than normal, which I thought was good, but two-thirds into the kneading, the dough went just as wet as on previous occasions. But a wet dough gives a nice light shaggy bread and I don't want to lose that.

Smoked Salmon Ravioli

IMG_0712

As always when we go to Sweden, we stock up on lovely hot smoked salmon and lately we've not had any at all, so this week I'm compensating for this fact. Besides, this time we got a new variety with chilli flakes on top, which turned out to be extremely tasty.

Last Monday we had it in the traditional way with steamed potatoes, mustard dill sauce and rocket salad. But Lundulph does like freshly made pasta, so I decided to combine the two and make ravioli. Without a pasta maker. Based on a recipe I found here.

The pasta is the one I made for the cheeseless lasagne. But before that, I prepared the filling.

IMG_0705

Ingredients

1 medium red onion
150 g chestnut mushrooms
1 tbsp grapeseed oil
300 g hot smoked salmon
250 ml créme fraîche
salt and pepper to taste

Method
  1. Peel the onion and clean the mushrooms, then dice both finely.

  2. Heat up the oil in a pan and fry the onion until it softens a bit, then add the mushrooms and fry on low heat until they've softened and given off some of their liquid.

  3. In the mean time, peel the skin off the salmon and discard. Place the salmon in a large bowl and break it up as finely as possible with a spoon.

  4. Add the onion and mushrooms to the salmon and stir in until they've combined well and evenly, then set aside to cool down.

  5. Once the mixture is cool, add the créme fraîche and stir in well, then season.


Mix the dough and leave to rest for 15 - 20 minutes, then divide into four parts and roll out one at a time to about 2 mm thickness. Remember to keep the other dough well covered up or it will dry out.

Cut out circles or rectangles, place a teaspoon of the filling in each, the brush the edge with water, fold into a little cushion and press along the edges. Then use a fork to seal the edge by pressing its teeth along the edge. Then set aside for an hour before cooking.

IMG_0709

The above amount of filling was far too much for the amount of pasta dough, I used about half of it only and ended up with 33 fairly large ravioli. I could have probably managed to produce one more, but rolling, filling and sealing took about an hour and a half and I made the mistake of saving all the off-cuts for last, rather than use them with the next piece of dough. As a fair amount of flour is used during the rolling, all the off-cuts became stiffer and were a lot more difficult to roll out, not to mention that doing them last meant I was already tired from rolling. So my last couple of raviolis ended up a bit thicker than the rest.

However, the remaining salmon mixture will be fine in a quiche. I'll make that in a couple of days, with the remaining 100 ml of the cream from my mascarpone making escapade and some milk. In fact, I might try and use the mascarpone itself.

I also won't be cooking all the ravioli today, but will freeze most of them, ready to use as emergency food, when I can't think of anything better to do.

On the whole, such a simple dish sure required a lot of effort to make, I suspect it's easier with a machine.

I also think the filling mixture would be good on jacket potatoes, rather like my Mexican style topping.

As for cooking the ravioli, one of the instructions I found on the Internet said place in boiling water and leave there until they float back up to the surface. Well they did after about 20 seconds. This meant that the filling wouldn't even have heated through. So I gave them 5 minutes. And I was using my big pressure cooker, filled two-thirds with water, with a dash of salt and about a tablespoon and a half of olive oil, all of it simmering well before I put the ravioli in. Lundulph was extremely hungry after an hour in the gym, so that was the other reason I rushed things. The ravioli were still well al dente, so I put them back in for another 4 minutes. I think at least 10 minutes is the optimal. The flavour was fantastic and I got the texture right too, the ingredients were just the right size to be noticeable, yet blend in together nicely. We ate 11 of the ravioli, meaning there are two further batches of 11 in the freezer for rainy days. And none of the ravioli split while cooking.

Lundulph was wondering about sauce. I didn't make any, mainly because I couldn't think of what to make. Cheese is obviously completely out of the question here and tomato I think tends to be a bit too sour for fish. Lundulph did a quick search which cropped up some sort of bell pepper sauce. I'm not sure about it, but it might work. We agreed in the end to try some sort of a thin béchamel sauce with lots of dill and a dash of mustard. The idea is to echo the mustard dill sauce that is traditional with salmon, yet make it light and without the vinegariness. But a definite success.

4 March 2010

Homemade Mascarpone

Via the WildYeastBlog, I came across BakingObsession, which is another wonderful baking blog. The beautiful photos are quite mesmerising, but there were also a couple of extremely interesting entries - homemade mascarpone and homemade ricotta.

IMG_0704

Now, having seen Susan's fabulous Tiramisu cake, I've decided to make one myself for Easter. And thus homemade mascarpone will come in very handy, but better do a dress rehearsal beforehand.

I have this strange idea about cream that more fat is better and so I almost always buy double cream, which is 47.5%. The instructions called for whipping cream, which is around 36 - 38%, but I didn't feel it was enough and went with the double cream this time too.

Then heating it gently over a bain marie. I have a pot and a glass bowl that fit very neatly together, with the bottom of the glass bowl being at most 5 cm deep into the water and well away from the bottom of the pot. Perfect for melting chocolate and making Swiss meringue. However, it turned out that it was not sufficient for getting the cream up to 87 degrees C for sterilisation. I managed to reach 78 degrees C and topping up of the water and increasing the hob made no difference, so after 10 minutes at that temperature, I decided it was ready.

And so I added 1 tbsp lemon juice and the cream went thick almost immediately, but I kept it in the boiling water for a few more minutes, stirring all the time, just to be sure.

I set it aside and lined a sieve with four layers of cheese cloth, which I forgot to dampen. I also didn't wait 20 minutes for the cream to cool before transferring it to the cheese cloth, I figured it wasn't up to the heat it was supposed to, so shouldn't need to cool as long. And besides, it had formed a skin on the surface. It looked very nice - lovely pale yellow colour - and tasted very nice, like a very smooth créme fraîche, but not as sour. A couple of hours later, nothing had dripped in the bowl under the sieve, the cheese cloth was soaked and the cream was cold, so I wrapped the whole thing in cling film and put in the fridge.

That was yesterday afternoon. I've had a peek this morning and it looks great, there's about a teaspoon worth of clear liquid at the bottom of the bowl, the mascarpone has firmed up quite nicely and smells of yoghurt and créme fraîche. I should have bought some from the shop, so that I can compare. Either way, I'm quite looking forward to tasting it tonight. I'm not going to skimp on the 24 h resting time.

24 h later: I took it out if the cheese cloth and it was completely rock solid. It still had the beautiful colour and smell, but tasted of butter with slight yoghurt overtones. I had some créme fraîche nearby to compare and well, I can only say that this mascarpone was a complete failure. I'll give it a go as a butter on my toast before I discard it completely. But I'll need to get whipping cream and try again, it must have been the fat content of the cream I used, nothing else.

A few days after that: I've now had this "cheese" on my lovely lingonberry and hazelnut bread for breakfast a few times and it's beginning to grow on me. Texture-wise it's pretty close to Philadelphia cheese and it's matured a bit, but still butter is the dominant flavour and things work OK. However, I'm struggling with the amount I ended up with, particularly since Lundulph won't help out and will get rid of it and try again with whipping cream and also with single cream, to see what I'll end up with. I'll also change the bain marie arrangement to one where the bowl with the cream rests on the bottom of the saucepan/pot with water, hopefully this will reach the higher sterilisation temperature that's recommended in the instructions.