Both looked beautiful and reading through the recipes quickly, I decided for the first one, which seemed a bit easier. Sadly I ignored looking up the original recipe it was based on, however, I ended up with something really good anyway and know what I need to do next time to achieve an even better result.
I'm posting the recipe here in metric along with the couple of alterations I had to make on the fly to make things work.
Ingredients
Sponge
220 g warm full milk (2 dl + 1 tbsp)
7 g instant yeast
165 g strong flour
Dough
All of the sponge
290 g strong flour
120 g granulated sugar
1 medium egg
2 tsp vanilla extract
1.25 tsp salt
2 tbsp full milk (if needed)
45 g unsalted soft butter
Topping
120 g plain flour
110 g granulated sugar
106 g unsalted soft butter
0.25 tsp salt
1 tsp ground cinnamon
15 g unsweetened cocoa powder
Now, I pretty much followed the instructions in the recipe on how to make the conchas, but in hindsight there are a few tweaks to do. I've incorporated these below. I must also measure up the flour next time so I know the weight, rather than the volume.
Method
- Warm up the milk on low heat to feel warm on the fingers, but not hot, about 40 - 45 degrees C. In the mean time mix instant yeast and flour well, then pour in the milk and mix to combine. I recommend using the bowl of the machine that'll make the final dough. Cover and leave for an hour in room temperature until it bubbles up.

- Add the ingredients to the dough, except the butter, then mix to a shiny and elastic dough. It must be sticky, so if it isn't, add a couple of tablespoons of milk, one at a time, while mixing until it is sticky.
- When the gluten has developed, add the butter and mix in well, then scrape off the bowl sides and the mixing paddle, cover the bowl and set aside for an hour to rise and double in size.
- While the dough is rising, mix the ingredients for the topping - it should form a paste like for cookie dough. Then place in the fridge to firm up.
- Line three baking sheets with baking paper.
- Take out the dough on a well floured surface and divide into 50 g pieces.

- Take out the topping from the fridge and divide into the same number of pieces as the dough. It may seem like very small pieces, but it should be OK.
- Either use the palms of your hands to flatten a topping piece into a circle or place the piece between two pieces of cling film and roll with a pin.
- Roll a dough piece into a ball, then cover with the topping circle. The topping should cover the top and sides of the dough ball. Then place on a baking sheet and press down to flatten a bit. It'll spring back and rise even further during proofing later on.

- Repeat with the remaining pieces. Then use a sharp knife to cut patterns into the topping, reaching the dough.

- Let proof for 30 minutes, while pre-heating the oven to 200 degrees C.
- Bake the conchas for about 15 minutes, until the topping looks dry and the areas where the dough is visible begin to show a bit of colour.
- Take out and let cool on a rack, then store in an airtight container.
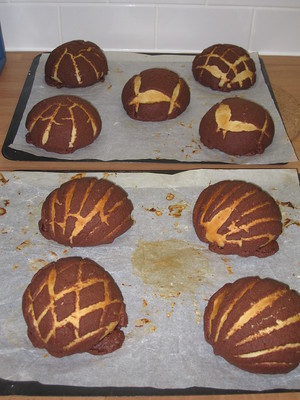
I made 14 pieces of 70 g each, which resulted in balls the size of a tangerine and after baking, buns the size of oranges, way too big. But they were very tasty and Lundulph suggested that they have some sort of creamy filling in the middle. I think perhaps some custard, I just need to work out how to get it in there, I'd like it to go in before baking, not afterwards. Will have to think about it and experiment.

The dough was not too sweet, but combined very nicely with the topping. I'd expected the topping to be crunchier, though given how thin it was, that might just not be possible to achieve. Still the combination of textures and flavours was very good and I think a centre of custard would be grand. Besides, I rolled the topping into too large circles, so they were very thin and I wanted to cover the whole buns almost. Though with such a sticky dough, once I'd placed it on the baking sheet, I couldn't lift it up again without ruining the ball shape, so I just tucked in the topping as much as I could.

It's very important to cut the patterns in before the dough has proofed too much, so that there is room for expansion without the topping cracking too much. It'll do that a bit anyway from the oven spring.
Lundulph also suspects they will go stale pretty quickly, so a quick whizz in the microwave just before serving would be in order too.
Oh and if you're wondering about why the baking paper looks so messy, that's because I originally tried to make the dough balls without flouring the work surface, but wetting my fingers instead. This became very messy, I couldn't really shape any balls at all and ended up scraping off the ones I'd made back onto the work surface, this time with lots of flour on it. The second attempt worked better.
Update on 2019-10-18:
I finally got round to measuring up the flour, mainly because I didn't have instant yeast and wanted to work out how much fresh yeast I should use instead.
7 dl of strong flour weighed 466 g, though I suspect there is variation depending on how packed together the flour is. For this I used 14 g fresh yeast. The resulting dough divided up really nicely into 18 pieces of 50 g each, which was very pleasing.
Further ingredient swaps were caster sugar instead of granulated, to make the dough a little bit sweeter and also using a large egg instead of a medium one.
Also dividing the dough into 50 g pieces, I reduced the baking time to 10 minutes. Finally, I got to use my new conchas cutters which I bought from Amazon a few months ago. A little bit disappointing, because they are made from hard plastic, which isn't sharp enough, so I had to press quite hard to get the patterns onto the buns and they weren't as defined as when I cut with a knife, but it's so much faster to do and there are some patterns I couldn't do with a knife, so definitely a good investment.
No comments:
Post a Comment