Showing posts with label Japanese. Show all posts

25 March 2021

Fluffy Japanese Pancakes for Waffle Day

After holding off for a few years, I'm back watching Ann Reardon's wonderful videos and when I saw this one, I just couldn't resist trying it out.

Fluffy Japanese Pancakes

The video actually looks at a fake video on how to make these fluffy things at home and also provides a recipe that really works.

As today is Waffle Day in Sweden, Lundulph and I are following our tradition of eating pancakes and although this type of pancake requires serving immediately after cooking, we had a 30 minute break after dinner, while I made these. But I'd prepared as much as I could before dinner and made sure to let the oven pre-heat while we ate our main course, so it was definitely a success.

Additionally, today Lundulph got his first injection of the Corona vaccine, so this was an extra treat for him and his cheeks did go rosy and his eyes went all sparkly.

I pretty much followed the recipe and the video. It calls for egg white powder, which I've never used before, so it was quite interesting. Ann Reardon also recommended using baking powder to help with stabilising things, if you're a beginner baker. I'm not, but I used it just to be on the safe side. I'll try without it next time.

Ingredients

Makes 4

2 egg yolks
1 tbsp milk
1 ¾ tbsp plain flour

2 egg whites
1 ¼ tbsp granulated sugar
1 tbsp egg white powder
1 tsp baking powder (optional)

Sweetened whipped cream
Blueberries, strawberries, banana slices
Maple syrup or honey

Method

  1. Place a thick-bottomed baking sheet in the oven and pre-heat the oven to 10 °C.
  2. Prepare a piece of baking paper by brushing lightly with a neutral oil.
  3. Whisk together the yolks, milk and flour until a smooth batter.
  4. In a large glass or metal bowl, whip the egg whites together with the sugar, egg white powder and baking powder if using. They should reach to stiff peaks stage.
  5. Using a rubber/silicone spatula, scoop out some of the egg white foam and gently whisk into the yolk batter to loosen it up a bit.
  6. Then pour the yolk batter into the whites and with the spatula fold in very gently and just until the two have combined and there are no streaks visible.
  7. Turn down the oven to 160 °C, take out the baking tray, place the prepared baking paper and pour 3 - 4 blobs using an ice cream scoop. Leave plenty of room between them.
  8. Place back in the oven and set a timer for 2 minutes 30 seconds.
  9. When the time is up, open the oven and add a second blob on top of each of the previous ones. Set your timer for 7 minutes.
  10. Prepare the whipped cream and fruit while the pancakes are baking.
  11. When the second timer is up, take out the tray and flip them over with a palette knife. Then bake for a further 4 minutes.
  12. Remove from the oven and serve immediately with the fruit, drizzled with syrup or honey and a generous blob of whipped cream.

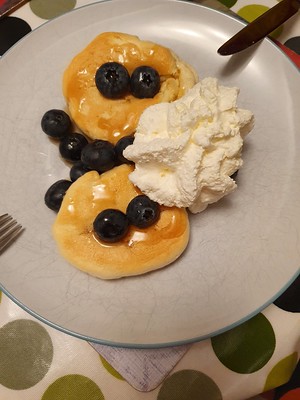
Comparing to the video, my egg yolks were a lot paler and so the pancakes ended up paler and I was worried that they hadn't baked properly, but I was wrong, they were beautifully puffed up. Though I ended up with lots of left-over mixture when I used the ice cream scoop, so next time, I'll transer the whole mixture to a piping bag, so that I can control both shape and size more.

I only bought blueberries for these and I used maple syrup. It worked very nicely. When I served them, Lundulph wondered if these were Yorkshire puddings, because he thought they smelt a bit like that, but he cut them open, spread a lot of blueberries on top and covered with maple syrup and whipping cream. Since I got my whipping cream dispenser a couple of years ago, we've been having a lot more whipped cream than normal, because it's such fun to squirt onto our various desserts.

14 February 2015

Mochi Ice Cream

After my Sister Bip and I tried the mochi ice creams, she's been wanting to try and make some at home. We did try over the Christmas holidays, but hadn't prepared properly and used rice flour we found in our Mum's cupboard. This was not a good idea, it wasn't the glutinous kind and so the gloopy mixture we concocted went straight to the bin. And Bip was well disappointed and upset. But she wrapped all the ice cream balls in a bag, ready to be wrapped in mochi dough.

However, this time she'd prepared and bought the fancy glutinous rice flour and we found our way back to the recipe we'd chosen. This is a very good web page, it has step-by-step photos and is very easy to follow.

The two things we did was to do our own measurement conversions to be on the safe side and also ignored the instructions for cooking the dough in the microwave - short bursts and keep an eye on it is the way to go.

The mochi dough is a very interesting thing. Lundulph looked up about the word glutinous in this context - it doesn't have gluten like wheat flour, but instead it refers to its stickiness like glue. Here's where the photos step-by-step proved really useful, because if I hadn't seen how much corn starch to use, I would have glued together half the stuff in the kitchen to myself.

What I mostly liked about the mochi was how it felt to the touch - like really soft and feather-light velvet. I was also surprised that even though I'd covered the mochi dough with so much corn starch, it quite happily combined back to a ball and allowed itself to be rolled out a second and a third time. But it's messy work and Bip didn't want to get too involved and wandered off to play with her phone towards the end of the mochi rolling.

IMG_4523

There was a lot of cling film involved and I felt bad about it and I wonder if there is an alternative that can be used instead.

IMG_4522

Once all the pieces were done, she helped in making the mochi ice creams by handing me the ice cream balls one at a time, while I rolled them up and gave back to her to place in the freezer.

IMG_4525 IMG_4531
IMG_4528 IMG_4530

We couldn't wait to try them and did so a couple of hours later after lunch. This was a bad idea - despite working as fast as we could, the room temperature mochi dough had melted the ice cream balls substantially.

The next day we tried again and this time the mochi ice creams had firmed up nicely. What I didn't like was that the mochi dough felt rather bland - I'll try to add more sugar next time. And I think a sweeter ice cream would be worth using as well. Or perhaps nutella or dulce de leche or gianduja. It would be nice to trim off some of the overlap of the mochi dough as well, will need to think about that.

Lundulph kindly acted photographer as I was up to my elbows in cornstarch and although my camera has had its share of food splatter, I felt this would kill it for sure.

21 November 2014

Coconut Onigiri

When my Sister Bip came to visit back in September, the last thing we did was to try two new desserts from Wagamama - the sweet onigiri and the mochi ice cream. Both turned out to be really tasty and I set about to try my hand at these beautiful and tasty delicacies from Japan. It took me a while to get all the ingredients, mainly because I kept forgetting to put them on my shopping list, but finally today I got my act together and made the onigiri.

IMG_4460

Obviously Wagamama haven't published the recipe, but a quick search on coconut onigiri gave resulted in this recipe with instructions, which seemed to be on the right line. I made some minor adjustments and converted to metric amounts.

Ingredients

2.5 dl sushi rice
5 dl coconut milk drink
0.7 dl granulated sugar
3 tbsp maple syrup
1.25 dl dessicated coconut
white drinking chocolate (optional)

Instructions

  1. Place the rice in a sieve and rinse well under running water.
  2. Transfer the rice to a casserole dish, add the coconut milk drink, granulated sugar and maple syrup. Stir through and bring to a boil.
  3. Put the lid on and let simmer gently for about 15 or so minutes, stirring occasionally.
  4. Place the dessicated coconut in a pan and toast for a few minutes under constant stirring - some of the flakes should go golden brown. Once this happens, remove from the heat and set aside.
    IMG_4459
  5. Once the time is up on the rice, turn off the heat and leave the rice to stand for a further 10 - 15 minutes. The liquid should have soaked into the rice and it should have the consistency of a thick porridge.
  6. Transfer the rice to a bowl, add the toasted coconut and mix well.
  7. Sprinkle white drinking chocolate on a large plate and also place some in a small bowl. Using latex gloves, form small balls from the rice, about the size of walnuts. Then roll these in the white chocolate in the bowl and place on the plate.
  8. The chocolate will likely melt/soak in, so they'll end up just as sticky as before, however it adds a nice flavour to the onigiri.

Actually, talking through these with Lundulph we thought that dipping the onigiri in melted white chocolate would work nicely. This would mean we'd need to eat them cold of course. So far, we've whizzed a few in the microwave and had them warm, which is really nice and I'm not sure if cold would be as nice. Perhaps if I make them a little smaller.

Using ganache as a filling would probably also be quite nice and I'm trying to work out how to achieve the ones at Wagamama, which had been battered and deep fried very briefly, adding an extra crunch.

Update 2023-07-22: Sadly the original recipe inspiration seems to have disappeared, as have the lovely Wagamama onigiris from their menu. But when my good friend Doctor Cutie came to visit with her family this year, I decided to make these, since she can't eat gluten anymore. I also wasn't sure if the dessicated coconut and the coconut milk would be gluten free, so I skipped the former and swapped the latter for single cream and semiskimmed milk. Here is the tweaked recipe:

Ingredients

150 g sushi rice
4 dl single cream
2 dl semiskimmed milk
0.7 dl granulated sugar
4 tbsp maple syrup
white or ruby chocolate
whole lingonberries, fresh or frozen

Instructions

  1. Soak the rice in cold water overnight, then drain and place in a deep saucepan.
  2. Stir in the cream sugar and maple syrup and simmer until the rice is soft and starts going mushy, stirring occasionally and adding skimmed milk if it starts going dry.
  3. Remove from the heat and leave to cool down completely.
  4. Roll into small bite-sized balls, make a hole and put one lingonberry inside and close up carefully so as not to burst the berry.
  5. Temper the chocolate, then dip each ball to cover well and leave to set. Store in an airtight container in the fridge.

I didn't decorate as I wasn't sure my decorations were gluten free, but there are loads of possibilities. The lingonberry gives just the right amount of tanginess to the very sweet rice. I suspect coating with white chocolate would make things even sweeter, the ruby chocolate has a bit of fruity tanginess to it, but worked very nicely too and our guests liked them too.

15 March 2011

Teriyaki Chicken with Noodle Rösti

Last week-end Lundulph came to visit and in addition to the surprise Valentine's Day dinner that I'd booked at a nice French Restaurant, I thought we could do with a fancy lunch. I sadly still don't know how to plate food.

IMG_1193

My Mum had bought a food magazine on easy recipes and flicking through it, this recipe caught my eye.

Ingredients

6 boned chicken thighs with the skin removed
2 chicken breasts
2 dl teriyaki sauce
2 large cloves of garlic
2 tbsp sesame oil
3 tbsp lime juice
400 g dried thin rice noodles
2 l water
1 chopped red chili of desired heat level
1.5 tbsp chopped fresh ginger
1 dl chopped fresh coriander
1 dl sesame seeds
butter for frying, about 1 dl
2 dl teriyaki sauce for serving

Method
  1. Cut the chicken into similar sized chunks and place in a bowl.

  2. Add the teriyaki sauce, press in the garlic and add the sesame oil and lime juice.

  3. Stir in well, cover and let stand in the fridge for at least 1 h.

  4. When marinating time is nearly up, pre-heat the oven to 175 degrees C.

  5. Bring 2 l of water to the boil, then add the noodles and simmer for 2 - 3 minutes.

  6. Drain most of the water, then add the chili, ginger, coriander and sesame seeds and stir in as well as possible.

  7. Heat up a frying pan on medium, then brown the chicken and place in an oven safe dish and finish cooking in the oven for about 20 minutes.

  8. In the mean time, heat up some butter in the pan, then take out about 1 dl worth of noodles and place in the frying pan in a pile. Then flatten with a spatula and let it go a bit crispy. Turn over and fry on the other side, then take out and place on kitchen paper to remove some of the fat.

  9. Repeat with the remainder of the noodles, adding butter as needed.

  10. Serve immediately.


This turned out to be a very good recipe. My Mum was worried that the spices weren't correctly balanced and tried to persuade me not to put in the full amount of sesame oil. Luckily I didn't listen to her this time, because it was yummy just the way it was.

We had enough for 5 people and there was a little left over, so 6 portions all in all.

The noodle rösti were an even better surprise - I call them rösti because that's what they ended looking like. Fabulously tasty, even my Dad had some, despite declaring from the outstart that he wouldn't eat anything silly like that.

My Sister on the other hand is now a teriyaki sauce convert and has declared to be the new ketchup and favourite dipping sauce.

I struggled with my timings and the chicken was ready well before the noodles and I had to keep it in the oven longer than needed and the breast pieces were a bit on the dry side.

We had a salad with this meal - romaine lettuce, radishes, cucumber and avocado, which worked rather well. Though I think a mixed baby leaf salad would be better.

As for our Valentine's Day dinner, we went to Brasserie Le Rouge. It was pricey, but very good and very nice atmosphere and very suitable for Valentine's Day. We didn't get a chance to celebrate it this year, so this was our opportunity to catch up.

30 October 2007

Modified Miso Soup

I've been aware of this Japanese speciality for some time and have had in the back of my mind to try it out. Today I did, after researching on the net for a couple of days, having decided on this recipe.

I spent last week getting the ingredients together but was unable to find dashi stock. Looking into it further, apparently dashi stock is made on dried giant kelp and dried bonito flakes. Now as you know, I'm not a big fish fan, so dried bonito flakes did not appeal in the least. But I found that occasionally the dashi stock can be exchanged for chicken stock. Also I had a few vegetables to use up. So here's what I concoted tonight.

Ingredients

200 g shiitake mushrooms
5 Chantenay carrots
1 long red pepper
8 dl water
3 cubes of chicken stock
100 g firm tofu
2 tbsp white miso puree
1.5 tbsp Japanese soy sauce
0.5 red onion

Method
  1. Peel and halve or quarter the mushrooms.
  2. Wash and slice the carrots and pepper.
  3. Bring the water to boil, then add the stock cubes and stir to dissolve.
  4. Add the mushrooms and vegetables. Cover and leave to simmer for a few minutes.
  5. Dice the tofu and add that as well.
  6. Mix the miso puree and the soy sauce in a bowl, then add it to the soup and leave to simmer for 5 - 6 minutes more.
  7. Slice the onion and use for decoration when serving.

I had a little taste of the miso and had a very bad feeling of the soup, but on the contrary it turned out quite delicious. Lundulph had seconds. He also topped up with a few slices of chorizo. I think I'll try adding strips of chicken or pork next time. Now we'll finish off with some lovely ginger cake that we bought from our local farm market on Saturday.