Showing posts with label Danish. Show all posts

26 August 2015

Birthday Kransekake

This year Lundulph's Mum (like my Mum earlier this year) is turning 70, so big celebrations are in the making, more on this later. But we also decided to have a small family get-together on the actual day and Lundulph kindly volunteered me to make a cake.
IMG_4779

Now times are busy at work at the moment, so I opted to work from home during the birthdays, as Lundulph's Dad also had his birthday a few days before his Mum. Thus we stayed at their place for a few days and while Lundulph was helping out with the party plans, I sat in the guest bedroom working.

This also meant that increasingly Lundulph got more and more nervous about the cake - he hadn't seen any signs of a cake, other than some odd looking biscuity rings that had been in the freezer and had meant he wasn't allowed to rummage around for food. This because I'd decided to make it a surprise for everyone and I was quite worried that Lundulph would get upset because I hadn't made a "real, traditional" cake. But I decided to plod on with my plan.

It all started of course when I went in to Lakeland for ideas and spotted a kransekake pan set. I couldn't resist it, it's as simple as that.

And while Lundulph was enjoying the Ashes for a couple of days, I used the opportunity to make the kransekake rings.

Ingredients

1 kg "50/50"-type marzipan
300 g icing sugar
80 g egg whites (2 eggs approximately)
50 g butter
2 dl ground almonds

Royal icing
2 dl icing sugar
1 egg white

Method

  1. Grate the marzipan coarsely into a large bowl.
  2. Add the icing sugar and stir together with your hand until the marzipan and sugar are mixed through.
  3. Whisk the egg whites lightly, then start adding to the marzipan mixture a little at a time, while kneading the marzipan.
  4. The mixture is ready when you can roll out a sausage of about 2 cm diameter and bend it into a circle without it cracking anywhere.
  5. Melt the butter and brush the moulds well, then sprinkle generously ground almonds and tap off the excess.
  6. Pre-heat the oven to 180 °C and start rolling the marzipan mixture to about 2 cm diameter lengths.
  7. Gently lay onto each ring mould, splicing the two edges with diagonal cuts.
  8. There should be some marzipan mixture left over, use about a ping-pong ball sized piece and shape into a cone for the top of the kransekake.
  9. Bake all in the oven for about 10 minutes, keeping an eye on them and removing as soon as they start getting a bit of colour. Bake the top on an oven safe dish lined with baking paper.
  10. Leave to cool down complete on the moulds, before carefully removing the rings. If they've puffed up too much and stuck together, carefully first separate in the moulds with a knife.
  11. Place the rings on a large plate, with smaller rings inside the larger ones, perhaps 3 - 4 stacked. Place in plastic bags and freeze until the day before they're needed.
  12. The day before serving, remove from the freezer and let thaw in room temperature.
  13. A few hours before serving, make up royal icing by mixing about 2 dl icing sugar with some egg white. Add the egg white a little at a time into the icing sugar and keep stirring through before adding more. Continue until the consistency is such that it can be piped , but it won't drip or run.
  14. To put the kransekake together, start by stacking all the rings, with the largest at the bottom and the smallest at the top, to make sure you have the right order as it can be difficult to tell, the size difference between neighbouring rings is small. Then remove them one at a time and lay them out in order.
  15. Put the royal icing into a piping bag fitted with a small round nozzle, then pipe four small blobs at the bottom of the largest ring and place it securely onto the serving plate.
  16. Pipe waves around the top of the large ring, always starting and ending in the inside of it, as this will get hidden with the next layer.
  17. Once the whole ring has completed, carefully place the next one on top, making sure it's centered and repeat the icing waves all around, before placing the next ring on top of that.
  18. Continue until the whole pyramid has completed - you may need to stand on a chair to reach the top layers. Finish with the little cone.
  19. The kransekake is eaten, by working your way down through the layers.
IMG_4776 IMG_4777 IMG_4778

And indeed it was a great success - it's simple, yet impressive as it's so tall once assembled. It was also very sweet, so I'll try to reduce this next time. The idea with the freezing is that it will make the kransekake crunchy on the outside and chewy in the middle. What happened was that the 4 - 5 rings Lundulph and I took home with us, got chewier and chewier with every day they stayed in the larder. It was very nice to have a little nibble after lunch or dinner. And Lundulph was not at all upset, but how could he with all the marzipan to munch on.

Some will also melt dark chocolate and make fancy filigree decorations which are stuck in between the rings. It was my intention to do this as well, however I ran out of time and as I don't trust myself to be able to temper the chocolate, I thought I'd better not bother. Next time I will and I'll also try the alternative traditional shape - a cornucopia, with small petit fours or such spilling out of it. This, however, requires the rings to be glued together with caramel and looking at some professionally made ones, they even have special stands for support, like here from a Danish brand of marzipan, it's in Danish, but just look at the photos.

Key thing to keep in mind - there must be at least 18 rings and preferably more. At the Danish Bake-Off in 2012, the kransekake (Norwegian) or kransekage (Danish) was one of the technical challenges and had to have 20 rings. I highly recommend doing an image search on Google for ideas on how to decorate.

Finally a word on the "50/50"-type marzipan. The numbers indicate the proportions of ground almonds to icing sugar if you're making it yourself. Rather go for a 50% marzipan, which tends to be more expensive and is not as soft to work with, but that's how it should be. I actually baked my kransekake at 200° and thanks to the egg white, it puffed up. I think in my Swedish baking book, it's recommended to shape everything and then let stand for 24 h to form a dry crust, before baking. A bit tricky in the UK, especially when moving towards Autumn and there's lots of rain and moisture in the air. Might be worth a try.

26 July 2015

Lemon and poppy seed cupcakes

This year has quite a few big birthdays in the family and next up is my Mother-in-Law. And I get the honour of making some of the desserts - cupcakes and cake pops. Lovely! So on my latest trip to my local Lakeland, I couldn't resist buying moulds for making lace out of icing. Of course it's not regular icing, it requires some special mixture to allow it to keep its shape.

IMG_4760

And as I'm doing more and more advanced things in my baking, I have to practice in advance and this is it - try out one of the many cup cake recipes I saved from the Danish Bake-off in 2012 and combine with icing lace. Note that the original recipe is in Danish.

Ingredients

125 g soft unsalted butter
100 g caster sugar
3 large eggs
2 tsp vanilla extract
2 tbsp lemon zest (about 2 lemons)
1 tbsp lemon juice
275 g plain flour
1 tsp baking powder
½ tsp bicarbonate of soda
1 ml salt
2 tbsp black poppy seeds
¾ dl single cream

Method

  1. Pre-heat the oven to 180 °C (160 ° C fan-assisted) and prepare some muffin cases.
  2. Whisk together the butter and sugar until pale and fluffy.
  3. Add the eggs, one at a time, and incorporate well. After the final egg, also stir in the vanilla extract, lemon zest and juice.
  4. In a separate bowl, sift together the flour, baking powder and bicarbonate of soda. Add the poppy seeds and stir through to make sure they are well mixed.
  5. Add the flour mixture a little at a time and whisk incorporate into the butter mixture to form a thick batter. Add the cream when the batter becomes stiff and the electric whisk is struggling.
  6. Spoon or pipe into the muffin cases, filling about ⅔ of each case.
  7. Bake for 15 - 25 minutes (depending on size), test with a toothpick to see if they're ready, it should come out clean.
  8. Remove from the oven and transfer to a wire rack and allow to cool.

I bought slightly smaller muffin cases recently, they are much more manageable when eating and have a better balance between the cake part and the icing. So I used them and had 20 muffins from the above amounts. I should have placed them in my metal muffin tins even if they are smaller, that would have helped them keep their shape, but instead I squeezed them all into one tray and so some went rectangular as they bumped into their neighbours while baking.

IMG_4755 IMG_4756

Now for the decorations, I first went for the recommended icing in the recipe, however it split and I couldn't sort it out, but it was very tasty, so I've frozen it into creamy ice lollies. I also was reluctant to flavour it - it was supposed to be divided in 2 equal parts and one to be flavoured with lemon juice and coloured yellow and the other part to be flavoured with orange juice and coloured orange. It seemed to be a lot of the two juices to be added and I thought it would end up being rather runny.

Ingredients for icing

90 g soft unsalted butter
75 g icing sugar
250 g mascarpone
1 tsp vanilla extract
yellow food colouring

Method
Whisk together everything until it's soft and fluffy. If it doesn't split, pipe onto the cooled down muffins. Otherwise freeze into ice lollies.

I tried to pipe the split icing with the hopes that it might force it to come together, but it started melting in my hands and I gave up. I put some giant raspberries on top, which tasted nice, but made the cupcakes so very top heavy they were not able to stand up on their own.

IMG_4759

The next thing was to try out the icing lace. The packet instructions were for industrial amounts, I made a fifth if them and still had a blob left over. The mixture was very rubbery from the start and it took me quite a while to work out the right level of pressure to use to get the lace moulds filled enough to form a lace and yet not accidentally scrape half of the filling off. I left them to dry naturally through the day and in the evening, I dug out some ready to roll blue icing, rolled it out and cut out circles, then put the icing lace on top and it looked very pretty.

The next day, the blue icing had bled into the muffins and also picked up lots of moisture from the air, as it is very rainy at the moment. The white icing lace kept well, but also succumbed to the strong blue colour of the rolled out icing on day 2. I'll need to make another batch of the icing lace, to make sure I have the knack for Mother-in-Law's birthday party. And I also need to work out a good recipe for the cupcakes.

I personally liked the poppy seeds, they give a very nice crunch, but Lundulph thought they were more of a savoury ingredient and we both were struggling to taste the lemon. I also thought the muffins were a bit on the dry side - the original recipe called for milk, but I think using single cream should make them a bit more moist. Lundulph suggested muffins with cardamom flavouring, like a cinnamon bun basically, so that'll be the next thing to try.

I also took some to work for some of my overworked colleagues. I've not heard anything from them, so my guess is these weren't quite a hit with them either. And not surprising, work has been hectic and stressful for weeks and I'm tired and have headaches, so my baking very much reflects this. I think I need to knead a dough by hand and get some of the built-up frustration out.

16 June 2015

Raw Cake with Strawberries and Mango

This year my little sister Bip turns 30 and I wanted to surprise her with a very special cake to fit with her new lifestyle as a vegan. Well, an occasional one anyway, she's been going out a lot lately and has also fallen for the odd seafood temptation.

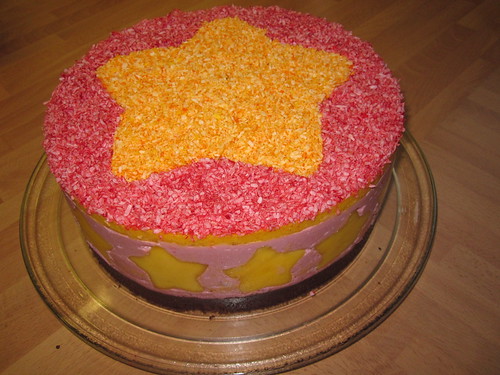
IMG_4627

I saved this recipe when I watched the Danish bake-off (Den Store Bagedyst) last year, it was just so very perfect in every respect. The original recipe in Danish can be found here.

Now there is no actual baking taking place here, so strictly speaking it shouldn't perhaps have formed the technical challenge on a bake-off show. But there is complexity to bringing it all together, and I decided that a dress rehearsal was in order and made this as dessert for when we threw a dinner party for our neighbours. I weighed most of the ingredients, but not all of them unfortunately. The original recipe says to taste each part and adjust as necessary.

The cake has a base, two mousses and toppings and requires quite a lot of ingredients, which might be tricky to get hold of and a cake ring or spring form of 18 - 20 cm diameter is required. It should be some 8 - 10 cm tall too. And make sure there is room in the fridge as it requires chilling, preferably overnight.

Ingredients

Chocolate crunchy base
110 g (8 pcs) medjool/mozafati/bam dates without stone
3 tbsp coconut oil
75 g (1 dl) Brazil nuts
75 dl (1 dl) coconut flour
45 g (1 dl) raw cocoa powder
1 tsp vanilla extract
1 ml salt
1 dl mulberries (white, dried) or raisins/sultanas

Strawberry mousse
385 g (6 dl) cashew nuts, soaked in water for at least 2 h
4 tbsp soft brown sugar
400 g (3 dl) strawberries
3 dl coconut oil
2 tbsp psyllium husks
1.5 dl water
Red food colouring
Runny honey or golden syrup to taste

Mango stars
1 firm, but ripe mango
small star cookie cutters, no more than 5 cm length

Mango mousse
2 dl fresh chopped mango
1 dl dried mango, soaked in water for 5 h
100 g (1 pc) ripe banana
1 tbsp coconut oil
2 tsp psyllium husks
Yellow food colouring

Decorations
2 dl dessicated coconut
Red food colouring
Yellow food colouring
Large star cutter to match the small ones. It should be some 15 - 19 cm long

Method

  1. Make sure to soak things that require this - better too long than not long enough.
  2. Start with the chocolate crunchy base and combine all the ingredients in a food processor and pulse until a coarse "dough" forms.
  3. Grease the cake ring and place on a baking sheet which has been lined with greaseproof paper. Cut out strips of grease proof paper, that are 15 cm wide and line the cake ring sides, making sure they stick without any bubbles.
  4. Pour the crunchy base into the cake ring and level it out at the bottom, gently but firmly pressing down - use the flat bottom of a glass or such to get a level surface. Place in the fridge to firm up.
  5. Now make the strawberry mousse by draining and blending the cashew nuts together with the brown sugar, half the strawberries, coconut oil, psyllium husks and water until very smooth.
  6. Add red food colouring a little at a time to enhance the colour. Taste and if needed, add runny honey or golden syrup to taste, it should be on the sweet side. The sweetness sensation tends to feel less when the cake is ready and chilled.
  7. Dice the remaining strawberries and stir into the mousse.
  8. Take the cake base out of the fridge and pour in a little of the strawberry mousse, to form a 1 cm deep layer, then return the cake to the fridge.
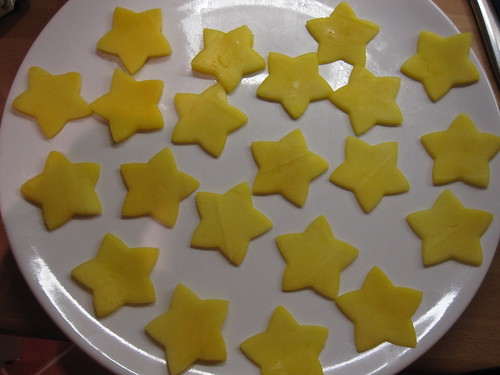
  9. Next make the mango stars by washing the mango and cutting it into thin slices, just under ½ cm thick. I strongly recommend a mandolin cutter for this and make sure to keep the skin on for stability.
    IMG_4611
  10. With the small star cutter, cut out 12 - 13 stars and set the leftovers from the mango aside for later.
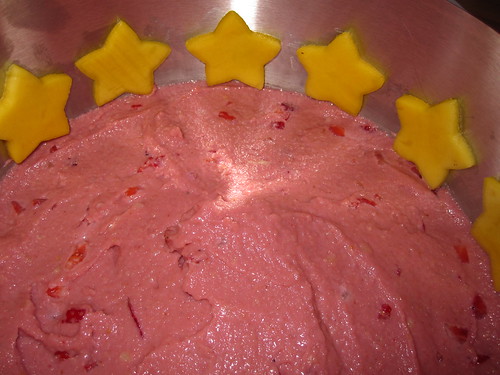
  11. Take the cake out of the fridge and carefully arrange the mango stars around the edge of the cake - stick them to the wall of the cake ring so that they rest on top of the thin layer of strawberry mousse.
    IMG_4612
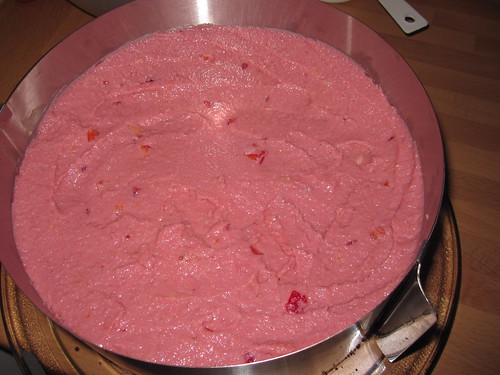
  12. Pour in the remainder of the strawberry mousse and make sure all the stars are completely covered by the pink mousse. You may need to push the mousse towards the edges with a spatula for this. Then back in the fridge for chilling.
    IMG_4613
  13. Then make the mango mousse by dicing the remainder of the mango and measuring up 2 dl of it and placing in the blender.
  14. Drain and add the dried mango, the ripe banana, the coconut oil and the psyllium husks and blend smooth.
  15. Add some yellow food colouring to enhance the yellow of the mango mousse. Take the cake out of the fridge and pour the mango mousse on top, it should be fairly runny and level itself.
    IMG_4614
    Now the cake can go into the fridge for the overnight chilling.
  16. Finally make the decorations by dividing the dessicated coconut in two equal parts and placing each part on a baking tray with edge and lined with baking paper.
  17. Add a some yellow food colouring to one part of the dessicated coconut and carefully rub together until all the flakes go yellow. Spread out on the tray and leave overnight to dry out.
    IMG_4615
  18. Repeat with the other part and the red food colouring, so it goes pink.
  19. About an hour before serving the cake, take it out of the fridge and carefully place the large star cutter on top. Pour in the yellow dessicated coconut inside the cutter and spread it evenly so the cake surface is completely covered.
  20. Carefully spread the pink dessicated coconut outside the cutter and spread so the cake surface is covered. Very carefully remove the large cutter and leave the cake out so it softens a little (unless it's a very hot day/room).
  21. Just before serving, carefully remove the cake ring and peel off the greaseproof strips of paper. If this is a birthday cake, not that you can't use candles on it, as all the dessicated coconut will fly off the cake when they are blown out. Also take care when serving, gently lay down the pieces, if you let them fall over, again the coconut will fly all over the place.

So there you have it - a raw and beautiful cake. Both times, I had to use the mini-blender that sometimes forms as part of a handheld blender set. These are a) not big enough and b) not powerful enough for making the base, but it can be done as long as it's done in parts - do the dry ingredients first, then do the dates with some of the dry ingredients and remove, then the mulberries/raisins/sultanas with some of the dry ingredients and remove. Finally stir/knead the whole thing through in a bowl, it should be coarse enough to give texture and crunch.

IMG_4604 IMG_4605
IMG_4606 IMG_4607

The mousses are wonderfully creamy and are well worth doing on their own, I think. The important thing is to remember to soak the dried mango for some 5 h, the pieces really need it. In my first trial, I forgot to soak the cashew nuts and rescued this by pouring boiling water over them and leaving them for about 30 minutes. However, I don't think this would work with the dried mango.

In my first attempt I also forgot to add the cashews to the strawberry mousse. So as I was blending the other ingredients, it looked horrible as the coconut oil and the water aren't really good friends and the strawberries were pretty juicy too, but I kept at it and ended up with a wonderful "mayonnaise"-like emulsion which was so very delicious in itself, I was almost sorry to add the cashews when I realised my mistake. I like cashews normally, not sure why I kept forgetting them. But I might explore what can be done with the strawberry mayo some time.
IMG_4610

The colouring in of the dessicated coconut was interesting. I'd read about it, but never tried it before. In the general rehearsal, I used my new paste colours and they didn't work that well. The second time I used liquid colours and they were very much better, so for next time I must remember to dilute the paste colours before using them in this way. The original recipe called for beetroot crystals and turmeric, but having tried turmeric as colouring a few years ago and producing some very pale and horribly-tasting macarons, I'm not falling for that one again. I also found out that beetroot crystals are very expensive, when I searched for them.

I wasn't able to get hold of dried mulberries the first time round, so went for sultanas. They have more moisture than mulberries it seems and are heavier - I measured them to 75 g, but I didn't measure the mulberries when I made the cake for my Sister. I don't think there was too much difference in taste though.

The second time I made the cake, I'd had my parents drive around, hunting for all sorts of exotic ingredients weeks in advance and the plan was that Lundulph and I would arrive on the day before Bip's birthday and I'd make the cake and we'd surprise her. As it happened, she invited herself over to my parents' place after finishing work. Not ideal, but I got going on the cake and was lucky in that Bip turned up some 2 h later than she'd planned. I was half-way through and somehow, my Dad and Lundulph managed to keep her busy, so she didn't notice me and Mum finishing things off. Quite a miracle, the cake was chilling in the top shelf of the fridge and Bip had a good rummage around, but didn't notice it.

As I mentioned above, this is not a cake where you can stick candles in - you can't blow on it, so instead we put in some sparklers in the shape of letters, forming Bip's name. They sort of worked, more of a novelty really, but Bip seemed pleased. I also cut out "30" for the sides, rather than stars and any shapes will do really as long as they are about 5 cm across and if the top of the cake can match up to the shapes on. And don't be tempted to buy too many mangoes - one large one is quite enough if you cut the slices thinly. The slices require that the mango is firm, whereas the mousse that it is ripe, so take care when choosing a fruit - you may have to get two. When my parents first started gathering the ingredients, they thought the mangoes looked way too firm, hard even, so they bought one and kept it on the window sill in the apple basket. This softened it a bit, but it took a long time. Luckily my Mum bought two more mangoes just to be on the safe side and they turned out to be better.

IMG_4625 IMG_4671

On the whole this has been a very interesting and inspiring experience and well worth repeating. It was also very tasty and Lundulph had seconds on both cake occasions. I've frozen a couple of the left-over pieces from the first cake, I think it will survive this rather well. It's also very fresh tasting and can give a false sense that this is healthy. But there is a lot of coconut oil in it, especially in the strawberry mousse and even if it's the oil to eat these days, I think moderation or "lagom" as they say in Sweden is a key word here.

12 April 2015

For The Vegetarians...

Of course there are vegetarians in the family, so I was looking at alternatives to the beef in the Beef Wellington. Unfortunately I didn't find anything that appealed, so decided to try out one of the very impressive pies from the Danish Bake Off from 2013(in Danish), a carrot and courgette pie.

IMG_4585

As I have vast amounts of left-over doughs of all kinds in the freezer, and the recipe called for a dairy product that seemed to be an Icelandic staple (and I couldn't quite find a good translation for what it was), I opted to defrost some of the shortcrust pastry and use that instead. What I was very pleased with was that I got to use my mandolin a lot and I managed to slice everything without any injuries!

Ingredients

shortcrust pastry for a 30 cm pie dish
1 egg 6 - 7 carrots
3 - 4 dark green courgettes
5 eggs
5 tbsp milk
salt, pepper and thyme

Method

  1. Pre-heat the oven to 200 °C. Separate the egg white and yolk.
  2. Roll out the pastry to about 3 mm thickness, then transfer to a pie dish, making sure that it's well fitted into it and goes a little over the edges.
  3. Cover the edges with strips of aluminium foil, prick the bottom surface to prevent it from bubbling up, then bake until it goes golden brown and begins to look dry.
  4. Take out of the oven, remove the edge protection strips and brush the whole inside with egg white, making sure nothing is missed out. Then return to the oven for a couple of more minutes before taking out and allowing to cool completely. This will protect the crust from going soggy from the vegetables.
  5. Peel and wash the carrots. Then trim the edges off the courgettes and scrub and wash clean, but do not peel.
  6. Using the thin slice setting on a mandolin and being very careful, slice carrots and courgettes along their length. Start with the courgettes, to get the hang of it as they are softer and easier to cut.
  7. Starting from the outer edge, line alternating courgettes and carrots, with the slices standing up on their edge.
    IMG_4578
    IMG_4579
  8. Continue until the whole pie shell has been filled, making sure to fit in as much as possible.
    IMG_4580
  9. Lightly whisk together the eggs, milk, salt, pepper and thyme. If you feel the liquid is too little, add more milk and adjust the seasoning, then drizzle over the pie to make sure it gets everywhere between the carrots and courgettes.
  10. Bake for 45 minutes and serve.

Next time I'll make more of the liquid, though it was quite nice as it was. I also think aubergines could add some extra colour or perhaps using light green and yellow skinned courgettes.

As for the amounts of carrots and courgettes, I wasn't really sure how much I'd need, so I sliced quite a few more than was necessary. A couple of days later, I cut them in chunks and made ratatouille, as I had some peppers that needed using up as well.

I also recommend showing the pie to the guests before cutting it, for the full effect, though even the cut pieces do look rather nice.

IMG_4586

My niece Lou actually asked to have some of this pie instead of the Beef Wellington and I'm quite pleased that she liked it. For the pie, I made the lovely cold white sauce and I also served with Dauphinoise potatoes. What I liked about it was that the vegetables had retained some of their crunch, though they were cooked. The original recipe also had bacon in it, but obviously I skipped it here.

19 January 2014

New Neighbour - continued

The second thing I baked to take to the new neighbour's party was the brittle/crisp almond flakes.

IMG_3764

Ingredients
Makes about 36

140 g plain flour
0.5 tsp cinnamon
0.5 tsp baking powder
60 g unsalted butter
36 g water
120 g caster sugar
50 g flaked almonds
0.5 tsp vanilla essence

Method

  1. Sift together flour, cinnamon and baking powder and make sure they are well mixed together.
  2. Place the butter and water in a small saucepan and melt together on low heat.
  3. Once the butter has melted, stir in the sugar to warm it up, but not to melt it.
  4. Stir in the almond flakes and vanilla essence and remove the saucepan from the heat.
  5. Now stir in the flour mixture. It'll become like thick batter, rather than dough.
    IMG_3758
  6. Prepare four sheets of baking paper of about the size of your baking trays. Divide the dough mixture between two of the sheets.
  7. Place the remaining two baking paper sheets over the dough mixtures, then carefully roll out each very thinly - about 2 mm.
    IMG_3760
  8. Stack the two dough sheets one on top of the other, then place on top of a thin baking sheet and possibly also place a second baking sheet over the dough sheets and place in the freezer for at least 1 h.
  9. When the time is up, pre-heat the oven to 160 °C (150 °C fan assisted).
  10. Take one frozen dough sheet at a time, place on a baking sheet and remove the top baking paper and set it aside.
  11. Bake for 8 minutes, then take out, cover with the saved baking paper and flip over onto it. Slide the baking sheet underneath and bake for a further 4 minutes.
  12. Once out of the oven, quickly cut into pieces and transfer to a wire rack to cool down. Repeat with the second dough sheet.

I cut the first frozen dough sheet into diamonds before I baked it, but the lines flowed together during the baking, so I didn't bother doing this on the second sheet. Of course you could pre-cut the pieces and transfer to new baking sheets with space between them.

In the Danish Bake-Off, these biscuits were a bit paler than mine and also didn't bubble up as much as mine. I'm not sure why, perhaps the amounts of cinnamon and baking powder should be reduced. It wasn't very clearly shown in the episode either, however, the result was very nice, particularly when it was still warm out of the oven - wonderfully chewy, but crispy. The following day, the thins had hardened a bit and would work very nicely together with ice cream. If so, they should perhaps be cut in long, narrow strips instead. Keep in an airtight container, if the air is damp like in the UK.

Lundulph's verdict on both these and the lemon sandwich biscuits was that there should have been more left for us, not just a small taster. I guess, I'll have to make some more...

New Neighbour

We have a new neighbour and she very kindly invited us for drinks the other day, so that we could get to know each other.

I thought that this would be a good opportunity to bake something - Lundulph and I are still munching through the various Christmas treats and I've not been able to bake for a couple of weeks, so this was a great opportunity.

Going through my recipe collection, I decided to try out two more of the Danish Bake-Off goodies from 2012. Now both below recipes can be done on a single day, but since I'm rather busy during the days at the moment, I made the doughs on the night before.

IMG_3767

Lemon sandwich biscuits
makes about 45

Dough
250 g plain flour
200 g soft unsalted butter
0.5 tsp salt of hartshorn (ammonium bicarbonate)
120 g caster sugar
half an egg, lightly whisked

Lemon buttercream
50 g soft unsalted butter
3 - 3.5 dl icing sugar
3 tbsp lemon juice
zest of one lemon, finely grated

Method

  1. Using one hand, carefully pinch together flour, butter and salt of hartshorn to fine crumbs - it'll look like wet sawdust.
  2. Mix in the sugar, then finally add the egg and bring together to a soft dough.
  3. Divide in two and place each piece between two sheets of clingfilm, then shape into discs.
  4. Place the discs in the fridge and chill for at least 30 minutes
  5. Pre-heat the oven to 200 °C (180 °C if fan assisted oven) and line trays with baking paper.
  6. Dust your work surface generously with flour, then take one disc out from the fridge and roll out to about 3 mm thickness, making sure the dough doesn't stick.
  7. Cut out cookies, I made round ones with the 48 mm diameter cookie cutter.
  8. Bake for 5 - 8 minutes, then let cool down on a wire rack. You might want to bake just a few on the first tray to see if the temperature needs adjustment, the biscuits should't spread too much.
    IMG_3765
  9. While the biscuits are cooling, make the buttercream. Start by stirring through the butter so that it goes really soft and creamy.
  10. Carefully add the icing sugar and incorporate into the butter until 3 dl have been incorporated.
  11. Now add the lemon juice and zest and stir in. If the buttercream feels too runny, add some more icing sugar until it reaches a piping consistency.
  12. Transfer to a piping bag with a star nozzle. Pipe a circle on half of the biscuits and press on the remaining ones to form round sandwiches.

By the way, I only made half the amount of dough into cookies, the second dough disc is frozen, I just didn't have the energy.

On the whole, these were very nice, even if the oven was pre-heated to 190 °C, a bit hot for the first tray, and they browned too much and also spread way too much. I turned it down for the second and third trays. This made the sandwiches look a bit funny, but there was absolutely nothing wrong with how they tasted which was really nice. But they are fairly large and one is quite enough, I think.

24 September 2013

Napoleon Hats

After a longish break to have a holiday and get together with the family to celebrate Lundulph's birthday, I decided it was time to pick a new recipe from my Swedish book "277 types of cakes". Besides, Lundulph and I recently cleared out the last of the white chocolate and cherry scones from the freezer. So I opted for a Scandinavian cake called Napoleon Hats. According to the book these are "really easy and quick to make".

IMG_3178

Ingredients
Makes about 25

half a batch of 1 - 2 - 3 pastry (link)
1 lemon
30 g egg white (from one large egg, save a couple of teaspoons)
500 g marzipan of the type 50-50 (50% almonds and 50% sugar)
1 egg yolk (from above)
1 egg
1 pinch of salt
25 g chopped pistachio nuts
100 g apricot glaze
200 g dark chocolate, 65% cocoa solids 100 g royal icing
2 - 3 drops of red food colouring

Method

  1. Make the 1 - 2 - 3 pastry and make sure it rests in the fridge for at least 1 h.
  2. Wash the lemon and grate the zest.
  3. Mix together the zest with the egg white and the marzipan well, then divide up into pieces of 20 g each.
  4. Using a little flour on your hands, roll each marzipan piece to a ball.
  5. Whisk together the remaining egg yolk, the whole egg and the pinch of salt to an egg wash and set aside.
  6. Dust the work surface with flour and roll out a piece of the pastry to 3 mm thickness, making sure it hasn't stuck to the worktop.
  7. Cut out circles of about 85 mm diameters and brush each with egg wash.
  8. Place a marzipan ball in the middle of each pastry circle,

    IMG_3172

    then fold up the pastry around the marzipan from three sides and squeeze together into a triangular "hat".

    IMG_3173
  9. Place the hats on a baking tray lined with baking paper, allowing a few cm of space between each.
  10. Put the whole tray in the fridge, while making the remaining hats.
  11. Once all hats are ready, pre-heat the oven to 200 degrees C. Chop the pistachios and place the apricot glaze in a saucepan.
  12. Bake each tray for 15 minutes. When the baking time is almost out, heat up the apricot glaze so it is runny and bubbly.
  13. Remove the ready baked tray and immediately brush the top of each hat with the apricot glaze and sprinkle a few pistachios.
  14. Move to a cooling rack and allow to cool completely.
  15. When all the hats have cooled, melt and temper the chocolate in a flat dish.
  16. Dip the bottom of each hat in the chocolate, remove the excess, then place on a piece of baking paper to set.
  17. In the mean time, make royal icing with the saved couple of teaspoons of egg white and colour it with red food colouring. It should be thick enough to pipe and keep its shape.
  18. Once the cakes have set, pipe a small blob on top of each.
  19. The cakes are best eaten on the day, but should be good for a further couple of days. They can be frozen, but should be allowed to thaw in room temperature, not microwave.

IMG_3174

Well, the "quick and easy" part turned out to be a load of rubbish, I made the 1 - 2 - 3 pastry the evening before and unfortunately it was rather sticky this time. I hoped a hight in the fridge would sort it out, but sadly no. I think the butter I used was too warm, since I'd had it in the kitchen the whole day while baking other things. The kitchen had reached tropical temperatures and the butter was on the verge of going liquid.

I also didn't use enough flour in the first lump I rolled out, so it took forever to get the circles off the table. The book also implied that I needed a whole batch of pastry, but I had half of it left over, so I've frozen it. A bit annoying that it was so sticky.

Even after I generously doused half the kitchen with flour, the whole thing was still fiddly. I spent most of the day baking these. I also don't think I managed to temper the chocolate. I followed my notes from my chocolate course, yet it didn't seem to work out, however, I don't think it matters much in this case.

IMG_3177

When I was ready, Lundulph was having his afternoon tea, so I gave him one to try. He said he liked it, but I got a feeling he wasn't entirely convinced. He said he had no reference point to compare to. So although I didn't really feel like eating sweet at the time, I decided to try one anyway to be on the safe side. All I can say is, that's what happiness tastes like.

25 August 2013

Baileys Cupcakes

I've been wanting to make cupcakes for some time now, but haven't been able to pick out a good recipe to try and then I remembered that after watching the Danish version of the Great British Bake-Off, I downloaded a whole bunch of really nice recipes. Thus, I started working my way through the list alphabetically and hit a jackpot at B already:

IMG_3099

Ingredients
Muffins
Makes 13 - 14
200 g caster sugar
150 g soft unsalted butter
3 large eggs
150 g plain flour
1 tsp baking powder
1 tsp vanilla essence
50 ml Bailey's

Butter cream 340 g icing sugar
170 g soft unsalted butter
1 tsp vanilla essence
1 tbsp instant coffee
0.5 tbsp water

Method

  1. Line a muffin tin with paper cases. Pre-heat the oven to 190 degrees C.
  2. In a large bowl whisk together the sugar and butter until pale and creamy.
  3. Add the eggs, one at a time and whisk until fully incorporated.
  4. In another bowl, stir together flour and baking powder and make sure they are well mixed.
  5. Add the flour to the batter and incorporate well.
  6. Finally whisk in the vanilla essence and the Bailey's
  7. Spoon the batter into the muffin cases, filling about two-thirds up.
  8. Bake in the middle of the oven for 20 - 25 minutes, check with a toothpick for readiness.
  9. Remove and let cool on a wire rack.
  10. While the muffins are baking, make the butter cream by whisking together the icing sugar and the soft butter.
  11. Add the vanilla essence.
  12. Stir together the instant coffee and water first, then add to the butter cream and make sure everything is well combined.
  13. When the muffins have cooled completely, decorate with the butter cream.

The recipe didn't mention how many muffins this would result in and since my muffin tins take 12, I divided the batter into 12 pieces. This resulted in a certain amount of overflow, which I clumsily trimmed. I think 13 or 14 would be better. Otherwise they baked quite well.

IMG_3096

A word of warning. The butter cream has a quite strong flavour and unfortunately I didn't take this into consideration and piped away like nobody's business and used it all up. This meant that the Bailey's flavour was completely lost. So either make half the amounts listed above or just save the leftover for another time. Or as Lundulph suggested - just use plain icing.

IMG_3101

I might experiment in getting Bailey's flavour into the butter cream as well next time. But still I need to focus on using less of the butter cream, it's way too sweet for my liking. I had a cupcake an hour ago and my tongue is still tingling from all the sweetness. My piping could have been better too, but the kitchen had become quite hot from the baking, so I placed the butter cream in the fridge to prevent it from melting. I piped it straight from the fridge and I should have massaged it a bit in the piping bag before doing that. Oh well...

14 June 2013

"Blødende" chokoladedessert

A couple of months back I purchased a set of stainless steel food rings and I've been looking for a reason and recipe to try them out.

Then I remembered that I watched a Danish bakery show last year and I'd saved a rather appealing recipe for chocolate fondant. They called it "bleeding" chocolate dessert, thus the title of this post.

Besides it was time to add another year to my count, so a perfect opportunity to try make this since I decided not to make a cake this year.

IMG_3005

Ingredients
6 portions
60 g salted butter
60 g dark chocolate (~65%)
50 g icing sugar
50 g plain flour
0.5 tsp baking powder
2 medium eggs
25 g toasted, chopped hazelnuts
50 g Viennese nougat divided into 6 pieces
grapeseed oil for greasing the food rings
icing sugar for sprinkling

Method

  1. Pre-heat the oven to 180 degrees C.
  2. Chop the chocolate into small, equal sized pieces and melt together with the butter in a bain marie very carefully. Only enough to melt, but not to heat up.
  3. In a bowl, stir together the flour and baking powder
  4. In another, larger bowl, whisk together the eggs and icing sugar until white and fluffy.
  5. Sift in the flour mixture into the egg/sugar mixture, followed by the hazelnuts and the melted chocolate/butter mixture and fold together carefully until the resulting batter is homogeneous.

    IMG_3003
  6. Line a baking tray with baking paper and brush with grapeseed oil. Brush also 6 food rings (5 cm diameter, 6 cm high) and place on the baking paper.

    IMG_3001
  7. Distribute the batter between the food rings, they should fill up to about three quarters, then gently push in a piece of Viennese nougat into each, so that it's hidden.
  8. Bake the cakes for 6 - 7 minutes, take out from the oven and carefully push the cakes out of the food rings and onto the serving plates and sprinkle with icing sugar.

    IMG_3004
Sadly I ended up with rather light and fluffy muffin-like cakes instead:

IMG_3008

Now there is a very simple reason for this - my food rings are 7 cm diameter and 7 cm high. This meant the batter wasn't enough. I used 4 rings and still the batter barely came up to the middle of them. The pieces of Viennese nougat were big and wouldn't hide very well inside the batter either.

I also baked for a bit longer, because the cakes took ages to rise and so they over-baked. However they were very tasty. Next time I'll get food rings of the right size.

Regular readers (if there are any) will of course know that I have a preference for unsalted butter. Also on this occasion I used it and added a pinch of salt. Not sure if it made any difference.

Another very appealing thing with this recipe is that the fondants can be frozen immediately after the batter has been poured into the food rings. As it was just me and Lundulph, I baked two of the fondants and froze two. I put a piece of baking paper at the bottom of an old ice cream box and placed two of the rings inside, before pouring in the batter. I then covered the whole thing with cling film, since the food rings were taller than the box, and into the freezer they went. The frozen fondants are baked in a pre-heated oven, straight from the freezer and for 3 minutes longer than when from room temperature. This means they can be prepared well in advance of a dinner party or if someone comes to visit unexpectedly.

Instead of the recommended home made vanilla parfait with pineapple and basil sauce, I just served with shop bought vanilla ice cream, which was rather lovely too.

6 February 2013

Almond biscuits with raspberry jam

The other day we visited Lundulph's parents as we haven't seen them since Christmas and I really wanted to bring them something baked.

IMG_2018

I had originally planned to bake bread, but didn't plan ahead and was short on time, so skipped it and went for the lovely almond biscuits with jam instead. This recipe is from the third week of Den Store Bagedyst, the Danish version of The Great British Bake Off.

Ingredients
Makes around 24, depending on size

200 g plain flour
75 g ground almonds/almond flour
50 g caster sugar
0.5 tsp almond extract
150 g unsalted butter at room temperature
icing sugar for dusting
smooth dark coloured jam

Method

  1. In a large bowl, blend together the flour, the ground almonds, the sugar and the almond extract.
  2. Cut the butter into 1 cm dice and add to the dry mixture, then using only the fingers of one hand, gently incorporate the butter. It is important that the dough is not over-worked.
  3. Once the mixture is homogeneous and looks a little like wet sawdust, use the whole hand to bring the dough together to one ball.
    IMG_2011
  4. Wrap in cling film or put in a plastic bag and place in the fridge for an hour.
  5. Pre-heat the oven to 160 degrees C. Prepare baking paper for the baking sheets.
  6. Place a piece of baking paper on the work surface, take half of the dough, form to a flat patty and place on the baking paper. Place a large piece of cling film on top and roll out over the baking sheet.
  7. When the dough is about 3 - 4 mm thick, remove the cling film and cut out biscuit shapes of your choice. Make an even number of biscuits and cut out holes in the middle of half of them. Leave at least half a cm between the biscuits.
    IMG_2015
  8. Remove all surplus dough around the biscuits, then bake for 15 - 20 minutes until golden brown.
    IMG_2014
  9. Repeat until all the dough has been used up.
  10. Once a baking tray is done, very carefully remove the biscuits to a wire rack to cool.
  11. When all biscuits are baked and cooled down, leave the ones with holes on the wire rack and move the others to one side.
  12. Dust the biscuits on the wire rack with icing sugar using a sieve.
    IMG_2016
  13. Warm up the jam for 10 - 15 seconds on half power in the microwave oven and stir it around.
  14. Place about a tsp of jam on each of the whole biscuits, then carefully spread it around evenly over each biscuit.
  15. Very carefully place an iced biscuit over each of the jam biscuits, press very gently in place.

The biscuits are very brittle and really melt in the mouth. This is why it is so important to be very careful when mixing the dough and only using the fingers and very gently squeezing the butter into the dry mixture. If kneading with the whole hand, I think gluten starts developing and makes the end result tough and chewy rather than melt in the mouth.

I made 16 biscuits and had about a quarter of the dough left over. I froze it and will try it out in a couple of weeks. I used a cutter that was about 6 cm diameter and made the holes using a metal cap from a wine bottle. I also rolled the dough to 5 mm, so overall the biscuits were a bit too big and too thick. Because of being so brittle, I think a 4 cm cutter would be better and also roll them slightly thinner too, so that a biscuit can be eaten in one bite.

I also cut them out a bit too close to each other. There is no leavening agent in the dough, but they still swell a little. Also it would be easier to remove the surplus dough. I had to use a toothpick.

I also didn't have any smooth jam, but used some of my raspberry jam, which had quite a lot of pips in it. The original recipe calls for blackcurrant jam ("solbær" in Danish, literally "sun berries"). I think raspberry worked quite nicely, but any dark coloured and tangy jam will do. However, it should definitely be smooth.

I think these are the fiddliest biscuits I've done to date, but they were well worth it and actually they didn't take too long to make. I'm very pleased with the dough and the texture I managed to achieve. Lundulph is still in awe of the angel food cupcakes, so his praise was subdued, but commented that they would be nice with strawberry jam. I'm not sure, but we'll see.

24 January 2013

Den Store Bagedyst

A few days back, I stumbled across the Danish version of The Great British Bake Off and thanks to the generosity of the Danish Radio, the episodes are still available in their entirety and I've been working my way through them. Denmark has one massive baking tradition to dip in, so watching the shows was very inspirational and I've saved most of the recipes, even though I probably won't get round to actually trying them out.

IMG_1981

But I decided to start with what was called Nougatsnitter from week 3, when they made cookies, macaroons and small strawberry tarts. In the competition, they asked for 15 cookies, from the amounts below I got 58 pieces.

Ingredients
Vanilla dough
200 g plain flour
100 g caster sugar
0.25 tsp baker's ammonia
140 g unsalted butter at room temperature
2 tsp vanilla extract
0.5 egg

Cocoa dough
190 g plain flour
20 g cocoa powder
100 g caster sugar
0.25 tsp baker's ammonia
30 g finely chopped roasted hazelnuts
140 g unsalted butter at room temperature
0.5 egg
1 tsp water (if needed)

Nougat cream
250 g Danish soft nougat
zest from half an orange
zest from half a lemon

Decoration
whole blanched hazelnuts, one per biscuit
melted white chocolate to glue them on

Method

  1. For each of the two doughs, first mix together the dry ingredients.
  2. Then work in the butter to form fine crumbs.
  3. Finally add the liquid ingredients and stir in to form the doughs, but careful not to over-work. It may be better to use a food processor for this.
  4. Roll out each dough to long sticks of about 1.5 cm diameter. Then put the sticks together - one vanilla and one cocoa and gently press together.
  5. Wrap the pairs in cling film and chill in the fridge for at least 30 minutes.
  6. In the mean time, grate the nougat coarsely, add the zests and stir in well into a cream, then cover with cling film and set aside.
    IMG_1976
  7. Pre-heat the oven to 200 degrees C and line some baking sheets with baking paper.
  8. Take out the "double-sticks" from the fridge and put together so quadruples form and the vanilla and cocoa doughs alternate.
    IMG_1978
  9. Now cut out biscuits, about 5 mm thick and place on the baking sheets, making sure they have some 3 cm space between them.
  10. Bake for 8 - 10 minutes, keeping an eye on them, so the vanilla parts don't go brown.
  11. After baking, transfer the biscuits to a cooling rack and allow to cool down completely.
  12. Pair up the biscuits, then place the nougat cream in a piping bag with a smallish nozzle.
  13. Pipe a little cream in the middle of one biscuit and carefully press a second biscuit on top of the cream.
    IMG_1979
  14. Melt the white chocolate, dip the bottom of the whole hazelnuts and stick one in the middle of each top biscuit.

I've made some alterations to the original recipe. I did try to stick to the original when I made the biscuits today, but they weren't quite right for my and Lundulph's tastes.

The bake-off called for 15 biscuits, the above recipe resulted in 58. I increased the nougat cream, as the original was only enough for 51 of the biscuits.

And when I make these again, I need to get two rectangular wooden pieces of 1.5 cm thickness to use as guide when I make the initial dough sticks. It would work better if placing dough between the sticks and use a rolling pin with the guides. That would give me rectangular sticks and the final baked shape should be better and have a clearer chequered effect.

I was concerned about getting a cream out of the nougat, which is generally solid, but once I'd grated it and stirred in the zest, it turned out quite nice. But care must be taken with the zest, it can very easily over-power the hazelnut flavour and vanilla.

Lundulph's comment was that he would prefer the biscuits chewier, however these are not that type of biscuit. Also he wasn't too keen on the whole hazelnut on top, he didn't feel it added anything other than make it look pretty.