24 October 2019

Mushroom Stroganoff

Last week-end, the English side of the family got together to celebrate the birthdays of my younger brother-in-law Dylan and my oldest niece Lou. There I found a pile of old lifestyle magazines, which had recipes, so I had to review them thoroughly and found this one from Jamie Oliver.

IMG_5852

I'm not really a fan of his, and generally I do my best to avoid his work, but having been to Sweden a couple of weeks ago to visit the Chocolate Festival (in Swedish) and to pick mushrooms with my Mum, I've been keeping an eye out for mushroom recipes and I felt compelled to read this one through.

I thought it sounded so good, that I also e-mailed it to my Mum, though I suspect she might just use it as inspiration. I , on the other hand, was determined to try it out, since I brought home a lot of lovely mushrooms, which my Mum very kindly cleaned, parboiled and froze in handy amounts for me. The mushroom season was a bit late this year, I guess due to the very dry Summer, and we didn't get too many mushrooms while I was there, but in the past two weeks, Mum has been sending me photos of her crops each day and it's barely believable how many she's been finding.

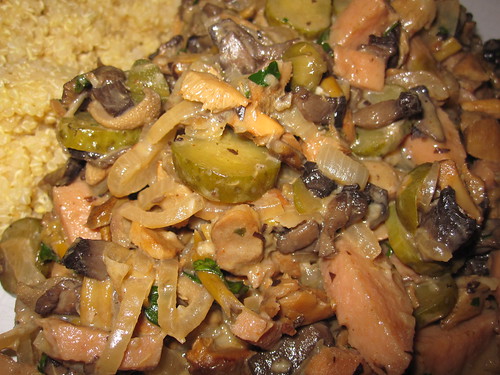
As per usual, Lundulph is keen to eat healthily, but every time he tries to go vegetarian, he's even more hungry than usual, so I decided a pure mushroom dish will just not cut it. And since I'd brought back a lovely falukorv from Sweden, I decided to add some of it for extra proteins. And I sort of doubled the amounts, so that we'd have enough for a second meal.

Ingredients

635 g mixed parboiled mushrooms
2 yellow onions
5 coves of garlic
250 g falukorv
8 pickled silverskin onions
4 pickled gherkins
2 tbsp olive oil
2 tbsp caper buds
100 ml whiskey
1 handful of flatleaf parsley leaves
1 tsp hot smoked paprika
160 g créme fraîche
salt and pepper to taste

Method

  1. Peel the onions and the garlic. Slice the onions and press or finely chop the garlic.
  2. Cut the falukorv into ½ cm thick circles, then into ½ cm strips.
  3. Cut the pickled onions into quarters and slice the gherkins.
  4. Heat up the olive oil in a casserole dish, then fry the onion and the garlic until transluscent.
  5. Add the falukorv, mushrooms, pickled onions, gherkins and capers and fry for 5 minutes, stirring.
  6. Pour in the whiskey and if you can, set it alight to flambé the dish.
  7. After the flames die down or another 5 minutes if you didn't set it alight, add the parsley, smoked paprika, créme fraîche and stir through.
  8. Season with salt and pepper and serve with boiled rice or quinoa.

First a couple of points - I describe how to parboil mushrooms in my post on vegetarian lasagne. The mushrooms my Mum and I mostly picked were yellowfoot, which are surprisingly filled with water, given their size, so parboiling is a very good idea and on days of good harvest, my Mum will actially pour out all the released liquid during the parboiling, otherwise it would take forever to wait for it to evaporate. Thus the volume reduces dramatically and is a good space saver. Also, the cooking time is reduced, in fact they are OK to eat after the parboiling without further cooking.

Next, the falukorv is also pre-cooked, so only needs to be heated through, again shortening the overall cooking time of the dish. Frankfurter-type sausages would be a good replacement here.

I didn't manage to set the whiskey alight, so I'm not sure how that would alter the flavour, but it worked fine non-flambéd. I used Jack Daniels whiskey, we have it in case someone asks for a Jack Daniels with Coke, so I thought it would be good for cooking with.

I would have preferred this dish with rice, but I forgot to put it on when I started cooking, so made quinoa instead, as it takes half as long.

Lundulph did enjoy this, more than I expected, he's not a fan of Frankfurter-type sausages, so avoids them when he can, but this one was well received.

I've recently discovered an online shop which sells Swedish foods, in addition to Ocado. It's called Totally Swedish and is a bit on the expensive side. There is some overlap in the range between them and Ocado and there are still items I'd like to have, that neither carries, but still, it's good to know they both are there, if only for special occasions. I should probably make a habit out of checking for new shows that sell Swedish food.

28 September 2019

Fig Rolls

Yep, once again I've been watching the Great British Bake-Off and once again I felt compelled to try out some of the recipes, starting with a favourite of Lundulph's - fig rolls. He does ask me to buy these for him every now and then. I'm not too fussed about them, they are a bit too dry for me and the texture of the biscuit reminds me of a very dry type of Bulgarian biscuit that ladies of my gran's generation usually make and which I find quite nasty.

IMG_5838

But home-made fig rolls, where you know what's inside is something completely different. And as per usual, I try to follow the original recipe as closely as possible, in particular since this one was from Paul Hollywood and previously his recipes have been good. As it turned out, this one was too, but the proportions were not quite right, however that is not a bad thing. The original recipe is here.

Ingredients

Biscuit dough 175 g plain flour
1 pinch of salt
%frac14; tsp baking powder
50 g unsalted butter at room temperature
40 g light muscovado sugar
1 large egg
½ tsp vanilla extract

Filling
200 g soft, dried figs
25 g light muscovado sugar
1 tsp ground cinnamon
1 ball of stem ginger in syrup - about 2 cm diameter

Method

  1. Sift together the flour, salt and baking powder and make sure they are well mixed.
  2. Beat together the butter and the muscovado sugar until pale and creamy.
  3. Add the egg and the vanilla extract and and whisk until well combined.
  4. Add the flour mixture in 3 batches, incorporating each fully before adding the next.
  5. Wrap the dough well and place in the fridge to chill, while you make the filling.
  6. Chop the figs and place into a small saucepan and add the muscovado sugar and enough water to just cover the fruit.
  7. Bring to the boil on medium heat, then reduce the heat to a fast simmer and let cook for 5 - 8 minutes, stirring occasionally. The figs should go even softer and the whole mixture should thicken.
  8. Transfer the mixture to a food processor and blitz to form a paste. Add the ginger and cinnamon and pulse a couple of times to get it mixed in, but not too finely chopped. Spread the filling onto a plate, cover with cling film and chill to firm up for 10 minutes.
  9. Pre-heat the oven to 180 °C fan. Prepare a couple of baking sheets with baking paper.
  10. Cut out a sheet of baking paper and dust with flour. Roll out the dough into a rectangle no more than 4 mm thick on the baking sheet. Cut along the long side of the rectangle into 10 cm wide strips.
  11. Flour your hands and form some of the filling to a sausage, about 2 cm diameter, and lay along the middle of a dough strip, then carefully use the baking paper underneath to fold the dough around the filling. Use a little water to wet the edges and make them stick together, they don't need to overlap too much.
  12. Repeat with the remaining strips, re-do any trimmed off edges to use up the dough.
  13. Cut each strip into equal pieces of around 4 cm length, then carefully place onto the baking sheets, no need to leave too much room, they don't puff up much.
  14. Using a fork, press down each roll to get the decorative lines on top and bake for 12 - 15 minutes, until they start going golden brown.
  15. Remove from the oven and transfer to a wire rack to let them cool down.

These are definitely really tasty and not remotely related to the shop-bought stuff and well worth doing. However, the original instructions don't tell you how thick to roll the dough and I only rolled it to the 25 x 20 cm as it said and it was way too thick. Also the amount of filling was almost twice what I could fit into the dough, I weighed it and it was 322 g, but I had to scoop out 141 g in order to get the dough around the filling. I've tried to make adjustments in the above instructions. But any left-over filling can be used as spread on toast as an alternative to jam or frozen for the next fig roll batch. I'd also say the filling probably works nicely as praline filling as well.

IMG_5831 IMG_5832
IMG_5833 IMG_5834
IMG_5835 IMG_5836

14 September 2019

Pear Galette for Lundulph's Birthday

It's the time of the year, when Lundulph's parents' pear tree is crammed with fruit and I'm racking my brain about what to do with them. Last year, I did work through a lot of my recipes and found one for a pear galette, which seemed rather nice and I decided to try it out this year. A quick google indicated that a galette is a rustic, free-form pie or tart.

IMG_5830

This recipe turned out to be very nice indeed and is really not difficult at all, even if it may seem so, so definitely a repeat, the original can be found here in Swedish. Another huge benefit is that this can be prepared in advance up to the point of baking, so it's very suitable for dinner parties, when all you need to do is bake it while the guests are eating.

Ingredients

Pâte Sucrée - sweet pastry
100 g cold, unsalted butter
3 ¼ dl plain flour
¼ tsp baking powder
1 ¼ dl granulated sugar
1 large egg

Almond paste
250 g marzipan
50 g unslated butter
1 large egg
½ dl plain flour
2 tbsp dark rum

Filling
4 - 5 crispy pears
50 g cold unsalted butter
3 tbsp dark muscovado sugar
1 tbsp ground cinnamon
50 g blanched almond flakes

icing sugar for dusting before serving

Method

  1. Pinch together the butter, flour, baking powder and sugar. Add the egg and work it in just so everything combines well. Flatten the dough, cover in double clingfilm and let rest in the fridge for at least 30 minutes.
  2. Grate the marzipan coarsely and melt the butter in a saucepan.
  3. Stir together the marzipan, butter, egg, flour and rum until the paste is smooth.
  4. Wash, peel and trim the pears, then cut into slices length-wise into equal thickness.
  5. Mix together the muscovado sugar and cinnamon in a bowl.
  6. Pre-heat the oven to 175° C fan.
  7. Roll out the dough onto a piece of lightly floured baking paper to about 3 - 4 mm thickness.
  8. Spread the almond paste over the pastry, but leave a clean edge of about 2 cm all around.
    IMG_5823
  9. Lay out the pears over the almond paste,
    IMG_5824
    then sprinkle with with the sugar/cinnamon mixture.
    IMG_5825
    Take care not to go over the edge of the almond paste.
    IMG_5826
  10. Using a cheese slicer or a potato peeler, cut out wide and thin butter pieces, then lay them over the pears, so that they are all covered.
    IMG_5827
  11. Carefully fold up the clean eges of the pie dough, then bake for 50 minutes until everything has gone golden brown.
    IMG_5828

And here is the lovely result, I recommend it's served warm together with vanilla ice cream.

IMG_5829

It was very well received when Lundulph came home together with his parents and we enjoyed a quiet celebration of his birthday. This galette did not last long, large as it was.

25 August 2019

Enchanted Narnia Panna Cotta

Last week my sister Bip visited for a long week-end and being a tea aficionado and a big fan of Bird & Blend Tea Company, she'd booked us both to a tea blending class. This was a very nice experience and in addition to learning lots about tea and creating our own mixtures, the trainers provided a lot of useful tips, one among these was the cold infusion of their Enchanted Narnia tea blend with coconut milk. Now, how could I possibly resist this? This tea blend tastes of Turkish delight and is very pretty to look at in its dry form.

So without further ado, I put 8 tsp of the Enchanted Narnia tea into a large jug and poured in 1 litre of coconut milk over the tea. Now, this tea mixture has lots of dried rose buds and they bobbed up to the surface, so I had to stir for a few minutes to get things mixed in a little bit. Then I covered with cling film and left the jug in the fridge at least overnight.

The next day, I strained some of the cold infusion into a glass and tasted it. It was a very nice, though the coconut of the milk was still the dominating flavour and it tasted way too creamy to drink just like it was. I decided to leave the mixture for a further 24 h in the hope that the Turkish delight flavour would develop further. It did and I gave some to Lundulph to try. He thought it was nice too, but again commented on how overly creamy it seemed to be.

And so it struck me - why not use this to make a panna cotta? A quick search cropped up this recipe that seemed very promising. I made some changes to the ingredients's list and I deliberately didn't heat up the infused coconut milk, so that the flavours wouldn't change - a hot tip from the chocolate course I attended a couple of years back.

Ingredients

3.5 leaves gelatine
300 ml single cream
1 tsp vanilla essence
30 g caster sugar
300 ml infused coconut milk

Method

  1. Soak the gelatine leaves in a little cold water for a few minutes.
  2. Place the cream, vanilla essence and sugar in a saucepan and bring to a boil, stirring until the sugar has dissolved.
  3. Remove from the heat. Squeeze out the gelatine leaves and stir into the saucepan and keep stirring until it has dissolved.
  4. Let the mixture cool down to around 40 °C and stir in the infused coconut milk.
  5. Pour into a suitable mould, let cool completely, cover with cling film and place in the fridge to set.

This turned out absolutely delicious. I suspect regular milk would work just as well. Sadly I forgot to take a photo.

To follow, I decided to try the cold infusion with hazelnut milk, however this wasn't as nice, the hazel flavour was just too overpowering. So I've been using it in my coffee and it tastes different, but rather nice I think.

16 August 2019

Celeriac Steak With Green Salsa

IMG_5804

For our anniversary, Lundulph and I decided to go on a mini-break to the New Forest. Lundulph made the arrangements and on the first night at dinner, he decide to go vegetarian and ordered the celeriac steak, commenting that it must be magical, as it cost almost as much as a meat steak. As it turned out he liked it, but was upset about the fact that the amount of calories in it were almost nothing compared to a real steak, again not really fair, as just because someone wants to reduce their intake of red meat, doesn't mean they also want to forego the calories. But he liked the taste, so I decided to try and make it at home. It really didn't look that difficult, but as it turned out there is a trick, which the recipe I chose didn't mention. I did also have some things I wanted to use up, so I did some swaps, but I don't belive that caused the failure of my homemade celeriac steak.

Ingredents

Steak
1 celeriac
25 g unsalted butter
1 tbsp grapeseed oil
2 cloves of garlic
a few sprigs of thyme
10 ml miso wine
150 ml chicken or vegetable stock
100 g curly kale, stalks removed
100 ml water
400 g can of mixed pulses

Salsa
1 dl flat leaf parsley leaves
1 dl peppermint leaves
1 tsp Dijon mustard
1 tbsp white wine vinegar
3 tbsp olive oil
Salt and pepper to taste

Method

  1. Carefully peel the celeriac, then cut into 1.5 cm thick "steaks", it should be 3 - 4 steaks in total.
  2. Heat the butter and grapeseed oil in a frying pan and once foaming, add the steaks and press in the garlic and add the thyme.
  3. Cook on one side until the steaks start going golden and caramelise, then turn and do the other side. Keep turning for a total of 10 minutes, while basting with the fat.
  4. Add the miso wine and keep cooking and turning the steaks until it reducec by half.
  5. Pour in the stock and let simmer for 15 minutes until the steaks go soft and can easily be pierced with a skewer.
  6. In the meantime wash and shred the kale and make the salsa.
  7. Put all salsa ingredients in a food processor and blitz until everything is chopped, but not too smooth.
  8. When the steaks are done, remove to a plate.
  9. Now add the kale together with the water to the pan and let simmer for 5 minutes until it starts to wilt and soften.
  10. Finally add the beans and stir through to get them hot.
  11. Serve the celeriac steaks on top of the kale/bean mixture and drizzle over the green salsa.

What failed with the above was that my steaks hadn't fully cooked and gone soft, Maybe I cut them too thick. I hadn't realised how hard a celeriac is and it was difficult to peel, it was a bit knobbly and too large for me to hold safely, so I recommend using a paring knife, rather than a potato peeler. Cutting the steaks evently was even trickier and I haven't given it much thought of a different way to achieving a better result - unfortunately I don't have space in my kitchen for a slicing machine, that would probably be ideal. My mandolin is not quite up to the job either, even the thick slices would be a bit too thin I think, but I might try it.

Otherwise Lundulph thought it was a decent first attempt and as he re-heated the remaining steaks in the microwave, they got softer and better, so the cooking times are approximate and it's important to check the softness. The other thing Lundulph was surprised about was that at the restaurant, the celeriac didn't taste like celeriac. The one I made did and it's not his favourite flavour, though he'll eat it, unlike me, who'll take the time to carefully remove every single piece from my plate. I'm guessing that once fully cooked, celeriac will lose or at least reduce the strong flavour it has in its raw form.

2 August 2019

Sesame Snacks

P8020464

My Mum regularly sends me recipes she comes across and this one I received a while back and haven't taken the trouble to make. Which is a pity, because it was rather good and very easy too. Lundulph's eyes went sparkly when he tasted these.

Ingredients

150 g sunflower seeds
50 g sesame seeds
50 g finely chopped sultanas
1 small or medium egg
2 tbsp honey

Method

  1. Pre-heat the oven to 140 °C (or 120 °C fan) and line a baking sheet with paper.
  2. Mix together all the ingredients in a bowl.
  3. Either pour the mixture onto the baking sheet and gently flatten out to a large thin patty or use a table spoon to create bite-sized pieces. If you do the latter, make sure to flatten them out.
  4. Bake for 30 - 35 minutes until the surface starts developing a little colour, then remove from the oven and leave to cool completely.
  5. If you made the large slab, cut it into squares or rectangles, then carefully peel off from the paper and store in an air-tight container.

I used a large egg and I think this was a bit too much, so the snacks didn't go completely solid and were still sticky at the bottom, even after cooling. So I layered them with baking paper in the cake box.

They were not too sweet and the combination of sunflower and sesame seed is really good. The honey I used has a pretty strong flavour, so the sultanas weren't too noticeable. They did taste a bit of the egg, again, I suspect it's because I used a large one, but this didn't detract from the overall experience at all.

I think this base recipe can be varied quite a bit with using different dried fruits and even replacing some of the sesame seeds with other seeds or nuts. As I said, Lundulph was well pleased and I suspect these are a lot less unhealthy than shop-bought sesame snaps and such like.

20 July 2019

Macedonian Salad

On our recent visit to Bulgaria, we stopped at a Black Sea resort for lunch. Always when the weather is very hot, I tend to lose my appetite and live on salads, kyopoolu and tarator, so concentrated on the starters section of the menu. Here I spotted what was intriguingly called Macedonian salad and had to order it to find out what it is. As it turned out, it was roast and peeled green peppers in a garlic/dill marinade. Yummy!

Some googling later revealed that Macedonian salad is very similar to the Bulgarian Shopska salad or a Greek salad and not at all what I was served, however I decided to try and make it for our friends' Summer barbecue at the end of July.

Ingredients

1 tbsp chopped fresh dill
0.5 dl olive oil
0.5 dl balsamic vinegar
salt and pepper
1 clove garlic
9 long peppers - any colour

Method

  1. Make the dressing on the day before - mix together the dill, oil, vinegar, salt and pepper and press in the garlic. Place in a glass jar in the fridge and give it a shake now and then.
  2. Roast the peppers - ideally on a barbecue or pepper roaster or electric hob - then place in a saucepan and cover with a lid and leave to "stew" for a few minutes.
  3. As soon as you're able to handle the peppers, peel off the skin and remove the stalks, seeds and pith, then rinse under hot water and cut up into bite-sized pieces.
  4. Place in a serving bowl, pour over the dressing and stir through to mix. It's now ready to serve.

If you choose red, yellow or orange peppers, the end result will have some sweetness to it, if this isn't your thing, select green peppers. I'd chosen a mixture of red, yellow and orange, because the colours looked pretty, however after roasting, yellow and orange became indistinguishable. Still, it turned out to be quite a hit and several people asked me for the recipe. In fact, I thought it was nicer than the stuff I got at the restaurant.

There's a bit more work because of the roasting, but it makes a huge difference and it's a very good thing to do for a barbecue and start with the peppers before the other things, so that while meat and such are being grilled, the peppers get to stew in their saucepan. It's well worth doing, this salad tied in very nicely with the red meats.

Unfortunately I forgot to take a photo.

19 June 2019

Zefir

IMG_5803

I've been working my way through a left-over bag of giant shop-bought marshmallows and wondering how difficult it would be to make them myself. My standard procedure in these cases is to watch videos on YouTube, the site turned out surprisingly helpful and pointed me towards "zefir" or "zephir". This is a Russian type of marshmallow sweet, which looked so beautiful and seemed quite easy to make, so I got on with this, especially since I had strawberries left over from the Rhubarb Dream Cake and a lot of agar agar in the cupboard following my experimentation with jelling liqueurs at Easter. I guess all my recent searches for Russian recipes is what prompted the zefir suggestion. I liked this one best, though I took inspiration from others as well. Below adapted amounts to fit with the strawberries I had to use up.

Ingredients

Makes 20 at 5 cm diameter

265 g strawberries
110 g caster sugar
1 tbsp lemon juice
1 large egg white
78 ml water
212 g caster sugar
2 tsp agar agar powder

icing sugar for dusting

Method

  1. First line several baking sheets with paper and make the strawberry puree by trimming, washing and quartering the strawberries and placing in a saucepan.
  2. Add the 110 g caster sugar and lemon juice and simmer for about 10 minutes and stirring occasionally.
  3. Push through a sieve to remove the seeds and get the puree really smooth and let cool down to room temperature, if it's still warm.
  4. Place 150 g of the puree in a large glass or metal bowl, add the egg white and whisk until it goes pale and very fluffy, like meringue.
  5. In another saucepan make the syrup. Place water,212 g of caster sugar and agar agar. Stir together, then place on the hop at medium-high heat and bring to a rolling boil while stirring. Let simmer for a further 7 minutes, while stirring constantly.
  6. When the syrup goes a bit gloopy, it's ready. Remove from the hob and slowly pour over the strawberry meringue fluff, while whisking continuously, very much like an Italian meringue.
  7. Once everything is incorporated and well mixed, transfer the mixture to a piping bag with an open star nozzle.
  8. Pipe 40 rosettes of about 5 cm diameter on the lined baking sheets, then leave for at least 24 h to dry out, it may take longer if the air is humid.
  9. Once a skin has formed on the surface, carefully peel from the paper and stick the bottoms together pair-wise. Sprinkle generously with icing sugar, then brush off the excess and store in an air-tight container. If they are still a bit sticky, cut up the baking paper and put between each or place in paper cupcake moulds.

I quite liked both the texture and the flavour, though I think the traditional size was a bit too big, as they are very sweet. So next time I'll aim for bite-size rosettes. Lundulph wasn't too impressed, he thought they were missing something and suggested they'd be better as decoration of a cake rather than to be eaten on their own.

Here they are on the dining table:
IMG_5802

However, I gave a few to my Russian friend Byala and her response was to say it's the best zefir she's ever had and that she'd eaten almost all of them in one go.

Update on 2019-07-20: During our recent trip to Bulgaria, we found a shop selling Russian food and I bought a packet of pink and white zefirs - I'm pleased to say that I did get them right for texture and sweetness, though of course in the humid UK air, I needed 2 days for the drying and they were still rather sticky. I think Sweden in deepest Winter might be ideal, with its super dry air. My parents weren't too excited either, my Dad didn't like the texture much. I'm wondering if these could be piped on a plain and not too sweet biscuit to offset all the sugar. I must experiment.

16 June 2019

Rhubarb Dream Cake

My Mum is well aware that we have surplus rhubarbs and whenever she comes across a recipe with rhubarbs, she sends it over. The latest crop is called "Rabarberdröm", which translates to rhubarb dream. I made this for a family barbecue at brother-in-law Roger's place for Father's Day. It didn't turn out pretty, but was very yummy.

IMG_5801

Ingredients

Cake sponge
2.5 tsp baking powder
2 dl plain flour
100 g soft, unsalted butter
2 dl granulated sugar
5 large egg yolks
1 dl semi-skimmed milk

Almond meringue
5 large egg whites
2 dl granulated sugar
1 dl blanched almond flakes

Compote
250 g rhubarbs
250 g strawberries
2 dl granulated sugar
4.75 tsp vegegel

Decoration
3 dl whipping cream
large, pretty strawberries
lemon balm leaves
blanched almond flakes

Method

  1. Butter and flour two cake tins of 20 cm diameter. Alternatively butter and line with baking paper.
  2. In a bowl, sift together the baking powder and flour.
  3. In a large bowl, whisk together the butter and sugar with an electric whisk to a light and fluffy consistency.
  4. Add the yolks and incorporate well, then add the remaining ingredients and whisk to a smooth batter.
  5. Distribute the batter between the two cake tins, level and set aside. Pre-heat the oven to 150 °C.
  6. Clean the whisks thoroughly, place the egg whites in a clean glass or metal bowl and whisk to soft peaks.
  7. Add the sugar, a little at a time while whisking to stiff peaks.
  8. Spread the meringue over the cake batter and sprinkle almond flakes on top.
  9. Bake for 35 - 40 minutes, the meringue should have a nice golden brown colour.
  10. Remove from the oven and let the cakes cool down completely in the tins.
  11. Wash and cut the rhubarbs and strawberries for the compote. Place in a saucepan on high heat and bring to the boil while stirring.
  12. Once some liquid has been released, add the sugar and the vegegel, stir in thoroughly and let simmer according to the instructions for vegegel.
  13. Remove from the heat and leave to cool down completely.
  14. When you're ready to put together, whip the cream to stiff peaks.
  15. Carefully take out one of the sponges from the cake tin and place on a plate.
  16. Spread half of the whipped cream and more than half of the compote over.
  17. Place the second sponge on top, followed by the remaining cream and compote.
  18. Wash the pretty strawberries, cut if very large, and decorate the cake, along with lemon balm leaves and more almond flakes.
  19. Serve immediately.

Instead of mixing regular sugar and vegegel, jam sugar or preserving sugar can be used - it already contains a jelling agent, so should work similarly. The amounts for the compote result in a lot of it, not everything needs to be used and also, the sponges and the compote can be made a day in advance and stored in room temperature.

I only have one spring form for cakes and an adjustable cake ring, so I used that. However, I hadn't thought things through very well, so couldn't quite fit both in the oven at the same time and ended up tilting the spring form slightly. This transferred to the finished sponge and so when I built the cake, it barely stayed upright.

I also suspect the oven temperature might need to go down a little, the meringue ballooned, but luckily it sank down again.

IMG_5797

Still it was very intriguing to bake a sponge with a meringue on top and in one go, I've not come across this before. It makes for an extremely sweet, light and moist cake.

IMG_5795 IMG_5796
IMG_5799 IMG_5800

9 June 2019

Svekolnik

I have a lovely colleague from Russia, Byala, and one day on the train home from work, we compared traditional summer foods in Russia and Bulgaria. It seems Bulgarians aren't the only ones partial to cold soups like tarator, Russians are too and Byala told me about two of them, svekolnik or holodnik and okroshka.

IMG_5789

I've been waiting for a hot day to try these out, but after the lovely Easter week, it looks like we won't be getting any of those for a while, so I decided to make the svekolnik, since I had a couple of beetroots in the fridge screaming to get eaten.

I didn't spend much time in researching recipes, but I found this one that seemed quite appealing and put together my shopping list for the other ingredients last Saturday.

Ingredients

2 beetroots, washed and trimmed
a little oil
1 cucumber
1 bunch salad onions (7 - 8) with good green bits
1 tbsp chopped fresh dill
1 litre kefir
1 tbsp horseradish sauce
salt & pepper
2 tbsp lemon juice
6 eggs
cold water
100 g sour cream
1 kg salad potatoes

Method

  1. Pre-heat the oven to 200 °C, rub a little oil on the beetroots and wrap in aluminium foil and bake for an hour. Check with a skewer if they're done, it should go straight through them.
  2. While the beetroots are baking, peel and dice the cucumber, wash the onions well and cut relatively finely, but keep a handful of the green bits for decoration.
  3. Hard boil the eggs and cool down quickly under the cold tap, then peel and chop three of them. Keep the others for decoration.
  4. In a large bowl, mix together the cucumber, onions, kefir, horseradish sauce, salt, pepper, lemon juice and chopped eggs. Cover and put in the fridge.
  5. When the beets are ready, remove from the foil and let cool down a bit, then peel off the skin, preferably wearing gloves, or your fingers will go bright pink.
  6. After the beetroots are peeled, grate coarsely and stir into to the the mixture and the soup will go bright pink. Put to chill until serving time. If the soup is too thick, add some water.
  7. Just before serving, wash, dice and boil the potatoes.
  8. Serve the soup with an egg halve, a tablespoon of sour cream and sprinkle with green onions. Add a small bowl of warm potatoes next to it.

IMG_5788

During the baking of the beetroots, the most wonderful smell spread through the house, Lundulph said it reminded him of the smell at his Nan's when they went there for Sunday roast dinner. I did waste a lot of energy running the whole oven for two beetroots, I think it should be possible to do a tray of them, covered with aluminium foil and use for other things. My sister Bip said they would be really nice with goat's cheese.

IMG_5785 IMG_5786

A couple of notes - the website said to put in 1 tbsp of horseradish sauce, but the embedded video said 1 tsp. I thought I'd err on the safe side, so just put a tsp in, but I think a tbsp would have been OK. I also think capers or fresh tarragon would be rather nice.

We started out by having the warm potatoes on the side, but soon Lundulph tipped the potatoes into the soup and it combined very nicely too. It was surprisingly filling, but if you want even more protein in the soup, you can add some diced ham.

The only thing is that it isn't as quick to make as tarator, but it's a nice alternative.

13 May 2019

Cauliflower Bang Bang

This is a recipe I found ages ago and put on my to do list, but it kept slipping down and down and it got to the point where I forgot about it. Then I bought a lot of cauliflower and wondered what to do with it, so I dug out this recipe and got going. The interesting bit is that I got to try out tapioca flour, I've never used that before.

IMG_5784

Ingredients

The cauliflower
1 large head cauliflower
1.2 dl ground almonds
1.2 dl tapioca flour
2 tbsp coconut flour
½ tsp paprika
½ tsp salt
2.4 dl sparkling water
lettuce and salad onions for serving

The Bang Bang sauce
1 dl + 1 tsp white wine vinegar
0.6 dl water
2 cloves of garlic
0.6 dl clear honey
2 tsp pepper flakes
¼ cayenne pepper
1.8 dl mayonnaise
0.6 dl Sriracha chilli sauce

Method

  1. Pre-heat the oven to 220 °C. Trim and wash the cauliflower, then divide into florets.
  2. In a large bowl, mix together the ground almonds, tapioca and coconut flours, paprika, salt and sparkling water to form a batter.
  3. Add the cauliflower pieces into the batter and stir around until all the pieces are well coated.
  4. Spread the cauliflower onto a baking tray in a single layer and bake for 25 minutes, making sure to flip after half the time.
  5. In a small saucepan, mix together all ingredients except the mayonnaise and sriracha, then place on medium heat and bring to a boil
  6. Leave to simmer for 5 - 10 minutes to thicken the sauce, then remove and leave to cool down.
  7. Once the sauce has cooled down, stir in the mayonnaise and sriracha.
  8. Shred the lettuce and the spring onion, but keep separate. Place the lettuce on a large plate. Drizzle the bang bang sauce over the cauliflower, then spread it on top of the lettuce. Sprinkle the spring onion over the cauliflower and serve.

To be honest, reading the recipe made it seem good, but the result didn't correspond to my expectations at all. Maybe the proportions of things were wrong somehow or the amount of cooking wasn't enough, I'm not sure, but the cauliflower wasn't crispy at all and the batter itself was almost lost in the baking, it was barely noticeable. I also got the impression that the sriracha sauce would be quite hot, but it wasn't and both Lundulph and I ended up adding a lot of extra to give this dish a kick. It was edible, but it's not something I'll do again. Just roasting cauliflower with some oil and Vegeta salt is so much nicer and easier to do.

6 May 2019

Asparagus Soup

IMG_5783

When I made the fabulous Osterpinze, there were a lot of recipes for asparagus soup on the various Austrian websites I read. It seems very much like I experienced in Bavaria, there is almost an asparagus obsession in Spring. I read through several recipes, but I didn't like them much and instead settled on this English one as it seemed to have the highest asparagus content of them all and made my way to the local Pick Your Own, to get some fresh asparagus.

Ingredients

350 g trimmed and washed green asparagus
3 shallots
2 cloves of garlic
100 g baby spinach
700 ml vegetable stock - stock cube is fine
25 g butter
1 tsp vegetable oil
Salt and pepper

Method

  1. Keep about 5 cm of the asparagus tips and cut up the rest of the stalks into chunks.
  2. Peel and finely slice the shallots, peel the garlic and wash the spinach if required.
  3. Make the stock.
  4. Heat up the butter and oil in a deep frying pan until it bubbles, then fry the asparagus tips for a few minutes to soften and give them colour and set them aside.
  5. In the same pan, add the asparagus stalks and shallots and press in the garlic, then fry for 5 - 10 minutes while stirring occasionally.
  6. Add the spinach and stir through to wilt it, then add the stock and bring to the boil.
  7. Remove from the heat and blitz with a stick blender. Season to taste and add more water if it's too thick.
  8. Serve the soup with a couple of asparagus tips on top.

This was a very nice soup, but really not enough for a meal in itself, a starter at best. I think it would also benefit from toasted pine kernels as a topping and possibly a drop or two of Tabasco sauce. The amount of asparagus can easily be increased and possibly a potato or two would provide more bulk. A nice fancy sourdough bread would probably be good too, like the original recipe recommends.

28 April 2019

Rhubarb Compote

The second thing I made with the first rhubarb harvest this year is a rhubarb compote from Delia Smith. The simplicity of the recipe is what drew me to it. Lundulph had asked for a spicy chutney, but I didn't have all the ingredients, so that'll have to wait until I've been grocery shopping.

IMG_5778

Ingredients

700 g rhubarb stalks, trimmed and washed
75 g caster sugar

Method

  1. Pre-heat the oven to 180 °C (160 ° fan).
  2. Cut the rhubarbs into 2 cm chunks and arrange on a shallow baking tray.
  3. Sprinkle the sugar evenly over them and bake for 30 minutes until they are soft.
  4. Remove from the oven and let cool down somewhat, then carefully transfer to a glass jar and let cool down completely and store in the fridge.

This turns out very nice, sweet and sour at the same time. Possibly I baked the rhubarbs a bit too long, because they wouldn't keep their shape in the transfer to the jar. I think combined with custard, mascarpone or pannacotta would be really tasty and sprinkled with some crushed up ginger nut biscuits for a bit of crunch.

I made two batches because I had rhubarbs to spare and the 1 litre jar I transferred the compote to was only half-full after the first batch. As it happened, I couldn't quite fit everything into the jar, so had a few of the chunks with some raspberry liqueur jelly for dessert. Yummy!

I think a little maple syrup would also be quite nice to drizzle over the rhubarb before serving.

Rhubarb Cordial

About 3 weeks ago, I managed to sprain my ankle and have been almost entirely housebound since. Very annoying as I had the days before Easter off in order to do some serious gardening. One thing I did do yesterday was to very carefully make my way up the garden to the rhubarb patch to harvest them, as they have gone rather large once more and I think in fact we have a record on the thickness of the stems this year. I pulled out the thickest ones, and left the really thin ones to hopefully grow fatter in the coming weeks.

IMG_5777

But what to do with them? There are still bags of last year's harvest in the freezer. Then I remembered that my good friend Dr Cutie makes rhubarb cordial, which is extremely popular in her family. So a quick search on the internet gave a few relatively easy recipes and I opted for the one that had the highest reader rating. The original is here (in Swedish). Otherwise they all followed the same principle, the difference was in the quantities of each ingredient.

IMG_5782

Ingredients

1 kg rhubarb stalks, trimmed and washed
3 dl water
4 dl granulated sugar per litre of juice

Method

  1. Slice the rhubarbs into ½ cm wide chunks.
  2. Place in a large saucepan and add the water.
  3. Put the lid on, bring to the boil, then turn down and let simmer until the rhubarb pieces disintegrate. Stir occasionally to make sure everything cooks evenly.
  4. Place two layers of cheese cloth over a colander, then place the colander over a large bowl, so that it is well away from the bottom.
  5. Carefully transfer the cooked rhubarb into the cheese cloth and leave to filter through for an hour or so. At the end, twist the cheese cloth around the rhubarb to squeeze out as much of the liquid as possible.
  6. Pre-heat the oven to its highest setting (mine goes to 200 °C on fan). Measure up the amount of juice and calculate how much sugar you will need. Prepare clean glass bottles for the juice, then place in the oven to heat up and sterilise for 20 minutes at least.
  7. Place the juice in a saucepan and bring to the boil, then stir in the sugar and bring to the boil again and simmer until the sugar has dissolved, this shouldn't take too long. Switch off the heat and skim off the foam on the surface.
  8. Transfer the cordial to a jug and carefully pour into the hot bottles. Leave to cool, then close and keep in the fridge.
  9. The cordial can be frozen as well.

From the comments under the recipe, dilute 1/6 or 1/7. I had 1.1 kg of rhubarb this time, so I increased the amount of water for boiling to correspond. After draining the stalks, I ended up with 9 dl of juice, so the amount of sugar I used was 3.6 dl, again in proportion to the given amounts. This filled up 2 half-litre bottles.

IMG_5780

I also didn't have the heart to throw away the remaining stalks, but scraped off as much as I could from the cheese cloths and put in a plastic bag in the freezer, this came to 360 g and will be used as cake filling.

18 April 2019

Osterpinze - Austrian Easter Bread

I have a lovely colleague, who is originally from Austria and last year she told me about the traditional Easter bread they have. She compared it to a brioche, but less sweet. Looking at photos it is clearly related to the Bulgarian kozunak, however, it seems it's eaten as a breakfast bread with savoury things like ham and hard-boiled eggs.

IMG_5761

So this year, I asked her about recipes she'd used and she sent me one she said was rather good. But then she also mentioned a version with white wine, and I was way too intrigued and asked for that recipe as well. It is here in German. I've lately started to refresh my German language skills in a more targeted way and this recipe adds the extra dimension of having several new words, so will be a learning experience as well.

Ingredients

Makes 6

250 ml white wine
2 tsp anise seeds
1 dl dark rum
1 dl raisins
250 g milk
140 g granulated sugar
2 x 7 g sachets quick yeast
1 kg strong white flour
2 large eggs
5 large egg yolks
6 g salt
zest from a large lemon
250 g soft unsalted butter
6 tsp nib sugar
1 egg for egg wash

Method

  1. Heat up the white wine and stir in the anise seeds, then set aside for 3 h, then sieve to remove the seeds.
  2. Heat up the rum and add the raisins, then set aside for 2 h.
  3. Sift the flour.
  4. In a large glass bowl make the poolish/pre-ferment: warm up the milk with 30 g of the sugar to about 30 °C and stir in the yeast until it's fully dissolved.
  5. Add 80 g of the flour and stir to get a batter. Cover and let stand for 20 minutes in a warm place. It should increase in size significantly, so make sure to use a large bowl.
  6. In the bowl of the dough mixing machine, whisk together the 2 large eggs, the egg yolks, salt, lemon zest and remaining sugar for about 5 minutes until it goes really pale and fluffy.
  7. Add the remaining flour, the poolish/pre-ferment, white wine, raisins along with the rum they were soaked in and mix to a soft dough.
  8. Check that the gluten has developed with the window pane test and then add the butter in chunks and get it well incorporated into the dough.
  9. Remove the mixing attachments from the dough, cover the bowl and leave to rise for an hour.
  10. Break the egg for the egg wash and whisk it to mix the yolk and white. Leave to stand and keep stirring every now and then.
  11. Turn out the dough, fold and turn it a few times, then let rise for a further hour.
  12. Line three baking sheets with baking paper and have the nib sugar ready in a small bowl along with the egg wash.
  13. Weigh the dough, then divide into 6 equal parts.
  14. Shape each into a round tight ball. Place two on each baking sheet on a diagonal, so that they don't stick together as they proof, and brush well with the egg wash and leave to proof for about 30 minutes.
  15. Pre-heat the oven to 170 °C.
  16. Just before baking each sheet, brush a second time with the egg wash, then sprinkle with nib sugar and using scissors, make three cuts centred in the middle.
  17. Bake each sheet for 30 minutes until the breads go golden brown.
  18. Remove from the oven and transfer to a wire rack to cool down completely.

I made these the day before Lundulph's family arrived for Easter. I served them to our guests as a mid-morning snack and they were wonderfully fluffy and disappeared alarmingly quickly. It was lighter than the kozunak and stayed soft surprisingly long - it was fine for breakfast 2 days after baking and only on day 3 did we need to whizz it in the microwave to restore the fluffiness and softness. I had intended to save one and give to my colleague as thanks for sharing this recipe, but to be honest, these breads were just way too tasty to want to share.

A note on the white wine - the recipe didn't really specify what to use, so I thought a dessert wine would be best and I bought a fancy muscat wine, Domaine Tailhades Muscat St Jean de Minervois. It was pricey and came in a half bottle and I had to hide it from Lundulph, who fancied using it as a dessert wine. I have some left over, so I'll make a single batch of the Osterpinze once we get through all the chocolate we acquired.

A note on the anise seed - I wasn't able to get hold of these, but I had star anise in my spice collection, so I used that instead, but it was barely noticeable, I didn't use enough of it. I quite like the anise flavour, so I would have preferred to have more of it. The original recipe stated that 2 tsp of anise seed would be around 2 g, so I measured the star anise to 2 g. Perhaps this was the issue, I should just have put in a few more of the beautiful stars.

I don't know if it was down to the wine or something else, I was very surprised that these breads stayed soft for so long. Hopefully it wasn't just pot luck.

17 April 2019

Student Potato Salad

Three years ago, I revived a long-forgotten recipe from my student days, when a quick potato salad was called for and it turned out to be a hit and when I now searched through my recipes, it seems I forgot to write it up at the time. I don't have any photos, potato salad tends not to look too pretty.

Ingredients

300 ml full fat crème fraîche
4 - 5 tbsp full fat mayonnaise
1 small Granny Smith apple
⅓ dl brined caper buds
2 tbsp flat leaf parsley
1 tsp salt
1 tsp ground pepper
1 kg waxy potatoes

Method

  1. Wash and cut the parsley finely.
  2. Peel and dice the apple.
  3. Drain the capers well, then chop finely.
  4. Mix together the crème fraîche, mayonnaise, apple, capers, parsley, salt and pepper in a large bowl. Cover and chill in the fridge.
  5. Peel and dice the potatoes, then boil until soft.
  6. When the potatoes are ready, transfer to a colander and rinse under cold water for a minute, then shake off excess water as much as possible.
  7. Take the bowl out of the fridge and slowly stir in the warm potatoes into the mixture. It should go a bit soft, but shouldn't melt.
  8. It's nice when it's still a bit warm, so if it's made well in advance, it should be brought to room temperature and carefully warmed up in the microwave oven.

It's very important that the apple is of Granny Smith type - it should add some sourness as well as a little hint of sweetness. It must also be small or there'll be too much crunch in the salad. I made the mistake of doubling the recipe and putting in 3 small apples and Lundulph thought that it was partially frozen.

Also important the warming up - straight from the fridge, it will be grainy and the flavours will be dulled and it'll taste like some sort of wallpaper glue (I'm guessing).

I also think fresh tarragon or dill would work instead of parsley as well.

25 March 2019

Crepes for Waffle Day

Once again it is time for pancakes on Waffle Day. Last year I did some research and found this recipe, which seemed rather good. I even started a post about it. But last year was very unproductive, I've started crocheting and knitting again, after many years' break and as with the early years of the food blog, it has become a bit of an obsession, especially when there are so many beautiful yarns to buy.

2019-03-25_crepes

I've decided to try and do more cooking again and I thought I'd go back to last year's recipe. But I couldn't find it, because the post never got finished. So another search and I found another recipe, which also seemed rather good. Plus I wanted to try out my new crepe making tool, which I got for Christmas.

I originally thought that I should halve it, since it's just the two of us. The recipe didn't mention the number of pancakes it would give and last year, I froze the remaining pancakes for future desserts, which worked very well. So here is the full recipe in metric:

Ingredients
Makes 14, at diameter of 20 cm

3 dl semi-skimmed milk
3 large eggs
30 ml oil
3 tbsp granulated sugar
½ tsp salt
115 g plain flour

oil for frying

Method

  1. Place all ingredients in a large bowl and quickly whizz with a hand blender to get a very thin batter, almost like water.
  2. Leave to stand for at least 20 minutes, preferably longer, like overnight.
  3. Heat up a flat frying pan of about 20 cm inner diameter to medium-high heat and brush with a little oil.
  4. When it has heated up fully, stir through the batter and pour ½ dl into the pan, then swirl around to get the batter to spread across the whole pan. If you have a crepe making tool, this is when it should be used to spread the batter quickly and evenly.
  5. It shouldn't take too long for the crepe surface to go dry and then using a spatula, loosen carefully around the edges.
  6. By now the edges will have started to go brown a bit, so carefully lift the edge, slide the spatula under and turn the crepe over.
  7. Let fry on the second side for 10 - 15 seconds, then remove onto a large plate. If the pan looks dry, brush with a little oil again, stir through the batter and repeat the procedure with the next crepe.

As it turned out, in my "greed", I'd picked a crepe making tool that was a bit too large for my frying pan, so I couldn't use it and had to swirl to spread the batter. Still the crepes turned out reasonably thin and delicate, no toughness anywhere and I only tore a couple as I rushed to insert the spatula under them for the turning.

Sadly I can't remember my thoughts last year when I made the first recipe now, but this second one was good and easy. I will try to make them with butter next time, I think that will add a richer flavour. I'll see if I can find a smaller crepe making tool, so I can get the crepes really nice and thin.

I have no comment from Lundulph, but he happily put away 5 of the crepes, two savoury ones, with lovely Hungarian salami and baked beans, and for dessert, two with marshmallow fluff, milk chocolate crumbs and desiccated coconut and one with fig jam. I had two, though I probably should have stopped after the first one, it was surprisingly filling. The remaining seven crepes are now folded and frozen.

What I can say is that the batter turned out so thin, I was worried it wouldn't work at all, but it did!

16 February 2019

Coffee Masala Cake once again

It's time for Brother-in-Law Roger's birthday once more and I was asked to make a cake.

IMG_5726

I had originally planed to bake one for my younger niece Falbala, but she put in a killer shift at her work place on her birthday and spent most of the next day sleeping, so I didn't. I'd planned a really elaborate cake for her, and I'll have to make it at some point. But as I had to make a cake for Roger, I decided to try and stick to the same theme as Falbala's cake, just simplify it, since I had to make it during the working week.

Thus came about the idea of making a cake sponge which was coffee flavoured and almost black to be covered with lovely white chocolate, a bit like a latte in cake form basically. And I had a coffee cake recipe which needed to be sorted out. Noting that I found the recipe and made it back in 2008, I've come a long way since and learned loads about baking and there is absolutely no surprise at all on why this failed at the time. But it also meant I couldn't use the full recipe for Roger's cake.

Instead I did what I usually do and google and go for the pretty picture or a baker that I can trust. This time it was Mary Berry's easy chocolate cake. With modifications to incorporate the coffee masala elements.

Ingredients

some butter and flour for preparing the cake tin
1 tsp ground cloves
1 tsp ground mace or nutmeg
½ tsp ground ginger
2 tbsp instant coffee
110 g plain flour
3 tsp baking powder
115 g unsalted butter at room temperature
115 g dark muscovado sugar
1 dl golden syrup
2 large eggs
25 g cocoa powder

Method

  1. Place the spices and the instant coffee in a mortar and pestle and grind down as finely as possible.
  2. Butter and dust a 20 cm cake tin with flour. Pre-heat the oven to 160 °C fan.
  3. Sift together the flour and baking powder.
  4. Put all ingredients together and beat with an electric whisk for a couple of minutes until well combined and homogeneous.
  5. Transfer the batter into the cake tin and level out with a spatula or a spoon. Make a shallow well in the middle to prevent it from bulging into a volcano.
  6. Bake for an hour until a skewer stuck in the middle of it comes out dry.
  7. Remove from the oven and let stand for 5 minutes before turning out onto a drying rack and allow to cool down completely.
  8. Slice in two just before decorating, so it doesn't dry out.

Filling

221 g white chocolate
98 g double cream at 47.5% fat

Method

  1. Chop the white chocolate finely and carefully melt in the microwave in 10 second intervals and stirring between each.
  2. Scald the cream, then pour into the chocolate mixture and stir well, then leave to set for about an hour or for 30 minutes in the fridge to speed things up.
  3. Use some of this ganache to spread a 1 cm thick layer between the two parts of the cake sponge.
  4. Use the remaining ganache as a crumb layer to cover the whole cake and stop any crumbs coming through to the glazing.
  5. Place the cake onto a roasting rack, which is on top of a baking tray.

Glaze

200 g white chocolate
1 tsp of Mycryo freeze-dried cocoa butter
100 g double cream at 47.5% fat
white chocolate buttons

Method

  1. Chop the chocolate finely, place in a plastic bowl and melt in the microwave in 10 second intervals and stir between each burst.
  2. Check the chocolate temperature, it should be between 40 and 45 °C.
  3. Keep stirring carefully and measure the temperature until it has reached 33 - 34 °C. Stir in the Mycryo to temper the chocolate.
  4. Scald the cream, then let it cool down to 33 - 34 ° as well, before stirring into the tempered chocolate.
  5. As soon as the tempered ganache has come together, pour it over the cake and make sure it runs smoothly over the sides and covers the whole cake.
  6. Leave on the rack to set completely, then carefully prize off the rack and transfer to the display plate.
  7. If the edge still isn't smooth, cover with a row of small white chocolate buttons.

IMG_5729

The cake sponge tasted quite strongly of coffee, not sweet at all, but combined with the white chocolate, this balanced quite well and the whole cake disappeared quite quickly, Roger grabbed the last piece for his drive home.

20 January 2019

Warm Salad With Brussels Sprouts and Curly Kale

IMG_5720

For decades now, my Mum has been subscribing to a ladies' weekly magazine. And for as long as she has been doing that, I've loved to do the crossword section. But since I met Lundulph and got interested in cooking again, I've also become quite partial to the food section too and as it happens, both of these are in the middle of the magazine, so that they can be torn out and saved. My Mum save these for me and whenever we visit Sweden, we bring back batches of these.

This year, I asked my Dad to scan some of the recipes, rather than dragging home a bundle of paper and I think this is the way forward, because I'm a lot more likely to try some of these out, like this warm salad with Brussels sprouts. It really jumped out at me because Lundulph always complains about Brussels sprouts. He does eat them once per year for Christmas dinner. He says it's like taking a regular sized cabbage and shrinking it to the size of a walnut, so the flavour is too intense for him. I disagree, regular cabbage tastes quite differently to Brussels sprouts and to date, I've not come across any member of the cabbage family that I don't like.

I made this salad to go with green masala chicken and steamed potatoes.

Ingredients
Serves 4

250 g Brussels sprouts, trimmed and washed
250 g curly kale, thick stalk removed and washed
1 dl walnuts
2 - 3 tbsp butter
1 large clove of garlic
2 tbsp honey
salt ½ dl dried cranberries

Method

  1. Quarter the Brussels sprouts and shred the curly kale coarsely. Peel the garlic and roughly chop the walnuts.
  2. Heat up the butter in a deep pan, then press in the garlic and sauté the Brussels sprouts for 5 - 6 minutes until the go soft.
  3. Add the curly kale, salt and honey and stir through. Fry for a few more minutes to soften the curly kale a little.
  4. Add the walnuts and cranberries, stir in to mix and remove from the heat. Serve immediately, before the kale goes soggy.

When I read the recipe, it seemed really good. When I was making it, I started having doubts, but it turned out rather nice. I had set honey and I ended up cooking everything longer than I should have and the kale went a bit soggy and limp. I think the runny honey can't be replaced here, as it needs to spread evenly across the salad and the set honey just stayed in a big lump. But there is a trick - heat up the set honey in the microwave to make it more fluid.

Lundulph thought it had too much butter in it, so I might do 50-50 butter and oil next time, though I thought it was nice. Possibly I might reduce the amount of honey a bit, as the cranberries turned out to be sweetened as well and it was perhaps a bit on the sweet side overall. Lundulph wasn't too keen on the walnuts either. I didn't mind, but I might swap for pine kernels, they tend to be a bit more savoury in flavour.

So overall, I was quite pleased with this salad.