25 December 2007

Christmas Ham

It is finally Christmas Day and this year I've made traditional Swedish Christmas Ham.

I ordered it from the butcher's a couple of weeks ago - a cured but uncooked piece of ham - about 4 kg and with all the fatty crackling still on and tied with a string net.

There are two ways to cook it - roast or boil and I opted for boiling, as it'll take out some of the saltiness.

It needs a thorough rinsing with cold water, then pat dry with kitchen towels. Place in a deep enough pot, add a couple of carrots and an onion cut in large chunks, along with a couple of bay leaves and around 25 allspice corns. Though having a sniff at them, they can be replaced by regular pepper corns.

Top up with water to cover the ham, stick a meat thermometer into the thickest part and bring to the boil. Turn down to low heat and leave to boil for about 3.5 hours (generally 1 h per kg ham), the middle of the ham needs to reach at least 73 degrees. Take of the heat when the temperature has been reached, it'll continue to rise for another couple of degrees before going down again.

Leave to cool, then take out and remove the crackling, it should come off quite easily. If you want, cut it up and deep fry to get it crunchy. I binned it, it was very slimy I thought.

I did this yesterday. I saved the stock too. Generally it can be made into what the Swedes call "dopp i grytan" and translates literally into "dip in the cauldron" - and you have a special bread (vörtbröd) to dip in. This bread has lots of spices and raisins in it, making it sweet and it should have a nice contrast to the salty ham stock. I've saved the stock, but won't do the dip this year as I didn't have time to do the bread. Still, it might be nice to freeze in portions for cooking .

Finally this morning, I did the topping of the ham:

2 egg yolks
5 tbsp Dijon fine mustard
1 tbsp honey
4 tsp cornflour
bread crumbs
whole cloves

The yolks, mustard, honey and cornflour are mixed well and brushed generously onto the ham. Then I coated with the bread crumbs and baked for 20 minutes on gas mark 6 (200 degrees C), just to get the bread crumbs golden brown.

The ham is served cold generally. I haven't tasted it yest, as dinner's an hour away, but it looks and smells very nice.

Just before serving, it can be decorated with the whole cloves.


According to what I've managed to find out, the ham should be big enough to last through every meal between Christmas and New Year.

The alternative is roasting which is what my Mum normally does and she uses the roasting bags, to keep it nice and moist. However, the roasted ham tends to be saltier. Again it should be roasted at gas mark 6 (200 degrees C) with a meat thermometer and is ready when it hits 73 degrees. And the decorating procedure is the same.

Merry Christmas
God Jul
Весела Коледа

Additional: Well, Christmas dinner is over and I must say the ham was very nice and tender. And we ate quite a lot of it already, the rest will be for sandwiches later tonight, probably with the potato bread I made yesterday.

24 December 2007

Potato bread

Today I also baked potato bread. This is another recipe from Anne's Food and her contribution to the Daring Bakers, and given how tasty they turned out, I'll try and join them.

As Anne, I used my kitchen assistant machine and boy was the dough sticky - I used a combination of sunflower seed oil and flour to be able to work it. And my Mother-in-law's numerous muffin tins.

Also I didn't have wholemeal flour, so used granary instead. And I left the potatoes to boil over and had to top up the liquid with some tap water. And I still have not succeeded in finding fresh yeast, so used my quick yeast that I use for my bread machine.

The dough rose ever so well, I had to push it down twice during the first 2 hour rise phase. And I got to use up most of the 4 egg yolks I had left over from the glue icing I made yesterday for the gingerbread house.

All I can say is YUMMY!

Gingerbread House 2007

This year we had a proper whole day of Christmas preparations - I got a new book on making gingerbread houses and the nieces got to select a design. Wisely they chose the "basic house", which turned out to be a lot more complicated than anything I've ever done before.

But we made the patterns from cardboard, the girls rolled the dough and cut out the pieces. We did make the larger parts thicker and had to bake them for 20 minutes. Also I forgot one of the house sides and we had to make it once we were half way through putting the house together. Besides the glue icing was quite runny, so we had to support the bits while it was drying.

We didn't really wait long enough before beginning the decorations and I think that contributed to the house going way crooked.


Still, we all had lots of fun and ate far too much coloured icing. I'm particularly proud of the spruces the kids made from ice cream cones.

22 December 2007

Bird of 2007

Ever since Lundulph and I moved together, we've had a different bird for our romantic Christmas dinner for two.

Our first Christmas we had goose as per old English tradition. I bought a frozen one, it cost £20. Thawed it and followed Delia Smith's recipe, despite the gut feeling we both had that it wouldn't work - even after I'd managed to hunt down the Armagnac that was required. I made Lundulph do the actual stuffing, it seemed too iffy for me. We didn't tie the goose either - it stretched out in the oven and we struggled to get it out in the end. And from the rather big bird that we put in, what came out was more of a pigeon size - during the roasting we'd gathered up about 2.5 pints of goose fat.

Don't remember much of what goose flesh tastes like. But the stuffing was a traumatic experience and since then I have severe doubts about Delia's capabilities as a cook. The only good thing that came out of this is discovering that goose fat is the ultimate thing for roast potatoes. Luckily Sainsbury's sell that in cans and I buy one every year for Christmas. And it's picking up in popularity too, it's easier to find these days.

Over the years, we've had turkey as is tradition today, chicken and guinea fowl last year. And so I present the bird of 2007:

Pheasant

This is what we settled on last minute two weeks ago, after discussing other game birds and their status in the UK in terms of how threatened they are. It's also from my new thing of going to the butcher's. And it seems that pheasant is en vogue this year, they had loads. I also ordered a cured uncooked ham for Christmas Day.

A quick search on pheasant recipes of the roasted type didn't result in anything inspiring, so I defaulted to look at Delia's website, where two recipes seemed interesting - "roast pheasant with chestnut stuffing and port and chestnut sauce" and "pheasant roasted in butter muslin". I couldn't decide on which of the two, so picked bits from both and invented as I went along.

Ingredients

1 small pheasant plucked and cleaned
3 rashers of unsmoked streaky bacon
1 fresh bay leaf
3 sprigs fresh thyme
salt and pepper
1 knob of butter, about 20 g
1 tsp plain flour for the roasting bag

Stuffing

3 shallots
2 rashers of unsmoked streaky bacon
10 g butter
110 g roasted and peeled chestnuts, chopped
1 handful of roasted and coarsely ground pine nuts
75 g dried cranberries
1 tbsp chopped fresh parsley
2 tsp fresh thyme
0.25 tsp ground mace
salt and pepper
2 fresh bay leaves


Sauce

juices from the pheasant
2 tbsp plain flour
2 dl sweet Madeira
375 ml Oxo chicken stock
90 g roasted and peeled chestnuts, quartered

Method
  1. As Delia recommends, I wiped the bird with kitchen towels, also the cavity, there was some blood that came out, when I unwrapped the pheasant. Also it seemed to smell a bit funny, so I had some doubts.
  2. Then I gave it a good massage on the breast to loosen the skin, just like Fanny Cradock. This was a rather surreal experience, but I managed to slide my hand entirely under the skin in the end. So I stuffed the bacon rashes along the breast under the skin.
  3. For the stuffing, I peeled and diced the shallots, diced the bacon and fried them in the butter for a few minutes and left to cool.
  4. Once the shallots and bacon were cool, I added the chestnuts, pine nuts, cranberries, parsley and thyme and seasoned with salt and pepper and stirred well.
  5. Then I bruised the two bay leaves, but not too much so they'd come apart. I stuffed one in the cavity, then half filled with the stuffing mixture, then the second bay leaf, then as much stuffing as would go in. And to be on the safe side, I tied the legs and tail together.
  6. I then put a tsp of plain flour in my roasting bag and shook it about, this was recommended on the packaging.
  7. I placed the pheasant in the bag, seasoned with salt and pepper, placed a bay leaf and 3 sprigs of thyme on it, and a knob of butter on top, tied it in and put in the oven (preheated at gas mark 7 (220 degrees C) on the lowest shelf. I used a roasting tray for this, but without the grid.

  8. I had some stuffing left over, so I put it in a shallow oven safe dish and put it the oven as well.


For the roast potatoes, I peeled and cut the potatoes in chunks, as they were quite big. Then I boiled them for 7-8 minutes, drained the water, and shook them around in the pot with the lid on. This rips up the surface of the potatoes and is the bit that'll soak up fat and become crispy, so it's a vital step. I put a deep roasting tin onto the hob (make sure it can take it!) and poured out most of the goose fat of the tin and heated up. Once it was hot, I transferred the potatoes to the tin and rolled them around to get them coated with fat, then put on the top shelf of my combined grill and oven. I've never had good experiences using it as an oven before, but on maximum 8 it did the trick. I took out the potatoes a couple of times during the roasting and basted with the goose fat and also turned them around a bit.

  1. I completely forgot to time the pheasant, I think it was in for about 40 minutes by the time I decided it was ready and took it out. I cut the top of the roasting bag and took out the bird, put the roasting grid back onto the roasting tray and put the bird on that and back in the oven to give it a bit more colour.
  2. I cut a small hole in one of the bottom corners of the roasting bag and poured out the juices into my non-stick wok pan and put it to boil.
  3. I put in one tbsp of plain flour and stirred in, then as soon as it got thick I added the Madeira. Sadly it went rather lumpy and mostly it stuck to the whisk, so I slowly added a second tbsp to make up for it.
  4. I added the stock, still stirring and wondering if I should sieve it or not. Decided against it in the end and added the chestnuts and left to simmer for a few minutes.
In addition I also steamed Chantenay carrots and broccoli.

All in all, I must say, it turned out rather well, the pheasant was very tasty, not at all extreme in any way, so I'm guessing it was a young bird. It wasn't dry either, thanks to all the bacon and the roasting bag. The cranberries were a bit too sweet, especially combined with the sweet Madeira sauce, but the flavours mixed rather well together.

As accompaniment we had a Californian Zinfandel from 2005, which worked quite nicely.

Due to all other things we still had to do, and general lack of imagination, I bought a ready made chilled dessert, which was very nice - some sort of chocolate pudding with gooey chocolate sauce and it came in small ceramic ramekins. I microwaved them to get the sauce bubbly and served with clotted cream ice cream. Yummy!

Lundulph was so hungry, he tucked in before taking a photo.

Right, now back to the kitchen to mix up some dough for the gingerbread house, that's tomorrow's project and this year the nieces have selected a new and complicated design.

21 December 2007

Finally!

Last week, after many years of consideration, I've bought myself an asparagus kettle and tonight I tried it out.


I still managed to over-cook the asparagus a bit, but still it was very nice. The kettle consists of a narrow, but tall pot with a wire basket. The idea is to place the asparagus standing up in the basket, with the tips above the water edge. That way, both the stems and the tips should be ready at the same time.

This I worked out and will try next time, as I left the basket in the pot while bringing the water to boil and then dropped the asparagus in and it went through the holes on the sides. What I should have done is to place the asparagus stems in the basket, place the basket in the pot and measure up water to be below the tips. Then take the basket out, bring the water to boil and put the basket back in for 3 - 4 minutes, depending on how thick the stems are.


I quite like to dip the asparagus in Hollandaise sauce, but I didn't have any today, so improvised the following, based on what we'd had at Fred & Ginger's some time ago.

Ingredients

4 tbsp pine nuts
3 tbsp olive oil
3 tbsp balsamic vinegar
1 tsp salt
1 tsp pepper
1 tbsp finely chopped parsley
1.5 tbsp dried mint


Method
  1. I roasted the pine nuts in a dry pan for a couple of minutes, stirring vigorously to avoid burning them.
  2. As soon as sizzling noises started and the pine nuts looked sweaty, I transferred them to the mortar and pestle and ground them very coarsley - a couple of minutes, then I got tired.
  3. In a bowl, I mixed all the ingredients, at which point the asparagus was ready.
Not as tasty as Fred and Ginger's, but quite nice on the whole. And since I started cooking Indian food, I always keep chopped parsley in the freezer. Note to self, get fresh mint for chopping and freezing.

16 December 2007

Roasted Lamb Rack with an aromatic crumb crust


Yesterday we had Lundulph's parents over for the day and spent most of it Christmas shopping. Lundulph's Dad and Lundulph himself like lamb a lot, so I thought I'd make a roast. But then I came across this recipe from Waitrose and it just looked too delicious to ignore.

I've also started going to our local butcher's, which is very exciting, so got the lamb rack from there - I asked for one of 600 g as per the recipe, and the butcher did comply, I explained how I was planing to cook it and he started preparing it, confirming that what I wanted was a French cut. He also cut the rack in two and put it so the ribs crossed and tied it with a string and said I could put some filling inbetween. But the rack was rather small - 7 ribs all in all. So I still bought another two from Waitrose - theirs are a lot smaller and all fat was trimmed off. They also cost more than twice as much as the rack from the butcher's.

So I doubled the crumb mixture also was in a bit of a rush and didn't get it mixed through very well. I covered all the lamb racks and left in the fridge while we were at the shops. That was also "chef's tip" on the recipe card.

Finally the timings for roasting were not right the recipe said 35 - 45 minutes and the Waitrose rack packets said 15 - 25 minutes. I started with the butcher's rack first as it was bigger and roasted it for 15 minutes, then put in the Waitrose racks as well and roasted for another 20 minutes. I checked with a thermometer - the racks had reached 55 degrees C. I left them in for another 15 minutes, then switched off the oven while we were having our starter.

Still when I served the lamb, the chops were nicely pink. Throughout the roasting, there were the most wonderful smells coming out from the kitchen. And despite that the crust hadn't been mixed up well, it was ever so tasty.

Along with the lamb I made rosemary and garlic potato wedges, which also went down a treat.

I used waxy salad potatoes and cut in wedges. Then I steamed them for about 7 minutes. In the mean time, I poured grapeseed oil in a pan and pressed three cloves of garlic into it and also chopped some fresh rosemary and mixed in. When the potatoes were done, I transferred them carefully into the pan and stirred them in to get them coated with the oil, then baked for 40 minutes, stirring a bit half way through. I left them in the oven while the lamb was roasting.

For greens I steamed some broccoli.

During carving, though, the crust fell off, sadly. Not sure how they did it on the recipe photo.

6 December 2007

December once more

It might seem that I've not done anything for a while and partly it's true, but I did bake the other day, a tad too early for St Lucia, but I had a hankering for the lovely saffron buns and it was the first Advent Sunday.

This is the same recipe I used last year. Once again I used too much flour and the dough was too hard. Also Lundulph was making a curry at the same time and had opened all windows to get the steam out, so it may have been a bit too cold for the dough to rise as well.

At the time of kneading and rolling I noticed that it was very tough and kept pulling back, so the little buns were difficult to make.

Also I'd forgotten to buy eggs for glazing, I always do that when the dough doesn't contain eggs itself. So I had in the back of my mind that apricot jam could be used. Funnily enough I had some apricot jam at home, since I used some for the dammsugare.


As you can see it looks OK-ish, the buns were very glittery when I took them out of the oven and are quite sticky to touch.

But mainly I really need to make a softer dough, possibly add a bit more sugar. The buns should be good hot and cold and these are only good hot. Too hard to eat cold.

I'm beginning to rationalise things a bit like my Mum too, as I couldn't be bothered with making the small buns and did two wreaths (using up a packet of marzipan I bought some weeks ago by mistake) and a plait.

It all freezes very well though, we'll be having these well into February next year, I bet.

28 November 2007

Rich Tea Biscuit Dessert

Finally Lundulph and I managed to get our acts together and have a dinner party. I've been wanting to do this for ages, but there have been so many other things to sort out. Tonight was Bulgarian night and I had made Shopska salad for starter. This is a fairly regular salad with tomatoes, cucumber and lettuce with grated feta cheese on top. I added roast peppers and radishes to that. Traditionally it should have onions and coarsely chopped parsley. This is not really suitable for the season, but I couldn't think of a more Wintery starter.

The main course was my moussaka, made in the small colourful terracotta pots. That went down very well indeed.

And for dessert, I made the following dessert, which I don't remember the original name of.

Ingredients

250 g strawberry jam
1 packet of rich tea biscuits (Marie type) of 300 g

Method
  1. If not already smooth, put the jam in a deep container and blend until completely smooth. It should be slightly runny.
  2. Tear off a piece of aluminium foil, large enough to wrap the packet of biscuits completely and place on the work surface.
  3. Take out all the biscuits, discarding any broken ones.
  4. With a knife or spatula, spread a little jam on one side of a biscuit and place somewhere on the aluminium foil. The layer should be half the thickness of the biscuit itself, don't be stingy.
  5. Take another biscuit and spread jam on one side as before, then place with the dry side on top of the previous biscuit.
  6. Repeat with the rest of the packet, save one biscuit. Note that after you've stacked about 10 of them, the tower will be a bit unstable, so I suggest you start on a new stack.
  7. Now comes the sticky part. Take each stack and lay down one next to the other, so that a long sausage forms. Place the last dry biscuit at the end that has jam on it, then quickly rinse your hands and roll up the aluminium foil, making sure the biscuits stay in place and close to each other. There may be need to give the whole thing a squeeze at the ends, then also make sure to roll it between your fingers to make the jam go back between the biscuits, as it'll run down one side once you start putting it together.
  8. Put standing up in the fridge overnight.
  9. When ready to serve, unroll the aluminium foil and with a sharp large knife cut through at an angle to get stripey slices.
  10. I served with dairy ice cream and it worked rather nicely.

This holds rather well for days. The dry biscuits will soak up quite a bit of the jam and the whole thing should become fairly solid and easy to cut. Of course other jams will work just as well, but they should be of a strong colour so that the stripes come out.

11 November 2007

Ruby Wedding

Well, the preparations of the previous days culminated in a big party yesterday and it went on well into the night and today.

I managed to get a snap of the table before too many guests had arrived.

Party Preparations 4


The Friday was the last day for preparations and was entirely dedicated to the pièce de résistance, a Swedish smörgåstårta or sandwich cake. This is the standard Swedish party food and is very good when a large number of people are invited. It's fairly easy to make and looks very impressive. Everyone has their own recipe, the following one is one that my Mum has developed over the years and I don't think I've changed it that much. Also it represents what I most like about my Mum's recipes - you can stop at some point and it's ready, or you can continue to add things to it to turn it into a different dish. In fact it epitomises this concept.

I made two - one larger one for the meat eaters and one smaller one for the vegetarians. I also ended up with some of the creamy stuff to spare, it would have been enough for two large cakes.

Ingredients

Creamy stuff

500 g canned sliced carrots
500 g canned garden peas
1.5 l strained Greek yoghurt
1 l crème fraîche
0.5 l extra thick double cream
400 g mayonnaise
salt and finely ground pepper
50 g fresh chives or finely chopped leek
25 g fresh dill

Cake base

4 x 800 g sliced white bread loaves

Decoration (suggestions)

smoked salmon
ready to eat king prawns
thinly sliced salami
thinly sliced ham
lettuce leaves
thinly sliced cheese
olives
Swedish meatballs
hard boiled eggs
cucumber
peppers of various bright colours
lemon
fresh dill

Method
  1. Open the carrots and peas and leave to drain well.
  2. Whip the cream, ignoring that it says it's not for whipping on the packet, it works just fine, but be careful not to over-do it, very easily done.
  3. Combine the yogurt, crème fraîche, the whipped cream and the mayonnaise. Add salt and pepper to taste.
  4. Set aside one third of this mixture and put in the fridge.
  5. Cut the chives and dill with scissors into the creamy mixture.
  6. Chop the carrots to pieces of approximately the same size as the peas.
  7. Add carrots and peas into the creamy mixture and stir in well and leave for an hour to allow the flavours to blend.
  8. In the mean time, if you don't have a cake board, cover a large chopping board with aluminium foil and sello tape it on the back. Make sure to have the matt side up.
  9. Now, take two slices of bread at a time and with a sharp knife, cut off the crusts, as close as possible.
  10. Lay out one layer of bread on the cake board, so there are about 3 cm on either side to spare. The slices should be close together, any gaps should be filled with suitably cut pieces of bread.
  11. Take some of the carrot and pea cream and spread on top as evenly as possible, making sure to cover up to the edges.
  12. Lay a second layer of bread on top, making sure that the edges do not coincide with the ones of the bottom row or the cake may split.


  13. Cover with another layer of the carrot and pea cream. Repeat with another layer of bread and cream and finish with a fourth layer of bread.
  14. Now take out the smooth cream from the fridge and cover the top layer of bread fairly generously and also cover the sides, to hide the layers of bread. Make sure to have a little left over from the smooth cream. Wipe off any spillage along the edges, this is where the matt side of the aluminium foil is handy, as it won't be as obvious as if wiping the shiny side.

  15. At this point it should be put in the fridge for a few hours, preferably over night.
  16. The next day, take out the cake and inspect it, to make sure that parts of the cream haven't been absorbed to the extent that the bread is visible. If this is the case, use the left over to touch it up. Also this is the state it should be transported in, if necessary, again the extra smooth cream can be used for repairs at the destination.
  17. Decorate as close to the beginning of the party as possible, particularly if there is no fridge to store the cake in. And here it's entirely your imagination that sets the limits. Here is what I did yesterday afternoon for the party, but every time it's different.


You may possibly recognise the creamy stuff from before, it's pretty much the recipe for white sauce, but with some yoghurt added as well, to make it a bit lighter. In fact, all of the ingredients can be "light" or "diet" varieties, apart from the yoghurt, which must be full fat and strained, or it'll be too runny and the bread will go soggy.

As for the peas and carrots, in Sweden you can get them ready mixed in cans, with the carrots suitably diced, but I couldn't find any, so had do get them separate. Again, draining is vital. But you can use other things instead, like canned diced mushrooms or diced cooked ham. In addition to adding interest in flavour and texture, they serve the purpose of preventing the cake sinking in at places, should the bread soak up the cream at different rates.

Also what struck me the other night is that if you add mushrooms and ham and boiled potatoes (all diced) to the creamy mixture, you'll pretty much end up with a Russian salad, as it is done in Bulgaria.

I was lucky in that the cakes hadn't sunk in anywhere and didn't need much repairing after the transport, so the leftover smooth cream went in a bowl to be used as a dip.

Party Preparations 3

On Thursday I had a bit of a rest night, in that all I made was a large number of kisses, this time also with walnut halves. I think they were the main hit of all my dishes at the party, so difficult to stop eating them.

This time I followed my comments on the original blog entry and used 1 part egg whites with 2 parts icing suger per weight, but this didn't work out well at all, in fact the mixture went runnier than it was originally. I tried to compensate by adding a couple of table spoons corn starch, but it made no difference to the consistency. So piping was also difficult and I put fairly small blobs on each nut half. Baking went fine, but the meringues went beige coloured, I suspect because of the corn starch. So further experimentation is in order. Either way, the kisses disappeared very quickly.

Party Preparations 2


On the Wednesday, I made pizza rolls. This is the same principle as with the cinnamon buns, but is done on a pizza instead. I made the pizza base in the bread machine and I made two lots - one with meat and one without.

Sadly the first lot was way too soft and the rolling was quite tricky and cutting the twirls was even more so and messy too. For the second lot I used a very generous amount of additional flour and worked a bit better, but I took too long to do the whole process and it went soggy and just as messy. Once in the oven though, things sorted themselves out. Next time I think I'll try the much stiffer wholemeal base instead, it should make things a lot simpler.

So the trick is to make the tomato sauce very very think. I used 2 cans of tomatoes and drained them, to speed up things a bit. The onions were chopped very finely and I also sliced some canned mushrooms and added to the sauce, again well drained. The cooker was quite orange from all the spluttering, but the sauce was as thick as a paste.

Then I rolled the dough into a rectangle and spread the paste apart from a 10 cm wide strip along one of the longer sides, which would end up as the outer edge of the roll. For the meaty pizza I cut pepperoni into small pieces and added some capers before rolling it and slicing. Each twirl was then placed in fairy cake paper forms, decorated with a slice of jalapeno, an olive and a thin piece of parmesan and baked at gas mark 6 (220 degrees C) until it got a nice colour. For the vegetarian ones, I used sweet corn and pickled roasted pepper strips, but with the same decoration. They didn't look as pretty as I'd hoped for, but worked quite well and were very moorish. On the whole, I should also have cut the mushrooms smaller too. And the paper forms were not very good either - they soaked up a lot of grease, some of it orange tinged from the tomato sauce and it didn't look nice at all. Perhaps I'll try without them next time.

Party Preparations 1

It may appear as we haven't eaten this month, but in fact, I've been so busy cooking this past week, that I haven't had time to update the blog. That and the possibility that Lundulph's Mum might have a peek and spoil some of the surprise. Lundulph's parents celebrated their 40th wedding anniversary this week-end and so a party was called for, a party with lots of food. I made a very precise schedule, which I managed to follow just as precisely.

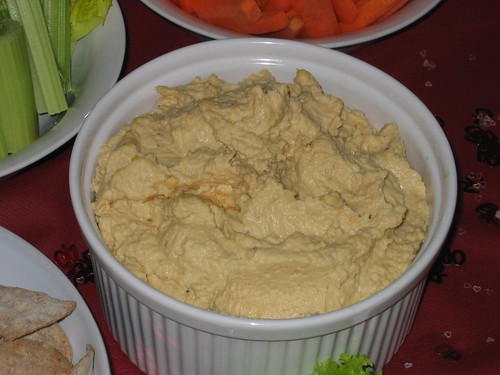
On the Tuesday, I made hummus and chicken liver paté, having never made either before. But I'd planned on trying the hummus ages ago and had a jar of tahini in the larder in preparation. The recipe is one that I'd written down on a small piece of paper, so have no idea where I got it from. As an aside, I have done this for many years and have a large collection of post-it notes and shopping receipts with recipes scribbled down on the back.

Ingredients

2 x 400 g cans chick peas
2 large cloves of garlic
3 tbsp tahini (sesame paste)
2 tbsp olive oil
2 tbsp lemon juice
salt and pepper to taste

Method

  1. Put the chick peas and 120 ml of their liquid in a blender along with the rest of the ingredients and blend until smooth.

IMG_3076_small

That's all there's to it. On the whole, I think I used a bit too much tahini and not enough olive oil, it felt a bit dry. Also it's a good idea to leave the hummus over night, to allow the flavours to develop. Very nice to dip, that's for sure.

The second thing I made that evening was chicken liver paté, mainly inspired by Fred & Ginger who had made some for us the other week. I had a recipe from Waitrose from ages ago, which seemed simple enough.

Ingredients
25 g butter
400 g chicken livers
1 medium clove of garlic
1 large fresh sprig of rosemary
150 ml double cream
50 ml sweet white wine (optional)
salt and pepper to taste

Method
  1. Trim the livers and cut into smaller chunks. Peel the garlic and wash the sprig of rosemary.
  2. Heat the butter in a large frying pan and fry the livers for 5 - 8 minutes, press in the garlic and add the whole sprig of rosemary and stir around occasionally to get the livers evenly cooked.
  3. Turn off the heat and leave to rest for 5 more minutes, then remove the sprig of rosemary.
  4. Scrape the contents of the pan into a food processor and start blending. Pour in the double cream and the white wine.
  5. When the paté is completely smooth, season with salt and pepper.
  6. Transfer into the serving dish, cover with cling film and make sure it touches the surface of the paté, so that it doesn't discolour, and leave to set for at least 1 h.

The recipe recommends Muscat de Beaumes-de-Venice and unfortunately that's the only thing I forgot to get, so I used a Syrah Rosé instead. Very intrigueing this paté thing, when it was ready in the blender, it had the consistency of chocolate mousse, but tasted of liver. I transferred it to a box and put it in the fridge, hoping that it would go a bit solid at least. It did and it was really good and had the nice smooth texture that you'd expect too and tasted lovely. It went particularly well together with the knäckebröd I made last month.

IMG_3074_small

30 October 2007

Modified Miso Soup

I've been aware of this Japanese speciality for some time and have had in the back of my mind to try it out. Today I did, after researching on the net for a couple of days, having decided on this recipe.

I spent last week getting the ingredients together but was unable to find dashi stock. Looking into it further, apparently dashi stock is made on dried giant kelp and dried bonito flakes. Now as you know, I'm not a big fish fan, so dried bonito flakes did not appeal in the least. But I found that occasionally the dashi stock can be exchanged for chicken stock. Also I had a few vegetables to use up. So here's what I concoted tonight.

Ingredients

200 g shiitake mushrooms
5 Chantenay carrots
1 long red pepper
8 dl water
3 cubes of chicken stock
100 g firm tofu
2 tbsp white miso puree
1.5 tbsp Japanese soy sauce
0.5 red onion

Method
  1. Peel and halve or quarter the mushrooms.
  2. Wash and slice the carrots and pepper.
  3. Bring the water to boil, then add the stock cubes and stir to dissolve.
  4. Add the mushrooms and vegetables. Cover and leave to simmer for a few minutes.
  5. Dice the tofu and add that as well.
  6. Mix the miso puree and the soy sauce in a bowl, then add it to the soup and leave to simmer for 5 - 6 minutes more.
  7. Slice the onion and use for decoration when serving.

I had a little taste of the miso and had a very bad feeling of the soup, but on the contrary it turned out quite delicious. Lundulph had seconds. He also topped up with a few slices of chorizo. I think I'll try adding strips of chicken or pork next time. Now we'll finish off with some lovely ginger cake that we bought from our local farm market on Saturday.

28 October 2007

Knäcke!


Finally after much consideration and sidetracking, I made some research on the topic of knäckebröd and baked some today. This is definitely a part of the Swedish staple diet, one interesting article (in Swedish) talks about the knäckebröd belt that goes through middle Sweden and that it has been a life saver for many during the late harsh Swedish Winters, when other food has run out.
There is also a plethora of recipes on the internet and out of the three I chose to look into, limitations on ingredients combined with the lateness of the Sunday afternoon and it's relation to the opening hours of suitable types of shops, I decided to experiment from the start and combine elements of the three recipes.

Here is the special knobbly pin that's so useful for these. I got it for Christmas last year from my sister Bip.


Ingredients

4 dl lukewarm water
2 tbsp grapeseed oil
1 tsp salt
3 sachets (7 g each) quick yeast
2 tsp coarsely ground fennel seeds
8 dl rye flour
2.5 dl strong white flour

Method
  1. I had whole fennel seeds, so I roasted them for a couple of minutes in a pan over medium heat, stirring constantly, until they released their aroma, then quickly poured them over to my pestle and mortar and crushed them as finely as I could.
  2. I put the water into my dough mixer, along with the fennel seeds, oil and salt.
  3. I also dissolved the yeast in the water, as opposed to mixing it in with the flour as you should do.
  4. Then I started the mixer and added the rye flour and finally the strong flour to form a stiff and non-sticky dough. Stiff in that the machine had trouble kneading it and I had to do the last bit manually to incorporate the last of the flour.
  5. As it has yeast, it needs to rise for about an hour, preferably longer. Cover the mixing bowl with a towel so the dough doesn't dry out. One recipe recommended leaving the dough in the fridge overnight for a really slow rise.
  6. The amount should give 18 - 20 cakes the size of a small plate. Roll out very thin, about 2 - 3 mm with a regular pin, then either prick the cakes with a fork or better, roll with a special knobbly rolling pin. And be generous with the flour too, it gives a more rustic look and tastes nice too.
  7. Pre-heat the oven to 250 degrees C (gas mark 9). Transfer the cakes to baking tins lined with baking parchment and bake for 7 - 8 minutes on one side only.
  8. Leave to cool on a metal grid so they can dry out and go crispy. They are very nice with butter when still slightly warm too, though.
Because the bread is so dry, it stores well for a very long time. It's also very versatile - it's great with cheese, paté of all kinds, not to mention with fish. But also good with just butter or with jam. We went to our local farm shop yesterday and bought a number of interesting chutneys and relishes, so I rather suspect it will be nice to dip with.

While I waited for the dough to rise, I found some inspiration from this blog. I'll definitely try out the recipes there, for now I just used my new Halloween cookie cutters.

I made some mistakes though. The very first lot was not baked completely, as I didn't pre-heat the oven long enough. Then as I was rolling, I kept rolling thinner and thinner and some did get burnt. As for the fennel seeds, I bought mine at least 2 years ago for a particular dish and have kept them in an air-tight jar since. So they had definitely lost some of their flavour, but there was enough left in them, to just give a very mild hint in the bread every now and then. Unless you are a big fan of fennel, I'd suggest a reduction in the amount if the seeds are fresh.

24 October 2007

A New Hope

Today Lundulph had a very hard day. We knew it both in advance and I decided to give him a treat and make a new dish from my Thai cook book. This is indeed a beautiful cookbook, the photos are brilliant and even to a person like me that doesn't eat seafood, the seafood dishes look nice. Unfortunately it is an American book and all recipes are given with American measures. In addition, I think they have seriously underestimated some amounts, not to mention cooking times. The translation into metric leaves a lot to be desired too. So I end up correcting it and I don't really like to do that the first time I follow a recipe. My Mum can just read a recipe and know what's wrong with it, but I haven't mastered that knack yet. Well, excluding Thai fish sauce, Nam Pla (that sounds like Klingon, hi, hi). The book is very generous with it, I think the number of tablespoons of fish sauce should be halved and the unit should be teaspoons. Then it's just right.

Anyway, enough rambling. Today's recipe is called Guay Teow Raad Naa and is translated as Wide Noodles with Cream Sauce. And below are the measurements I used, not entirely according to the recipe.

Ingredients

Marinade

2 tbsp cornflour
2 large eggs
4 tsp toasted sesame oil
2 tsp finely ground black pepper
2 tbsp Vegeta

Main dish

375 g turkey breast
250 g wide rice noodles
1.5 tbsp toasted sesame oil
3 tbsp Japanese soy sauce
1 tbsp pressed garlic
1 l water
0.5 tsp fish sauce
2 tbsp light brown soft sugar
2 tbsp cornflour dissolved in 3-4 tbsp water
1 small broccoli head
5-6 Chantenay carrots
1 long red pepper
1 dl frozen peas
3 dl diced mushrooms

Method
  1. Mix the ingredients for the marinade. I had some very old finely ground black pepper that I used, the heat and most of it's aroma has gone, so if you're using fresh black pepper, the amount should perhaps be reduced to avoid it dominating the whole dish.
  2. Slice the turkey breast into really thin strips - about half a centimeter thick and across the muscle fibres, so that it soaks up the marinade quicker. Stir in the pieces into the marinade and leave to stand while preparing the other ingredients.
  3. Soak the noodles in hot water for at least 10 minutes until they go soft. The noodles are the ones I bought last Sunday from the Thai market. In their dry form they were translucent and I hoped they would go completely see-through, but instead they went white.
  4. Wash and cut up the broccoli into small florets; wash and slice the carrots and pepper thinly - about a third of a centimeter thick.
  5. Peel and dice the mushrooms if they are fresh, I used ones I'd frozen, so that speeded things up a bit.
  6. Heat up half the toasted sesame oil on medium heat in a wok pan. Add the soy sauce. Drain the noodles and add to the wok. Stir constantly until all the oil has been taken up and the noodles are pale brown. Take out of the pan and place in an oven-proof dish in the oven to keep hot.
  7. Peel the garlic, mix the cornflour with the water.
  8. In the same pan as before, heat up the rest of the oil, press in the garlic and leave to fry for about a minute, then add the water, fish sauce and sugar and stir well.
  9. Add the turkey along with the marinade and bring to the boil. Add the dissolved cornflour and stir constantly. A medium thick sauce should form, if it's too dry, add some more water. Leave to bubble for 5 - 6 minutes.
  10. Add the vegetables and mushrooms and stir in well. Let cook for another 5 - 10 minutes. It'll look like a beige stew, but the vegetables should still be visible with their bright colours.
  11. To serve, place the noodles at the bottom of a bowl and top up with the stew.

Given my mishaps over the last week, I had very low hopes for this, it didn't look anything like the picture in the cookbook, but boy, was it tasty! So I did managed to treat Lundulph to a nice dinner. Will try to get a photo up tomorrow, we were just too hungry to bother with that today.

28.10.2007 update:
Here is what it looked like, not too esthetically pleasing, but very tasty indeed.

23 October 2007

Bangers and Mash

Well, after all the hints Lundulph has been dropping over the past days, I finally made bangers and mash for our Sunday dinner to celebrate the British Sausage Week.


Together with Delia's perfect mashed potatoes. The sausages were some new-fangled thing from Sainsbury's with jalapenos, loads of garlic and lime and turned out to be very tasty.

I also made a potato soup again, this time with leek, but that didn't help much, it didn't taste very nice, though it wasn't as bad as the first one I made a few weeks back.

Then finally I had two cartons of Fläderdryck from from the Swedish shop and thought I'd try to work out the fab dessert we had at Fred & Gingers a couple of months back. I'd never made jelly before, so the whole thing was rather exciting and I wasn't sure what to expect. I certainly didn't expect it to take overnight for the jelly to set. Here's the result:


The fruit is physalis which turned out to have been picked far too early and was quite sour, some rosey Commice pears, which were quite tasty and fragrant and pomegranite. I love pomegranites and when I saw these in the supermarket, I just had to buy them.


And they turned out to be quite sweet too, translucent pale pink. But once in the jelly, their colour was drained into nothingness. The jelly was quite tasteless, so note for the future - use juice concentrate and fruit with more colour and flavour too.

So I seem to be in some sort of inspirational low cooking-wise. But I went to the Rumwong Thai Market in Guildford and got some interesting ingredients that I'll be trying out tomorrow, we haven't had Thai food for ages.

14 October 2007

Salmon pie

Once again, I end up spending most of my Sunday in the kitchen cooking for the whole next week. My life-work balance is off balance at the moment, but some ingredients were left over from today's escapades and I've plans for them later on in the week. But today it was time to do another salmon pie. This time I remembered not to use any salt in the greens, sadly, when I looked back at the recipe, I realised that I'd forgotten all the herbs, so no wonder it didn't taste of much. The difference this time is that I chopped 2 green chillies and put in, but they turned out to be quite mild, so we didn't notice them. Also I only had one packet of puff pastry, so I rolled it enough to wrap it around the salmon and the greens.

Milinki


I've been wanting to do this Bulgarian bread for ages and I had a big box of grated cheese in the fridge which needed using up and so I baked milinki (милинки). They are popular as a snack or for breakfast in Bulgaria. Sadly they need some fine tuning as they were quite far from what my Mum's milinki taste like. Nothing wrong with the ingredients, mind you.

Ingredients

5 dl warm milk (40 - 45 degrees C)
1 tbsp salt
1 tbsp granulated sugar
1 tbsp cider vinegar
3 tbsp grapeseed oil
11 - 13 dl strong white flour
25 g dried yeast or 50 g fresh yeast

150 g margarine + some for greasing the tin
150 g grated cheese, e. g. cheddar
4 eggs

Method
  1. If you are using fresh yeast, dissolve it in the milk. If using dried yeast, mix it in with 10 dl of the flour.
  2. Add the salt, sugar, vinegar and oil to the milk and mix well, then start incorporating the flour a little at the time.
  3. If the dough is too soft, add an additional 1 - 3 dl, it should still be a very soft and sticky dough.
  4. Leave to rise for 30 minutes. In the mean time, grease a deep (5cm) baking tin and melt the margarine.
  5. When the dough is ready, dip your fingers in the melted margarine and shape the dough into small balls, about the size of a small walnut. I found that squeezing the dough between my thumb and index finger worked well, it was all very slippery. Keep dipping your fingers and the dough won't stick. Line them up in the baking tin, quite densly, there shouldn't be any space between the balls.
  6. When the tin is full, cover with the grated cheese. Whisk up the 4 eggs with what's left of the margarine and pour over the cheese. Then leave to rise for another 20 minutes.
  7. Pre-heat the oven at 200 degrees C or gas mark 6, then bake for about 15 - 20 minutes until golden brown. If you've done it right, the milinki will rise almost above the tin.

As you can see in the photo, I left some without cheese for Lundulph, however without the cheese, it's just plain bread. I think traditionally you'd use feta cheese and mix it in the dough. The milinki are quire nice hot with tea and we used to dip them in icing sugar, which sounds very strange, but is quite tasty with the saltiness of the cheese and the sweetness of the sugar combined.

This is the first time I make these and I'm not happy with them one bit, if you look in the photo, the middle is very yellow and didn't bake well, this is a new behaviour from my cooker - it seems to bake only along the edges. Also I need to work faster and make the dough balls smaller, as by the time I'd filled the baking tin, the first ones had already risen to twice their original size. I'll have to watch my Mum when she makes them to work out the secret. The milkinki are good to freeze as well, I recommend cutting them up first, though. Then just reheat in the microwave when needed.

The interesting thing is that the dough can be used to make ordinary bread, or as pizza base or as the Bulgarian mikitsi (микици), which are similar to doughnuts or churros. That's yet another thing my Mum makes regularly and we have it as a treat when we go to visit, it's far too greasy to eat often.

7 October 2007

Something fishy...

Gosh, this past week has gone really fast! And thanks to my cooking last Sunday, we've lasted throughout it. Well, Lundulph was out a couple of evenings too.


Some time ago, Lundulph had had mackerel with paprika aioli and really liked it. So in the hopes of making the same at home, he bought some mackerel fillets. We'd frozen them for future use and defrosted them yesterday. The instructions I had was mackerel fillets with paprika aioli. Now, I didn't have enough garlic to make aioli and wasn't really sure about the paprika part, so this is what I did instead:

Ingredients

Fish

3 mackerel fillets
3 small cloves of garlic
3 tsp grapeseed oil
1 tbsp paprika


Potato salad

800 g waxy potatoes
4 large chestnut musrhooms
1 medium sized red onion
2 tbsp soy sauce
2 tbsp olive oil
black pepper


Method
  1. Make the potato salad first, by dicing the potatoes and steaming them until ready.
  2. In the mean time, peel the mushrooms and slice thinly. Peel and slice the onion thinly as well.
  3. Place mushrooms and onion in a bowl, add 1 tbsp of olive oil and the soy sauce, stir well and leave to marinate.
  4. When the potatoes are ready, set aside to cool a bit. Drain the mushrooms from the marinade. I rinsed them as well, to get some of the colour back, but that washed out too much of the flavour.
  5. Mix the mushrooms with the potatoes in a bowl, add the rest of the olive oil and some black pepper and stir in well.
  6. Preheat the grill at medium.
  7. Lay out the fillets on aluminium foil on the grill pan. Peel the garlic and press it over the fillets and rub in well.
  8. Drizzle one tbsp of grapeseed oil over each fillet and rub in.
  9. Sieve the paprika over the fillets, I used a tea sieve. This helps spread the paprika more evenly and removes lumps.
  10. Bake under the grill for about 3-4 minutes.
Sadly I didn't time the fish and it was a bit over-done and chewy. Also I don't think the freezing-defrosting helped either. On the whole mackerel is a lot fishier tasting than I thought, and I'm not really a fish person. But Lundulph liked it, even if it was far from what he'd eaten at the restaurant. I'll try the paprika aioli next time, I think I need to smother it with garlic to take out some of the fishiness of it.

Our greens were mangetout and broccoli. The broccoli seems to be in season now, as it looked very good, but didn't really work well with the fish and potato salad flavour-wise. The mangetout was better, but since it's well out of season, it was a bit stringy.

30 September 2007

Nibbles

I had some puff pastry left over and thought I'd use it up before it went out of date. I cut up some of it into strips, about 20 cm long and 2 cm wide, then twisted each strip and placed on a baking sheet lined with baking paper. I baked at gas mark 7 until the twirls were golden in colour.


I saved one part of the puff pastry, put some grated cheese in it, folded two of the edges into the middle, then folded along the middle again. I sliced this flat roll into 1 cm wide pieces and placed lying down onto another baking sheet with baking paper.


Both these were very tasty and I recommend they are served fresh before they've had a chance to cool down completely.

Autumn begins

Well, it's once again Sunday and since it has been rather chilly over the last week, I thought it's time for a soup. Also I was in a highly experimental mood and this is the result:


Ingredients

750 g potatoes
5 - 6 carrots
3 small parsnips
1 tbsp honey
2 tbsp dried thyme
3 tbsp grapeseed oil
1 l water
1 tsp vegeta
black pepper
9 Polish kabanosse sausages

Method
  1. Wash, peel and slice the carrots and parsnips.
  2. Place on a tray lined with aluminium foil, add the honey, thyme and oil and mix them round, so the carrots and parsnips get a good coating.
  3. Wash, peel and dice the potatoes, then steam for 10 minutes. Take out about a third of the potatoes and mix in with the carrots and parsnips. Leave the remainder of the potatoes to finish steaming.
  4. Place the tray with the vegetables under a medium-high grill, stirring occasionally, should the vegetables begin to burn.
  5. When the potatoes are ready, move them to a deep pot and blend them, adding the water gradually. At the end, add the vegeta and black pepper.
  6. Slice the kabanosse sausages.
  7. When the other vegetables are ready, add them along with the sausages to the soup and bring to the boil.
This was quite nice and very filling.

25 September 2007

Pan Fried Trout Fillet

Well, when I saw the trout fillets in the shop, I just couldn't resist buying them, even though I'm not really a fish eating person. Not at all in fact. But during our visit to Bulgaria in August, we had freshly caught river trout, pan fried with mashed potatoes, so I thought I'd give it a go.

And it definitely worked. I found this recipe for the trout and it sounded as good as it was simple. I actually made bread crumbs to use for the fish, rather than flour.

I had some spuds left over from last week, so I steamed them to death and made Delia's perfect mashed potatoes. This is the second time I make this recipe and it was once again very delicious, despite that I swapped the crème fraîche with extra thick double cream. I think that this, combined with the potato variety (possibly Vivaldi), that made it rediculously sticky and shape-defying.

I'd bought some runner beans especially for this, but sadly they were way past their best and turned out leathery and tough. What I worked out is that peeling the skins revealed a bright green and creamy innard, so all was not lost.

And once again I couldn't resist getting a couple of boxes of fresh chantrelles, which I just stewed in butter.


All in all a very yummy meal, even if it looks a bit colourless in the photo. This is a definite repeat candidate. It even didn't take too long to do, so quite good for after work as well.

16 September 2007

Beans with chilli and garlic

The other day we went to a nice Italian restaurant and some of the vegetables we had were French beans with chilli and garlic. So I tried it out today, to go with our barbecued lamb and turkey.

I tried it out, I steamed the beans, then sautéd them along with the chopped red chilli and finely sliced garlic. Sadly I used walnut oil for this and it was a mistake, it didn't taste nice at all, though it wasn't completely inedible. I'll try this out with toasted sesame seed oil or butter next time.


This concludes this busy, but highly enjoyable week-end.

Lundulph's Birthday Cake

Well, I was reminded of this type of cake on my holiday at the beginning of August, I'd made it at uni and completely forgotten about it.

This is what it looked like when it was ready for show:


This is what it looked like 5 minutes later:


Vertical stripes! Yay! This is basically a huge swiss roll and when you cut it, you get vertical striped pieces. Here are step by step instructions in photos. Start with the sponge base for the swiss roll (now you see why I made swiss roll the other day - dry run). This cake ended up 33 cm diameter and used up almost 2 swiss roll sponges. Bake the swiss rolls and leave to cool completely. Then cut each sponge into 4 strips:


The fillings I'd chosen were raspberry jam and chocolate mousse. I managed to get hold of seedless raspberry jam and mixed up two satchets of Angel Delight with single cream instead of milk. First I spread a thin layer of raspberry jam, then the Angel Delight:


Actually you could do the whole sponge in one go, I just did it in steps for the instructions. Mind you, it's quite messy, don't be tempted to lick your fingers! Now roll up the first strip.


I used the removable bottom of my large cake tin, as I couldn't find a suitable cake base (not to mention a fancy doily). Then just keep adding to the spiral, here's the cake in the final round:


Note that on the last piece, I cut a wedge edge to form a smooth end. The left over Angel Delight, I piped in to the holes between the sponge strips and leveled out the top. In hindsight, I should have made a carton strip to use as template, because there was too much variation between the strips and I ended up using quite a lot of Angel Delight to level out the top. So I had none left for the sides. What I did was to whip extra thick double cream with some icing sugar. Then mixing in chocolate powder to get the same colour as the Angel Delight. I piped some to cover up the edges.

Also I had the chocolate Swedish horses (Dalahäst). Sadly the dark ones have a white surface here and there - the reason for this is that I stored them in the larder and that is a bit too warm for dark chocolate and this causes the fat to move to the surface of the chocolate, it hadn't gone bad in any way.

I made most of the cake late last night and kept it in the fridge. The sponge soaked up some of the moisture from the jam and Angel delight. I really like moist cakes, I don't care much for the English type, they tend to be so very dry and with all the icing and marzipan on top, they are extremely sweet. But maybe that's a good thing, because you don't eat as much of them. Either way, I'll continue to make moist cakes.

This was great fun making.