30 March 2009

Baking Mojo

I'm happy to say that the baking mojo seems to have returned.

IMG_4170

I had 4 egg yolks left over from the other day when I made the Coffee Masala Cake and the only thing I could think of making was pasta.

I was going to stay well clear of the Cordon Bleu book after last time. I briefly searched on the Internet and right on top was Jamie Oliver's web site. I don't like him much, but skimmed through the article. It said either eggs or egg yolks. So far so good.

The packet of pasta flour (durum wheat flour that is) said whole eggs and less flour per egg.

So I improvised a bit.

Ingredients

4 large egg yolks
160 g pasta flour
approximately 1 dl water

Method
  1. Mix the eggs yolks and the flour with your fingers into a crumbly dough.

  2. Add water, a little at a time, and keep mixing until the dough comes together and is smooth, fairly pliable and a bit sticky

  3. Sprinkle flour on the work surface and knead the dough for 5 - 6 minutes. If the dough keeps sticking, add pinches of flour until it stops sticking.

  4. Cover in cling film and leave to rest for at least 15 minutes.

  5. Divide into 8 pieces. Keeping them in the cling film, take out one at a time and roll as thin as possible on a floured surface, making sure it doesn't stick.
  6. Leave to stand for 10 minutes, then cut to a desired shape and allow to dry a few more minutes.

  7. Store in an air tight box in the fridge or freeze if the pasta won't be used within 24 h.


I made the pasta on Sunday and kept in the fridge overnight. We had it for dinner today and I over-cooked it a bit, while I was fiddling with our usual mixture of tuna, sweet corn, peas, olive oil and crushed chillies.

Not only did it smell like pasta when it was done, it tasted like pasta too, though a bit on the soggy side. I could easily have left it a bit thicker and cut into thinner strips or smaller pieces. I cut tagliatelle of about 1 cm width and various lengths.

IMG_4165

Both the flour packet and the article on Jamie Oliver's web site said to divide into small pieces before rolling, particularly when doing so by hand. Divide and conquer is definitely the way to do it. I didn't even think of trying to roll the whole lot in one go. This is definitely a thing I'd repeat and will then add spinach or tomato puree. I'll also cut into smaller pieces, it'll be easier to handle after it's cooked.

Aromatic Asian Steak

With sweet and sour cucumber salad.

IMG_4168

As I mentioned a few posts ago, I have a large number of recipes that I haven't tried.

I decided to start getting through all the recipe cards I tend to pick up every time I go to Waitrose. I laid my collection on the worktop and asked Lundulph to choose. He picked out two, the first of which is the title of this post.

I wandered down to the butcher on Saturday morning and got a nice piece of sirloin steak. It was just over 1 kg - given the amount of fat on it, I thought this would result in a doubling of the recipe.

To be on the safe side, I trebled the marinade. I had to swap out the lime juice for lemon juice, I had all other ingredients.

I took off most of the fat from the steak and put it out for the foxes. Then I sliced it into three 2 cm thick steaks. I'm not sure how it was supposed to be cut, it wasn't too clear from the photo on the Waitrose web site. I put the pieces to marinate in the morning on Sunday, so they had some 8 h to marinade.

Unfortunately, I made the salad shortly after I'd put the meat to marinade. That was sort of implied in the instructions, but since radishes were involved, they leached red colour everywhere, which is why the salad looks so manky.

I browned the steaks briefly on hot, turning several times every 30 - 40 s or so, then put in the oven along with all the marinade for 11 minutes. The marinade formed a thick sauce that mostly covered the steaks.

I boiled white basmati rice to go with it and we had a nice Georges Duboeuf Fleury from 2006, which, as Lundlulph put it, had passed it's Ribena stage and tasted like proper wine.

Overall, I think I put in too much honey, because the steak was a bit on the sweet side for me. But the whole reminded me of Mrs W's Lamb Kebabs, which I tried out last Summer.

We ate one of the steaks yesterday. One is in the fridge for Wednesday and one is in the freezer for later on in the year.

Lundulph Nostalgia

Rummaging around the freezer a few days ago, I found a packet of fish fingers. These exist in Sweden as well and were the only type of fish I'd eat while at school. The packet in question was purchased on one of the few times Lundulph would come shopping with me and last Friday seemed like a good time to tuck into it.

I bought some Heritage potatoes from Sainsbury's, they were purple and looked rather exciting. This to make mash and for a bit of colour, I had a packet of peas in the freezer too.

IMG_4163

The interesting bit is the mashed potatoes. Despite the heritage ones being floury, i e for roasting, I steamed them along with the couple of waxy Vivaldi ones I had left over from earlier. Pushed all of them through the potato press and realised I didn't have creme fraiche as per Delia's perfect mashed potatoes.

So the way I resolved this was to use butter and home made yogurt.

I had about 1 kg potatoes to which I used 100 g unsalted butter (the only kind I use in my sweet baking escapades these days, thus the only kind in the fridge) and 6 tbsp yogurt, along with salt and ground black pepper. It tasted just as nice as with creme fraiche.

Rather nice and quick dinner, I thought.

28 March 2009

Reduced Shopping Efforts

Well, since I had three disappointing shopping sessions at the beginning of the year, I've now moved on to Sainsbury's online services. And although they aren't as refined as Ocado - don't tell you if anything is out of stock, don't send you a reminder SMS - they have been better. The first two times they were running well early and called to ask if they could deliver some 45 minute before the booked slot. The third and fourth times, they've delivered spot on within the booked slot. So from that point I'm very happy with them.

They seem to be having some stock control issues, in that some of the things I've ordered aren't availble - cornflakes or groundnut oil - cupboard stuff that they shouldn't struggle to hold. Also milk has been a bit of a hit and miss. However as is my habit, I generally tend to re-stock my larder/fridge/freezer well in advance, this hasn't been an issue. Lundulph has commented that Sainsbury's are notorious for lacking stock control also in their shops. I think I agree.

So for now, I'll keep using them, but I do need to refine my routine.

Overall, I am biased towards Sainsbury's though, from all the supermarkets I've tried, they are the ones that have pretty much all of the things I use. Waitrose generally oozes expensive feel to it and also that it doesn't have everything you might need. But maybe it's just that they have a reduced choice of everyting. Marks and Sparks are aiming for the same thing and often when the food is in a corner of the rest of the shop, I always think that's wrong - you shouldn't have food next to clothes and shoes, that just doesn't work for me. ASDA tends to have scary people in it and along with Tesco they seem to aim for the unhealthier foodstuffs, at least that's the impression I have. Morrisons/Safeways used to have quite a few interesting tings to offer, but required a thorough search for them and nowadays the other supermarkets carry these also.

A favourite of mine is Lidl. It too has often strange and scary shoppers, but when it comes to a good selection of biscuits and wafers, I think they're unbeaten. They also have a lot of canned foods and I regularly buy crates of roasted red peppers in vinegar, not to mention pickeld baby cornichons or gherkins. The peppers are great in salads or on pizza and the cornichons are wonderfully tender and also good on pizza as it happens. They also do canned button mushrooms and canned tomatoes, so I generally get crates of them too, along with sweetcorn. We tend to have salad for dinner a couple of times a week and it's very handy to have canned veggies. As I've said before, I think a salad should have at least four vegetables in it and preferably a lot more.

Anyway, I thought I'd post an update on my online grocery shopping experiences.

27 March 2009

Further Baking Badness

I'm in a rut, that's what it must be.

I thought I'd do something fairly simple just to get back on my baking feet so to speak, but no, this is not to be. I guess it's just too much else going on around me that's stressing me out to the point where I can't enjoy baking.

Last night's attempt was at Swedish Moccastrass. They are basically fancy looking shortbread type of biscuits. Overall, I think the dough was correct, but it said that it needed to be piped, and although soft and pliable, piping was not on its list of things to do and I spent about half an hour trying to even bring it down to the nozzle. The butter also started melting in my hands and oozed out of the piping bag. I attempted a remedy by adding 2 tbsp of grapeseed oil, which worked for about 15 flower shaped squirts, then it oozed out of the piping bag as well. I got angry and binned the rest.

The resulting biscuits weren't too tasty, so should up the sugar next time and down the amount of flour perhaps. But to be on the safe side, I've asked my Sister to give me a cake press for my birthday.

I didn't bother taking photos, it wasn't worth it. I'll give this recipe another try at some point, when my baking mojo is back.

24 March 2009

Bad Baking Day

Last Saturday Lundulph went to a concert and I took the opportunity for some baking - I wanted to try out a couple of recipes from my "Things to cook in 2008" list. Yes, 2008, I'm well behind.

Now, first up was focaccia. Actually I'd first experienced the French version Fougasse, from the bakery chain Paul. But it seems that the Italian Focaccia is more popular, when I searched the web. So that's what I set off to make.

As usual, I didn't do too deep research, but picked one of the recipes that came up at the beginning of a google search. The recipe seemed harmless enough, not too detailed, but enough. Sadly I was a bit sloppy and put in all the olive oil into the initial dough, completely ignoring the fact that fat prevents gluten from developing, thus ruining any possibility of success - the glugen needs to develop in order to contain the gasses from the yeast that will give the bread it's structure and texture. Besides, the dough was way too firm, but the recipe said it should be oddly enough.

Anyway, I followed the rest of the instructions, apart from the baking that took twice as long and I also skipped putting a bowl of water at the bottom of the oven - gas ovens tend to have a more moist heat.

IMG_4156

The result smelt like a focaccia and was barely edible. One of the two focaccias burnt too and both were well dry. At this point I had a gut feeling that my next project would also fail.

Project two was a Coffee Masala Cake. I can't remember where I found it - maybe The Daring Bakers or The Fresh Loaf. The name sounded very intriguing and it had cashew nuts on top, and I've never used cashews for sweet dishes, only for korma or as a snack.

The recipe was interesting too - only egg whites and it had both baking powder and baking soda.

I didn't succeed in getting the spice and coffee mixture as frothy as specified in the recipe and I had to add 3 tbsp milk to make it runny enough to whip in the first place. The batter ended up quite thick, but still was OK for a sponge cake. Looking at the photo in the recipe now, that one's a lot runnier. I had some doubts about the amounts for the various spices, but they turned out quite good.

Still, into the oven it went. It rose very nicely, almost threatening to overflow. I added cashews and chocolate chips as instructed after 20 minutes, at which point it had a crust, but was very wobbly indeed. 15 minutes later, it still looked a bit wobbly and I thought I'd put a skewer through it to see how much it had to go. And disaster! As soon as I pulled out the skewer, the cake sank in. I quickly closed the oven door and ran off, I really didn't want to watch that.

A further 15 minutes and the cake was shaped like a bowl and was done. I've still not managed to work out what went wrong. The baking powder and soda were well mixed in with the flour, but I guess only using egg whites makes the sponge a lot more fragile.

IMG_4157

IMG_4158

Lundulph suggested I fill the hole with Angel Delight. But I didn't. Still the cake itself was rather tasty, quite strong on the cloves and not too sweet. I think I'll use caster sugar next time, not granulated. Also I'll reduce the cloves a bit and add more ginger - Lundulph recommended that too.

He had it with fairly thick pouring cream and said that worked out quite nicely.

So for my next project I've picked something a bit easier. But I'll wait a while, last Saturday was very depressing. I need to fine tune the cake and work out how to make focaccia too.

24 February 2009

Fat Tuesday

IMG_4184

This year I finally got the opportunity to make semlor. This is a traditional Swedish pastry to be eaten on Shrove Tuesday. There's no concept of pancake day - Swedes have pancakes every Thursday after their pea soup with mustard and gammon.

But so far Lundulph has always insisted on pancakes for dinner (being a working day). However, this time I succeeded. I made the buns on Sunday night and the filling on Monday. Then did the final assembly this morning in order for them to be as fresh as possible when I took them in to work to tempt my colleagues.

As usual I didn't have too much time to research recipes, but one of the three I came across was from Dagmar of A Cat In The Kitchen. She definitely seems to know what she's talking about and the fact that the buns for the semlor required both yeast and baking soda made things even more interesting.

I followed the recipe to the spot to begin with and just after I put in the 9th (and what I'd decided it would be the last) decilitre of plain flour, I realised that this is a Swedish recipe, where all flours are strong. I'd used UK plain flour which is low in gluten and thus doesn't rise too well.

Ta-dat ta-ta, to the rescue, I threw in another decilitre of super strong flour and of course that pretty much killed the dough. From being nice and soft and just barely sticky, it went all floury and stiff. Yikes! What to do? Add more liquid, about 1 dl of it. It took ages to work it in, even with the machine, the stiff dough just slid over the milk surface and I had to stop it to give it a hand a few times. Once fully incorporated, it was a bit on the runny side, so I added two tablespoons of strong flour which brought it back to almost the original perfect consistency. It was a bit stickier, but I thought let it rise and see how it goes.

This was a good gamble. Barely 45 minutes later the dough had swollen nicely. Now I'd decided to make mini bite-sized semlor and weighed the dough to work out now much each bun should weigh. 60 g seemed good and I got 26 of these dough lumps and had 40 g piece left.

The dough was still a bit too sticky to work into balls the way my Mum has taught me, so I did what I learned in my baking course last year. Cup hand over the piece of dough as if it's a computer mouse. Then gently I made circular movements with only the top parts of my fingers touching the dough. Miraculously it forms into a nice round ball, about the size of a chicken egg.

IMG_4180

Another 45 minutes later an my mini buns had proofed to regular size. Think small grapefruit.

IMG_4181

I've had to throw away a number of eggs lately after using for glazing and decided against wasting yet another one on these. So I brushed them with milk only. This is the way they are in patisseries and cafés in Sweden as well.

Unfortunately I didn't start pre-heating the oven on time and they over-proofed a bit. I baked the first lot at 210 degrees C (the actual temperature of my gas mark 6) for 8 minutes, but they did not look done at all and I kept setting the timer on 3 minutes at a time and checking them. I turned the baking sheet around, as it wasn't baking evenly either. And turned down to gas mark 5, which took the temperature down to 190 degrees C.

Yes, I've invested in an oven thermometer and as it turns out, my oven is way off from what the gas marks allegedly should be.

The second tray I baked in the top oven, which underperforms at the best of times and I had to set it to 7 to get to 210 degrees C. It also works quite differently too, because the buns in it were the most successfully baked ones, I think.

For the last tray, I kept gas mark 5 and 190 degrees C and baked them for 16 minutes, which was perhaps a minute or two too long as they went quite dark on top and barely had colour at the bottom.

IMG_4182

These were left to cool down completely overnight and on Monday morning, I put them in my fancy cake box padded up with kitchen towels to take up any moisture.

In the evening, I cut off small lids from each bun and nipped out the middle carefully. The texture was very nice.

I flipped the Kitchen Assistent machine on its side and put in the blender attachment. I diced 250 g of white marzipan and put in, then 2 tbsp icing sugar and the crumbs. Then heated up 1 dl semi-skimmed milk and poured it in, then whizzed away. Some help was required, but I got the whole lot into a smooth and fairly thick mixture, which I left on the side in room temperature.

This morning, I lined up some of the buns in my big deep baking tin and put about a tablespoon of the marzipan filling into each bun.

I flipped back the Kitchen Assistent onto it's legs again and put in the whisking bowl and whisked 600 ml of double cream with 5 tbsp caster sugar to stiff peaks. I filled my piping bag with it and squeezed out a generous amount to cover the filling and hole of the semlor.

IMG_4183

Then I trimmed each of the lids into a triangle. This is traditional in Sweden and my boss, who's also from Sweden got very upset when we looked up photos of semlor today and there were some Swedish ones with round lids. You've got to get things right, really!

And don't forget sifting icing sugar on top.

Lundulph was in a rush in to work this morning, so didn't have one then, but I just assembled one for him now and he now has a very happy expression on his face. Definitely approved and a repeater.

But with pancakes as a savory main course he said.

They were also very popular amongst my colleagues at work, those who dared to try them. I regret that I didn't bring in more.

A final note on Dagmar's recipe. She says it makes 12 buns, but I got 26 regular sized ones and one smaller one. If I'd made just 12 buns, they would have been gigantic.

16 February 2009

Cheddar!

For Valentine's Day we decided to go away on a mini-break to Exmoor National Park. We used to do this a few years back, but house, mortgage and work kind of tied us down.

So I sneaked out half an hour earlier from work on Thursday in yet another snow blizzard in order to pick up Lundulph and drive off to Somerset. It didn't look good and I'd called the B&B on Monday to find out if we'd be able to get there.

We certainly did get there, later than planned, but not only was it not snowing, it was +8 degrees according to the car.

Our landlords had lit a very nice fire for us, but we were too tired to enjoy it.

We spent the next two days hiking up and down the rolling hills and did some funny walks in the evenings. Not to mention that going away off season means that feeding places are rare and open at awkward hours. We kipped a few pints in the various establishments on Porlock High Street while waiting for at least one to start serving food. Lundulph got his rare steak, still flapping on the plate and I went for the healthy option of veggie burger with chips...

Anyway, on our last day we made a few stops on our way back, one of these being the town of Cheddar to admire the Gorge and also buy some genuine, real, original, the one and only Farmhouse Cheddar.

IMG_4179

The gooseberry and elderflower jam just seemed too intriguing. The Cheddar shop had oak smoked wedges and I have a very spot soft for smoked cheeses. They also had Cheddar rounds aged in caves. They were covered in cheese cloth that had gone black with mould. I bought the smallest size they had and I suspect I'll have to share it with someone, it's way too big for me and Lundulph has an unnatural and inexplicable aversion to cheese.

Speaking of caves, we also went to Wookie Hole and we did that before Cheddar Gorge and that was such a waste of pretty much everything, put me in a bad mood. Not only was it quite far to get to, they had some sort of "Experience" fairground attraction collection for which they had the nerve to charge £15 per person. This gave us a guided tour of 30 minutes with one guide who was lacking in the areas of organisation and pronunciation, so the group ended up wandering too far in and had to retrace our steps and at least I struggled hearing what he was saying (in case he had some interesting things to say). After that we got to walk through the "Fairyland" - artificial islands with fairy statues of various sizes and wind chimes - and through pre-historic earth with a "Neanderthal man" who seemed to be pregnant with a sheep and have his wig on backwards and a selection of plastic dinosaurs desperately in need of a lick of paint. Even the little children failed to bring up enthusiasm and I can't blame them - Jurassic Park is a tough act to follow. The trail then took us around the back of the place where all the skips are kept and into some sort of demo area for making paper, but the chap stationed there didn't seem to be too interested.

There was some sort of cafe to rip you off further before allowing the victims into the nostalgia entertainment arcade. I must say it as an impressive collection of very early one armed bandits - two had Sega written on them, but you had to pay 50 p for 5 old pennies in order to play them.

The maze of mirrors was sort of OK and there was a decent selection of bendy mirrors to make you look funny and finally we reached the exit and the massive shop. This is a lot bigger than I've seen at other places and had the usual tat. At this point Lundulph got fed up and we walked off.

So the lesson learned is don't bother, it's not worth it.

But do go to Cheddar Gorge, it is very pretty, though there were so many people there.

I'll blog further on this when I've opened my cheeses. Must see when Lundulph is out next...

10 February 2009

Banoffi off

Well, my boss laid down the challenge - make a banoffi pie and compete against colleagues with other colleagues tasting and rating.

I've heard of the concept of Banoffi or Banoffee, which apparently is the older spelling. And I think I might have had some a few years back, don't remember really. It's not a dessert I would have tried out, but a challenge is a challenge and when it's one for cooking, I can't really resist.

A quick google hit upon the original recipe from The Hungry Monk.

The lack of experience in banoffi and Lundulph sitting next to me and reading along pointed me in the direction of following this to see what'll happen.

IMG_4122

Besides, boiling unopened cans of condensed milk for hours on end was very novel. I'll have to open one of the unboiled ones to see what normal condensed milk is like. It was quite amazing that after 4 h of boiling and allowing the tins to cool down, would turn into toffee coloured thick cream. I had to work it up a bit to make it pliable enough to spread over the pie crust.

IMG_4123

IMG_4124

I also had to get up early this morning to line with bananas (to stop them from going brown) and cream (to stop it from collapsing). I wisely kept the pie in my car in the cold until it was time for the tasting session.

IMG_4125

Obviously the other 5 contestants had a bit more experience than me, because they didn't use the condensed milk, but made proper toffee, which was a lot sweeter. They all made the pie base from crushed biscuits, one had used ginger biscuits which was rather nice. Another had used Philadelphia cheese in the cream, also quite nice. A third had over-done the toffee and it had partly turned to fudge. Combined with pecans, I think it was the winner.

I came second to last and a lot of the pie was left to take home. We had some after dinner at which point I realised that something had gone badly wrong with my pie crust - it was well salty! Not sure what happened, but no wonder no one liked it.

I also need to get a slightly smaller pie dish too, to avoid making such massive amounts.

The recipe recommended making as many tins of toffee as possible in one go, since it's to boil for so long, might as well do en masse, they store just as well and long after the treatment. So now I have three cans of toffee in the larder. I'm keen to experiment with bits of fudge next time.

Also maybe some lemon zest in the cream would be nice to offset the sweetness.

8 February 2009

Falbala's Third Birthday Party

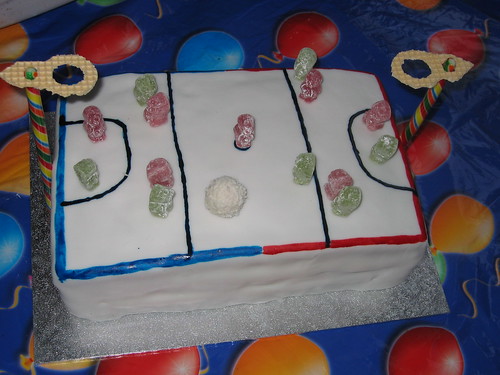
My younger niece, Falbala, was born on New Year's Eve and her favourite sport is netball, so I'd promised to make her a cake in the shape of a netball court for her 10th birthday last year.

Sad circumstances prevented us celebrating her on that day and various other things forced us to put it off up to yesterday. This of course resulted in her getting three separate celebrations. Yesterday's one was with her friends.

So over the past week, I've been preparing her cake. This was also the first time I got to use icing to cover the cake, it's harder than it looks. And as I was putting the cake together, I got alternative ideas on how I could have done it all and skipped the icing completely. Never mind.

I used the same cake base as for Lou's cake, but I made 2.5 times the amount. Also instead of almonds, I used white chocolate bits. This resulted in a big rectangular cake - 17.5 x 28 cm and I baked it for 2 h 20 m. This was a bit too long and I should have stirred the chocolate bits in after pouring the mixture into the cake tin, because they seem to have moved to the edges of the cake and caramelised, rather than remain in their shapes, so the whole cake had a toffee flavour to it. Also because of the over-long cooking time, the crust went quite thick. But keeping the oven on 175 degrees (just over gas mark 3) prevented the cake from burning.

The cake itself was fairly thick and I ended up cutting it into three layers. As a filler, I made the white chocolate ganache I made for the Opera cake last year. And I trebled the dose.

You'll have spotted the white chocolate theme by now. Falbala likes white chocolate a lot. So I spread the ganache generously between the three layers of the cake.

Next was the white icing. They had ready rolled icing, but I suspected it was for a round cake and also would not be sufficient to cover the size I intended to make, so I bought ready icing in a lump of 1 kg. The instructions said dust the surface with a little icing sugar and roll. I did that and the icing sugar was pushed out along the edges and the whole thing was firmly stuck to the work surface. I also noticed that although easy to roll out, it didn't roll evenly like dough. Since it wouldn't come off in one piece, I pulled it all together and laid out baking paper and rolled again on that. This worked a treat and it was very easy to flip over the cake as well. Still, the middle of the icing was a lot thicker than the edges and I couldn't shift it.

As I've mentioned earlier, the kitchen shop in our village has a very good selection of bits for sugar craft and I got red and blue paint to paint the lines of the court on the icing. The proprietress was kind enough to tell me to leave the icing on the cake to dry out a bit before painting, so that the colours won't soak in and bleed into it. Thus I left the cake iced and ready in the fridge overnight and painted it yesterday morning. The colours are very thick and it does say concentrated on the label, so I used the blue to paint the lines, this was difficult because I couldn't rest my arm for support anywhere and the thickness of the paint forced me to keep dipping in it a lot more often than I'd expected. So for the side lines, I dissolved some of the paints in a little water and this worked out nicely, it felt like using water colours.

For the goals, I'd brought thin wafers all the way from Sweden and was about to start working out how to fit them to the rock candy posts, when Lundulph commented that in netball there are no boards behind the hoops, just the hoops themselves. I hadn't worked out the hoop and net bit anyway, so was a bit distressed at this point. I'd had some vague thoughts ages ago about doing something really fancy with caramel, but I'd probably need to be a pro to achieve what I'd thought out. I tried to make a net-like structure from icing, but it wasn't strong enough and in the end skipped the net altogether. I used the wafers to cut out hoops, really quite ugly, but completely edible, which was a major target on this project.

I'd saved some of the white coconut Rafaello sweets for the ball. It turned out to be well bigger than the hoop holes, but never mind.

Then I spotted the bag of jelly babies in the larder. Lundulph had bought these for Christmas because I'd never had these. As luck would have it, there were precisely 7 babies in red and green and they became the players. Unfortunately I had to skewer them onto short pieces of bamboo sticks to make them stand on the cake, that was the only non-edible thing, though I'm sure I would have thought of something else if I'd had the time. Of course the Rafaello ball was about the same size as the jelly babies, looked even sillier.

So there you have it, the netball court cake for Falbala:

IMG_4117

2 February 2009

Pork Vindaloo

This is a recipe from the Fat Free Indian Cookery book by Mridula Baljekar and was chosen by Lundulph for his special fancy dinner this week-end. He's had a nasty cold and I thought I'd cheer him up a bit.

IMG_4114

As it turned out we had to do it on Monday, but the severe weather conditions (for the UK) worked in our favour in that we both stayed home and could start cooking at a decent hour.

So first of all be warned - this dish requires marinating, so at least 2-3 h and preferably overnight.

Ingredients

1 kg boneless leg of pork
4 green cardamom pods
5 large dried medium hot chillies
2.5 cm piece of cinnamon stick
4 cloves
0.5 tsp mustard seeds
0.5 tsp fennel seeds
0.5 tsp black pepper corns
1 tsp crushed very hot chillies (optional)
2 tbsp pureed ginger
5 cloves of garlic
2 tbsp cider vinegar
300 ml medium sweet cider
2 tsp sweet paprika
1 tsp salt
220 g onion
400 ml hot water
1 tsp dark soft brown sugar
1 tsp tamarind paste

Method
  1. Remove all the rind from the pork, along with all visible fat and as much of the sinewy bits as possible, then cut into 3 cm cubes and put in a bowl.
  2. Cut up the dried chillies into smallish pieces. Take out the cardamom seeds from their pods, break up the cinnamon stick, then roast on low heat together with the cloves, the mustard seeds and the black pepper corns and additional crushed chillies for about a minute, stirring constantly. The mustard seeds will start popping and jumping out of the pan. Then set aside on a plate to cool.
  3. Grind the cooled down spices in a spice or coffee mill.
  4. Mix the ground spices with the pureed ginger and press in the garlic, then add the cider vinegar. Stir in well, then pour over the pork and coat it thoroughly and leave to marinate.
  5. Place the pork with its marinade in a non-stick large pan and fry on medium heat until the meat is sealed.
  6. Add the cider, bring to the boil and cover up and leave to cook for 35-40 minutes until the liquid has reduced to resemble thin batter. Stir occasionally.
  7. Take off the lid, increase the heat a bit and let the last of the liquid evaporate - about 3-4 minutes.
  8. Stir in the paprika and the salt, then add the onion and 50 ml of the hot water and cook for a further 4-5 minutes.
  9. Add the rest of the water, the sugar and the tamarind paste, cover again and let simmer for another 10-12 minutes.
  10. Serve with brown basmati rice.

I happened to have dried chillies - they were fresh when I bought them... My mistake was that I cut them too coarsely and the same goes for the cinnamon, so I had trouble grinding them - I spent way too much time pushing them into the coffee grinder (used only for spices!) with a chopstick. No way I'll be doing that next time, I'm sure ready ground spice collection will do fine!

I coated the bits of pork and left for some 20 odd hours to marinate in the fridge. A bad mis-calculation on my part, but things turned out OK in the end.

Lundlulph's verdict was that it had good heat, not too much, so that you could taste the other ingredients, but sufficient enough to slow you down so you can enjoy it. He also thought the pork ended up tasting a bit gamey.

My theory is that the leg was from an old-ish or well exercised pig, either of which is good, implying some sort of decent free-range life.

We had Fetzer Syrah Rose wine with it, to match the strong flavours. I bought a whole crate of it a couple of years ago, it's quite intensely flavoured and was very en vogue for a Summer wine then. It worked out rather nice and we're working our way through a second bottle already. I also had some broccoli, but I forgot to steam it in time, so we skipped it. While finishing off the vindaloo, we had some popadoms with sweet chilli dip.

Seems we'll be spending another day at home tomorrow, the snow's settling in, but not showing any signs of melting.

And an interesting thing about vindaloo - it's originally a Portugese dish - vin originating from the word for vinegar and aloo in this case coming from the word for garlic. Heavily transformed in the hands of the Indian cooks, I think this may well be a repeat recipe. I think it would be nice to try with game meat as well, should work out nicely.

1 February 2009

Ye Olde Recipe Collection

We've been having major renovations in our house for most of January. We're half-way through ( I hope), at least the dirty part should be over. And this week-end I've pushed the dishwasher to it's limits in running everything through to get rid of all the dust the plasterers kindly spread all over our house.

And in wiping my cookery books clean, I came across a big batch of Waitrose recipe cards. Flicking through them briefly, they all seemed so very tasty, so I've decided to work my way through them.

This week-end I'd decide to make something really nice for Lundulph, he's had a cold for a few days and still isn't too well.

But all the cleaning we've been doing (interspersed with a lot of computer games and end of the month accounts work) and me not reading the recipe through properly, we'll be having the special meal tomorrow. I've prepared everything though, so should be just add the bits at the right time.

Tune in tomorrow for Pork Vindaloo.

28 January 2009

Disappointed

In case you haven't noticed, I've not been cooking anything new lately. I have cooked, but only old, quick stuff. Both Lundulph and I are up to our ears in work, with only enough time to get home and eat quickly before it's bedtime.

So from this year on, we decided to try out the delivery services of Ocado. Lundulph reckoned they have the best reputation. I've had a lot of doubts about all that, but an extra hour every Friday of spare time was tempting and I registered on their web site.

Tonight was our third delivery and I've decided to make it our last.

The first round as a big order - having been away for Christmas and my Sister Bip being over for a week, stocks were low, so I thought might as well give it a good go. The delivery was over an hour late, though admittedly it was icy conditions. All our bits were delivered, but they weren't the ones I normally would buy from Sainsbury's. The choice on the Ocado website was surprisingly low. One of the eggs was cracked, the apples were comedy sized - no bigger than golf balls! And they were well beaten up and bruised. The other vegetables didn't look too happy either. I also had a bit of a struggle with the user interface on the web site and got the wrong number of some items. It was nice to get email confirmation with built in calendar reminder, though GMail interpreted it as an invite, not an appointment. There were a few SMSs as well. And the new thing was the free newspaper, great! And a voucher for a free bottle of wine! Yay!

The second round, I'd prepared my shopping list in advance and also worked out how to add several of an item to a shopping list. The shopping arrived and again veg were sad and apples were bruised. So I decided to do the non-bruisable items from Ocado and go and buy salad stuff and fruit from Sainsbury's. I mostly buy the same things every week, so won't take long. The delivery itself was actually on time and all bits were there. Got the wine and the paper and another free wine voucher, sadly for the same type of wine. But still.

Tonight the delivery was 20 minutes late and I only got a call a couple of minutes before the chap arrived. When he did, he only had the 5-6 bags with cupboard things, the one bag with fridge items was not there and he hadn't printed out my shopping list, nor did I get a newspaper, just the wine. So I checked my order, then called the helpline to be placed in a queue for a while. Seems quite a few unhappy customers tonight. The lady who finally answered was very friendly and also called the driver to see if my missing bag was in his van, but turns out not and my only option was to cancel the order. She offered me a complimentary bottle of wine. Hm, no, got two of them already. So I've decided to stop buying from Ocado. Maybe I'm too demanding, but I've built up a routine of our grocery needs and it's hard to break.

So next week I'll try Sainsbury's. If they're as unsatisfactory, I'll have to start shopping again. Fingers crossed!

We were also thinking of getting a veggie box from Abel & Cole, Fred and Ginger have done that and Ginger spoke very warmly about it, but Lundulph wasn't too keen on a diet of turnips until new stuff is available in the Summer, so we're holding off for now. Besides, I don't have the time to come up with inventive things to do, which you need to with a seasonal veggie box. But I'm planning on trying our local pick your own in the Summer, now that's really something!

1 January 2009

Baklava for New Year's Eve

As long as I can remember we've had baklava on New Year's Eve and I have a suspicion that this is a Bulgarian tradition to have this wonderful dessert at this time of the year. This year we celebrated New Year in the UK and I finally got a chance to make this. Sadly New Year didn't quite work out. My Sister Bip came to visit and got a massive allergic reaction to the cat at Lundulph's parents' house and we had to go home and celebrate on our own. Lundulph and the others did try the baklava and said that it tasted as it should.

Ingredients

120 g walnuts
2 dl finely ground breadcrumbs
200 g filo pastry
1.5 tbsp ground cinnamon
100 g unsalted butter
300 g granulated sugar
4 dl water
1 tsp mastic resin nodules (optional)
half a lemon

Method


  1. Coarsely chop the walnuts. Butter an oven-safe dish, about 2.5 - 3 cm deep.
  2. Lay a sheet or two (if very thin) of filo pastry, then sprinkle some of the walnuts, then some breadcrumbs and some cinnamon and another layer of filo pastry.
  3. Continue layering an finish off with two layers of filo pastry.
  4. Melt the butter on medium heat, until it bubbles. In the mean time slice the baklava with a sharp knife. I cut diamond shapes. Set the oven to pre-heat to gas mark 4 (175 degrees C).
  5. Drizzle the hot butter with a spoon along the cuts and also along the edge of the dish. Then bake in the middle of the oven for about 30 minutes, until it goes golden brown.
  6. In the mean time, put the sugar and water in a saucepan and bring to the boil.
  7. I found mastic resin in a Turkish shop, it's not necessary, but adds a nice flavour to the baklava. Place it in a double piece of cheese cloth and tie in tight to a little bag or it'll go sticky and be impossible to remove from the saucepan.
  8. Add the mastic bag and the lemon and leave to simmer for about 30 minutes, it'll be ready shortly after the baklava itself.
  9. At the end of the simmering of the sugar syrup, remove the mastic bag and discard. Fish out the lemon with a couple of large spoons and squeeze it out into the syrup as much as possible. Remove any pips that might have come out.
  10. Pour about three quarters of the syrup over the baklava and leave to soak in. Check after half an hour, if all the syrup has been absorbed, pour over the rest and leave to cool completely.
  11. Cover with greaseproof paper and clingfilm and store in the fridge.

I actually forgot to put the cinnamon between the layers and rescued by cooling the syrup to abut 40 degrees and stirring in all the cinnamon there before pouring it over the baklava. As I said, Lundulph thought it tasted as it should.

The baklava sold in Turkish shops is cut into smaller bite-sized pieces and also tends to be dryer, so can be handled with your fingers. The baklava that I made should be very moist from the syrup, almost swimming in it, so a knife and fork are required to eat. It's very sweet, so don't be tempted to cut into too large pieces.

Happy New Year 2009 to everyone!

Update 03.01.2009:
I finally got to taste my own creation and have the following observations to make. It was not as sweet a my Mum's and discussing this with her, I think adding the leftover syrup might have reduced the sweetness a bit. In addition, from the amount she normally makes (1 kg filo pastry) she'll use 1 kg sugar to 1.2 l water. Reducing to the amounts above, this wouldbe 3.5 dl water.
Another thing was that the syrup had gone quite slimy and I think this may be caused by the lemon flesh that came out when I squeezed it. Instead, the lemon juice shold be squeezed out before putting the lemon into the syrup. Squeeze it straight in, then drop the lemon in as well. This should be done at the very end of the syrup preparation, then just let it come back to boil again and fish out the lemon, shaking off any excess.
Of course these adjustments will have to wait to next year's baklava, because I won't be doing this any time soon, it's much too rich for that.

16 December 2008

Christmas Baking

Last Sunday was once again time for the traditional Christmas baking with the nieces. I made one quantity of gingerbread dough on Saturday morning.

This year we used the old cutters for the house, rather than attempting the complicated contraption we did last year. Lou and her sister were very good and rolled the dough nicely and evenly.

IMG_4105

I tried to explain the difference between sucrose and glucose while we were waiting for it to caramelise in order to glue the bits together, but I don't think I managed to do that very well.

They also decorated it by themselves and did a good job of that too, though I think quite a lot of the icing was eaten right out of the tube, rather than used on the gingerbread house. It's not quite complete yet, Lundulph's Mum will finish it off and the girls will dust with icing sugar. I'm waiting for photos.

IMG_4106

I made a backgammon board. Lou's sister got quite into it when I taught them earlier this year and I thought it would be a fun thing to make. Certainly it won't collapse, even if it gets damp.

IMG_4102

This took most of the day, but I think we all enjoyed ourselves. There was about a third of the dough left and we froze it for later.

Pigeon Stock

Remember the bits to be saved from the whole pigeons?

I put them in my big pressure cooker, along with

1 large onion cut in chunks
4 cloves of garlic, sliced
5 sprigs of lemon thyme
10 juniper berries
1 dl olive oil
salt & pepper
3 l water

I brought everything to the boil (not under pressure) and left it to simmer for a couple of hours while we had our Christmas dinner. Then I let it cool down overnight, strained and froze in half litre measues.

I've never made stock before, so it'll be interesting to see. I do use stock fairly regularly.

13 December 2008

Bird of 2008

IMG_4099

Note the fairly small print - may contain shot. I found one while chopping them up and Lundulph found several during our dinner, possibly ate a few too. I bought 4 birds that were quite a bit smaller than I expected, comparing to the ones hanging around in our garden.

The recipe I decided to go for, after a fairly short research session was this one. Breast of wood pigeon with sweet potato rösti, buttered Savoy cabbage and red wine sauce. Quite a mouthful. It seemed fairly simple to do though and I didn't want to end up tired after a whole day's cooking.

I increased the amounts to what I thought would be 4 portions:

Ingredients

1 large sweet potato
4 tbsp olive oil
salt and pepper

1 small Savoy cabbage
3 l water
salt
40 g butter
10 sage leaves

4 pigeon breasts
3 tbsp olive oil

2 tbsp olive oil
3 cloves of garlic
5 dl red wine
3 bay leaves
5 sprigs lemon thyme
10 juniper berries
salt and pepper

Method
  1. If whole pigeons are used, wash and cut off the legs, wings and back and save for later. Pat the breasts dry with kitchen tissue.

  2. Peel and grate the sweet potato. Then place in a couple of layers of cheese cloth and squeeze out as much excess liquid. Do about a handful at a time, it's easier and gets more liquid out. Then mix with the olive oil, salt and pepper.

  3. Trim the outer leaves of the Savoy cabbage and wash. Cut in four and remove the stalks and shred it. Bring the water and salt to boil and put the shredded cabbage in and boil for 6-8 minutes, then drain.

  4. Place the sweet potato into an oven and hob proof pan and place on the hob on medium heat and fry for 6-8 minutes. Stir occasionally and add more olive oil, if it seems too dry. Pre-heat the oven to gas mark 6 (200 degrees C). Move the pan to the middle of the oven and continue to bake for another 15 minutes.

  5. Heat up the oil and brown the pigeon breasts, then put in a pan and continue baking in the oven.

  6. Add a bit more oil into the pan where the pigeons were browned, press in the garlic and fry for a couple of minutes, then add the remainder of the sauce ingredients and simmer to reduce to half the volume, then strain.

  7. Just before serving, heat up the butter. Then add the sage and fry for about a minute until they start to wilt, then add the cabbage and stir well.


IMG_4100

Now, I've had Rösti in Germany many years ago. It was made of regular potatoes, but I couldn't work out how it all stuck together - just grated potatoes. Same with the sweet potatoes, I couldn't get them to stick together and form a cake, so I gave up and stirred around, it had actually started to burn by the time I did this. Still it wasn't ruined, but turned out quite nice.

The pigeons were interesting to chop up - the original recipe called for breast thinly sliced and should I try this recipe again, I'll definitely try to fillet off the breasts. I ended up over-doing them and they tasted mostly like liver with a bit more texture than actual liver. I should have baked them at lower temperature as well and I probably kept them too long for browning as well.

The cabbage was nice, could have done with a bit more salt. The red wine sauce was very nice indeed. I think pigeon needs another chance, and less baking at lower temperature might give better results.

But I now have a new obsession - work out how to make proper rösti.

For dessert I made mille-feuille, also known as Napoleonbakelse in Sweden. Sadly I forgot to prepare the puff pastry and bought ready rolled one.

I used one packet of puff pastry - 375 g and made the créme mousseline.

Place the rolled out puff pastry on a baking sheet (line with parchment if necessary), prick with a fork, then place in the fridge for 30 minutes or so.

Pre-heat the oven to gas mark 7, 220 degrees C, place a second baking sheet on top of the puff pastry and bake in the middle of the oven for 20 minutes. Then remove the top sheet, turn down the heat to gas mark 3, 170 degrees and bake for further 5 minutes. The second baking sheet prevents the puff pastry from rising high. Once done, take out and leave to cool.

The cream I made turned out very runny, I should probably have put it in the fridge to make it stiffer.

Trim the edges of the puff pastry if necessary, then cut up in strips, about 5 x 10 cm size. Select the flattest nicest looking ones for the top layer.

Dust a plate with cocoa powder, place one puff pasty peace on top, spread some cream (or pipe), place a second puff pastry piece, then another layer of cream and finish with the nice piece of puff pastry.

Dust with icing sugar. Each layer of cream should be at least 1 cm thick.

IMG_4101

Because the cream was so runny, everything squirted out and was mis-shapen. Generally in cafés, only one layer is proper créme mousseline, and the second layer is just whipped cream. This is always an annoyance with my Mum, it should be créme mousseline.

Also, if the pastry keeps its shape once you start eating it, there's something dodgy with it - probably gelatine or something similar. The créme should just be squeezed out between the layers and go all messy on the plate. Which is why I generally don't buy these pastries in cafés, I can't eat them in a dignified way.

8 December 2008

Chocolate Panettone

When I spotted the Chocolate Panettone in Origami Baskets the other week, I had to rejoice - another "cheaty" recipe not involving sourdough and a solution to the problem of not being able to find proper panettone moulds in the shops. Two in one!

And so, I set out to get all ingredients - including the brown wrapping paper!

I followed the amounts on the Wild Yeast Blog as much as I could, but I think I need new scales - the ones I have are getting more and more random. They started off by flicking between all sorts of numbers if the microwave happened to be on at the same time. Actually microwaves do leak loads of nasty waves. But now the scales have started flicking also when the radio is on, or the dish washer/washing machine which are both at the far side of the room. So who knows how accurate I managed to measure things up. The only thing I changed was that I used fresh yeast, now that I know it's readily available from the supermarket, it's just too tempting to use. For the starter dough, I used 12 g and for the final dough 6 g.

As the dough was spinning around in the kneading machine with me beaming over it as long strings formed in the dough, I kept thinking this is gonna be great. Actually most of the dough seemed to be stuck to the walls of the mixer bowl.

While the dough, divided into three balls was resting, I made the baskets. After 30 minutes, the balls had swollen quite a lot and seemed a lot bigger than the ones on Susan's post. I should have made a fourth basket and divided the dough in four. I put the skewers in, at which point Lundulph came in to see what I was up to and gave them a suspicious look.

So, I put the dough into the baskets, then into the oven with a flat Pyrex dish at the bottom of the oven and I kept pouring steaming hot water every now and then into it. And here's where I went wrong. Despite Susan saying explicitly to what stage the dough should be allowed to rise, I went for the 3 h wait and so they went well over the top, by the time I got round to glazing and baking.

IMG_4096

Anyway, I preheated the oven on gas mark 4 and reduced to 3, which is 170 degrees C, slightly lower than the recommended 350 degrees F. 20 minutes later all three looked like they'd barely noticed it getting warm in the oven. I gave them another 30 minutes, still no difference. I moved the rack to the middle and raised to gas mark 5 and I baked them for another 20 odd minutes.

I had also not worked out the hanging contraption, so very quickly I put two chairs back to back and placed our mop and a curtain pole over them and fixed them in with some blutack. Susan is right, the panettones are barely out of the oven and they start sinking in. Besides because of the over-proofing, they didn't really rise much beyond the proofing height.

This took most of the day and I left them to cool overnight.

From above:

IMG_4097

From below:

IMG_4098

Yes, they went messy once I brushed the glaze on. That was a tasty glaze, I had quite a lot left over.

Then the result - perfect panettone texture - very light. Sadly also extremely dry and crumbly, that's the over-baking, along with the burnt crust - it had caramelised.

But this is definitely a keeper recipe, I just need to work out the oven bit.

23 November 2008

A Light Saturday Dinner

I've come to realise that making soup is quite a hit and miss business for me. I do like soup, but I don't seem to have the knack for it and so about 50% of the soups I make are barely edible and on those occasions I end up eating them myself. But the other 50% of them work out pretty well. Last night was a good one. Remember the cabbage I baked the other day? I saved all the liquid I used for boiling the cabbage and used it as follows:

Ingredients

3 tbsp grape seed oil
1 large onion
6 dl cabbage stock
6 dl water
1 tsp vegeta spice mixture
5 medium sized potatoes
2 large carrots
1 yellow pepper
10 okra fingers
2 tbsp dried savory
2 tbsp finely chopped parsley
black pepper

Method
  1. Heat the oil in a deep non-stick saucepan.
  2. Peel and dice the onion and fry in the oil until translucent.
  3. Add the cabbage stock, water and vegeta and bring to the boil on medium-low heat.
  4. Wash and if needed peel the potatoes, then cut into strips and add to the soup.
  5. Wash and peel the carrots and cut in strips and add to the soup.
  6. Wash the pepper and remove the seeds, wash the okra and remove the stalks.
  7. Cut the pepper into strips and the okra into small chunks and add to the soup
  8. Let simmer for another 5 minutes


  9. IMG_4078

    Lundulph had a couple of pork sausages left over from a grilling spree and I put them in as well, to heat them through. This turned out rather tasty. Very quick as well, I used my alligator chopper for the onion, potatoes and carrots, brilliant if you want everything in julienne strips. I think some tomato might have been nice as well, but I couldn't be bothered.

16 November 2008

Panettone Experiment

IMG_4077

Finally, one thing to tick off the things to try out list. I first realised this is something that can be made at home when I read the entry in Wild Yeast. And now that I've been baking so much lately, I felt I was on a roll and started investigating how to go about this. Sadly time doesn't permit to follow Susan's recipe with Italian starter. But while scouring the web for panettone moulds, I came across this fabulous site.

Needless to say, there is no such thing as a panettone mould in the UK. I only found one and it was star shaped and more of a novelty size muffin, than a panettone. Oh, yes, of course, there's the industrial quantity of 12000 (twelve thousand!) disposable ones on a pallet. I would probably need to open up a bakery to be allowed to buy them though.

So, when I found the above fab recipe, not only did it have photos and very good instructions, it also recommended using coffee tins lined with baking parchment. Brilliant! I have only one coffee tin, left over from some 10 years ago, when I got it along with my espresso cooker. As Winnie-the-Pooh would say, it's particularly useful when empty.

The recipe called for three of those tins, but I didn't manage to find two more, so in the end I decided to use my variable size cake tin. So they are a bit on the squarish side. I divided the dough in 4 and in hindsight, that star shaped mould would probably have worked.

An electric whisk and a dough mixer of some sort is essential.

Anyway, let's get to the point. I made a few changes to the recipe as well to make it possible to make it, so to speak.

Ingredients

2.4 dl raisins
1.6 dl dark rum
1 dl lukewarm water
1 dl semi-skimmed milk
0.6 dl fresh yeast or 0.3 dl dry
3 large eggs
1.5 dl caster sugar
1.75 tsp salt
10 dl super strong flour
2.4 dl chopped nuts (I used coarsely ground almonds)
1.2 dl candied orange and lemon peel
100 g unsalted butter at room temperature

Method
  1. On the night before, measure up the raisins and pour the rum over them and leave to stand until needed. There should be very little liquid left after about 20 odd hours.
  2. Place the water and milk in a small saucepan and warm up to about 37-40 degrees, then crumble up the yeast and stir in to dissolve and set aside.
    Whisk together eggs, sugar and salt until light and creamy.
  3. Add the yeast liquid and keep whisking until well incorporated.
  4. Transfer to the dough mixer and start adding flour. It should come together fairly well. Let the mixer knead until the dough has become shiny and gluten develops. A tip from Susan at Wild Yeast is to pinch about a tablespoon sized piece of dough and start stretching it. If it can form a continuous thin membrane with no breaks, then it's done.
  5. Now add the nuts and the candied peel. Drain the raisins (but don't squeeze them out) and add as well and let the mixer knead them in well.
  6. Cut up the butter in to 4-5 chunks and add one at a time. Here the dough will get very greasy on the surface and it'll seem that nothing is happening, but be patient, the machine will do it's job and incorporate it. The dough will start forming strings too, this is lovely gluten that will make it rise.
  7. When all has been incorporated, cover the bowl with a towel and let it rise until double in size. This would be about an hour or so. Make sure the kitchen isn't too hot, or the butter will start melting and may ooze out.
  8. Prepare the baking tin by lining bottom and sides with baking parchment. No need for greasing up anything.
  9. Turn the dough out onto a work surface, no need for additional flour. Divide into 4 parts and roll each out with a rolling pin to a rectangle about 20 by 30 cm and 1 cm thick.
    IMG_4075
  10. From the short side, roll up like a cigar, then bend it into a horse shoe shape and place in the baking tin with the two ends down. Then let proof to double size again. Towards the end of the proofing, pre-heat the oven to gas mark 6 (200 degrees C) and place a pan or a bowl at the bottom shelf and pour some hot water in it. This is particularly important in electrical ovens.
    IMG_4076
  11. Turn down the oven to gas mark 5 (190 degrees C), place a sheet of aluminium foil over the panettones and bake in the middle of the oven. Because there is so much sugar in this dough, it burns easily and the foil will prevent it going black before it has baked through. Check after 20 minutes, if the panettones seem a bit uneven, turn the baking pan around and lower the heat to gas mark 4 (180 degrees C) and leave for another 15-20 minutes.
  12. Take out of the oven and remove from the baking tin as soon as possible, or condensation will form and make the panettones soggy.

The panettones rose well above the edge of the tin, so the trick to getting a high cake like that is to roll it like a cigar and bend into a horse shoe. We had some for breakfast this morning. It was a bit denser than the panettones you get in the shops and could have done with more sugar. I think I cheated a bit on the whisking at the beginning and the fresh yeast I used had been frozen, I'll try again with really fresh one next time. And perhaps the ground almonds might have had something to do with this, they should have been chopped. But I'm proud of my first attempt, it worked quite nicely indeed.

Something I also noticed is that the sides that were facing the middle of the tin didn't bake as dark as the outer ones. Next time I need to think out a more individual way of covering them with the aluminium foil to allow heat to go through inside the tin as well.