31 May 2010

Paris Day 4

Continued from Paris Day 3.

We did take the Eurostar to Paris and on our last day, I had a few more things on my list to tick off before going home.

One was to go to the food market on rue Mouffetard. Not that I had anything in mind that I wanted to buy, but I love to wander around in food markets and this one was really lovely. We arrived fairly early in the morning with the intention of getting breakfast there, but my schedule was busy and we decided against sitting down.

The market is not too big, but had a good variety of shops and I'll definitely go back and spend a bit longer there.

We then rushed off to Poilâne on 8 rue du Cherche-Midi. It's well hidden away, but well worth going to. The tiny shop had several shelves full of their famous signature loaf, a few pretty looking pastries and some other bread in the back. At the entrance I saw other worshippers pressing their noses against the window glass.

IMG_0814

And so I entered into the temple of bread with Lundulph in tow. It smelt wonderful and I wish I could have bought a sample of everything.

But instead, I asked for one of the breads, a pain au chocolat and a chausson aux pommes and weaseled off to the counter and the little basket of punitions, which I knew were there for the customers to try. They are little butter biscuits and punitions mean punishments, the story is shown in this interview with Dorie Greenspan. The bread is sold by the kilo and my loaf came in at just over 2 kg. I was tempted to buy a bag of punitons as well, but decided to leave that for next time as with so many things on this trip already.

The pain au chocolat was a bit on the greasy side and it didn't help that it got a bit squashed by the massive bread in my bag. Lundulph is partial to apple turnovers and that's what he had - a chausson aux pommes, which again was a bit on the greasy side. The one he had at patisserie Paul outside Forum Les Halles was much better.

We had our breakfast sitting in front of Notre Dame, then walked on past it and on to Il Saint-Louis, which I'd also missed in my previous visit. This is a very nice place, beautiful houses and shops and reminded me very much of Gamla Stan in Stockholm on a sunny Summer's day.

I had some vague hopes that Berthillon would have just opened and not have a massive queue outside. Because I wanted to try some of the famous ice creams. Sadly it was closed, so we completed our round of the island and went back to the hotel to pick up our luggage. Next time, the first place to go will be Berthillon, even if I have to queue up for half an hour or so.

Well home, we opened our suitcase to unpack and everything smelt of bread, as I'd put it in there, it was quite heavy to carry.

IMG_0815

I had to have a sit-down after slicing the bread, the best thing would have been to ask them to slice it in the shop, but it would have to last, so I bought it whole. I froze most of it, but we had a few slices in the first few days after coming home and this is indeed a wonderful bread that's definitely worth its reputation.

The crust is thick, sour tasting and crunchy-chewy, while the inner crumb has no sourness to it at all. No extreme holes, but not too dense, it is very good with pretty much anything on it. We've certainly tried it with all the different jams we have, I had it with Leerdamer cheese and chicken liver and wild mushroom paté. Lundulph had it with ham and just plain with butter. It was fantastic and very much worth lugging back home.

And the best thing of all I just found out - there is a Poilâne shop in London, meaning we can get this fabulous bread easier than waiting for our next trip to Paris.

Paris Day 3

Continued from Paris Day 2.

Thus we skipped breakfast on the Monday and had a light lunch at the fabulous Angelina on Rue Rivoli. This has been called the Rolls Royce of Paris tea salons. It was certainly very nice and busy.

I had a gorgeous and bright yellow omelette "Angelina" with ham and mushrooms,

IMG_0788

while Lundulph went for the salmon salad and commented that it would beat the Ladurée salad any day of the week.

IMG_0786

As we were having our salads, all people around us were getting their desserts, so we just couldn't resist. Lundulph decided to try out a classic mille-feuille,

IMG_0790

while I went for the smaller option of a selection of four mini macarons. Lundulph has had mille-feuille before at home and commented that the Angelina one had a denser pastry that wasn't quite to his taste. I thought it looked a bit overcooked, but I think this is done on purpose. The pastry has some bitter tones to it then to offset the sweetness. But the pastry was rather dense and thick and hard to get through, not that there is any graceful way of eating mille-feuille.

Although the menu implied that I could choose the flavours, this wasn't the case, I just got these

IMG_0789

Yes, the red and green one arrived pre-cracked and so it was the first one I ate. And here was the interesting bit - the macarons were cool, not room temperature and seemed to be filled with fresh cream, rather than the more tolerant stuff they use at Ladurée. I can't remember what it tasted like, nor the orange one, which I hoped would have some hints of violet, due to the purple bits stuck to its underside. I then went for the white one, which was pronounced marzipan flavour and finally the brown which was very chocolatey. As it turned out, I'd managed to eat them in reverse order of freshness, as the red and green one was quite soft, whereas the chocolate one was crunchy on the outside, gooey and creamy in the middle, as it's supposed to be. So when it comes to macarons, Ladurée wins.

A lot of other guests were being served with what looked like a ball of yarn. Which apparently is the thing to have at Angelina - a Mont Blanc, which is a ball of cream and meringue covered with spaghetti made of chestnut purée and dusted with icing sugar. Maybe next time.

Drink-wise, Angelina is famous for their hot chocolate, again something to put on our list for our next visit.

I was wondering about the colour of the omelette and it struck me that given the amount of macarons they make, they must have a massive surplus of egg yolk, so I wonder if they don't make their omelettes with only yolks, which would account for the colour. It was extremely tasty.

As our days in Paris progressed, so the temperature rose - starting at 26 when we arrived and hitting 29 on the Monday. A veriable heat wave.

We dressed up to go to our second beautiful restaurant and were quite sweaty by the time we reached the Metro station and it didn't get better underground.

The second restaurant was Mollard Tradition opposite Gare Saint-Lazare. This restaurant specialises in sea food (something I'd missed in my research and a good thing too) and even had a stand outside where they sold all sorts of sea creatures.

We wandered in and were wonderfully surprised - the setting was fabulous. Lots of large mirrors and inbetween beautiful intricate mosaics and little lights. We were shown to a table and asked for our voucher. No irritation, no rushing off or anything and again English speaking staff. What did strike us was the heat - there was no air conditioning there and it was even hotter than outside. Curious for a place that does sea food.

We were served ice cold Campari and some puff pastry nibbles, while we were choosing from our special menu. Lundulph went for the scallop paté,

IMG_0791

while I had to pick the only non-fishy thing on the list - onion soup with Emmental cheese. I wasn't looking forward to this, having got stuck to my seat from the heat already. But it was very nice and very big too. I wisely didn't eat it all. Lundulph quite liked his starter, but said it did have a strong fishy flavour. Actually I'm sure there is variety between the different edible sea creatures, but since I don't eat them, the word "fishy" generally describes them well for me.

Our main course arrived swiftly too; Lundulph had looked up what confit de canard is and had decided to try it out.

IMG_0794

Looking at what he got, it seemed to have been deep fried, rather than gently poached. The potatoes were supposed to be sautéed with mild garlic, but they were definitely deep fried and no garlic had been near them. So on the whole, Lundulph said he basically had chicken and chips.

I opted for the fresh grilled salmon.

IMG_0792

It was well cooked, perhaps a teeny bit too long, but tasted OK. It was placed on a bed of stewed butternut squash and this was a bad mistake - these two should not mix, not in my book. So I had to pick out all the squash. Under that was regular curry sauce, like the stuff you get up North on your chips, nothing special. It worked OK with the salmon though. One more potato would have been nice. But what were they thinking with the butternut?

Then it was time for dessert and coffee and I was quite looking forward to this - we both went for Ile Flottante Crème Anglaise. This has been on my list of things to try for ages.

IMG_0795

And it was delicious and I wish I had space for a second one at the time. Or should have skipped the other dishes and just replaced them with ils flottantes.

IMG_0802

The coffee also arrived on time, along with our desserts. This restaurant was bigger than the previous one, but had a lot more waiters too, so no one was forgotten and no one had to wait for ages.

For our next visit, we'll skip the pre-booking, but just wander in and get the greater choice from their regular menus, I think the totals would work out around the same as what we paid.

What most impressed me was that food was served a lot quicker than in English restaurants and no one came up to us to ask if everything was OK. Lundulph thought there was too short time between starter and main course, then the waiting palaver for our coffee didn't really add to our enjoyment.

There are a few more beautiful restaurants to visit and it'll be easier now that we sort of have worked out the ropes, we'll manage easier.

I've taken home a few culinary pointers that I'll try out as soon as possible.

Our adventure continues in Paris Day 4.

Paris Day 2

Continued from Paris Day 1
On the Sunday we took the metro to Pigalle in order to do the short walk around Montmartre. This bit I'd missed in my previous visit, so it was rather exciting. Aware of what the area around Place Pigalle is like, I was a bit worried, but we started our walk as per the guide book and as worked our way up the hill, the fancier the surroundings became, it's obviously quite a posh area these days. It was lovely, practically no cars at all, mainly due to the fact that a lot of the streets consisted of steps. We passed several bigger streets with street markets on them. We did stick to our route and towards the end we came out to a small open area with a windmill on top of it. This is the famous Moulin de la Galette. Again we were sweaty, dusty and tired, so we decided to finish our walk, then return for a lunch there, it just looked so nice. And it was. Again, the waiters were friendly and spoke English and again I was too hungry to photograph our meal. Lundulph had a small piece of pan fried hake with some sort of saffrony puree and baby vegetables, which he says was the tastiest of all the meals we had in Paris. I had a veal fillet steak with mushroom sauce, which was a bit bigger and very nice tasting. They'd only failed on the green peas - they were dry and crunchy and not nice tasting at all.
For dessert however, we both opted for the pear tart and this was an almost religious experience.
IMG_0773
This was like several desserts combined into one - a pear tart, where the pears had been poached in something red, covered with what can only be described as creme brulée. Then a few fresh fruits, to add a bit of sourness to offset the sugariness of the tart and a small scoop of passion fruit ice cream. The only thing that wasn't good was the tart base - it was too thick and hadn't baked properly.

Another interesting thing was that this was a good example of mise en place, where the fancy looking plate layout had been prepared well in advance. The fruits had been carefully glued to the plate with caramel and the tart itself was stuck on with glucose.

With the food we had a carafe of cold white wine. This corresponded to about two thirds of a regular bottle and a perfect amount for lunch.

We went back to our hotel to have a bit of a rest before our dinner at Bouillon Racine. This is located in the Latin Quarter of the city, very near Musée de Cluny and the Sorbonne. There are actually two restaurants next to each other, possibly used to be one in the past. We walked into the first one, as it had Bouillon Racine written across its windows and doorway. But no, this wasn't the place, we were directed to go next door, where it said Bouillon Chartier. Had I paid attention to the photos from my research, I'd have realised that.

We presented our voucher to the head waiter, who seemed to get very irritated and rushed off. We got ticked off on his list and he showed us a table in what became the English speaking area. He also presented us with a special menu from which we were to choose our dishes, slightly different to the regular menu.

The restaurant was beautiful, but looked a bit faded and worn out. Maybe I'd set my hopes too high. On this evening however, Lundulph and I were possibly at the height of our synchroneity as we chose exactly the same things for all three courses.

Our amuse bouche was white whine kir and olives, which was followed by the rather large starter of game terrine with hazelnuts and onion marmalade.

IMG_0776

This was quite tasty, but fatty and too big for me, so Lundulph ate half of it.

The main course followed on fairly quickly. Too quickly for Lundulph's liking, but very much to mine. Pork shanks in beer sauce and sauerkraut. Yummy! Slow cooked to perfection, collapsing at the lightest touch of the fork.

IMG_0777

The croutons on top were badly misguided as they were actually made of gingerbread, like the one used for making houses for Christmas. So we picked them off. The rest was so good, both Lundulph and I couldn't stop eating, even though we had both reached our stomach capacity.

At this point the restaurant had filled up quite nicely, the head waiter had disappeared and there was only one waiter for the 30 odd tables on the ground floor. In fact he forgot one of the starters for the people sitting next to us.

For dessert, it was crème brûlée and I believe the best one I've ever had.

IMG_0778

It was served at room temperature and was wonderfully smooth and creamy, so I'm wondering if the serving temperature is the reason for this. Definitely something to try out.

We were well stuffed at this point, but we did want some coffee and ended up waiting for it for what felt like an eternity, I'm guessing some 40 - 45 minutes. The lonely waiter was very hard to get hold of, he had so many tables to wait on.

We had planned to go to the glass pyramid at the Louvre to see it lit up, but after this massive meal, the only thing we wanted was to get home and sleep, in the hopes that our stomachs wouldn't burst on the way.

Our adventure continues in Paris Day 3.

Paris Day 1

Well, it's been ages since I wrote, and the reason is that we went to Paris for a long week-end and prior to that, I had to empty the fridge. This exercise is nothing to write about, however Paris is, so this'll be a very long post.

Lundulph had never been to Paris before and last time I went was 11 years ago, so we pretty much repeated my sightseeing escapades from then. Lundulph did most of the photographing, averaging about 250 photos a day. Being two is much better than one, though and we also did a few restaurants and I did the snapping of our food and that's what I'll write about.

On our first day we lunched at Ladurée, the Champs Elysées branch. Both of us were sweaty, dusty and tired and generally scruffy looking, so it was rather odd to wander in to the elegance of the restaurant. But we were seated in the cooler outdoor(ish) section and were presented with their thick menu book. It was a nice relief that the waiters spoke English and were quite friendly. Both Lundulph and I went for a big salad and sadly we were too hungry to take time and photograph them. Also sadly the Ladurée web site is a year out of date, so the menu there doesn't have the salads we ate. Still, Lundulph ordered one with wild rocket salad and cured meat with mustard vinaigrette. When it arrived it turned out to have stealth cheese. Lundulph doesn't eat cheese and was rather upset about that, after all the menu had bothered to mention the type of mustard, yet had omitted to mention the cheese. He also thought the rocket was a bit overpowering, though was happy with the balance of flavours otherwise. I went for a salad with a soft boiled egg. Didn't pay attention to the green bits, but I think it might have been Summer purslane. I'd never come across it before. Though searching on the web, indicated that it might not have been, the leaves were a different shape. I think it was perhaps some sort of water plant. It had a fairly neutral taste, but lovely texture and crunch and looked very pretty. The egg was cooked perfectly and when I punctured it, I ended up with a great creamy salad dressing.

After further loads of walking in the heat, I thought we could refresh ourselves a bit at a tea salon. We'd just reached the Bastille and I thought why not pop in to Lenôtre? And so we did, it was wondefully cool and also there was no tea salon, but just a patisserie to buy loads of fab looking little things. As much as I would have loved to, there was no way I'd buy anything from there only to carry it around Paris for the rest of the day, so we quickly made a U-turn and walked out. I don't think the ladies in the shop even noticed that we'd been there. What to do now? Well, there seemed to be a tiny café next door, so we went in.

It was called Le Paradis du Fruit and turned out to be a smoothie parlour, a very colourful one. We were seated and given a menu and once again faced the agony of choosing. Agony, because there were a lot more things that we could possibly consume in one go. Lundulph decided on a raspberry-strawberry-yoghurt mixture, whereas I went for the Josephine Baker, which had passion fruit, mango and coconut. I also instantly regretted going for the regular size, where the big one would have been better.

While we enjoyed our smoothies, the children at the next table were served massive coupes of ice cream and fruits and I so hoped that we'd stumble across another of these parlours over the next few days, but sadly we didn't.

In the evening we went to look at the Eiffel Tower and had dinner at one of the brasseries nearby. That was nasty, I found two hairs in my dish and my fork was dirty (though I swapped it with the one on the next table). Our steaks were a bit on the gristly side too, but the chips were OK. The beers were ridiculously expensive. The whole thing was a mistake. But Saturday was over and we were knackered after a whole day's walking around.

Luckily for the next two evenings I'd booked tables for dinner from the Idéal Gourmet. Not sure how I stumbled across this web site, but I did and it had a list of beautiful restaurants and the possibility of booking online with a three course menu, all inclusive for a decent price.

Our adventure continues in Paris Day 2

12 May 2010

Spaghetti with Avocado Pesto

In preparation for the family visit this week-end, I went through some of my recipe collection for suitable food. I also spotted this that seemed quite good for a mid-week dinner.

Waitrose's Avocado Pesto Linguine from January 2007.

IMG_0757

As has happened before, in case the recipe disappears from their web site, I'm posting it here too, with my alterations (the cheese had to go).

Ingredients

2 large minute steaks
4 tbsp Japanese soy sauce
3 tbsp Cajun sauce
130 g spaghetti
1.5 large ripe avocados
2 cloves of garlic
1 red Thai chilli
1 tbsp lemon juice
1 handful fresh parsley
2 handfuls fresh basil
5 tbsp olive oil
salt and pepper to taste
1 handful pine nuts
2 tbsp grapeseed oil

Method
  1. Trim the minute steaks and cut into thin strips, about 1 cm wide. Then place in a bowl and pour the soy and Cajun sauces over the strips and stir well to get them coated. Cover and put in the fridge for about an hour.

  2. Cook the spaghetti according to the instructions on the packet.

  3. In the mean time, cut the avocado in half, remove the stone and peel, then cut in chunks.

  4. Peel the garlic, deseed the chilli and cut both in smaller pieces.

  5. Put the avocado, garlic, chilli, lemon juice, parsley, basil, olive oil, salt and pepper in a bowl and blend until smooth. Or use a food processor.

  6. Toast the pine nuts in a dry pan and set aside. In a separate pan, heat up the grapeseed oil, then add the strips of beef and stir fry for a few minutes.

  7. Drain the spaghetti, then stir in about two thirds of the avocado pesto and the pine nuts.

  8. Serve the spaghetti in a bowl with a few strips of beef on top.


I was a bit shy on the salt and completely omitted the pepper, so the avocado pesto was a bit on the bland side, once it was stirred in with the pasta. On its own it was lovely.

The recipe card recommended that the pesto be done last minute so it doesn't discolour, I agree, though I think giving it some time allows more flavours to develop. Maybe do it in advance and cover well with cling film, not allowing any air bubbles on the surface might be the way to go. Otherwise it's a very quick dish to do. The minute steaks were something I had in the freezer and wanted to use up. The butcher had hammered the life out of them when I bought them, so they were nice and thin and picked up the flavours rather nicely when cut into thin strips, this is a trick I learned from a Chinese friend of mine. The original recipe recommends bacon, but I think the beef was a healthier option.

As for the Cajun sauce, this is one I've picked up at one of the many garden centres I visit. It's called Very Hot Cajun Sauce and is yellowy-orange in colour, so tricks you into thinking it's not too hot, but actually it could be used as rocket fuel. Thus use a spoon when you stir the beef strips, or you might end up with serious burns on your hands.

8 May 2010

A New Sauce

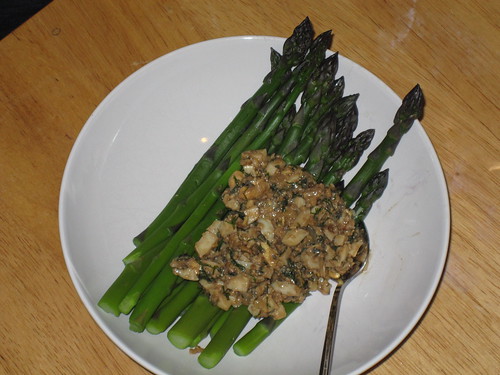
Yes, despite sleeping in this morning, I made my way to the PYO, while Lundulph was getting his hair cut. And although the skies were about to open, there were lots of people picking. I had to go to the farthest rows, but still managed to get a full basket of the lovely things - a kilo and a half of asparagus.

Again, some thins, some middles and some fats. But unlike last week, I had done some advance planning and had purchased a number of fresh herbs and some eggs in an attempt at replicating the "sauce" I had with white asparagus when I was studying in Munich.

In Germany, they seem to prefer the white asparagus, i e the ones that aren't allowed to see daylight. They also need peeling and I'm not too keen on them. Don't taste as nice and seem to be a lot more effort.

But they make a nice sauce thingy to go with them - it has a mixture of fresh herbs, hard boiled eggs, balsamic vinegar and olive oil. I think. Impossible to actually dip in, but oh so tasty.

IMG_0756

So here's my attempt at recreating this stuff.

Ingredients

2 tsp finely cut tarragon
2 tsp finely cut basil
2 tsp finely cut mint
2 tsp finely cut dill
2 tsp finely cut lemon thyme
2 tsp finely cut oregano
0.5 tsp salt
0.5 tsp pepper
3 tbsp olive oil
3 tbsp balsamic vinegar
1 dl toasted and ground pine nuts
2 hard boiled eggs

Method

  1. Cut the herbs finely with scissors, add salt, pepper, olive oil and balsamic vinegar and stir to mix.
  2. Toast the pine nuts, then grind in a mortar and pestle.
  3. Chop the eggs and stir in as well and let stand for an hour.
  4. If it looks too dry, add more vinegar and oil.
  5. Serve with the steamed asparagus.

This is the first time I've used tarragon, I'd no idea what it smelt and tasted like. A bit like anise, quite pleasant. I didn't measure the amounts precisely either. And I let it stand for 5 h, I should have refrigerated, but it was fine anyway. I didn't want it cold, as it would chill the asparagus too quickly and I like it when it's warm.

It was also not really dippable, both Lundulph and I had to use a spoon to balance a few pieces onto the asparagus and it was tricky at best. So Lundulph suggested I blitz it for the next lot of asparagus, to make it more creamy. Otherwise the flavour was really good, the tarragon dominated a bit and gave it a sweet tinge. Would probably work with other things, even on a piece of toast. We ate the lot, it was barely enough for all the asparagus I steamed (about 500 g).

As dessert, we had semla. From the 10 buns I froze back in February, along with the marzipan filling. I just bought some whipping cream. I allowed the buns to thaw at room temperature in the morning and this turned out not to be a good idea, as they were fairly dry by the evening when we had them. I'll try defrosting in the microwave just before they're needed next time. Also, I'd whipped the cream the day before to hard peaks. And it had collapsed and gone quite runny, very disappointing indeed. I've left whipped cream overnight before and it has been fine, but then I've used double cream and even extra thick double cream, both of which have higher fat content, which perhaps makes it possible to keep its fluffiness. A thing to keep in mind in the future. But other than that, the freezing had been successful. I suspect the marzipan filling won't last for all the buns though. I'll have to improvise.

Update on the blitzed sauce, 9th May 2010:
Well, I made some changes to the amounts of the herbs. Blitzing made a difference too, the asparagus could be dipped, so a definite improvement, however the balsamic vinegar made it go beige, so perhaps not appetising to look at.

Ingredients

2 tbsp finely cut tarragon
2 tbsp finely cut basil
1 tbsp finely cut mint
1 tbsp finely cut dill
2 tbsp finely cut lemon thyme
2 tbsp finely cut oregano
0.5 tsp salt
0.5 tsp pepper
4 tbsp olive oil
3 tbsp balsamic vinegar
1 dl toasted and ground pine nuts
2 hard boiled eggs

I also had to increase the olive oil and balsamic vinegar in order to get the blender to blend. The flavour was close to the first version, though I missed the texture a bit.

2 May 2010

Toad In The Hole

During my shopping round last Friday, they had a special offer on sausages and I got a couple of packets. Generally I freeze them, just as I do with Swedish meatballs, as they all make very nice emergency dinners, when I've not had time or inspiration for something new. But I thought with Bank Holiday week-end coming up, I should treat Lundulph to a Toad in the Hole.

IMG_0754.JPG

I've never made this before, but I know Lundulph has mentioned it on occasion, so I also grabbed a packet of eggs.

This morning I set to investigate recipes, but having had some massive trouble with my new Linux installation and localisation issues that could not be removed (leaving parts of the computer in English, part in Swedish and part in Bulgarian), I didn't have sufficient time to focus on recipes, so I went to DinnerDiary to see if they'd already made this.

Indeed they had, twice even and the second time, Kerri had kindly posted the recipe. I didn't have Madeira for the gravy, so went with Bisto granules, which is reliable and something I always have in the larder. I also had a packet of jumbo Frankfurters for myself, since I don't like regular English sausages.

Ingredients

170 g plain flour
1 tsp salt
300 ml cold semi-skimmed milk
150 ml cold water
3 large eggs
12 sausages of your choice
vegetable oil

Method

  1. Sift together the flour and salt in a large bowl and set aside.
  2. In another bowl, whisk together the milk, water and eggs, then slowly add to the flour while whisking until a thin and even batter forms.
  3. Pre-heat the oven to 200° C.Pour a generous amount of oil in a large deep pan and place in the oven to heat up well.
  4. Heat up a little oil in a frying pan and brown the sausages.
  5. When the oven pan has heated up well, give the batter a stir, then remove the oven pan, pour the batter into it and add the sausages, spread out as evenly as possible. Then place back into the oven and bake until the batter has expanded and gone golden brown - could be around 30 - 45 minutes.
  6. In the meantime, prepare the gravy and keep warm.
  7. When the bake is ready, serve immediately with the gravy.

The batter was surprisingly thin, but this is correct, it will puff up really nicely and crisp up.

As for dinner tonight, well, we'll have the remaining asparagus - the fattest spears that are left.

Update 2020-03-15:
Once again, Lundulph had started dropping hints about toad in the hole, so I decided to use up a piece of Falukorv I had kicking about in the freezer. Now this was just a small piece, so I decided to make small toads in the holes (is that the plural?) in the muffin tin instead. This only used up half of the batter and as I cut the Falukorv too thickly, I only had 11 pieces for the 12 hole tin.

I also discovered that Lundulph had used up all the beef gravy, so we had to have chicken gravy - this worked just as well. I managed to confuse myself with tsp and tbsp and made way too much gravy, but with the spare batter, I'll be making Yorkshire puddings for lunch, to go with various other leftovers.

The main thing was that Lundulph was well pleased and his eyes sparkled.

1 May 2010

Posh Nosh

It is the 1st May and this means our local Pick-Your-Own is open for business - asparagus.

Lundulph and I went, armed with a basket and a knife, and picked thin ones and picked thick ones and picked really fat ones too.

I've never picked asparagus before, it was quite enjoyable, especially since we were the only enthusiastic pickers at the farm and had the choice of two large fields of the stuff. The raspberries are looking pretty good too and the strawberries were full of big dark green leaves, it'll be a good year I think.

Anyway, we took a turn through the farm shop, just to be on the safe side, then went straight home. While the kettle was boiling the water, I trimmed and washed the thinnest of the spears and boiled them for 5 minutes and we gobbled them up with mayonnaise.

IMG_0752.JPG

Extremely tasty and with a wonderful texture to them.

We then spent the afternoon in front of my computer - I've installed Linux and it's sort of working.

We had the thick asparagus for dinner (6 minutes boiling time, a bit too long and it went yellow at the bottom) along with some unbelievably expensive Scottish smoked venison and salad. The venison tasted like cardboard with some really old spices on it. Yuck! Lundulph thought it was sort of OK, but I beg to differ.

IMG_0753.JPG

We now have the really fat asparagus spears left, which we'll have tomorrow. So very very tasty, I'll be going back for more and soon.

30 April 2010

Mexican Feast

Well, sort of anyway.

The Ultimate Chilli Con Carne from DinnerDiary has been on my to cook list for ages and following a recent blogpost there, I decided that it's now high time for it.


Ingredients

2 tbsp olive oil
3 red Thai chillies
6 cloves of garlic
2 cans of beans (400 g each)
400 g can tomatoes
1 green bell pepper
2 tbsp olive oil
500 g lean minced beef
salt and pepper
2 tbsp olive oil
1 large onion
2 tsp ground cumin
1 tsp ground coriander
1 tsp hot chilli powder
1 tsp ground cinnamon
1 tsp smoked paprika
2 dl red wine
300 ml beef stock
2 tbsp tomato puree
1 bay leaf
1 tsp cocoa powder

Method

  1. Preheat the oven to 190 degrees. Then wash the chillies and remove the flimsier paper bits off the garlic and place in a small ramekin. Then drizzle 2 tbsp of olive oil, cover with aluminium foil and bake for 30 minutes, then allow to cool.

  2. Prepare the beans by draining them and the tomatoes by crushing or even liquidising them. Wash and cut the pepper into small pieces.

  3. In a large lidded non-stick pan, heat up 2 tbsp olive oil, season and brown the meat, then set it aside.

  4. Heat up another 2 tbsp olive oil and soften the onions. In the mean time, deseed the chillies, peel the garlic and mush up with the oil they roasted in.

  5. Add the chilli/garlic to the onions and fry through for a couple of minutes, then do the same with the ground spices.

  6. Deglaze with the wine, then add the browned mince, beef stock, tomatoes, tomato puree and beans. Some further seasoning may also be called for.

  7. After all has come to boil, put a lid on and reduce the heat to low, then let simmer for an hour.

  8. Add the green bell pepper and the cocoa powder and let simmer for another 20 minutes.


Unfortunately living outside of London means I can't get hold of all different types of chillies and I also had some cans of beans I wanted to use up, so as usual I'm improvising a bit. The biggest thing is that I halved the stock, since I don't have beans that require cooking and will soak up a substantial amount of the liquid. Still the chilli was more of a thick soup than a stew when I put the lid on.

So I took the lid off and hoped that most of the liquid would evaporate during cooking. And indeed after 32 minutes I had a lovely looking stew, so I put the lid back on and moved the pan to a small burner on its lowest setting. it smelt wonderfully too, the smoked paprika dominated, with a delayed but distinct hint of sweet cinnamon. Later on in the cooking, the cinnamon took over almost completely.

IMG_0750

Doing things on the day before will of course allow flavours to develop. And cooking slowly for longer too, but mainly it is important in order to get the beans cooked through. The time can be reduced when using canned beans, though I'm sure they would change the overall flavour. The Thai chillies turned out to heat up the chilli con carne very nicely indeed - which was a nice surprise, usually we struggle to get it hot enough for our taste. Also I was very excited about the cocoa powder. I've encountered chocolate in game pies and I know on the whole it adds to the richness, but I've never been brave enough to use it myself.

Overall, this was a success, the chilli was very much different from what we normally do, which is an adaptation of Delia Smith's simple recipe. No specific spice or ingredient dominated or even came forward, but instead they all blended to a very rich flavour, though perhaps a bit on the sweet side.

Still the above worked very nicely indeed and we had it with tortillas, nachos, tomato salsa, sour cream and what claimed to be guacamole. The last two helped mellow the heat of the Thai chillies.

IMG_0748

The "guacamole" is a very old recipe, one of the first I picked up when I started collecting recipes and I've been meaning to try out for a very long time. Old recipe as in 1988 or 1989 I can't remember exactly. It was one of those info leaflets about new and exotic foods that were beginning to appear on the Swedish market and was to encourage people to give it a try. Actually I think most people were already familiar with avocados, but it wasn't perhaps as popular as it is nowadays. I've no idea who issued this leaflet and what I ended up with is certainly not guacamole as it is known in the UK today, but the mixture was rather tasty anyway.

Ingredients

3 large ripe avocados
1 small onion
1.5 dl sour cream
1 large clove of garlic
salt and pepper
a few drops of Tabasco
1 medium hot fresh red chilli

Method

  1. Cut the avocados in half, remove the stone, then scoop out the flesh with a spoon onto a bowl.

  2. With a fork, mush up the avocado - the idea is to still have a few chunks for texture.

  3. Peel and finely dice the onion, then add to the avocado along with the sour cream.

  4. Press in the garlic, season and add the Tabasco.

  5. Wash and if needed deseed the chilli, then chop it finely and add to the mixture.

  6. Stir in everything well, then chill until needed.


I think this recipe could benefit from dill and possibly swap the onion for red onion or chives to get a more interesting colour as opposed to washed out green. The mixture would work well just as a regular dip and I suspect might be quite nice in a sandwich cake too.

15 April 2010

Spanatchnik With Salmon

Dealing with left-overs once more, this time a piece of lovely hot smoked salmon, that just wasn't big enough for a meal for the two of us. So I decided to make spanatchnik and put the salmon in it as well.

IMG_0743

However with one significant difference to my original recipe, I swapped some of the grapeseed oil with butter and I have a nagging suspicion that made the big difference, because this time it tasted really nice. Or it could be that I grow impatient and don't bake it long enough or I don't know.

I also had different proportions on the greens, so here's the recipe.

Ingredients

250 g frozen spinach
2 large leeks
3 tbsp grapeseed oil
5 sprigs fresh thyme
1 dl chopped fresh parsley
2 tbsp dried mint
2 tbsp dried dill
2 tsp sage
salt and pepper to taste
25 g butter
200 g hot smoked salmon
75 g butter
540 g filo pastry (2 packets as it happens, there was some left over)

Method
  1. Thaw the spinach over a sieve to remove excess liquid.

  2. Trim and wash the leek, then slice it thinly.

  3. Heat up the grapeseed oil on medium heat and add the leek to get it soft.

  4. Once it's softened, add the spinach and the herbs and stir in to mix well. Then season and continue to cook until it feels a bit dry.

  5. Take off the heat, then stir in a knob of butter (about 25 g) until it's melted completely. At this point you can put a break into this dish.

  6. About an hour and a half before you want to serve the dish, pre-heat your oven to 200 degrees C, then melt the 75 g butter on very low heat, just until it's melted, it should not bubble.

  7. Crumble the salmon into the greens and stir to mix well./li>
  8. Brush some of the butter on an oven-safe dish.

  9. Unpack the filo pastry and lay it out. If the pastry seems too thin, use two layers at a time. Also if it's in an awkward shape, overlap pieces to get a decent shape to roll.

  10. Brush melted butter onto the whole filo sheet, then dab teaspoon sized pieces on two thirds of it, leaving a third to form the outermost of the roll. Then carefully roll it up and place in your baking dish.

  11. Repeat until all the filo and filling have been used up. Any left-over pastry can be used as crunchy decoration. It still needs to be brushed with butter though.

  12. Finally brush the spanatchnik with the remaining butter and bake for about 45 minutes, until the filo turns golden brown.

  13. Note that if you run out of butter early, just melt some more, it may seem like a bad thing all this butter, but it's necessary to bake the filo pastry and make it crunchy.


The salmon we had was a new type, which in addition to being hot smoked also had chilli flakes and crushed pepper on top, which made it very tasty.

The spanatchnik was accompanied by white sauce, made with whipping cream and chives, instead of double cream and spring onions. I made it in the morning and let the flavours develop in the fridge.

On the whole extremely tasty.

13 April 2010

Chicken Cushion with Black Venus Rice

IMG_0742

Not being entirely sure what to do for dinner, I noticed that our butcher was open, which is very rare on Mondays. So I wandered in to see if they had anything interesting looking, but they didn't, so off the top of my head I asked for a chicken cushion. They didn't have any, so I got one made up especially and this time it was a whopping big one too.

So that was the meat part of dinner sorted. What about carbs? Well, there was the brown packet of fancy expensive vacuum packed black rice I bought at Harvey Nicks last August. It's called Black Venus Rice and the packet was full of family lore about this rice and a "btw boil for 35-40 minutes in salty water" nicely hidden away in a corner.

I'd not had any suitable opportunity to try this out, but a friend of mine had tried it and said it was great. So, following the instructions I boiled 100 g of the rice in 500 ml liquid. Since I decided to put some mushrooms in for good measure and I only had canned ones, I put in the liquid from them and topped up with hot water to reach half a litre. I also put in salt. After 30 minutes, it looked like there wasn't enough water and the rice would start sticking, so I poured in a bit more. Curiously when I first poured in the liquid, it all went dark purple/red like wine and for a moment I toyed with the idea of chucking an egg in to see if the shell would pick up the colour. I'll do it next time. 40 minutes did it for this rice type.

Given the cost of the 500 g packet, I was surprised that it wasn't cleaner. I rinsed it well, but didn't have the patience to go through all the grains and pick bits out apart from the couple of odd looking things I spotted straight away.

In the mean time I baked the chicken cushion and I gave it 50 minutes as it was bigger, but that was over the top and the meat felt a bit dry.

I'd also quartered the button mushrooms and fried slowly in a bit of butter. As Lundulph came in through the door, I drained the rice, rinsed it well and mixed in with the mushrooms and re-fried it. The rinsing was necessary as it turned out I'd added too much salt to the cooking water and the rice tasted very salty too, but rinsing removed that.

The chicken was stuffed with some sort of sage and onion stuffing mixed with sausage meat and the whole lot worked pretty well.

The rice was certainly one of the tastier I've eaten, so I think it's worth having a packet in the larder.

5 April 2010

Easter Baking Part 2

IMG_0741

The second thing I baked this Easter was the dessert to go with the Easter dinner and it was again from Susan's inspirational blog - the February 2010 Daring Bakers Challenge. Additionally I decided to try and replicate the cake shape itself and happily ordered the adjustable cake ring from Amazon.

First thing for the Tiramisu was to make the ladyfinger biscuits. Instead of using the recommended recipe for the challenge, I opted to make the one given in Lenotre's "Desserts and Pastries". This is the first recipe I try out.

Ingredients

5 eggs
150 g granulated sugar
125 g plain flour
icing sugar to sprinkle on top

Method
  1. Pre-heat the oven at 180 degrees C.

  2. Separate whites and yolks of the eggs into separate bowls, making sure that the whites go into a metal or glass bowl, not plastic.

  3. Set aside a tablespoon and a half of sugar. These are to be used with the whites.

  4. Whisk the yolks with an electric mixer at medium speed, then gradually add the majority of the sugar. Keep whisking until the mixture turns pale yellow and reaches the so called ribbon stage - when (the stopped) whisk is taken out of the mixture and the mixture drizzles back in a continuous stream forming a ribbon folding on itself before dissolving into the rest of the mixture in a bowl.

  5. On lowest possible speed, mix in the flour just enough to incorporate it, no more.

  6. Wash and dry the whisks thoroughly, then add the saved sugar and whisk on high speed until stiff peaks stage.

  7. Carefully fold the whites into the batter.

  8. Line a couple of baking sheets with baking paper and pipe strips of the mixture. Then sprinkle generously with icing sugar and bake for 18 minutes. Turn the sheets around after 12 minutes, if the biscuits aren't browning evenly.

  9. Let cool a few minutes on the baking paper, then prise off and place on a cooling rack. Store in an airtight container


I made a double batch of the above, as it was just not quite enough for the cake. I followed Susan's instructions with drawing three circles on the baking parchment and piping in them, then the strips for the edge fairly close together so they'd flow together during baking and make easier to build the cake. The three circles were 15 cm diameter, the strips were 10 cm long. I only have a 1.5 cm round nozzle, which worked well for this, the batter was perhaps a bit on the runny side, so it flowed well.

Unfortunately I forgot to sprinkle the rings and some of the strips with icing sugar before baking and this is sort of fatal for these biscuits in that the icing sugar forms the typical crust of these. Instead what I had was a sticky sponge for Swiss roll. I rescued by sprinkling even more icing sugar afterwards, to prevent the circles sticking together in the cake box. I also didn't prise them off, but left to cool completely on the baking parchment, then cut around each shape before fitting into the cake box. It sort of worked OK. However, I now know the cake box is not airtight - the rings went a bit soggy, over the two days' storage, but no major harm was done.

With the leftover batter, I piped more ladyfinger strips, but this time well apart from each other and some of them I decorated with chopped mixed nuts and some with dessicated coconut, both very good combinations.

Next I made the two cooked creams - sabayon (zabaglione) and pastry cream. I've never made sabayon before and followed the instructions to the point, however, the instructions were incorrect, which lost me half an hour of constant stirring over a water bath - it should have been whisking, not stirring! I found that out when I looked in my Cordon Bleu book and once clarified, I whisked and the sabayon foamed up and thickened wonderfully. It was extremely tasty too.

Ingredients for sabayon

2 egg yolks
50 g granulated sugar
60 ml coffee
1.25 ml vanilla essence
0.5 tsp lemon zest - about half a lemon

Method
  1. Bring some water to boil in a pot.

  2. In a heat-proof bowl, that fits over the above pot for a double boiler/bain marie, whisk together all the ingredients until everything is evenly blended and smooth.
  3. Place the bowl over the pot of boiling water and keep whisking for about 8 minutes until the mixture cooks through, foams up and thickens to the consistency of custard. It'll also go quite pale. Then allow to cool and chill in a fridge until needed.


Ingredients for pastry cream

55 g granulated sugar
8 g plain flour
0.5 tsp lemon zest - about half a lemon
2.5 ml vanilla extract
1 egg yolk
175 ml milk

Method
  1. Mix all the ingredients in a saucepan until well blended, then place on low heat and cook for about 12 minutes, stirring continuously until the mixture thickens into a custard and bubbles.

  2. Take off the heat and transfer to a container, then cover the surface of the cream with cling film, making sure no air bubbles are trapped. Then let cool completely and refrigerate until needed.


Additionally 75 g mascarpone cheese and 235 ml whipping cream, whipped with 55 g granulated sugar and 2.5 ml vanilla essence, are required. Do the whipped cream just before putting the whole cake together and it should be whipped to "stiff peaks stage". The mascarpone should be whisked up too to soften it up and make easier to mix. Some further cold lightly sweetened coffee can be used to brush the ladyfinger circles and fresh raspberries - about 300 g work very nicely. I decided against making mascarpone, life was just too busy this past week anyway.

Note that the mascarpone and the two cooked creams above result in what seems very small amounts, however, it is perfectly sufficient for the Tiramisu cake.

I put this cake together just before beginning to cook the main dinner. My original plan was to make it on the day before, to allow the cake to firm up and the biscuits to soak up some of the wetness of the cream, however I decided against it, in case everything went too soggy and collapsed or went crackling dry and collapsed. Especially since I noticed that the cake box wasn't airtight.

I adjusted the cake ring to 17.5 cm diameter and lined it with baking paper, placing everything on a cake plate. Then I placed one biscuit circle in the bottom, followed by the conjoined biscuit strips along the sides. There was some deformity during baking, but things were soft and fitted together anyway. I then mixed all the creams and the mascarpone together. I hadn't whipped the cream sufficiently hard and the end cream was a bit too soft. Still I scooped some of it into the cake ring to form a 2 cm thick layer, and pushed in some raspberries. Then biscuit ring number two went in and I took off the baking parchment as I needed it, so I had to run and wash my hands several times while building the cake.

When I put in the final circle, I realised that I'd got the dimensions a bit wrong or the cream was just too runny to hold things up, so the edge biscuits stuck out a bit more than in Susan's photos.

I grated some dark chocolate over the cake and put it in the fridge for the few hours while dinner was cooked and eaten. Along with the cake ring for support. I took it off just before taking the cake out to the table.

IMG_0740

As soon as my Brother-in-law stuck a knife into my creation the whole thing collapsed and he rushed to cut pieces and quickly slosh them onto people's plates. Although a shapeless mess, it tasted fabulously and there was one little piece left, which Lundulph and I shared for dessert today.

I think next time, I'll do a different pastry cream, possibly also use some liqueur as is more traditional. This time I had to take into account my two nieces who are too young for alcohol and my Brother-in-law's girlfriend who doesn't drink alcohol. Maybe I should be a little cheeky and add some gelatin to the cream to force it to keep its shape too.

I'm very glad I invested in the cake ring though, it's a brilliant tool and I look forward to using it more as I refine my skills at cake making.

I also compared this recipe to the two I've done on previous occasions and noticed that neither of them involves any sort of creams, but just stirring in some egg yolks into the mascarpone and that's about it more or less. Given the dangers of eating raw eggs, this recipe seems a lot better, if a bit on the fiddly side. I certainly thought it was well worth doing.

Easter Baking Part 1

Going away from tradition this year, I did not make kozunak this year. Instead I decided to try my hand at Hot Cross Buns, an English tradition around Easter. Actually very much like the Semla buns in Sweden, these are available on the 2nd of January, when people haven't quite recovered from the Christmas celebrations.

The idea came from this blog entry on the WildYeastBlog. With one modification - I'd mix the dough on the evening of Easter Saturday, refrigerate, then shape and bake on the morning of Easter Sunday, so that they would be nice and warm by the time our guests arrived.

As expected the dough rose nicely despite being in the fridge. I was a bit uncertain about the ground allspice that went into the dough, but the end result was fantastic. What I didn't like was the paste for the crosses. I ended up adding a lot more water than Susan's recipe states, and it was still pretty thick and I had to use a flat nozzle to pipe it in the end and my hands went shaky afterwards.

The other thing I didn't like about the paste was the fact that even making extra wide crosses, I only used up about a quarter of the paste and had to throw away the rest.

Here is what they looked like just before going into the oven.

IMG_0738

And here they are after baking and glazing.

IMG_0739

As you can see I missed a bit on one of the buns and it has only a stripe rather than a cross.

Oh, and I baked them for 18 minutes on 200 degrees C, instead of starting off at a higher temperature and reducing after 7 minutes.

The glaze remained sticky throughout, but I sort of expected that. I'd bought clotted cream and raspberry jam and that was definitely a winning combination.

So, I'd definitely repeat these once I've found a different paste recipe.

Family Easter Dinner

Over the last week, I've been preparing for yesterday's family Easter get-together, mostly with buying and preparing food.

Ever since our Christmas ostrich, we promised to invite the rest of the family to try out this delicacy. I decided to do the same recipe, however being nine people, I decided to treble everything. Thus three ostrich fillet roasts, three times the mushrooms, three times the gravy and three times the potatoes.

Now since I don't have a restaurant kitchen and staff, I decided to do each fillet roast on it's own. So I made three lots of the spice mixture for the dry marinating. All other things I did in one go.

The potatoes were prepared in the evening of the previous day and were kept in my pressure cooker under water. That made them swell sufficiently to prevent me from fitting them all into the baking tray, a feat I did manage to do after I'd sliced them into the Hasselback shape. So there are two tiny tatties in a bowl of water in the fridge waiting to be cooked. I greased them with goose fat, which I had left over from Christmas and had kept in a box in the freezer. I think I should have seasoned the potatoes before baking them, as the were, they tasted a bit too much of just fat. I think it could be to do with the increased water content of preparing them the day before.

Also on the day before, all the spices were ground, the mushrooms and the greens (baby leeks, French beans and purple sprouting broccoli) were washed and dried. One thing I sort of cheated with was to use ground coriander and cardamom instead of grinding them alongside the black pepper and juniper berries. This is not really a problem, but I made a mistake that I've specifically commented on in other blog posts - if grinding spices before use, the flavour is stronger than if using pre-ground spices, thus amounts need to be adjusted. I completely ignored doing that, very consciously and so the balance of the spice mixture was wrong. In addition, I used up all the juniper berries left in the jar, which were perhaps a tad too few. This resulted in the black pepper completely dominating in the end result, most unfortunate, though most of the family seemed OK with the extra heat.

For the mushrooms, I skipped the butter at the end and just heated up the double cream on low and stirred in the mushrooms briefly.

I prepared the first part of the gravy on the day before as well and as it turned out, the jar of cranberry sauce was a lot smaller than I thought and it was also a lot emptier than I thought. In fact it only had enough for one batch of gravy, so I topped up with lingonberry jam, which I happened to have in the fridge and which tasted pretty similarly. The lingonberry jam was definitely in a big jar and it was almost full. Also I cracked open a bottle of sherry vinegar, which I've been dying to try out for ages. It combined very nicely with the Merlot wine and the port. For some reason not everyone had gravy, so we have quite a lot of it left over now. Hopefully it's good for dipping bread in or something. Maybe I can freeze it.

The greens were just steamed. I had intended to sauté them, but there just wasn't enough time for that.

Now out of the nine of us, two are vegetarians, so for them I made a traditional Bulgarian dish - Бюрек от пиперки, which is "byurek" of peppers and here how it is made.

Ingredients
6 sweet bell peppers, preferably as oblong as possible
400 g feta cheese
4 large eggs
salt
pepper
parsley
breadcrumbs
6 tbsp grapeseed oil

Method
  1. Roast the peppers as per instructions here. Then peel, remove the handles and seeds carefully so the peppers remain intact and finally rinse thoroughly.

  2. In a bowl, break up 400 g of feta cheese with your fingers, so that it resembles cottage cheese nodules. Then add two of the eggs, season with salt and pepper and coarsely chopped parsley. Be generous with the seasoning, as the peppers themselves won't be seasoned.

  3. Fill each pepper with the mixture and make sure they are flattened a bit.

  4. In a shallow bowl, big enough to fit a pepper, break the two remaining eggs and whisk together lightly. Spread the breadcrumbs on a plate, then heat up the grapeseed oil in a frying pan.

  5. Dip each pepper in the eggs to get it coated on all sides, then roll in the breadcrumbs and fry for 2 - 3 minutes on each side until the coating goes golden brown.


A word on feta cheese. Traditionally feta is stored in brine and that's how you used to buy it in Bulgaria. Then some time before it's needed it can be immersed in water, which draws out a lot of the salt. The amount left depends on now long the feta is soaked, so in extreme cases all the salt will be gone and it'll taste like fromage frais. So for a byurek, a slightly too salty feta is to be preferred. The egg/feta mixture is then to be stuffed into red peppers because their sweetness offsets the feta cheese so very nicely. Unfortunately I've not come across brined feta recently, the packets in the supermarkets are completely salt free. This doesn't really matter, just season the mixture well. I also used low fat feta and had some doubts about that, but it turned out to be very nice indeed and tasted great. It was listed as 11.5%, regular feta is around 25% I believe.

Other types of peppers can be used of course. The ones I used were good for a main course with potatoes and greens, but using small ones, they would make nice finger food at a buffet, hot or cold. The dish is popular in Bulgarian restaurants, though some might be using the Bulgarian hard yellow cheese called кашкавал (kashkaval), which is very similar in flavour to Peccorino Romano or Peccorino Sardo cheeses, though quite fatty and not as hard in texture.

As before, the mushrooms were the first to run out - there were precisely enough for all nine of us and some did make attempts at nicking other people's mushrooms, they were tasty.

Meringue Chicks

IMG_0737

My Mum told me about this a couple of weeks ago and sent me the instructions on how to make little chicks out of meringue.

As per usual, I didn't follow the instructions on the meringue itself, but made the one I normally make. Unfortunately I over-cooked it ever so slightly, which is why the white chicks look the way they do. Adding yellow food colouring kind of sorted things out a bit and I also set aside a little and coloured red for their crests.

For beaks, I used two small pine seeds and the eyes were made with melted dark chocolate.

The way they are done is to first pipe a larger ball of meringue (so the mixture needs to be pretty firm). Mine were about the size of a walnut. Then on top of that, a second meringue ball is carefully piped, which forms the head. Generally the top of this second meringue ball will form a little crest, so can be left as is, or add on a red crest with a flat nozzle.

Finally stick two pine seeds in as a beak and then bake as normal, but for an hour and a half or even longer, if the meringues are still sticking to the baking sheets, then leave in the oven after switching it off, overnight is good and will get them nicely dried out. The reason for the longer baking is that they will end up bigger and taller.

Some 10 minutes into the baking, when the meringues have just started to dry out, using a wet sharp knife, cut into the main chick body to shape wings and spread out a little. I waited too long for this - 15 minutes and so the meringues were too dry and cracked badly, so after trying on a couple of chicks, I decide to leave it and let them complete baking without wings.

Once they are done and cooled down, melt a little dark chocolate and dot eyes on them, then place in airtight containers, so they don't go soggy.

I'd made these especially for my two nieces and sadly completely forgot about them yesterday. So maybe I can make new ones with them next time we meet.

Pre-Easter Eggsperimentation

As Easter was getting nearer and nearer, eggs in all colours and sizes kept cropping up more and more and during one shopping trip, I impulsively bought a lonely looking packet of quail eggs. I've seen them around, but have never had them and given our recent escapade into duck eggs, I've been feeling adventurous.

And so as a nice surprise to Lundulph I served them as a starter before our salad dinner.

IMG_0734

The instructions stated to carefully put in boiling water for one minute, then take off the heat and leave for another 30 seconds, which will achieve a soft boil. If aiming for a hard boil, let them boil for two minutes, followed by a 30 second rest in the hot water. I went for the soft boil and they turned out perfect, even if I counted the seconds in my head, rather than using a timer. A bit fiddly to peel, being so very tiny, but once that was done, a quail egg was a wonderful bite with a nice firm white and creamy runny yolk. The shells were beautifully brown/grey speckled, slightly blueish on the inside and the flavour was very much like a regular chicken egg, but with a slight hint of sweetness at the end.

When I made a second lot a couple of days later, again I counted in my head, however this time I must have counted faster because the eggs were underdone and had to go back in to the water for a few more seconds.

My third attempt was when half the family came over for the traditional Easter dinner. This time I timed it strictly to the second and they ended up between our previous two attempts, so were pretty tricky to peel and most managed to squeeze them too hard so the yolk erupted out. I worked out that peeling the top third of the egg was sufficient to suck out the creamy yolk, then use the tip of a dinner knife to scoop out the white. Still, they tasted lovely on little nests of baby leaf salad. No need for any seasoning or dressing, I might add.

Which brings me to the second egg of the season, I spotted this in our local farm shop, where I also got the beautiful baby salad leaves for the family dinner. The egg was from a goose and was massive in comparison. I've not seen goose eggs in at least 20 years and I'd certainly never eaten one, so this was all very exciting too.

IMG_0735

A quick google indicated that boiling for 10 minutes would result in a runny yolk, so that's what we did. I remembered also that Stephen of Dinner Diary had boiled one for 11 minutes a couple of years ago too.

So after boiling the thing, Lundulph and I started peeling it, realising that the shell was significantly thicker. There was also quite a lot of white at the top and Lundulph began to despair that there wouldn't be much yolk, but this was completely groundless - there was loads and it was wonderfully runny and creamy.

On the whole, it seems that flavour-wise these eggs are pretty similar to each
other, at least to me and Lundulph. The raw white of a duck egg is a lot clearer than
the corresponding chicken one, but behaves in pretty much the same way in cooking too. I've yet to try it out on meringues.

I'm now also pretty curious to see if I can get hold of a turkey egg, I'm guessing it would be of similar size to the goose egg.

The online shop where I purchased the ostrich fillet for Christmas also say they do eggs, when in season, though this season isn't specified. This sounds extremely tempting, but would require the majority of our extended family to come together for a massive omelet for a purchase like this to be viable. Not entirely out of the question for the future though.

One thing to note in the two photos above is that the bowls in which the quail and goose eggs are presented are the same.

Oh, and sorry for the silly pun on the post title, I just couldn't resist.

27 March 2010

Omelet and Bread Proficiency

Over the past couple of days, I've been successful in omelet making as well as bread making.

Again, a last minute dinner decision on the omelet, but I decided to try and make it a bit more special, by frying sliced onion in some butter and also slicing and frying some shiitake mushrooms also in butter. I kept them separate, as they'd take different times to cook.

IMG_0728

I whisked a couple of eggs together with a splash of milk, salt and pepper, then fried it in a little butter as well. When it was almost ready, I added some onions and mushrooms to one half, then managed to fold the omelet with the help of a couple of spatulas. I don't feel as confident as professional chefs to just flick it into folding. it was difficult to get onto the plate in a good way too, only one of the omelets worked. I decorated with a couple of slices of "Fillet Elena" (филе Елена), which is a Bulgarian cured and dried fillet meat - similar idea to billtong, but not as hard. Together with the tomatoes I bought from our new greengrocer's, it turned into a very yummy mid-week meal.

I've also had success with the latest batch of bread.

Having almost run out of flour (unheard of!), I took out 150 g of my starter "Monty", added to that 100 g strong white flour and 100 g wholemeal flour along with 100 g water, which turned into a fairly stiff starter. I closed the jar tightly and went off to the shops (to buy more flour among other things).

Back some 5 h later and there was pssst-ing and sigh-ing in the kitchen. Turns out, Monty was so happy about the feed, he'd fed intensely and generated such a pressure in the jar that the lid had bent and the starter had run over and was working its way on the work surface. So no time to lose.

I put the starter in the mixer bowl - it was 380 g in total. To this I added 150 g wholemeal flour (all I had left) and 800 g strong white flour. Then topped up with 410 g water. After almost full gluten development (i. e. 8 min kneading in the machine) I added 15 g salt and 0.5 dl olive oil. I let the machine run for another 6 minutes and still most of the olive oil had not been incorporated, so I stopped it before it burnt out the engine and started kneading by hand. This worked a lot better and all the oil went in fine. This is the first time I've added fat to a sourdough, very exciting.

The dough went into the bowl again for a rest of 1 h 30 min, while I took the opportunity to make a tepee over my tubs of potatoes, to protect them from filling up with water from all the rain we've been having.

The dough rose very nicely in the mean time. It weighed just over 1600 g, so I divided it into three and shaped into loaves that went into my three loaf tins. The dough was quite stiff this time, at about 50% hydration, so very easy to work with. I gently pushed each part out onto the surface into a rectangle, then rolled it into a loaf.

Once in the tins, I brushed with more olive oil and sprinkled a mixture of polenta, crushed oat bran, sesame and black onion seeds. Then covered with cling film and left to rise for about 4 h. I could have left it a bit longer, but it was nearing bed time and I didn't want to leave them overnight or the dough would try to escape again.

I baked the loaves for 20 minutes on 250 degrees C, then turned down to 200 degrees C and gave them another 30 minutes.

IMG_0730

Lundulph and I had some for lunch today and both texture and flavour was super. I must remember not to use as much water as I have up to now. My previous breads have worked out to some 90 - 100 % hydration, which has resulted in a sloppy dough and not too pretty loaves (though they were quite tasty too). I also resisted the temptation to slash the loaves, though I suspect I would have been more successful than before. Drooling over the photos in The Fresh Loaf, I've noticed that some breads had poor excuses for slashes, just like mine and it occurred to me that it might have to do with how wet a dough is.

So now we're set for another couple of weeks of bread and I'll have to try and make pancakes with the surplus of sourdough I'll end up with when I feed Monty next week.

By the way, Lundulph didn't like my tepee and I had to take it down today and made a more discreet looking poly tunnel. It rained really heavily in the afternoon with a fair bit of wind too, but the thing is still standing, so all is well in the garden, looking forward to some lovely tatties.

13 March 2010

Conchas for Mother's Day

Tomorrow is Mother's Day in the UK and to celebrate I decided to have a go at conchas. I first spotted these on Susan's YeastSpotting event on 5th February this year and they looked so intriguing, I put them up on the list of to bake. Quite high up too. Then Susan herself followed suit a couple of weeks later.

Both looked beautiful and reading through the recipes quickly, I decided for the first one, which seemed a bit easier. Sadly I ignored looking up the original recipe it was based on, however, I ended up with something really good anyway and know what I need to do next time to achieve an even better result.

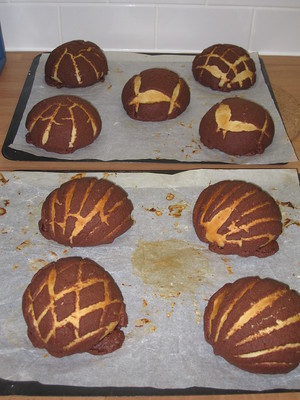
IMG_0727

I'm posting the recipe here in metric along with the couple of alterations I had to make on the fly to make things work.

Ingredients
Sponge
220 g warm full milk (2 dl + 1 tbsp)
7 g instant yeast
165 g strong flour

Dough
All of the sponge
290 g strong flour
120 g granulated sugar
1 medium egg
2 tsp vanilla extract
1.25 tsp salt
2 tbsp full milk (if needed)
45 g unsalted soft butter

Topping
120 g plain flour
110 g granulated sugar
106 g unsalted soft butter
0.25 tsp salt
1 tsp ground cinnamon
15 g unsweetened cocoa powder

Now, I pretty much followed the instructions in the recipe on how to make the conchas, but in hindsight there are a few tweaks to do. I've incorporated these below. I must also measure up the flour next time so I know the weight, rather than the volume.

Method

  1. Warm up the milk on low heat to feel warm on the fingers, but not hot, about 40 - 45 degrees C. In the mean time mix instant yeast and flour well, then pour in the milk and mix to combine. I recommend using the bowl of the machine that'll make the final dough. Cover and leave for an hour in room temperature until it bubbles up.
    IMG_0720
  2. Add the ingredients to the dough, except the butter, then mix to a shiny and elastic dough. It must be sticky, so if it isn't, add a couple of tablespoons of milk, one at a time, while mixing until it is sticky.
  3. When the gluten has developed, add the butter and mix in well, then scrape off the bowl sides and the mixing paddle, cover the bowl and set aside for an hour to rise and double in size.
  4. While the dough is rising, mix the ingredients for the topping - it should form a paste like for cookie dough. Then place in the fridge to firm up.
  5. Line three baking sheets with baking paper.
  6. Take out the dough on a well floured surface and divide into 50 g pieces.
    IMG_0721
  7. Take out the topping from the fridge and divide into the same number of pieces as the dough. It may seem like very small pieces, but it should be OK.
  8. Either use the palms of your hands to flatten a topping piece into a circle or place the piece between two pieces of cling film and roll with a pin.
  9. Roll a dough piece into a ball, then cover with the topping circle. The topping should cover the top and sides of the dough ball. Then place on a baking sheet and press down to flatten a bit. It'll spring back and rise even further during proofing later on.
    IMG_0723
  10. Repeat with the remaining pieces. Then use a sharp knife to cut patterns into the topping, reaching the dough.
    IMG_0724
  11. Let proof for 30 minutes, while pre-heating the oven to 200 degrees C.
  12. Bake the conchas for about 15 minutes, until the topping looks dry and the areas where the dough is visible begin to show a bit of colour.
  13. Take out and let cool on a rack, then store in an airtight container.

I made 14 pieces of 70 g each, which resulted in balls the size of a tangerine and after baking, buns the size of oranges, way too big. But they were very tasty and Lundulph suggested that they have some sort of creamy filling in the middle. I think perhaps some custard, I just need to work out how to get it in there, I'd like it to go in before baking, not afterwards. Will have to think about it and experiment.

IMG_0725

The dough was not too sweet, but combined very nicely with the topping. I'd expected the topping to be crunchier, though given how thin it was, that might just not be possible to achieve. Still the combination of textures and flavours was very good and I think a centre of custard would be grand. Besides, I rolled the topping into too large circles, so they were very thin and I wanted to cover the whole buns almost. Though with such a sticky dough, once I'd placed it on the baking sheet, I couldn't lift it up again without ruining the ball shape, so I just tucked in the topping as much as I could.

IMG_0726

It's very important to cut the patterns in before the dough has proofed too much, so that there is room for expansion without the topping cracking too much. It'll do that a bit anyway from the oven spring.

Lundulph also suspects they will go stale pretty quickly, so a quick whizz in the microwave just before serving would be in order too.

Oh and if you're wondering about why the baking paper looks so messy, that's because I originally tried to make the dough balls without flouring the work surface, but wetting my fingers instead. This became very messy, I couldn't really shape any balls at all and ended up scraping off the ones I'd made back onto the work surface, this time with lots of flour on it. The second attempt worked better.

Update on 2019-10-18:
I finally got round to measuring up the flour, mainly because I didn't have instant yeast and wanted to work out how much fresh yeast I should use instead.

7 dl of strong flour weighed 466 g, though I suspect there is variation depending on how packed together the flour is. For this I used 14 g fresh yeast. The resulting dough divided up really nicely into 18 pieces of 50 g each, which was very pleasing.

Further ingredient swaps were caster sugar instead of granulated, to make the dough a little bit sweeter and also using a large egg instead of a medium one.

Also dividing the dough into 50 g pieces, I reduced the baking time to 10 minutes. Finally, I got to use my new conchas cutters which I bought from Amazon a few months ago. A little bit disappointing, because they are made from hard plastic, which isn't sharp enough, so I had to press quite hard to get the patterns onto the buns and they weren't as defined as when I cut with a knife, but it's so much faster to do and there are some patterns I couldn't do with a knife, so definitely a good investment.

8 March 2010

Smoked Salmon Pie

As mentioned the other day, half of the ravioli filling was left over and so I decided to make a pie.

IMG_0714

This worked out very nicely indeed, the recipe for the pie crust is from my Cordon Bleu book.

Ingredients
3 dl plain flour
1 tsp salt
1.2 dl unsalted butter
1 egg
2 - 3 tbsp water

Method
  1. Mix the flour and salt in a bowl, then cut the butter into thin slices into the flour and rub in. The mixture should look a bit like pale polenta.

  2. Add the egg and water (a little at a time) to form a dough. Shape into a ball and refrigerate for at least 30 minutes. Do not over-work it or it'll become difficult to work with.

  3. Roll out to the size of the pie dish and transfer carefully to it. Careful not to stretch the dough during rolling, as that'll make it shrink during baking.

  4. Blind bake at 180 degrees C until it develops a bit of colour, duration depends on how thickly it was rolled.

  5. Remove from the oven and allow to cool a few minutes, then add the filling. Use any left-over dough for decoration or if the pie dish is small, as a lid for the pie.

  6. Bake at 200 degrees for 30 minutes until the pie has baked through.


IMG_0715

I only had one egg left and I used it in the dough, so couldn't brush the bottom crust with egg white before the blind bake. Otherwise it's a good idea to do this, it'll protect it from going soggy from the filling. Also the yolk can then be used either in the filling, if doing a quiche or brushing the dough decoration/lid of the pie, which again will make it more attractive visually.

We had it with pickled gherkins, roasted artichoke hearts and pickled roasted chillies. This last lot of the chillies was a bit of a disappointment, since the chillies in question had been picked way too early and had not developed any spiciness to speak of. However, the flavour of fresh chillies came out very strongly and they were still very tasty, I just fancied a bit of spicy heat as well.

Still, the pie turned out very nice and tasted great too and got me thinking that this would be a good way of using up left-overs, especially when there's not really enough for a full portion to freeze. I might just mix a couple of batches of the crust dough and freeze and have ready for such situations.

5 March 2010

Lingonberry And Hazelnut Bread

The inspiration behind this comes from TheFreshLoaf blog. Generally I look at the photos only, but ever so often there are interesting posts as well. One was on bread with blueberries and whole hazelnuts.

IMG_0713

Not really season for blueberries at the moment, but I have some lingonberry jam that I'm trying to use up. Lundulph wasn't taken with it and the jar is just too big for me to tackle on my own, though I am doing my best.

So this week's batch was to be wholemeal and have lingonberry jam and hazelnuts in it. Since I started my sourdough Monty, I've been improvising heavily, although generally using the same ingredients every time, but varying the amounts. However, I thought I'd write these down.

Ingredients
350 g white flour starter (100% hydration)
350 g strong white flour
150 g strong wholemeal flour
300 g water
12 g salt
150 g sweet lingonberry jam
100 whole roasted hazelnuts

Method
  1. Feed the starter a few hours in advance, so that it's at its peak when baking. Monty takes about 5 h.

  2. Add the starter, flours and water into the bread mixer and run for 10 minutes to get a nice dough. Or make by hand of course.

  3. Towards the end of the kneading, add the salt, then the lingonberry jam and incorporate well.

  4. Finally add the hazelnuts and mix just enough to get them evenly spread out in the dough. Then shape the dough into a ball and leave to rest for 2 h.

  5. Butter two loaf tins ("pound loaf" size).

  6. On a generously floured surface shape the dough into a long sausage, then divide in two and place in the loaf tins, cover with cling film and place in a cool place to proof overnight or a warm place to proof in 4 - 5 hours.

  7. Pre-heat the oven to 225 degrees C, then slash the loaves and bake in the middle of the oven for 45 minutes. If the crust goes dark, cover with aluminium foil and turn the heat down a bit.

  8. Remove from the loaf tins and let cool on a wire rack.


Lundulph had three slices for breakfast this morning and said it was very nice, though he couldn't notice the lingonberry, only the hazelnuts and mostly because they were whole. This is what I expected, the jam sweetens the bread a bit, so won't perhaps work in a ham sandwich, but mostly it makes it moist. The crumb feels almost a bit sticky.

I haven't had breakfast yet because I'm still full of ravioli from last night.

And yes, I still need to practice on my slashing. I actually went and bought razor blades, in the hopes that they'd work better than the knife I've been using so far, but no. I even tried to wet it, but water doesn't really stick to metal. I'll try dusting flour on the loaves first before slashing.

One thing about improvising with amounts is that I've always ended up with a very wet dough. When I first mixed up the ingredients for this batch, it seemed to turn out rather stiffer than normal, which I thought was good, but two-thirds into the kneading, the dough went just as wet as on previous occasions. But a wet dough gives a nice light shaggy bread and I don't want to lose that.