5 April 2010

Meringue Chicks

IMG_0737

My Mum told me about this a couple of weeks ago and sent me the instructions on how to make little chicks out of meringue.

As per usual, I didn't follow the instructions on the meringue itself, but made the one I normally make. Unfortunately I over-cooked it ever so slightly, which is why the white chicks look the way they do. Adding yellow food colouring kind of sorted things out a bit and I also set aside a little and coloured red for their crests.

For beaks, I used two small pine seeds and the eyes were made with melted dark chocolate.

The way they are done is to first pipe a larger ball of meringue (so the mixture needs to be pretty firm). Mine were about the size of a walnut. Then on top of that, a second meringue ball is carefully piped, which forms the head. Generally the top of this second meringue ball will form a little crest, so can be left as is, or add on a red crest with a flat nozzle.

Finally stick two pine seeds in as a beak and then bake as normal, but for an hour and a half or even longer, if the meringues are still sticking to the baking sheets, then leave in the oven after switching it off, overnight is good and will get them nicely dried out. The reason for the longer baking is that they will end up bigger and taller.

Some 10 minutes into the baking, when the meringues have just started to dry out, using a wet sharp knife, cut into the main chick body to shape wings and spread out a little. I waited too long for this - 15 minutes and so the meringues were too dry and cracked badly, so after trying on a couple of chicks, I decide to leave it and let them complete baking without wings.

Once they are done and cooled down, melt a little dark chocolate and dot eyes on them, then place in airtight containers, so they don't go soggy.

I'd made these especially for my two nieces and sadly completely forgot about them yesterday. So maybe I can make new ones with them next time we meet.

Pre-Easter Eggsperimentation

As Easter was getting nearer and nearer, eggs in all colours and sizes kept cropping up more and more and during one shopping trip, I impulsively bought a lonely looking packet of quail eggs. I've seen them around, but have never had them and given our recent escapade into duck eggs, I've been feeling adventurous.

And so as a nice surprise to Lundulph I served them as a starter before our salad dinner.

IMG_0734

The instructions stated to carefully put in boiling water for one minute, then take off the heat and leave for another 30 seconds, which will achieve a soft boil. If aiming for a hard boil, let them boil for two minutes, followed by a 30 second rest in the hot water. I went for the soft boil and they turned out perfect, even if I counted the seconds in my head, rather than using a timer. A bit fiddly to peel, being so very tiny, but once that was done, a quail egg was a wonderful bite with a nice firm white and creamy runny yolk. The shells were beautifully brown/grey speckled, slightly blueish on the inside and the flavour was very much like a regular chicken egg, but with a slight hint of sweetness at the end.

When I made a second lot a couple of days later, again I counted in my head, however this time I must have counted faster because the eggs were underdone and had to go back in to the water for a few more seconds.

My third attempt was when half the family came over for the traditional Easter dinner. This time I timed it strictly to the second and they ended up between our previous two attempts, so were pretty tricky to peel and most managed to squeeze them too hard so the yolk erupted out. I worked out that peeling the top third of the egg was sufficient to suck out the creamy yolk, then use the tip of a dinner knife to scoop out the white. Still, they tasted lovely on little nests of baby leaf salad. No need for any seasoning or dressing, I might add.

Which brings me to the second egg of the season, I spotted this in our local farm shop, where I also got the beautiful baby salad leaves for the family dinner. The egg was from a goose and was massive in comparison. I've not seen goose eggs in at least 20 years and I'd certainly never eaten one, so this was all very exciting too.

IMG_0735

A quick google indicated that boiling for 10 minutes would result in a runny yolk, so that's what we did. I remembered also that Stephen of Dinner Diary had boiled one for 11 minutes a couple of years ago too.

So after boiling the thing, Lundulph and I started peeling it, realising that the shell was significantly thicker. There was also quite a lot of white at the top and Lundulph began to despair that there wouldn't be much yolk, but this was completely groundless - there was loads and it was wonderfully runny and creamy.

On the whole, it seems that flavour-wise these eggs are pretty similar to each
other, at least to me and Lundulph. The raw white of a duck egg is a lot clearer than
the corresponding chicken one, but behaves in pretty much the same way in cooking too. I've yet to try it out on meringues.

I'm now also pretty curious to see if I can get hold of a turkey egg, I'm guessing it would be of similar size to the goose egg.

The online shop where I purchased the ostrich fillet for Christmas also say they do eggs, when in season, though this season isn't specified. This sounds extremely tempting, but would require the majority of our extended family to come together for a massive omelet for a purchase like this to be viable. Not entirely out of the question for the future though.

One thing to note in the two photos above is that the bowls in which the quail and goose eggs are presented are the same.

Oh, and sorry for the silly pun on the post title, I just couldn't resist.

27 March 2010

Omelet and Bread Proficiency

Over the past couple of days, I've been successful in omelet making as well as bread making.

Again, a last minute dinner decision on the omelet, but I decided to try and make it a bit more special, by frying sliced onion in some butter and also slicing and frying some shiitake mushrooms also in butter. I kept them separate, as they'd take different times to cook.

IMG_0728

I whisked a couple of eggs together with a splash of milk, salt and pepper, then fried it in a little butter as well. When it was almost ready, I added some onions and mushrooms to one half, then managed to fold the omelet with the help of a couple of spatulas. I don't feel as confident as professional chefs to just flick it into folding. it was difficult to get onto the plate in a good way too, only one of the omelets worked. I decorated with a couple of slices of "Fillet Elena" (филе Елена), which is a Bulgarian cured and dried fillet meat - similar idea to billtong, but not as hard. Together with the tomatoes I bought from our new greengrocer's, it turned into a very yummy mid-week meal.

I've also had success with the latest batch of bread.

Having almost run out of flour (unheard of!), I took out 150 g of my starter "Monty", added to that 100 g strong white flour and 100 g wholemeal flour along with 100 g water, which turned into a fairly stiff starter. I closed the jar tightly and went off to the shops (to buy more flour among other things).

Back some 5 h later and there was pssst-ing and sigh-ing in the kitchen. Turns out, Monty was so happy about the feed, he'd fed intensely and generated such a pressure in the jar that the lid had bent and the starter had run over and was working its way on the work surface. So no time to lose.

I put the starter in the mixer bowl - it was 380 g in total. To this I added 150 g wholemeal flour (all I had left) and 800 g strong white flour. Then topped up with 410 g water. After almost full gluten development (i. e. 8 min kneading in the machine) I added 15 g salt and 0.5 dl olive oil. I let the machine run for another 6 minutes and still most of the olive oil had not been incorporated, so I stopped it before it burnt out the engine and started kneading by hand. This worked a lot better and all the oil went in fine. This is the first time I've added fat to a sourdough, very exciting.

The dough went into the bowl again for a rest of 1 h 30 min, while I took the opportunity to make a tepee over my tubs of potatoes, to protect them from filling up with water from all the rain we've been having.

The dough rose very nicely in the mean time. It weighed just over 1600 g, so I divided it into three and shaped into loaves that went into my three loaf tins. The dough was quite stiff this time, at about 50% hydration, so very easy to work with. I gently pushed each part out onto the surface into a rectangle, then rolled it into a loaf.

Once in the tins, I brushed with more olive oil and sprinkled a mixture of polenta, crushed oat bran, sesame and black onion seeds. Then covered with cling film and left to rise for about 4 h. I could have left it a bit longer, but it was nearing bed time and I didn't want to leave them overnight or the dough would try to escape again.

I baked the loaves for 20 minutes on 250 degrees C, then turned down to 200 degrees C and gave them another 30 minutes.

IMG_0730

Lundulph and I had some for lunch today and both texture and flavour was super. I must remember not to use as much water as I have up to now. My previous breads have worked out to some 90 - 100 % hydration, which has resulted in a sloppy dough and not too pretty loaves (though they were quite tasty too). I also resisted the temptation to slash the loaves, though I suspect I would have been more successful than before. Drooling over the photos in The Fresh Loaf, I've noticed that some breads had poor excuses for slashes, just like mine and it occurred to me that it might have to do with how wet a dough is.

So now we're set for another couple of weeks of bread and I'll have to try and make pancakes with the surplus of sourdough I'll end up with when I feed Monty next week.

By the way, Lundulph didn't like my tepee and I had to take it down today and made a more discreet looking poly tunnel. It rained really heavily in the afternoon with a fair bit of wind too, but the thing is still standing, so all is well in the garden, looking forward to some lovely tatties.

13 March 2010

Conchas for Mother's Day

Tomorrow is Mother's Day in the UK and to celebrate I decided to have a go at conchas. I first spotted these on Susan's YeastSpotting event on 5th February this year and they looked so intriguing, I put them up on the list of to bake. Quite high up too. Then Susan herself followed suit a couple of weeks later.

Both looked beautiful and reading through the recipes quickly, I decided for the first one, which seemed a bit easier. Sadly I ignored looking up the original recipe it was based on, however, I ended up with something really good anyway and know what I need to do next time to achieve an even better result.

IMG_0727

I'm posting the recipe here in metric along with the couple of alterations I had to make on the fly to make things work.

Ingredients
Sponge
220 g warm full milk (2 dl + 1 tbsp)
7 g instant yeast
165 g strong flour

Dough
All of the sponge
290 g strong flour
120 g granulated sugar
1 medium egg
2 tsp vanilla extract
1.25 tsp salt
2 tbsp full milk (if needed)
45 g unsalted soft butter

Topping
120 g plain flour
110 g granulated sugar
106 g unsalted soft butter
0.25 tsp salt
1 tsp ground cinnamon
15 g unsweetened cocoa powder

Now, I pretty much followed the instructions in the recipe on how to make the conchas, but in hindsight there are a few tweaks to do. I've incorporated these below. I must also measure up the flour next time so I know the weight, rather than the volume.

Method

  1. Warm up the milk on low heat to feel warm on the fingers, but not hot, about 40 - 45 degrees C. In the mean time mix instant yeast and flour well, then pour in the milk and mix to combine. I recommend using the bowl of the machine that'll make the final dough. Cover and leave for an hour in room temperature until it bubbles up.
    IMG_0720
  2. Add the ingredients to the dough, except the butter, then mix to a shiny and elastic dough. It must be sticky, so if it isn't, add a couple of tablespoons of milk, one at a time, while mixing until it is sticky.
  3. When the gluten has developed, add the butter and mix in well, then scrape off the bowl sides and the mixing paddle, cover the bowl and set aside for an hour to rise and double in size.
  4. While the dough is rising, mix the ingredients for the topping - it should form a paste like for cookie dough. Then place in the fridge to firm up.
  5. Line three baking sheets with baking paper.
  6. Take out the dough on a well floured surface and divide into 50 g pieces.
    IMG_0721
  7. Take out the topping from the fridge and divide into the same number of pieces as the dough. It may seem like very small pieces, but it should be OK.
  8. Either use the palms of your hands to flatten a topping piece into a circle or place the piece between two pieces of cling film and roll with a pin.
  9. Roll a dough piece into a ball, then cover with the topping circle. The topping should cover the top and sides of the dough ball. Then place on a baking sheet and press down to flatten a bit. It'll spring back and rise even further during proofing later on.
    IMG_0723
  10. Repeat with the remaining pieces. Then use a sharp knife to cut patterns into the topping, reaching the dough.
    IMG_0724
  11. Let proof for 30 minutes, while pre-heating the oven to 200 degrees C.
  12. Bake the conchas for about 15 minutes, until the topping looks dry and the areas where the dough is visible begin to show a bit of colour.
  13. Take out and let cool on a rack, then store in an airtight container.

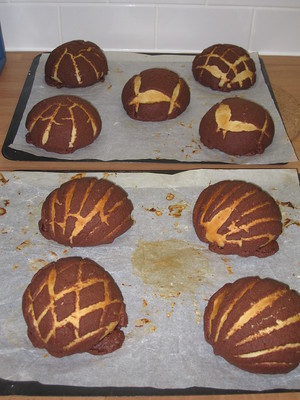
I made 14 pieces of 70 g each, which resulted in balls the size of a tangerine and after baking, buns the size of oranges, way too big. But they were very tasty and Lundulph suggested that they have some sort of creamy filling in the middle. I think perhaps some custard, I just need to work out how to get it in there, I'd like it to go in before baking, not afterwards. Will have to think about it and experiment.

IMG_0725

The dough was not too sweet, but combined very nicely with the topping. I'd expected the topping to be crunchier, though given how thin it was, that might just not be possible to achieve. Still the combination of textures and flavours was very good and I think a centre of custard would be grand. Besides, I rolled the topping into too large circles, so they were very thin and I wanted to cover the whole buns almost. Though with such a sticky dough, once I'd placed it on the baking sheet, I couldn't lift it up again without ruining the ball shape, so I just tucked in the topping as much as I could.

IMG_0726

It's very important to cut the patterns in before the dough has proofed too much, so that there is room for expansion without the topping cracking too much. It'll do that a bit anyway from the oven spring.

Lundulph also suspects they will go stale pretty quickly, so a quick whizz in the microwave just before serving would be in order too.

Oh and if you're wondering about why the baking paper looks so messy, that's because I originally tried to make the dough balls without flouring the work surface, but wetting my fingers instead. This became very messy, I couldn't really shape any balls at all and ended up scraping off the ones I'd made back onto the work surface, this time with lots of flour on it. The second attempt worked better.

Update on 2019-10-18:
I finally got round to measuring up the flour, mainly because I didn't have instant yeast and wanted to work out how much fresh yeast I should use instead.

7 dl of strong flour weighed 466 g, though I suspect there is variation depending on how packed together the flour is. For this I used 14 g fresh yeast. The resulting dough divided up really nicely into 18 pieces of 50 g each, which was very pleasing.

Further ingredient swaps were caster sugar instead of granulated, to make the dough a little bit sweeter and also using a large egg instead of a medium one.

Also dividing the dough into 50 g pieces, I reduced the baking time to 10 minutes. Finally, I got to use my new conchas cutters which I bought from Amazon a few months ago. A little bit disappointing, because they are made from hard plastic, which isn't sharp enough, so I had to press quite hard to get the patterns onto the buns and they weren't as defined as when I cut with a knife, but it's so much faster to do and there are some patterns I couldn't do with a knife, so definitely a good investment.

8 March 2010

Smoked Salmon Pie

As mentioned the other day, half of the ravioli filling was left over and so I decided to make a pie.

IMG_0714

This worked out very nicely indeed, the recipe for the pie crust is from my Cordon Bleu book.

Ingredients
3 dl plain flour
1 tsp salt
1.2 dl unsalted butter
1 egg
2 - 3 tbsp water

Method
  1. Mix the flour and salt in a bowl, then cut the butter into thin slices into the flour and rub in. The mixture should look a bit like pale polenta.

  2. Add the egg and water (a little at a time) to form a dough. Shape into a ball and refrigerate for at least 30 minutes. Do not over-work it or it'll become difficult to work with.

  3. Roll out to the size of the pie dish and transfer carefully to it. Careful not to stretch the dough during rolling, as that'll make it shrink during baking.

  4. Blind bake at 180 degrees C until it develops a bit of colour, duration depends on how thickly it was rolled.

  5. Remove from the oven and allow to cool a few minutes, then add the filling. Use any left-over dough for decoration or if the pie dish is small, as a lid for the pie.

  6. Bake at 200 degrees for 30 minutes until the pie has baked through.


IMG_0715

I only had one egg left and I used it in the dough, so couldn't brush the bottom crust with egg white before the blind bake. Otherwise it's a good idea to do this, it'll protect it from going soggy from the filling. Also the yolk can then be used either in the filling, if doing a quiche or brushing the dough decoration/lid of the pie, which again will make it more attractive visually.

We had it with pickled gherkins, roasted artichoke hearts and pickled roasted chillies. This last lot of the chillies was a bit of a disappointment, since the chillies in question had been picked way too early and had not developed any spiciness to speak of. However, the flavour of fresh chillies came out very strongly and they were still very tasty, I just fancied a bit of spicy heat as well.

Still, the pie turned out very nice and tasted great too and got me thinking that this would be a good way of using up left-overs, especially when there's not really enough for a full portion to freeze. I might just mix a couple of batches of the crust dough and freeze and have ready for such situations.

5 March 2010

Lingonberry And Hazelnut Bread

The inspiration behind this comes from TheFreshLoaf blog. Generally I look at the photos only, but ever so often there are interesting posts as well. One was on bread with blueberries and whole hazelnuts.

IMG_0713

Not really season for blueberries at the moment, but I have some lingonberry jam that I'm trying to use up. Lundulph wasn't taken with it and the jar is just too big for me to tackle on my own, though I am doing my best.

So this week's batch was to be wholemeal and have lingonberry jam and hazelnuts in it. Since I started my sourdough Monty, I've been improvising heavily, although generally using the same ingredients every time, but varying the amounts. However, I thought I'd write these down.

Ingredients
350 g white flour starter (100% hydration)
350 g strong white flour
150 g strong wholemeal flour
300 g water
12 g salt
150 g sweet lingonberry jam
100 whole roasted hazelnuts

Method
  1. Feed the starter a few hours in advance, so that it's at its peak when baking. Monty takes about 5 h.

  2. Add the starter, flours and water into the bread mixer and run for 10 minutes to get a nice dough. Or make by hand of course.

  3. Towards the end of the kneading, add the salt, then the lingonberry jam and incorporate well.

  4. Finally add the hazelnuts and mix just enough to get them evenly spread out in the dough. Then shape the dough into a ball and leave to rest for 2 h.

  5. Butter two loaf tins ("pound loaf" size).

  6. On a generously floured surface shape the dough into a long sausage, then divide in two and place in the loaf tins, cover with cling film and place in a cool place to proof overnight or a warm place to proof in 4 - 5 hours.

  7. Pre-heat the oven to 225 degrees C, then slash the loaves and bake in the middle of the oven for 45 minutes. If the crust goes dark, cover with aluminium foil and turn the heat down a bit.

  8. Remove from the loaf tins and let cool on a wire rack.


Lundulph had three slices for breakfast this morning and said it was very nice, though he couldn't notice the lingonberry, only the hazelnuts and mostly because they were whole. This is what I expected, the jam sweetens the bread a bit, so won't perhaps work in a ham sandwich, but mostly it makes it moist. The crumb feels almost a bit sticky.

I haven't had breakfast yet because I'm still full of ravioli from last night.

And yes, I still need to practice on my slashing. I actually went and bought razor blades, in the hopes that they'd work better than the knife I've been using so far, but no. I even tried to wet it, but water doesn't really stick to metal. I'll try dusting flour on the loaves first before slashing.

One thing about improvising with amounts is that I've always ended up with a very wet dough. When I first mixed up the ingredients for this batch, it seemed to turn out rather stiffer than normal, which I thought was good, but two-thirds into the kneading, the dough went just as wet as on previous occasions. But a wet dough gives a nice light shaggy bread and I don't want to lose that.

Smoked Salmon Ravioli

IMG_0712

As always when we go to Sweden, we stock up on lovely hot smoked salmon and lately we've not had any at all, so this week I'm compensating for this fact. Besides, this time we got a new variety with chilli flakes on top, which turned out to be extremely tasty.

Last Monday we had it in the traditional way with steamed potatoes, mustard dill sauce and rocket salad. But Lundulph does like freshly made pasta, so I decided to combine the two and make ravioli. Without a pasta maker. Based on a recipe I found here.

The pasta is the one I made for the cheeseless lasagne. But before that, I prepared the filling.

IMG_0705

Ingredients

1 medium red onion
150 g chestnut mushrooms
1 tbsp grapeseed oil
300 g hot smoked salmon
250 ml créme fraîche
salt and pepper to taste

Method
  1. Peel the onion and clean the mushrooms, then dice both finely.

  2. Heat up the oil in a pan and fry the onion until it softens a bit, then add the mushrooms and fry on low heat until they've softened and given off some of their liquid.

  3. In the mean time, peel the skin off the salmon and discard. Place the salmon in a large bowl and break it up as finely as possible with a spoon.

  4. Add the onion and mushrooms to the salmon and stir in until they've combined well and evenly, then set aside to cool down.

  5. Once the mixture is cool, add the créme fraîche and stir in well, then season.


Mix the dough and leave to rest for 15 - 20 minutes, then divide into four parts and roll out one at a time to about 2 mm thickness. Remember to keep the other dough well covered up or it will dry out.

Cut out circles or rectangles, place a teaspoon of the filling in each, the brush the edge with water, fold into a little cushion and press along the edges. Then use a fork to seal the edge by pressing its teeth along the edge. Then set aside for an hour before cooking.

IMG_0709

The above amount of filling was far too much for the amount of pasta dough, I used about half of it only and ended up with 33 fairly large ravioli. I could have probably managed to produce one more, but rolling, filling and sealing took about an hour and a half and I made the mistake of saving all the off-cuts for last, rather than use them with the next piece of dough. As a fair amount of flour is used during the rolling, all the off-cuts became stiffer and were a lot more difficult to roll out, not to mention that doing them last meant I was already tired from rolling. So my last couple of raviolis ended up a bit thicker than the rest.

However, the remaining salmon mixture will be fine in a quiche. I'll make that in a couple of days, with the remaining 100 ml of the cream from my mascarpone making escapade and some milk. In fact, I might try and use the mascarpone itself.

I also won't be cooking all the ravioli today, but will freeze most of them, ready to use as emergency food, when I can't think of anything better to do.

On the whole, such a simple dish sure required a lot of effort to make, I suspect it's easier with a machine.

I also think the filling mixture would be good on jacket potatoes, rather like my Mexican style topping.

As for cooking the ravioli, one of the instructions I found on the Internet said place in boiling water and leave there until they float back up to the surface. Well they did after about 20 seconds. This meant that the filling wouldn't even have heated through. So I gave them 5 minutes. And I was using my big pressure cooker, filled two-thirds with water, with a dash of salt and about a tablespoon and a half of olive oil, all of it simmering well before I put the ravioli in. Lundulph was extremely hungry after an hour in the gym, so that was the other reason I rushed things. The ravioli were still well al dente, so I put them back in for another 4 minutes. I think at least 10 minutes is the optimal. The flavour was fantastic and I got the texture right too, the ingredients were just the right size to be noticeable, yet blend in together nicely. We ate 11 of the ravioli, meaning there are two further batches of 11 in the freezer for rainy days. And none of the ravioli split while cooking.

Lundulph was wondering about sauce. I didn't make any, mainly because I couldn't think of what to make. Cheese is obviously completely out of the question here and tomato I think tends to be a bit too sour for fish. Lundulph did a quick search which cropped up some sort of bell pepper sauce. I'm not sure about it, but it might work. We agreed in the end to try some sort of a thin béchamel sauce with lots of dill and a dash of mustard. The idea is to echo the mustard dill sauce that is traditional with salmon, yet make it light and without the vinegariness. But a definite success.

4 March 2010

Homemade Mascarpone

Via the WildYeastBlog, I came across BakingObsession, which is another wonderful baking blog. The beautiful photos are quite mesmerising, but there were also a couple of extremely interesting entries - homemade mascarpone and homemade ricotta.

IMG_0704

Now, having seen Susan's fabulous Tiramisu cake, I've decided to make one myself for Easter. And thus homemade mascarpone will come in very handy, but better do a dress rehearsal beforehand.

I have this strange idea about cream that more fat is better and so I almost always buy double cream, which is 47.5%. The instructions called for whipping cream, which is around 36 - 38%, but I didn't feel it was enough and went with the double cream this time too.

Then heating it gently over a bain marie. I have a pot and a glass bowl that fit very neatly together, with the bottom of the glass bowl being at most 5 cm deep into the water and well away from the bottom of the pot. Perfect for melting chocolate and making Swiss meringue. However, it turned out that it was not sufficient for getting the cream up to 87 degrees C for sterilisation. I managed to reach 78 degrees C and topping up of the water and increasing the hob made no difference, so after 10 minutes at that temperature, I decided it was ready.

And so I added 1 tbsp lemon juice and the cream went thick almost immediately, but I kept it in the boiling water for a few more minutes, stirring all the time, just to be sure.

I set it aside and lined a sieve with four layers of cheese cloth, which I forgot to dampen. I also didn't wait 20 minutes for the cream to cool before transferring it to the cheese cloth, I figured it wasn't up to the heat it was supposed to, so shouldn't need to cool as long. And besides, it had formed a skin on the surface. It looked very nice - lovely pale yellow colour - and tasted very nice, like a very smooth créme fraîche, but not as sour. A couple of hours later, nothing had dripped in the bowl under the sieve, the cheese cloth was soaked and the cream was cold, so I wrapped the whole thing in cling film and put in the fridge.

That was yesterday afternoon. I've had a peek this morning and it looks great, there's about a teaspoon worth of clear liquid at the bottom of the bowl, the mascarpone has firmed up quite nicely and smells of yoghurt and créme fraîche. I should have bought some from the shop, so that I can compare. Either way, I'm quite looking forward to tasting it tonight. I'm not going to skimp on the 24 h resting time.

24 h later: I took it out if the cheese cloth and it was completely rock solid. It still had the beautiful colour and smell, but tasted of butter with slight yoghurt overtones. I had some créme fraîche nearby to compare and well, I can only say that this mascarpone was a complete failure. I'll give it a go as a butter on my toast before I discard it completely. But I'll need to get whipping cream and try again, it must have been the fat content of the cream I used, nothing else.

A few days after that: I've now had this "cheese" on my lovely lingonberry and hazelnut bread for breakfast a few times and it's beginning to grow on me. Texture-wise it's pretty close to Philadelphia cheese and it's matured a bit, but still butter is the dominant flavour and things work OK. However, I'm struggling with the amount I ended up with, particularly since Lundulph won't help out and will get rid of it and try again with whipping cream and also with single cream, to see what I'll end up with. I'll also change the bain marie arrangement to one where the bowl with the cream rests on the bottom of the saucepan/pot with water, hopefully this will reach the higher sterilisation temperature that's recommended in the instructions.

27 February 2010

Super Fancy Lamb Kebabs

Last week, Lundulph and I had a week-end in and I took the opportunity to watch Saturday Kitchen. I find this show a bit hit and miss, some recipes I really don't like, some are fantastic and I can never make up my mind if I should watch it regularly or not. Last Saturday, one of the recipes was for kebabs and when I saw the piece of meat ready to be cooked, I just had to watch it.

IMG_0702

The dish was Cyrus Todiwala's Mutton Cannon Ni Seek Boti. That is kebabs and although I didn't pay too close attention, it seemed a good and fairly quick thing to do. I wasn't too excited about the mutton part, I find lamb too strong flavoured on many occasions and I suspected mutton would be even more so, but the piece of meat to use was the best end of the neck and I think "cannon" implies the whole length of the fillet, it certainly seemed to have a cannon shape.

So off to the butcher I went. Unfortunately our butcher doesn't do mutton at all, so I had to get the lamb cannon instead. Lambs being slightly smaller, I asked for both fillets and it was a great joy to watch the butcher bring out half a carcass, snip off the kidneys, peel off the skin on the back and finally pull out a bit machete and carve between the ribs and the spine to get to the two cannons. It looks so easy when a professional does it, but when I try, the piece of meat defies all physical laws so that I end up with an unrecognisable mess. Maybe I don't have the right kinds of knives.

Anyway, out the two beautiful fillets came and amounted to just over 700 g at £25 per kilo. Steep, but it was for Friday dinner, which we try to make a bit more special to celebrate the coming week-end. I did try to get hold of the wine recommended for this dish, but sadly it was not to be.

Since I had a bit more meat than specified in the recipe, I increased the amounts of the marinade a bit as well.

Ingredients

700 g cannon of lamb (best end of neck)

Marinade

2 tbsp minced fresh ginger
2 tbsp minced fresh garlic
1 tsp turmeric
4 tsp ground coriander
2 tsp ground cumin
2 tsp hot chilli powder
1 tsp garam masala
2 tbsp lemon juice

Lamb marinating

Salad "Cachumber"
1 red onion
1 small green mango
1 green chilli
2 plum tomatoes
half a cucumber
handful of fresh mint leaves
handful of fresh coriander
1.5 tbsp lime juice
1 tsp cider vinegar
salt to taste

Cachumber

Relish

1 large green chilli
1 tbsp minced fresh ginger
2 large cloves minced garlic
2 tbsp chopped fresh coriander

For frying the meat

3 tbsp grapeseed oil

For the kebabs

Bamboo skewers soaked in water for a couple of hours
1 dl plain flour
2 eggs
pinch of salt
grape seed oil to fill the frying pan to almost 1 cm

Method
  1. Trim the lamb if it still has bits of fat or sinew on it, then cut into small chunks suitable for kebabs.

  2. Mix all the ingredients for the marinade and coat the lamb well. Set aside at room temperature for a couple of hours, then refrigerate until needed.

  3. Prepare the salad by peeling and finely slicing the onion and mango. Then deseed the chilli and chop. Deseed the tomaotes and cucumber and slice into juliennes. Finally shred the mint and coriander and mix everything well, then refrigerate until needed.

  4. Make the relish by chopping the chilli finely (deseed if you don't want it to be too spicy). Combine together with the ginger, pressed garlic and coriander and put in the fridge.

  5. Just before starting, place the flour on a plate and whisk the eggs with the salt in a shallow bowl.

  6. Heat up the oil in a deep frying pan on high heat, then fry the marinated chunks of lamb until they are well browned, about 3 - 4 minutes. Do in batches, so the pieces are not crowded in the pan.

  7. Once all meat has been browned, make the kebabs, taking care as the meat should be quite hot still. The pieces can be skewered quite closely together.

  8. Heat up the oil to high heat

  9. Roll the kebabs in the flour, make sure they're well coated. Then dredge through the eggs, then place in the hot oil and let fry for 2 - 3 minutes, turning the kebabs to get them fried all over.

  10. Place the ready kebabs on tissue to drain a bit, then serve along with the cachumber salad and the relish.


Now, the above is what I did, because the recipe wasn't quite clear. Apparently the relish wasn't a relish at all, but was an additional layer of spice for the lamb. After the meat had been browned in batches, it should have been returned to the pan, then the relish should have been stirred in and the whole lot should have been left to the side to cool a bit. On the whole, my way worked just as well and had the benefit of allowing more control of the spicy heat. I'd included the chilli seeds in the relish and they did dominate quite a lot, so won't do that next time.

As anticipated the meat was fantastically light and tender. The marinade was perfect for the lamb, I suspect the mutton would have been more obvious as a flavour.

The salad was a great surprise too. I was not at all sure about having mango in a salad. In addition did Mr Todiwala mean a green mango as in an unripe mango or a specific type of mango that doesn't go reddish when it's ripe? Not that I think there was any choice in the supermarket where I normally shop, but I chose a small firm mango that was green all over, so every sign of not quite ripe.

Deseeding the tomatoes and cucumber was fiddly, but worth it, because it avoided a lot of excess liquid in the salad and everything combined nicely, so no single flavour dominated, but there was an overall nice balance of the ingredients and the texture was terrific.

I reduced the amount of oil required to fry the kebabs by half I think. Lundulph wandered into the kitchen to see what was happening just as I started pouring the oil into the pan and I told him to not to look. Then I just couldn't force myself to pour any more than just under 1 cm depth. It certainly felt like deep frying to me. After the kebabs were fried, I not only placed them on tissue, but placed some on top and patted them a bit, to soak up as much as possible.

Some alternative method for the flour and egg procedure will need to be worked out, because it was not straightforward to roll the skewers. Some chunks of meat refused to roll around and they were a bit different sizes, so some didn't reach to get coated and I ended up sprinkling with my fingers, then the same through the eggs to get a bit of coating and a lot of the stuff was stuck to my fingers, when it would have been better on the kebabs.

Since I didn't manage to get hold of that recommended wine - Papa Luna 2007 from Spain, Lundulph selected an Albali Gran Reserva from 2001 and also from Spain, which was very nice indeed.

You might have noticed that there were no carbs to accompany this meal and I suggested we have some quick toast with that, but Lundulph said we could always have that for dessert and tucked in. We didn't miss the carbs one bit and I can't think what it would go well with in the carb department at the moment.

The amount of 700 g lamb seems to be enough for 4 people or perhaps 5 if you do a starter and dessert. I used up 5 skewers on this occasion, but will remember to cut the pieces slightly differently next time.

Oh and I'd bought baby chestnut mushrooms to serve with the kebabs, but unfortunately I completely forgot about them and they are still in the fridge. I don't think they're needed in this case.

22 February 2010

Tandoori-style Chicken

I've finally managed to track down the Gujarat Masala Curry paste required for this Waitrose recipe. Lundulph chose it ages ago and I should really have done one of the other recipes in the collection, but I'd set my heart on this one and so I've not made any progress on Ye Olde Recipe Collection until now.

IMG_0683

The original recipe is here. I had twice the weight of chicken in the shape of fillets, so decided to do a double dose of this dish. The chicken is accompanied by a raita, a salad and chapatis. The below recipe incorporates the changes I made to the original recipe.

Ingredients

150 g Veeraswamy Gujarat Masala Curry Paste
4 tbsp lemon juice
0.5 tsp turmeric
0.5 tsp sweet paprika
600 g full fat Greek style yoghurt
1 kg chicken fillets
250 g cucumber
20 g fresh mint leaves
salt and pepper to taste
1 red onion
3 tomatoes
6 chapatis

Method
  1. Mix the curry paste, 2 tbsp lemon juice, turmeric, paprika and 400 g yoghurt together well in a non-metallic dish. Place the chicken in the marinade and make sure it's well covered. Cover the bowl and place in the fridge 90 minutes.

  2. Peel and dice the cucumber finely. Wash and chop the mint leaves finely. Stir into the remaining yogurt, season, then cover and put in the fridge.

  3. Peel and slice the onion finely. De-seed the tomatoes and slice thinly as well, then combine both into a salad and refrigerate.

  4. Cook the chicken under a medium grill, that has been pre-heated. Turn every 10 minutes or so, so that the chicken breasts are evenly cooked through and through.

  5. Once the chicken is ready, heat up the chapatis as per the instructions on the packet. In the mean time, slice the chicken into small pieces and serve so that the warm chapatis can be filled with the chicken, salad and raita.


As usual, I felt the need to add steamed broccoli to this meal. I also bought some baby chestnut mushrooms, but decided to save for our Friday dinner.

Next time, I think I'll only use 300 g of the yoghurt for the marinade and use the rest for the raita. In fact, the amount of mint and cucumber was not doubled, so what's on the photo of the card is far from what you'd end up with, had you used the listed amounts.

After I'd mixed the marinade, I couldn't resist to have a taste of it. It was very yummy and I think would be excellent as a dip for crisps or tortilla chips just like that.

The de-seeding of the tomatoes was a first for me. I've never had them like that and I felt a lot of the tomato got discarded, but it'll make for a less watery salad. It was a bit of a faff doing it though. I've saved the seeds and frozen for future use.

I also saved the stalks of the mint, I intend to chop them finely and make into tea.

Dicing the cucumber finely made me wonder how advisable this is - cucumber has a tendency to go very watery if cut too finely and indeed this one did. I think it'll benefit from de-seeding too. The raita was very tasty and worked very nicely with the chicken, but the mint was quite dominating, so I'd use a bit less. If I'm to make it for poppadoms, I'll cut the cucumber even finer.

The marinade was quite mild and delicate, once the chickens were ready, I should perhaps have done a bit of basting during the grilling. And the red onion was one of the dominating flavours too, so maybe swap it for something milder, like chives or shallots.

I should do some research on chapatis and see if I can make my own.

Oh, and I had a quick look in my Classic Indian Vegetarian Cookery book, which has a whole chapter on the garam masala spice mixtures and one of these is the Gujarati garam masala from the Western parts of India. It has over ten different spices and is a dry mixture. I might give it a go one of those days.

17 February 2010

Time for a Semla once again

IMG_0682

Once again Shrove Tuesday was nearing and I asked Lundulph if he wanted pancakes for dinner. To which he replied that we need to start a tradition here - with a semla on the Tuesday and pancakes for breakfast the following Saturday.

Chatting to my Mum, it seems that Sweden is in semla fever already, and these lovely buns have been in the shops pretty much since the beginning of the year. She'd also spotted a recipe that she liked and sent it to me to try out. The amounts were slightly smaller than the recipe I did last year, so that was good too.

In addition, I'd been toying with the idea of duck eggs. They sell them in the supermarket and they look very pretty, but I've never seen anyone actually buy them, so when I went to get the semla ingredients, I bought a packet to try them out.

IMG_0679

The yolk seemed to be a brighter yellow and I think the eggs were fairly fresh, as the white was quite dense. I like the shells very much, they look like they're made of alabaster and have some inner glow to them. They are also a bit thicker than chicken eggshells.

What annoyed me a bit about this new recipe was that it called for half an egg. Now that's a tricky one I thought, but resolved the issue by whisking the egg with a fork, then pouring in about half of it. On the interesting side was that the recipe called for "white syrup". It's sold in Sweden and is recommended for baking. I guessed that pure glucose should do the trick too and whisking it together with the butter, I ended up with this fluffy cream

IMG_0678

Ingredients
75 g unsalted butter
0.75 dl glucose
2.5 dl full fat milk
25 g fresh yeast
0.5 egg
1 ml salt
1 tsp ground cardamom (0.5 tsp if freshly ground)
3 dl plain flour
3.5 dl strong flour
1 ml ammonium carbonate

Method
  1. Whisk the butter and glucose to a light and fluffy cream.

  2. Warm up the milk to about 37 degrees C. In the mean time, crumble up the yeast in the dough bowl. Pour the warm milk over it and stir to dissolve the yeast.

  3. Add a couple of tablespoons of the butter cream, egg, salt and cardamom and stir in well.

  4. In a separate bowl, mix the plain flour with 2 dl of the strong flour an the ammonium carbonate, then add to the dough liquid and mix into a very wet dough/thick batter.

  5. Keep mixing until gluten has developed, then set aside to rest for 30 minutes.

  6. Add the remainder of the butter cream and some more of the strong flour to get a fairly soft dough. It should just about not stick.

  7. Take the dough out of the bowl onto a floured surface and divide into equal sized pieces, about 60 g each. I got 16 from the dough.

  8. Shape into balls and place on baking sheets lined with baking paper. Brush the buns with the remaining egg, then cover with cling film and let rise for 40 minutes.

  9. Pre-heat the oven to 225 degrees C, then bake the buns until they are dark golden brown on top, the recipe said 7 minutes, I baked mine for 14 and their bottoms were still quite pale.

  10. Leave to cool on a rack, then follow the instructions from last year.


The recipe instructions recommended making your own marzipan, but I had some in the larder already and I wanted to use it up. Also the instructions were to just cut off a lid off the buns and spread the marzipan over them, then topping up with cream and putting the lids back on. Wrong, wrong, wrong! I think it's crucial to nip out the middle bit and blend with the marzipan.

My Dad sent me an article from the "Semla academy", where the two writers discuss what is good and what is bad for a semla and here is what they say:

The buns should be hand made and the size of a grapefruit.
The lids should be triangular in shape. They reckon often round lids are cut by a machine, so if they are triangular, this implies that they've been hand cut.
The marzipan should be 50% almonds and 50% sugar.
The whipped cream should not be runny but also not too hard and butter taste is a big no no.
Generosity with the icing sugar on top is also important.

This article was in the Stockholm City magazine on Monday 15th February. Only in Swedish, sadly. Besides, most of the other papers will have some sort of semla tasting and comparisons.

On the whole, I don't agree with everything on the list above.

This new recipe was actually very good, the buns rose from this

IMG_0680

to this

IMG_0681

and you can see the colour after baking. Some of the buns stuck together on the sides, that's a bit annoying, but I hadn't expected them to swell up so much in such a short time. Good thing I brushed them with egg beforehand too. The cling film came off a bit easier then, but I suspect I would have punctured them, if I'd tried to brush them just before baking.

A note on the ammonium carbonate, this is often also known as hartshorn salt and is a chemical rising agent and part of the mixture known as baking powder. It smells very strongly of ammonium, but this disappears during baking. I have a bag of it that I bought in Sweden, however, if you can't find it, use the double amount of baking powder instead.

The buns were very fluffy and light and quite soft too, I had to be careful not to leave imprints of my fingers when I cut the lids. A serrated knife is the thing to use.

Lundulph and I enjoyed one each yesterday and there are four more to be put together and eaten this week, the remaining 10 buns have been frozen for future use. Lundulph did consider having a second one, but decided against it in the end. After a big dinner, it would have made him ill for sure.

31 January 2010

Tom the Tomato

Remember tomato plant that Lundulph rescued from the drain outside our house? It's now taller than me and I'm about 160 cm. The plant is very leggy, which was to be expected in the circumstances. But the plant did set fruit and the first one was promptly named Tom.

Well, Tom went red the other week and a couple of days ago, he fell off his perch, so Lundulph and I ate him in a ceremonial way. He was the size of a regular cherry tomato, but smelt very nice and had a bright warm red colour.

IMG_0583

Flavour was very good, but the texture was on the mushy side. Also the skin was very thick and reminded me of my childhood, when I refused to eat tomatoes until my Mum had peeled them for me.

IMG_0584

I suspect that whatever tomato seed sprouted, it was some sort of hybrid that didn't come true to form and instead exhibited these undesirable qualities.

However, there is a second fruit ripening as we speak, Tom's brother Dom and there was one new flower yesterday and several other buds coming along, so we may well have more pickings this Spring.

It's good as a proof of concept, but once we have a greenhouse, we'll select a known variety.

30 January 2010

Harjinder's Chicken Curry

The other day, I stumbled upon the new cooking show from The Hairy Bikers. I find them quite entertaining, though I've not tried any of their recipes before. The cooking show is called "Mums Know Best" and I watched episode 3 entitled "Simple Suppers". One of the Mums that the Hairy Bikers visited was Harjinder from Manchester, who was amazing. I liked that she cooked in massive amounts and had a pretty fully stuffed fridge and was in awe, when she actually started cooking and just couldn't stop. It seemed that once she'd reached two-thirds into one dish, she just started another one.

IMG_0603

One thing that she demonstrated and that was provided in her list of recipes, was the Chicken Curry that just looked lovely and also had the basic Tarka masala sauce that forms the basis for the majority of Punjabi cooking and which can be made in large batches and frozen in decent sized portions, only to have the meat of choice added to make up a quick meal.

I got all the ingredients together, the only thing I wanted to try and couldn't find in my local supermarket was ghee. So grape seed oil had to do. I also had shop-bought garam masala that had a lot more spices than Harjinder's, but looking at her list and the ingredients of the stuff I had, I got away with using just that pretty much.

However, I hadn't read through the recipe very thoroughly and got a few things in the wrong order. Some things I chose to ignore and so I'm writing down what I did, because the end result was well tasty.

I'd originally planned to treble the sauce and freeze for later, but decided against this at the last minute and a good thing too, because I don't have a big enough dish to cook it all in.

Ingredients

600 g waxy potatoes, like Vivaldi
1 dl grape seed oil
3 tsp ground cumin
2 largish onions
1 small head garlic
1 can (400 g) plum tomatoes
1 dl blended fresh root ginger
2 fresh green chillies
3 - 4 bay leaves
600 g chicken breasts
4.5 tsp garam masala
1.5 tsp salt
2 tsp turmeric
0.5 tsp hot red chilli flakes
3 tsp sweet paprika
0.5 l hot water
3 medium sized fresh tomatoes
1 dl chopped fresh coriander

Method
  1. Wash and/or peel the vegetables as needed. Dice the potatoes and parboil for 10 minutes, then drain and set aside.

  2. Remove the hard stalk bits from the fresh tomatoes and cut a shallow cross at the bottom, then dip into the boiling potato water for a few seconds. Then peel the skin and dice.

  3. Chop the onions and garlic. Cut the chicken breasts in largish chunks. Chop the fresh chillies if you want hotter curry.

  4. If the canned tomatoes are whole, tear them up into pieces with a fork.

  5. Heat up the oil on high, then add the onion, garlic and cumin and fry for a few minutes until they go golden brown around the edges. Keep stirring occasionally.

  6. Add the canned tomatoes with their juice, bring to the boil and simmer for 3 - 4 minutes.

  7. Add the ginger, fresh chillies and bay leaves and simmer for a further 3 - 4 minutes.

  8. Add the chicken and the spices and keep sirring until the meat has sealed/browned. Then turn the heat down to medium, add the hot water and the potatoes, then let simmer for 10 minutes uncovered.

  9. Add the fresh tomatoes and the coriander, stir in and simmer for a further 5 minutes, then serve.


In theory the potatoes could go in raw, but with the parboil, they went just a little mushy around the edges and thickened the dish into a stew. The texture was great as was the level of spicy heat - I added the fresh chillies whole. It could have benefited from broccoli both for colour and for taste, so that's a thing to add next time, because this is a definite repeat. Or skip the potatoes and serve with rice, should work as well.

Lundulph actually wanted turkey because he prefers the texture, but a month after Christmas in the UK, there isn't a single turkey to be found, so chicken had to do. He also liked the texture achieved with the parboiled potatoes, he said it reminded him of dishes with dhal - slightly watery, but yet with body, which he associates with Indian food.

We're now set for a week of chicken dishes, since I also made Thai green curry the other day.

Crème Caramel/Brûlée

Once again, this is a thing that Lunduph has been hankering after for ages and since I needed a dessert for this evening, I thought I'd give it a go. I've also recently become the proud owner of Gaston Lenôtre's Desserts and Pastries and thought I'd try it out.

IMG_0604

Well, the book only has the Crème caramel recipe and it calls for 4 eggs + 8 yolks. I only had 6 eggs handy and by the way the book calls it Crème à la Vanille Caramelisée, so had to skip it this time.

I've made crème caramel once before, on the first time my parents-in-law came to dinner. Then I used my Mum's recipe and it didn't work quite - I didn't serve it because I couldn't get it out of the bowl. And last night, I couldn't find the recipe either. This is a dish that should be made at least on the night before.

So I had to resort to Delia's Complete Cookery Course. Generally the recipes I've tried from this book, I didn't like much, but it was an emergency.

And this book has two different recipes, one for crème caramel and another for crème brûlée. The former is baked in a bain-marie in the oven, whereas the latter is cooked on the hob, like custard with corn flour as thickener. Whether this is the main difference to these two or not, I don't know. My thought originally was that in crème caramel the caramel goes in the bottom of the dishes, so that it melts and goes runny when the desserts are taken out, whereas the crème brûlée stays in the dishes and has the caramel on top in which case it doesn't melt, but forms a nice crunchy surface.

The crème caramel recipe seemed simpler, so I plodded on with my original idea about these two puds - bake in the oven and do the caramel on top.

I also made the assumption that milk would be involved and I felt generous in the supermarket and bought fancy Jersey milk. Gold top in old money. Delia called for part milk and part single cream. Oh well, that's what happens when you shop before reading the recipe...

Anyway, I'll stop waffling now and get on with the recipe.

Ingredients

425 ml gold top milk
4 medium eggs
40 g caster sugar
2 tbsp medium maple syrup
1 ml vanilla essence
1 dl caster sugar for the crunchy caramel top

Equipment
The mixture will end up about 800 - 850 ml, so either one big soufflé dish or 6 smaller ones.
A deep baking pan into which the soufflé dish(es) are placed.
Hot water to pour into the baking pan so that it reaches two-thirds of the soufflé dish(es).
Saucepan to melt the sugar.

Method
  1. Heat the milk on low heat, stirring occasionally.

  2. Prepare the baking dish(es) and pre-heat the oven to 150 degrees C. Boil the water to have it ready.

  3. When the milk begins to steam a bit, whisk the eggs, sugar, maple syrup and vanilla essence so that they just come together, preferably by hand so as little foam as possible forms.

  4. When the milk is about to start boiling, pour it into the egg mixture and continue whisking briskly by hand until it's incorporated.

  5. Pour into the baking dish(es), then put the baking tray into the oven and pour in the hot water.

  6. Bake for 1 h, then take out and allow to cool completely, before chilling in the fridge until needed.

  7. Just before serving, melt the sugar in a saucepan on medium heat. This should take about a minute. Do not stir, just shake a couple of times, then when all the sugar has melted, quickly distribute over the crème brûlée and twist and turn the dish(es) to cover the whole surface. It'll bubble a bit as it meets the cold custard. This must be done quickly or the caramel will harden in a too thick layer.


I definitely need to practice on the caramel. It burnt bit, I wasn't quick enough and the crunchy layer was a bit on the thick side. I initially tried with my tiny kitchen blow torch, but it didn't work at all, I think the blow torch is too small, practically a cigarette lighter and I would have run out of the lighting fluid and overheated it, before the sugar melted. Or I used too much sugar. I tried caster sugar and also icing sugar, but it took forever and I gave up. Delia recommended melting the sugar in a sauce pan and that's what I did.

One thing that Delia recommends is to break up the surface before serving, but both Lundulph and I disagree, it's great to get a little dish with the golden shiny surface and to whack it lightly with your spoon and hear it crack.

The custard was lovely and creamy, but the dark caramel dominated the taste and the finer hints of vanilla and maple syrup didn't come through as I'd hoped. Still, very encouraging for a first try and I'll keep practicing.

However, I made the massive mistake of using an electric whisk for the egg mixture and I kept whisking until it pretty much filled the 2 litre bowl, it was that foamy. When I added the milk it went over the edge and made a good portion of my work surface very sticky indeed. I ended up skimming off as much of the foam as I could into the sink.

Lundulph also reckons if the custard goes up to the brim of the dish, sprinkling thin layer of sugar, then holding the blow torch so that the flame is parallel to the surface would do the trick, whereas my dishes ended up half-full and I had to point the torch down into them, thus perhaps I failed at getting the perfect thin layer of caramel.

18 January 2010

Bread from the sourdough revival

To continue from my previous post on my sourdough revival I let the dough rise for about 5 h. At 4 h 30 m I switched on the oven to pre-heat to just over 200 degrees C.

The dough had risen beautifully and smelt very nice too.

IMG_0514

I baked the loaf first and had a bowl of water next to it, still it didn't go too crusty and softened further as it cooled down. I baked it for 40 minutes.

Second I baked the boule, which spread a bit more than I wanted it to, but not enough to warrant emergency folding. Again I left the bowl of water in the oven, but it didn't seem to generate a substantial amount of steam. Also, since the oven has started to only bake on top, about two thirds into the baking time of 50 minutes, I turned the boule upside down, to get it baked underneath a well.

IMG_0527

I think I'll get a couple of loaf pans, a bit bigger than the one I have at the moment and use them instead. The dough is soft and benefits from the support a loaf pan gives. So no more free-standing sourdough bread.

IMG_0528

The crumb was perfect this time, I still can't believe how great the bread turned out from the revived sourdough. Miles apart from the original result last year. And then I did follow the instructions in the book, whereas this time, I improvised to a large extent. Making it up on the fly paid off nicely and I'm hoping I'll be able to repeat next time towards the end of this week. I've kept back what I hope is about 200 g worth of sourdough in the fridge to feed up the day before baking.

Another interesting thing is how much the different coatings changed the overall bread flavour. The loaf was covered with oat bran which gave it a nutty earthy flavour, which would be good with jam or soup, whereas the boule was covered with sesame and black onion seeds and seemed to call for spicier foods to go with it.

In the mean time, we've run out of crisp bread, so I'll be making a batch of that.

Gyuvetch follow-up

Sadly, the gyuvetch was not the success I'd hoped for, although using a bit more oil and double amount of tomatoes at least resulted in it looking as it should. But the vegetables were too crunchy for my liking, in particular the French beans and if I hadn't pre-fried the potatoes, I suspect they'd have been half-raw too.

The meat was braising steak, so would require a longer cooking time, and the 14 h of slow cooking had tenderised it a bit, but not to the point where it melts in your mouth. Thinking back, just before I took the pot out of the oven, the thermometer in there was showing 90 degrees C. Combined with the long cooking time, this should have been sufficient to tenderise the meat, but no.

So experimentation will need to continue to work out how to do a good gyuvetch every time.

There are a couple of options I'd like to try out:

  • Do the same I did the other day, but cook on a higher temperature for a couple of hours, before turning down to slow and leaving it overnight.

  • Only slow cook the meat, then add the vegetables in the morning and cook on higher temperature for an hour or so.

  • Do the same as the other day, but crank up the heat in the morning for the last couple of hours.


On the whole, I should experiment with smaller quantities, as there's so much two people can eat and the gyuvetch is not suitable for freezing.

Perhaps I should choose a nicer cut of meat and dice it, rather than use the ready braising beef they sell in the butcher's too.

So overall, a step on the way, but not quite as far as I'd hoped.

15 January 2010

Sourdough revival part 4

As mentioned in the previous post, last night I fed the starter again, it's been 3 days since the last feed. Again I added

100 g strong white flour
50 g water at room temperature

It looked a bit funny when I took the jar out of the fridge - it had a thin film of liquid, which apparently is called hooch. I found this out on a new web site I found last week - breadtopia. This site has a lot of interesting information and intriguing recipes, so it's definitely one I'll follow from now on.

So I poured out the hooch first. What remained looked a bit like sandy mud and was a bit grayish on top and it smelt a bit different from the original sourdough. However, once I fed it, the look, feel and smell returned.

I then put the jar near the window sill overnight, in order to get it at it's peak in the morning.

When I got up this morning, the sourdough had had its peak and was on its way down again, however it was still well above it's level immediately after feeding. So I skipped breakfast and started on my bread. I guessed that my starter would now weigh 500 g (original dry sourdough 100 g + 100 g water, then first feed 100 g flour + 50 g water, then second feed 100 g flour + 50 g water), so I scooped out 300 g of the starter, leaving me with 200 g for next time.

The consistency was more liquid than in the original run last year, but definitely had the bubbly honeycomb texture. It wasn't as malleable, but stuck to anything.

Next, I wanted to avoid ending up with loads of dough and also I wanted to make the dough a bit harder, so it wouldn't just spread out everywhere and went against what the book said on amounts of flour and water.

300 g sourdough starter
300 g strong white flour
100 g stone ground spelt flour
300 g water at room temperature
10 g salt

I put everything in the bowl of the Kitchen Assistent except the salt, fired it off at medium speed and let it churn for over 10 minutes. I made myself a cup of coffee in the mean time and towards the end, I added the salt.

As is now my habit, I dusted the work surface with flour, took out the dough and folded the edges to form a ball, then back into the mixing bowl for an hour's rest.

After that, I decided to make one boule and one loaf pan. So a third went into the loaf pan, the rest went into the basket. Both are now proofing near the window sill, I don't want to leave them for the 16 - 18 hours as it says in Richard Bertinet's book, I think it might be too long.

The dough was still quite sticky on my fingers, but came off nicely from the plastic scraper and felt like it had a bit more stamina to it.

For the loaf pan, I greased it with butter, then covered that with oat bran and I also sprinkled some on top of the dough. The boule is laid on and covered with a mixture of polenta, sesame and black onion seeds. I bought the onion seeds ages ago an keep forgetting to use them, yet they're so decorative.

IMG_0513

I'll let them proof now and check them mid-afternoon, to see how much they've risen, if it looks sufficient, I'll bake them.

Cooking Day

Yesterday was the first big cooking day of 2010. I started out with making more baked cabbage, since I didn't feel I had enough at my Mum's place over the holidays. I also followed my own advice on the blog entry of frying the paprika for 1 minute. At about 45 seconds the burnt smell hit me very hard, but I didn't have the necessary resources to do a second batch, thus, I used it anyway. I've updated the entry to say 30 seconds only. Otherwise it baked fine and is quite edible, but not as tasty as it could have been.

While this was baking, I went to the butchers to stock up on meats as we'd completely run out. I bought 2 kg pork mince, 1 kg braising beef and 4 large chicken breasts.

The second thing on my cooking list is a new idea that I want to try out, which is Bulgarian meatballs "on demand". The thing is, the meatballs can be frozen, but are never as good when re-heated, so I was thinking, what if I prepare the mixture and freeze it in decent sized chunks, then just defrost one when needed, quickly form the balls and fry. That way it won't require as much planning and will be something that can be done mid-week. So I mixed up according to the recipe and put in the fridge overnight for the flavours to develop. I'll divide it up today and freeze. Speaking to my Mum, she's once again way ahead of me and has already tried this out. Let's hope it works for me as well.

Third on the list was gyuvetch, this time with meat. Due to the snow in our area, the shops have been struggling with re-stocking and so I picked what they had vegetable-wise and used carrots, French beans and courgette in addition to the potatoes. In the freezer I also had diced green pepper and peas. I'd also bought a jar of mixed mushrooms in sunflower oil. That's more of an antipasti thing, but should add to the overall flavour.

IMG_0503

Before starting, I did a quick google search, which spat out the following interesting recipe/video. It's substantially different from the one I make, but had a few elements in it that I'd quite like to try out sometime. What I tried out this time is to make sure the meat gets more colour this time, rather than a quick seal in the frying pan. Then I made sure to fry the onions, carrots and potatoes. I think now that I only slow cook gyuvetch, it's become rather bland of late and I'm trying to figure out why. For starters, I think I've reduced the amount of fat used too much. This time the fat of the mushrooms went in as well. Also I've been skimping on frying the onions and carrots and I think the potatoes might benefit from a turn in the pan too. I also doubled the amount of tomatoes, so let's see if this'll work out better. We're having the gyuvetch for dinner tonight, fingers crossed.

IMG_0504

The last thing I did before going to bed was to feed my sourdough starter. The chicken breasts are still in the fridge, waiting to be trimmed and frozen.

12 January 2010

Sourdough revival part 3

It has been 24 hours since I fed my revived sourdough and my heart is singing, because it's alive!

This is what it looked last night - sort of half-time:

IMG_0480

Most definitely bubbles, not to mention that it had risen, though I forgot to mark the original level.

Today I opened the jar to get a smello-visual confirmation:

IMG_0481

The book said that now it would be the same as at the end of Stage 4 and ready for use. Actually it is quite a bit runnier this time and I don't need to bake right now, so I've put it in the fridge and will feed it in 3 days as per the instructions. This amount seems fairly good and I'll see if I can maintain it without discarding any ferment. It's about half of what I originally ended up with for baking, thus I should be able to manage better and just do one loaf at a time, rather than four in a quick succession.

IMG_0485

I noticed that it's quite obvious how big it got at one point - double volume at its peak. This is just before I put it in the fridge.

I've spent the last couple of days reading up on sourdough and keeping one going, it seems that it can be quite badly neglected, i. e. not fed for a month, while in the fridge and still have some life in it. Or it can be fed once or twice a week and go on forever. Either way, it should be "perked up" to be at the peak of it's abilities when baking. I'll give it a try when I bake next time and I'll also try to make a slightly harder dough next time so that it doesn't spill everywhere. Though that might have been due to over-proofing.

Talking to friends in Sweden, it seems to have become so very fashionable to bake with sourdough, that even the shops sell it, though when I looked, I couldn't find any and so didn't try it out, as I'd planned. Just as well, though, my Mum had outdone herself on lovely food as usual, thus no need for additional bread delights.

11 January 2010

Sourdough revival part 2

As I mentioned in my previous post, I'm in the process of reviving the sourdough I dried out last year.

Here is what it looked like after one day on the window sill:

IMG_0446

And here is what it looked like after two days on the window sill:

IMG_0447

Neither had any bubbles as the instructions mentioned. I had a sniff at it, still smelt fermenty-sweet, like it did when I made it. So I decided to give it two more days, then throw it in the bin.

Today is day 3 and when I remembered to check it (it was hiding behind the curtains now), I noticed a thick layer of bubbles over the surface of the liquid.

IMG_0469

It's not what I expected, but then I didn't expect it to separate with the cream coloured goo at the bottom and yellowy liquid on top either, so maybe these were the bubbles the book mentioned? So I fed it with

100 g strong white flour
50 g water at room temperature

These mixed very nicely with the ferment in the jar and it is now back on the window sill for another 24 h.

IMG_0470

I'm pretty sure it was warm enough for the original soaking of the ferment, so I'm guessing that I may either have killed off the majority of the wild yeasts while drying them in the oven. Or I didn't pulverise the dried sourdough sufficiently, but left it in granules, which take longer to "wake up". Still, hope is still up.

In the mean time, I got the no-knead spelt/rye bread ready and baked. It rose very nicely over the 24 h but due to the lower gluten levels, didn't have the strength to hold together. I followed the usual process of resting on the surface for a few minutes, then folding, then resting a bit more, then folding a second time and then I placed it in the rising basket (now that I have one, I want to use it) for a couple of hours. The dough still felt rather "porridge-y" and didn't rise substantially during the proofing. But it was a bit easier to transfer to the baking pot, even if I did flip it a bit off centre. Also during baking, it didn't rise much beyond what it already had and when I cut it, it was denser, but that's how it should be with rye I think.

Lundulph said it was a bit salty, so if I repeat this particular flour combo, I must remember to reduce the salt. What I realised after I put in the bread to bake is that I'd completely forgotten to add the bread spices, which I brought with me from Sweden back in September. Dang! Next time perhaps. Most annoying is that I did take them out and put them on the worktop, ready to be used and then turned a blind eye to them.

Incidentally, remember Tom the Tomato? Well, he's grown to the size of a golf ball and also has a younger brother Dom. Not only that, the plant is almost as tall as me and it has a second lot of flower buds coming along. How cool is that?

IMG_0450

8 January 2010

New year, old bread

God fortsättning, as they say in Sweden, in the days after New Year. Literally it means good continuation, basically a wish for the new year to continue well.

We had a really good New Year in Sweden, with copious amounts of snow and more degrees below zero than you can shake a stick at.

For starters, I got to paint the New Year dinner bread my Mum aways bakes and she had a brush, which made a big difference. Sadly I didn't take a picture, but I'm definitely getting a couple of brushes for myself.

We also went to a New Year's party at a friend's penthouse near the centre of Stockholm. There was lots of Champagne and a great view of the fireworks. My friend and her boyfriend had each made a dessert - she two beautiful cakes and he some gorgeous chocolate mousse. I couldn't resist taking a couple of snaps, which I want to share.

IMG_0434
This one had cream of forest berries inside.

IMG_0433
This one had cream of cappuccino inside and the poinsettia flower tasted of raspberry, yummy!

IMG_0436
There is fluffy chocolate ganache at the bottom and white chocolate mousse on top, absolutely divine.

My contribution was to bring the ready rolled white icing for the cakes all the way from England. I also made bread sticks from the basic recipe of Richard Bertinet:

500 g strong white flour
10 g fresh yeast
10 g salt
350 g water

They turned out very popular and I had to make a second batch for my Mum, who particularly liked them with "grillkrydda", which is a spice mix used for coating meat before a barbecue. My Dad thought they were a bit salty and ate the poppy seed ones. Bip liked both I think.

We're now back at home and managed to just make it home before the snow arrived, made the scenery look like the one we'd just left, i. e. covered in a thick blanket of snow and made the whole country more or less grind to a halt. Who would have thought? But speaking with my Mum, it got even colder after we left, with below minus 20 degrees C!

And we've finally run out of the sourdough bread. Yesterday I made my way to the shops to stock up on some basics and lo and behold, they'd run out of strong white flour! There must be a lot more bakers in the area, than I've previously suspected. So I had to settle for some stone ground spelt flour. I've used it before and it tasted rather like wholemeal, so should be OK. I've now mixed up my usual kneadless bread but with 6 dl spelt flour and 1 dl rye flour and had to increase the liquid to 4.5 dl to get the porridge consistency. This will take up to tomorrow morning, but is quicker than the next step in my sourdough escapades - reviving and using the dried out ferment I created in stage 2. It certainly smells just like it did back then and the instructions are

100 g dried ferment
100 g warm water

Put both in a jar, put the lid on and shake well to mix.
IMG_0444
As you can see, it's now on the window sill, taking in the heat from the radiator. With the Winter all around us and our house not being too insulated, the average temperature has dropped to around 18 degrees and I'm constantly putting on more clothes or leaning against the radiator. The instructions are to keep this for a day or two in a warm spot, near a radiator and not to drop below 25 degrees C. So fingers crossed.