18 September 2010

Bulgarian Rabbit Fricassée

When I cooked rabbit two years ago, my Mum sent me a whole batch of rabbit recipes from one of her Bulgarian cook books. In the end, I did a slow cooked stew, but when I spotted rabbits in our local butcher's, I decided to go through them again and give one a try.

I'd frozen the rabbit, which I found out is a bad idea, as it makes it go rather dry when cooking. Oh, well.

I read through all the recipes and the most appealing one seemed to be the rabbit fricassée. Almost all the recipes called for the rabbit to be marinated for 24 h and they had provided the marinade recipe for it as well.

I also intended to make sure that no small bones ruined the experience by providing an unnecessary crunch.

I defrosted the rabbit and made the marinade.

Marinade Ingredients
2 l water
0.5 l wine
2.5 dl vinegar
1 large carrot
1 medium sized onion
2 bay leaves
20 pepper corn
2 cloves

Marinade Method
  1. Mix the water, wine and vinegar in a large saucepan.

  2. Peel and wash the carrot and onion, then cut in large chunks and add to the liquid along with the bay leaves, pepper corns and cloves.

  3. Bring to the boil and let simmer with the lid on for 15 - 20 minutes, then cool completely before using.


This marinade is for game generally, not just for rabbit. Also wine and vinegar were not specified, so I chose a red Zinfandel wine. For the vinegar, I thought I'd use a stronger one - malt vinegar, but I only had 2 dl of that, so I topped up with 0.5 dl of sherry vinegar.

It was while the marinade was cooling in the sink that my cooker lid exploded.

The instructions said to pour the marinade over the rabbit, then turn it every couple of hours, but my saucepan was big enough for the rabbit to fit in nicely. So in it went and the whole lot in the fridge to marinade for 24 h or so.

Then yesterday I researched on how to joint a rabbit and found these two videos mostly useful and instructive. Part 1 and part 2.

I also sharpened my big chef's knife and took the rabbit out of the marinade. It had soaked up well and had turned purple. OK, never mind. The marinade itself smelt of Swedish mulled wine. Must have been the cloves.

Watching the first video twice, I proceeded to cutting my purple rabbit into chunks. I think my rabbit had a slightly different anatomy to the one in the video, because I encountered some extra bones here and there, but on the whole, I think I was quite successful.

IMG_0946

I then watched the second video and ended up with this:

IMG_0947

I know the rabbit is a pretty small animal, but the useful bits are very few. But it came with its liver and kidneys, so I decided to add them to the good bits. The rest of the rabbit was to be used for the stock.

Ingredients
1 marinated jointed rabbit
1 large onion
2 large carrots
1 slice of celeriac, about 100 g
2 bay leaves
20 pepper corns
water
salt to taste

100 g butter
4 tbsp plain flour
2.5 dl milk
2 egg yolks
2 tbsp lemon juice
fresh chopped parsley

Method
  1. Dice the edible pieces of the rabbit, place in a cheese cloth and tie into a bundle. Place the bundle and the rest of the rabbit in a large saucepan.

  2. Peel and wash the carrots, onion and celeriac and cut into a few pieces and add to the saucepan.

  3. Add the bay leaves and the pepper corns and cover with water.

  4. Bring to the boil, then season well and simmer for about 1 h. Check occasionally and remove any foam that forms in order to get a clear stock.

  5. Remove the bundle and place its contents into an oven-proof dish and keep warm in the oven.

  6. Strain the stock and discard the rabbit carcass and vegetables.

  7. Melt the butter on medium heat. When it bubbles, add the flour and stir vigorously for a couple of minutes.

  8. Slowly add the milk, while stirring briskly. It'll lump together a the beginning, but as more milk is added it will turn liquid again.

  9. Once all the milk has been added, continue with the stock until you reach a thick gravy consistence.

  10. Cover the sauce and let it bubble slowly for 10 minutes.

  11. Take off the heat and stir in the two egg yolks and the lemon juice, then pour the sauce over the rabbit, sprinkle the parsley and serve.


IMG_0948

The recipe recommended that this dish be served with mashed potatoes, so I made Delia's Perfect Mashed Potato, which I've done on many occasions and it has never disappointed.

I had also picked what is probably the last runner beans of the season and I cut them in pieces and steamed, then stirred through with knob of butter at the end.

Given all the effort, this was a bit of a disappointment. The recipe didn't actually specify the amount of water to use, I got almost 2 l stock in the end. It also didn't specify how long to cook for, it just said until it goes soft. Well, it was soft when it was raw and when I checked it after an hour it was quite solid. I wanted to be on the really safe side and gave it another 30 minutes and the meat was very dry, so no more than an hour. And I suspect the freezing contributed a lot to the dryness as well.

The liver and kidneys were very strongly flavoured and I think I'll save them next time and make pate from them, rather than add to the rabbit dish.

I used about 6 dl of the stock for the sauce and it made up way too much for the handful of meat, but the sauce very good and might work with white meat of chicken and turkey, as it had quite a nice aroma. And I have over a litre of stock left, which I will freeze in portions, it is also quite good.

In all, the marinade was good and I'd like to try it on other meat. The sauce would be well worth using elsewhere. I'm glad and proud that I managed to joint the rabbit on my own and I now need to buy a slightly smaller, but much sharper knife than I currently have. And I'll repeat the slow cooked recipe next time, it was so much tastier.

And stay away from runner beans after July. The ones I served last night were so very stringy, it was practically impossible to eat, I ended up splitting them in half and just scraping off the inner-most bits.

Lundulph said the dinner was OK, but it's not one we should repeat. Though perhaps the liver and kidney put him off for the rest of the fricassée. Once you'd eaten a bite from them, the flavour remained in the mouth and it was impossible to taste the actual rabbit.

Explosion!

Well, I've been having evil thoughts about my cooker lately, mainly to do with the fact that it doesn't have a fan in the oven, thus resulting in bread with almost white underside, as not enough heat ends up underneath.

Multi-zone cooking it's called and is probably really good for a roast dinner, where you need to cook several things at different temperatures, but for bread, you want heat both above and under.

And perhaps the cooker picked up bad vibes from this and decided to explode its lid last Thursday. Luckily at the time, I was in the living room, sorting my recipes. That's when I heard a large bang from the kitchen and was almost afraid to go in and see what might have caused it.

But that was just a moment's hesitation. I carefully opened the door to a floor covered with small dark glass pieces and wondered what on earth they were - all glasses I have are clear. Then I noticed that the two bread tins I'd placed on the cooker were sitting at a slightly odd angle and realised that the toughened glass lid was no more. I rushed in and removed them, thinking I might have left a hob on and closed the lid and that would have caused this disaster.

I then spent the better part of the evening cleaning up, while trying not to imagine how shredded I would have been if I'd been in the kitchen at the time of the explosion. Well, the kitchen was in need of a good clean anyway.

I then had a long talk with my parents and my sister on the phone, thus completely forgetting about my two loaves and they almost tried to escape from the tins after over 6 h of proofing, when I'd originally intended to do only 3. This was not detrimental in any way, in fact I might have stumbled upon something good.

I also did some search on the internet about this. I've only had the cooker for barely 4 years. But it seems that this is nothing new. And there are lots of theories about it. The one that appealed to me is the placing very hot or very cold things on the lid, thus weakening the glass and causing it to shatter in a highly dangerous way. I do place frozen things on the lid to defrost. And I do put things that I've taken out of the oven on the lid as well, though not at the same time as the frozen things. And I do close the lid very soon after using the hobs, without letting things cool down first. Still, this shouldn't happen. Why don't they use the same stuff they use on ceramic hobs? That seems to be able to take a bit more beating.

Mainly though, it seems that the glass of the oven lid is the one to explode in such a dangerous fashion. Well, I have a double oven, that makes it 2 more chances of this happening, though on a slightly smaller scale.

I was mostly worried that I'd forgotten to switch off a hob before closing the lid, this terrified me immensely. But as I taped up the metal bar at the back, which held the glass lid to the cooker and had a lot of sharp bits sticking out of it, I noticed that it kept pushing a small metal piece, as the lid opened and closed and I realised that this was the gas cut-out, should one indeed close the lid when hob is on. Puh! Even if I had forgotten it, it wouldn't have continued to burn.

So, now I have a maimed looking cooker and am seriously thinking of replacing it. With one that has a fan in the oven, so I can get a more even temperature when I bake my breads. Sadly there wasn't much available on the market, only one oven in fact.

There were also no cookers that had a metal lid instead of a glass one. It would probably buckle, but that won't fly through my kitchen and pierce me.

I baked my breads at nearly Midnight, when I finally remembered them and they turned out absolutely lovely.

As for the cooker, I'll live with this one for a bit longer, hopefully new models will come out that do the things I need them to do. And are easier to clean.

16 September 2010

Rhubarb Jam Second Batch

Well I'm not sure what I did right this year, but the rhubarbs sprouted new leaves after I picked them earlier this year. Enough for a second batch of jam.

Looking at my entries before, I didn't write down details on what I did, so will do that now.

Ingredients
750 g trimmed rhubarb stalks
800 g jam sugar
8 g pectin (1 sachet)
2 dl water
1 tsp vanilla essence

1 tbsp lemon juice
20 g unsalted butter
2 tbsp punsch

Method
  1. Place the jars in the oven on just over 100 degrees C.

  2. Wash and dice the rhubarb and place in a large saucepan with a thick bottom.

  3. Add the sugar, pectin, water and vanilla essence and stir round, then heat up on medium-low heat, stirring occasionally.

  4. Boil until the rhubarb is soft and starts disintegrating and the setting point is reached, about 15 - 20 minutes.

  5. Add the lemon juice, butter and punsch and stir in well, then remove from the heat.

  6. Distribute into the hot jars, close the lids tightly and allow to cool.


Of course the punsch can be exchanged for a different liqueur or omitted altogether, like in the first batch. I actually used 0.5 dl and it was a bit over-powering, so I've reduced the amount. It's still very tasty though.

11 September 2010

Rump Steak With Pepper Salsa

It is once again time for Ye Olde Recipe Collection, I did say I'd picked out two cards at the beginning of the week.

IMG_0941

This was originally planned for last night, however, due to my DIY-ing, I ran out of time, and so postponed to today.

In addition I had a bit of a baking day today. The main thing I did was the strawberry mousse cake, which will be for Lundulph's birthday celebrations tomorrow. Lundulph agreed that I would do the same cake a second time, in order to get the gelatin amounts right. Fingers crossed that it works, I botched up folding the strawberry purée into the whipped cream and it went all runny, but I definitely used the right amount of gelatin. I think.

Then I decided to make a large batch of bread and once and for all reduce the amount of sourdough in the jar in the fridge. I fed the starter in the evening before and ended up using 500 g of it on a 1:2:3 formula, where the liquid was 500 g water and 500 g Guinness. This was very interesting, as the 1500 g flour was far from enough, I ended up with a thick batter instead of dough, so I ended up adding a further 200 g flour. And this time I went through the process properly with two stretches and folds during the rising and properly shaping the loaves and tucking in to get the surface tension and got a fantastic oven spring. Also, despite using white flour, thanks to the Guinness, the breads ended up looking rather brown, almost like rye bread. They are gifts to the family for tomorrow, so I've no idea what they taste like, I hope it's good.

IMG_0944

Then finally I got onto the evening meal. The recipe is from Waitrose again. The card doesn't actually make any recommendations as to how to serve as a complete meal, so after conferring with Lundulph, we settled on potatoes, as being the best carb accompaniment to a steak. Then I spotted some nice looking curly kale in the shop and decided to give it a go. I've had it once before at a dinner at our neighbours a few years back and remember it was nice.

The salsa part seemed a bit on the not enough side, so I decided to double it. I also thought that a plum tomato wouldn't work grilled and de-seeded, so I went for a beef tomato instead.

Ingredients
Salsa
2 large red peppers
1 large beef tomato
2 tbsp chopped fresh oregano
1 hot red chilli
2 tbsp olive oil
2 tsp balsamic vinegar
salt to taste

2 beef rump steaks
crushed black pepper

new baby potatoes
sliced curly kale

Method
  1. Pre-heat the grill on medium high. Wash the peppers, tomato, oregano and chilli.

  2. Quarter the peppers and remove the seeds. Halve the tomato and remove the woody stalk part.

  3. Grill the peppers skin side up for about 10 minutes, adding the tomato halves skin side up after 3 minutes.

  4. In the mean time, chop the oregano and chilli and mix together with the olive oil and vinegar in bowl.

  5. Steam the potatoes and the curly kale according to instructions on the packet.

  6. Once the peppers and tomato are done, their skin should be blackened. Place in a plastic bag or a saucepan with a lid and let stand for a few minutes. Then peel the skins, de-seed the tomatoes and dice both finely and stir in with the oregano, chilli, olive oil and balsamic vinegar.

  7. Sprinkle crushed black pepper on the steaks and fry them to the required doneness, then serve with the potatoes, curly kale and salsa.


Well, the two beef rump steaks I got were good, but one was rather thick and frying them together proved a challenge. Besides I was a bit distracted with the potatoes and curly kale, thus I didn't cook the steaks long enough and didn't turn them quickly enough, thus the thicker steak seemed almost charcoaled on the outside and was way too rare in the middle. I had to fry it for another couple of minutes. The thinner steak was good for me, I like it medium rare or well done, so it was fine, but felt a bit on the grisly side. So if I'm to do this again, I won't go for rump steak, but for something fancier.

The curly kale wasn't as nice as I remember it. What mostly put me off was the texture, it felt a bit like paper. Lundulph seemed to like it though.

The salsa was a really nice surprise, I hadn't made any thoughts about it, but it turned out really well. Of course, grilling peppers isn't quite the same as roasting them in a pepper roaster, in the 10 minutes, they didn't cook through like they do in the pepper roaster, but I think this actually was an advantage for the salsa. The beef tomatoes were quite fleshy and didn't go too mushy under the grill. I generally don't like grilled or fried tomatoes, unless blended, so this worked well.

On the whole a bit fiddlier than expected, but was a nice meal. The salsa was the best, I thought, and I'm glad I made a double amount.

9 September 2010

Caramella Cooks Is 4

Well, what do you know, it's 4 years since I started recording my recipes. In a way it feels a lot longer.

IMG_0938

I've also neglected my Ye Olde Recipe Collection project and went through my cards the other day and decided on a couple of recipes that looked easy and quick enough to do. You see, I'm rather busy during the days this week, so quick ad easy is crucial.

The one I did last night was Waitrose's Oriental salmon with salad onions. However this recipe calls for a griddle pan, something I do not possess (yet). The recipe card is for 2 portions, but the salmon fillets in the shop looked so nice, I bought two packs, which amounted to 4 portions and that's what I adjusted to. Well, I tripled the marinade as I always find the given amounts are not enough.

Ingredients
3 tbsp light soy sauce
1 dl grated fresh ginger
1 tbsp olive oil
4 salmon fillets with skin still on, about 600 g
2 bunches of salad onions
600 g potatoes
3 tbsp olive oil
1 tbsp sweet paprika
salt

Method
  1. Mix together the soy sauce, ginger and olive oil, then marinade the salmon in it for about 10 minutes. A good way to do this is to put the fillets in a food bag together with the marinade, tie the bag well, then shake around to get the fillets covered.

  2. Clean and trim the salad onions, clean and dice the potatoes, then steam them until completely cooked.

  3. Pre-heat the oven on the slow cook setting, just over 100 degrees C. Heat up a frying pan on medium heat.

  4. When the marinating time is up, fry the salmon with the skins down for a few minutes, then turn around once and fry for another couple of minutes.

  5. Transfer the salmon to an oven safe dish and put in the oven to finish cooking and keep warm.
  6. When the potatoes are done, transfer to an oven safe bowl, drizzle some olive oil, sprinkle paprika and salt and stir around, then also place in the oven to keep warm.

  7. Pour any left over marinade into the frying pan again and add the onions and fry for a couple of minutes just so they start to soften a bit, but not so that they begin to wilt.

  8. Distribute the onions on four plate, place a piece of salmon on top of each, then add the potatoes and serve.


When I fried the salmon, it went opaque very quickly and I panicked a bit thinking that I'd overcooked it and took it out and served it, but it wasn't quite ready in the middle. Thus, finishing it off in the oven would get it cooked through, without burning the surfaces completely.

Despite the simple marinade, the flavour was very good. The original recipe recommended crushed potatoes, I added the paprika and it blended in quite nicely. The salad onions had lost the oniony edge and had developed a sweetness that combined nicely with everything else as well.

Alas, these were the last few of our own homegrown potatoes. I guess the compost that we grew them in, our very own, wasn't strong enough for the hungry plants and we got 3 portions in total. I think I'll buy something stronger for next year, as it's definitely worth growing them.

5 September 2010

Bulgarian Vegetable Stew

I had some errands to do in London the other day and decided to meet up with Lundulph in the evening and go for a meal somewhere. This was not planned and we spontaneously decided on Belgo Centraal. We've been there several times before and it's always been a good experience. Not so this time. Although part of the restaurant seemed to be closed off and the open part was half full and we got to choose our table, it seems that we needed to be got rid off quickly. We got two full minutes to study our menus and place our order.

We decided to skip starters and ordered our mains and our beer. The only info on the various beers was the alcohol content, so we had to take a chance on them.

Five minutes later our food arrives, but no beer in sight. No way they could have cooked the food that quickly. In fact, my food was lukewarm and although I generally don't mind that at home, it's not what I'd expect in a restaurant. Lundulph's dish seemed a bit hotter, it was steaming, but he thought the portion was a bit on the small side.

Anyway, our beers arrived and they were OK. We ate our food and the plates were promptly removed as soon as we finished and we were asked if we wanted dessert. If we'd said no, we would have had our dinner in a total of 25 minutes. Not acceptable! But I wanted some ice cream, last time we went I had what I believe is the best chocolate ice cream I've ever had, wonderfully smooth. So we ordered dessert. The ice cream was good, they called it Dame Noir and was supposed to be dark chocolate ice cream with white chocolate sauce and Chantilly cream. Well, it was mostly dark chocolate ice cream, with perhaps a couple of drops of something white, which I guess is the white chocolate sauce and a blob of whipped cream, not Chantilly. The ice cream was good, but not as silky smooth as the one I remembered. So on the whole, this was a disappointment and we paid and went home.

IMG_0937

So a little comfort food would be in place and yesterday I finally cooked a яхния (yahnia) which is Bulgarian for stew, generally in tomato/paprika sauce. There are several recipes in my Bulgarian cook book. After my last visit to the PYO, I had runner beans and courgettes in the fridge and wanted to take out some more of our lovely potatoes, so ended up combining tree of the recipes - the one for potato stew, the one for runner bean stew and the one for courgette stew. And it turned out lovely and comforting, just as I hoped it would.

I also wanted to use some of the chillies on the plant I got from Lundulph's Mum a couple of weeks ago, it's very prolific and I can't keep up with it.

Ingredients
2 medium onions
550 g courgettes
450 g potatoes
350 g runner beans
0.5 dl grapeseed oil
45 g butter
2 tbsp sweet paprika
0.5 dl tomato purée
6 dl boiling water
450 g potatoes
350 g runner beans
3 hot red chillies
1 tbsp corn flour
1 dl water
1.5 dl fresh chopped parsley
2 tbsp dried dill
salt to taste

Method
  1. Start by washing, trimming or peeling the onion, potatoes, courgettes and runner beans. If the runner beans are large, try to remove as much of the two stringy veins along each side of the beans.

  2. Dice the onion fairly finely, dice the potatoes and the courgettes into about 1 cm cubes. Cut the runner beans into pieces of about the same size as the other veg.

  3. Heat up the grapeseed oil in a casserole dish on medium heat, then fry the onion for a few minutes until it's soft. Then add the courgettes and keep frying and stirring until they begin to soften as well.

  4. Lower the heat, then add the butter and stir it around to allow the courgettes to pick up the flavour. Sprinkle the paprika and stir in well, the onions will pick up the colouring and go orange brown.

  5. Stir in the tomato purée into 6 dl of boiling hot water, then pour into the saucepan and stir in the potatoes and the runner beans. Chop the chillies and add them as well. Then allow to simmer gently for 20 - 25 minutes, until the potatoes are ready (they'll take the longest). If the stew seems to go dry, add a bit more hot water.

  6. Stir in the corn flour into 1 dl of water. Then add it to the stew, season to taste and add the parsley and dill. Allow to cook for another 5 - 6 minutes to thicken it up.


The stew is supposed to be a quick one, but cleaning and dicing vegetables takes time. Still, well worth the effort I think, though I might increase the paprika next time. The original recipes state either use fresh chopped tomatoes or the tomato purée. I don't like cooking with fresh tomatoes, so went for the purée option.

And the casserole dish I used doesn't have a lid, so the stew lost moisture and I had to add some more water half way through cooking.

The chillies turned out hotter than I thought. I'd used one earlier in a large batch of pizza sauce and it was not really noticeable, so I thought they were on the mild side and bravely put in three with seeds and all and there's quite a kick to it now.

Most of the recipes in my Bulgarian cook book finish with "serve with yoghurt". My Mum disagrees with that and so I've grown up without having yoghurt on everything, though I was considering it for this stew, when I realised how spicy hot it was. I don't think it'll improve the flavour though and would probably make it look unappetizing, so better not.

I had some pork chops in the freezer, so Lundulph had one with the stew, whereas I went for all vegetarian.

This also leads me to wonder if the courgettes and aubergines must be fried before being added to a gyuvetch and maybe that's why I've been failing there.

27 August 2010

Panna Cotta With Apple Compote

I went to Waitrose the other day and picked up yet another recipe card, I just can't resist those. This one was Delia's Vanilla cream terrine and is basically a panna cotta, but with yoghurt instead of milk.

IMG_0936

Though instead of berries, I made a Bulgarian apple compote.

Ingredients
Panna Cotta
7 g leaf gelatine
425 ml double cream
75 g caster sugar
425 g Greek yoghurt
2 tsp vanilla extract

Apple Compote
850 g apples
7.5 dl water
1 lemon
2.5 dl caster sugar
2.5 dl apple brandy or white wine
0.5 tsp ground cinnamon
3 cloves

Method

  1. Make the panna cotta first, as it needs a few hours to set. Place the gelatine in a little cold water for 5 - 10 minutes to soften up.

  2. Place the cream and sugar in a saucepan and heat up on low just enough to dissolve the sugar.

  3. Squeeze out the gelatine and stir into the cream until it dissolves, then remove from the heat.

  4. Mix the yoghurt and the vanilla in a bowl, then pour in the cream and stir through well.

  5. Pour into moulds or a loaf tin and allow to cool, then put in the fridge for a few hours to set.
    IMG_0933

  6. Peel and core the apples, then dice finely and place in a bowl. Note that the amount of apples is after peeling and coring.

  7. Put the water in a saucepan with a couple of strips of the lemon peel and all of its juice, then bring to the boil.

  8. Once it's boiled, pour over the apples and let stand for 5 minutes, then strain the liquid back into the saucepan.
    IMG_0934

  9. Add the sugar, brandy, cinnamon and cloves to the liquid and bring to the boil once more to dissolve the sugar.

  10. Transfer the apples to glass jars, then distribute the liquid so that all the apples are covered. They will float up to the surface though. Put lids on the jars and allow the compote to cool, then store in the fridge.
    IMG_0935


Actually I had to make yoghurt first, since I was almost out, and I did that last night, since it needs about 12 h to form. My yoghurt is a bit sweeter than the yoghurts available in the shops, I'm not sure why, perhaps the yoghurt bacteria has changed over a few generations.

The panna cotta turned out very nicely indeed. I was going to use a loaf pan originally, but then I spotted my brioche moulds in the cupboard and decided to use them instead. Just after I put the panna cotta in the fridge, I got some doubts about not using enough gelatine and indeed, according to the packet, I should have used more. It was a bit tricky to get the panna cotta out of the moulds and it just about held its shape, but Lundulph thought the texture was very good and said I shouldn't put more gelatine in.

The compote isn't a traditional one, since the apples aren't actually cooked. I used the remainder of the apples I got from my neighbours last week and being cooking apples, they were quite tart, even with the sugary syrup, but the panna cotta took the edge right off them.

The only thing I would have liked in addition is a bit of a crunch in something like a brandy snap or such. Lundulph thought some sort of créme brûlée crunch would be in order. I'm not sure about that, but will have to try it out.

The second time round, we had the panna cotta with the remaining caramelised figs and that was really nice too, plus they had their own built-in crunch. And what I found interesting was that in the first serving, the panna cotta was the sweeter part of the dessert, offsetting the sourness of the apples, while in the second, it was the neutraliser to the strong sweetness of the figs. I see a lot of possibilities with it.

26 August 2010

Under Development...

Ever so often, when I go to the greengrocer's I get seduced by a tray of big soft figs and the other day was such an occasion. They weren't fragrant, but were soft and seemed perfectly ripe, so I bought four with the thought of making a second attempt at caramelising them. Click here for the first failed attempt.

IMG_0932

Also, I've been catching up on Celebrity MasterChef 2010 and have had loads of inspiration. In fact, I went and bought a notepad yesterday, to write down my ideas.

But back to the figs. The top hits on google for caramelised figs didn't seem quite right to me. But having watched berries be dry fried in cast iron pans with sticks of cinnamon and vanilla pods and star anise and being sprinkled with sugar, I decided to give it a try.

I skipped the spices though, they looked very pretty in the pan, but without liquid to transfer the flavour, I doubt very much that they'd do their job.

So, I washed and quartered the figs and had to be very careful, they were extremely soft and easy to squash. In the mean time I heated up my trusty pan on medium.

All the quarters went in and were sprinkled with 3 tbsp of caster sugar to add sweetness and 3 tbsp of dark brown soft sugar to add flavour, it's not really sweet on its own.

Then carefully stirring around to get the fruit coated with a little bit of the caramel that started forming pretty quickly. I took the pan off after a couple of minutes to prevent the sugar from burning and kept stirring for another minute or two.

And we had them for dessert after our salad tonight. Lundulph had seconds on them. They were good, even if they weren't as aromatic as the ones we've had in Bulgaria.

But they are most definitely a work in progress, I think quite a few things were missing to make them a good dessert, though I'm not entirely sure what is missing. Lundulph suggested maybe some balsamic vinegar. I'd toyed with the idea of red wine, so I might try both out, a lot of the caramel remained in the pan, so something to deglaze it would be good an form some sort of sauce. Perhaps it can be reduced with some spices like cinnamon etc.

25 August 2010

Stuffed Squashes

The other day at the PYO, I took a shortcut between two rows of beans and saw what appeared to be courgette plants, but they had round bright yellow fruit - squashes! (I guess, Wikipedia isn't too clear on it, maybe they are a type of golden courgette or zucchini).

IMG_0926

And I had to pick a couple. The chap at the till said they were large and possibly over-ripe. And indeed they were, the seeds were almost fully mature, when I cut them in half.

IMG_0928

I thought scooping out the seed bits, then filling up with minced meat and baking in the oven would work nicely, so I set to work. I'd planned ahead and had defrosted a batch of Bulgarian meatball mixture.

So, I turned the oven on to 200 degrees C and in addition to cutting the two squashes in half, I also cut off a slice at each end, so that the halves could stand up.

I was worried that the squashes would be very sweet, so sprinkled each half with salt, dried dill and dried savory, before distributing the mince mixture between them. 575 g of mince mix fitted quite nicely into the four halves.

I brushed a little grapeseed oil on a baking tray and placed the four halves on that, then drizzled a bit more over the top edge of each squash half, but not the meat as it was pork and had enough fat of its own there. This was a lot quicker to do than I expected. I wondered if I needed to do something more and decided to sprinkle two of the halves with polenta to get a crispy coating on top of the mince, to see how it would taste.

IMG_0930

So into the oven and bake for an hour, at which point the squash was soft.

For carbs, I boiled some brown basmati rice and some black Venus rice in separate saucepans. Each takes about 35 minutes. I drained them well, then stirred together to get a more decorative effect. The black Venus rice still coloured off on the brown basmati rice a little.

IMG_0931

I managed to time everything just right and dinner was ready when Lundulph came home.

And it tasted very nice actually. When I think about it, it's pretty much Bulgarian meatballs served with courgettes with rice, but presented differently. The squash was indeed rather sweet and tasted a bit like butternut squash, but I'd managed to season it just right.

Lundulph suggested it would be nice to swap the meatball mixture with a hearty chilli con carne, like the one from DinnerDiary. So I might give it another try soon.

24 August 2010

Sausage Buns

A few weeks back I spotted some wonderful looking sausage buns on The Fresh Loaf blog, then I also spotted them in Bulgaria as part of the breakfast assortment in our local bakery and I just had to try them out.

IMG_0925

However, searching for a recipe on the internet didn't result in what I was after - a sourdough recipe for these buns. What I found called for instant dry yeast.

But I still have loads of starter to use up in order to come down to the regular level! OK, improvise once again.

The bun should be a bit on the sweet side, to balance the saltiness and smokiness of the Frankfurter sausage. It should also be very soft.

Thus, I needed a soft dough. Thus I changed the feeding habit of the starter - 2:1:2 and this was thinner than pancake batter. I left it to feed up for over 8 h, but of course with little food, it only rose about 50% in this time. In fact it reached this point after about 5 h, but I thought I'd give it some more time.

Then making the dough, the starter was 480 g, so I added the same amount of water and 880 g of super strong white flour. This was all I had left, as I also made 3 loaves of bread earlier. The dough was very sticky, I mixed it for a few minutes, then let it autolyse for 30 minutes, then about 10 minutes further mixing at medium speed, during which I added 45 g honey and 20 g salt.

I let it rise for 2 h 30 minutes and folded it at 50 min and 100 min. It was still very sticky, but had a bit of a backbone to it.

And sadly this is where I got sloppy - of all I've learned about bread making, I completely ignored most of it. That is to fold it again before dividing, then divide up and fold each piece again before rolling into a string to wrap around each sausage.

IMG_0920

I also realised that I had way too much dough for the 10 Frankfurters I had to hand, and thus didn't follow the recommendations not to wrap too much dough around each sausage. But it used up most of the dough and what was left, I made into knots.

IMG_0923

It all fitted on four trays and they ended up proofing for between 45 minutes and 2 h. And because I hadn't worked the dough properly, it all splodged out on the trays, rather than rise upwards like it's supposed to.

IMG_0922

However, I baked the sausage buns and the bread knots at 200 degrees C for 23 minutes and they were tasty and light, however the ratio bread to sausage was completely wrong. I think I'll try this again, with a smaller amount of dough, work it properly, add more honey, as it wasn't sweet enough and use big Frankfurters.

Oh, and I didn't have any eggs, so I brushed the bread knots with oil and sprinkled poppy seeds on top, and of course almost all of them fell off at the lightest touch. Lundulph had one of the knots as a sandwich with butter and cold Swedish meatballs and said it was very good.

Lots of things to keep in mind for next time.

19 August 2010

Wiener Apfelstrudel

I got talking to our neighbours the other day. Their apple tree is bent over with fruit and they very kindly gave me a tray of apples, not being sure what to do with all the fruit and telling me to help myself wherever I can reach. They are cooking apples, they said, but can be eaten if really desperate.

IMG_0918_cropped

So I washed the apples and lined them up to dry and racked my brain and my cook books on what to do with them. Then it struck me - strudel! It's been ages since I had it, in Munich in fact in 1996, and I've not thought of having go at making one myself.

So a quick google later and I found two recipes. The first one was in pictures and and looked pretty straight forward, but on reading it through, it talked about letting the dough rest in the oven at 50 degrees C. Unfortunately the lowest setting on my oven is S, for slow cooking and is just over 100 degrees C, so I thought I'd have to skip it.

The second one, however also had a better way of dealing with the "rest in a warm place" thing.

This resting of the dough in a warm environment is a new technique to me, I wonder what the chemistry and physics are behind it. It wasn't in my food science book as far as I remember anyway. I had my doubts, but it most definitely worked. I followed the second recipe, along with the photos of the first one. By the way both are in German, so you might want to run them through google translate. As always, I had to make some changes, due to lack of certain ingredients.

Ingredients

Dough
200 g strong flour
5 tbsp water at room temperature
50 g unsalted butter
1 ml salt


Filling
about 1 kg apples
zest of 1 lemon
2 tbsp dark rum
5 ml vanilla essence
75 g unsalted butter
100 g caster sugar
1 tsp ground cinnamon
50 g finely ground breadcrumbs
50 g sultanas
50 g chopped nuts
1 egg yolk (optional)
icing sugar for dusting


Method
  1. Half-fill a heavy lidded saucepan with water, put the lid on and bring to the boil.

  2. In a small saucepan, melt the butter on low heat.

  3. Sift the flour into a bowl, add the water, salt and the melted butter and stir together into a dough. Take it out onto a work surface and knead it for a few minutes.

  4. When the water has boiled, switch off the hob and pour out the water. Dry the saucepan and the lid and return to the hob, then shape the dough into a ball and place in the saucepan and cover. Let rest for 30 minutes.

  5. Now peel the apples, quarter and remove the seeds. You should end up with about 850 g of cleaned apple pieces, then cut into juliennes or small dice and place in a bowl.

  6. Grate the lemon zest over the apples and also add the rum and vanilla essence, then stir through to mix as evenly as possible.

  7. Melt the butter on low heat, once melted switch off the hob. Mix the caster sugar and the cinnamon in a bowl and set aside. Pre-heat the oven to 180 degrees C.

  8. Place a large clean kitchen towel on the work surface and dust liberally with flour. Take out the dough after it's rest and place on the towel and start rolling it out until it begins to go transparent.
    IMG_0914

  9. Brush the dough very sparingly with some of the melted butter, then start stretching it by hand. A method for this is to pick up the dough and let it hang off your knuckles and letting gravity stretch for you, but this requires practice and speed, as it can tear quite easily. You want to end up with a transparent rectangle of 50 x 70 cm approximately.

  10. Brush with about two-thirds of the melted butter, then sprinkle the breadcrumbs.

  11. Then spread the apples over the whole surface, except the outer 3 cm of each of the short sides of the dough rectangle. Follow with the sultanas and the chopped nuts.

  12. Finally sprinkle the cinnamon sugar over the filling.

  13. Now, fold the two bare doug strips of the short sides over the apple filling, then carefully pick up two corners of the long edge of the towel and use it to roll up the strudel. Continue all the way until it's all rolled up, tucking in the sides where they try to unfold.

  14. Line a baking tray with baking paper, then turn over the strudel. If it won't fit, bend it very carefully into a horse shoe shape.

  15. Using the towel edges to wrap around the baking tray, swiftly flip the whole caboodle, so the strudel ends up in the baking tray and the towel regains its freedom.

  16. Bake in the middle of the oven for 30 minutes, then take out and brush with the remaining melted butter, then continue baking for a further 15 - 30 minutes, until the strudel gets a golden brown tinge.

  17. Let cool before serving.


This resting the dough in a warm pot was very novel and although it felt a bit tough when I put it in the pot, when I took it out, it was as soft and stretchy as anything. I just need to work faster to avoid it drying out. I did over-stretch in a couple of places and it broke, but the holes were quite small. I should have worked on getting thinner edges too.

IMG_0915

I wasn't too good with the swift flip, and my towel wasn't big enough and I struggled to wrap it around the baking tray. Besides I also fidgeted too much with taking photos and this and that and the dough dried out a bit and was even more fragile, so some of the apple filling fell out and will make an interesting addition to my cereal tomorrow.

IMG_0916

I actually also made a few mistakes during the making - I forgot to add the vanilla essence to the apples, so used my recently purchased dropper to sprinkle the essence around. It sort of worked, I think. I was also worried that I'd over-done the rum, the apples smelt quite strongly of it, but after baking it blended in with the other flavours.

The sultanas might seem like ridiculously few, but don't be tempted to add more, once the strudel is rolled up it'll be fine.

I also brushed the remaining butter before putting the strudel in the oven, not after 30 minutes, so will try out brushing with egg yolk next time, to give it a bit more shine, though the strudels I've had in cafés have all been dusted heavily with icing sugar, so it doesn't really matter if the surface is shiny or not. I ended up baking my strudel for 55 minutes.

IMG_0917

And what did it taste like? Like a rather nice strudel actually, though the apples were perhaps a bit on the sour side, I should have used a bit more sugar, but Lundulph liked it and said less sugar is better. The dough was nice and crispy, but not as brittle as filo or puff pastry.

I was just so amazed that I succeeded in rolling and stretching the dough into transparentness. You see, I've made filo pastry once in my life and that's many years ago and under the supervision of a friend who was a very experienced filo baker. That dough was not kept warm, but was rolled and stretched and resulted in a similarly thin sheet. I also foolishly didn't note down the recipe. But after this experience, I'm quite keen to try making filo as well.

This has used up about two-thirds of the apples, I'll have to think up something else do with the remainder.

18 August 2010

Jamming Sessions

IMG_0913

Over the Summer, I've been picking the patch of wild strawberries I started a couple of years ago, a bowl every other day pretty much. I put them in the freezer and ended up with just under 4 litres, leaving the last few to the fat wood pigeons that frequent our garden. By weight, this corresponded to 1.6 kg of wonderfully fragrant redness.

So the other day, I thawed them all in my pressure cooker (the biggest pot I have).

In preparation I'd purchased jam sugar, which is granulated sugar with pectin added to it. According to the instructions on the packet 1 kg of this sugar would be enough for 800 g of strawberries. I thought that would be well too much sugar, so decided to use a 1 kg packet for all my lovely wild strawberries.

The instructions also said only boil for 4 minutes, however that was nowhere near the jam setting point and I ended up boiling them for nearer 40 minutes. This was such a shame, as it pretty much killed them and all the fragrant flavour was completely lost and I ended up with a generic strawberry jam.

Additionally I made losses to the pot itself, a they'd burnt onto the bottom, well beyond caramelisation. It took two runs through the dishwasher and then finally manual scrubbing with a scourer to remove the black stuff off the pot.

Thus I ended up with 2 jars.

We had also a bumper crop from our three gooseberry bushes, that came with the house. I moved them a couple of years ago and put in a lot of manure. It turned out to have herbicide residue in it and the poor plants did struggle last year, but have come back with a vengeance this time. I picked the whole lot in one afternoon and ended up with 1.2 kg of these wonderful berries.

Into the freezer they went of course and I thawed them this morning. Before starting to cook them, I searched for pectin on the internet. I found a couple of web sites that sell it, however postage would have cost more than the pectin itself. So, I wandered down to the Co-op, which is nearest. They didn't anything in that direction, so on to Waitrose, who did! Yes, saved me the additional few hundred meters to go to Sainsbury's. I bought two packets, to be on the safe side.

Reading the instructions on the sachet, they were quite different from the instruction on the jam sugar. The whole thing seems a bit random. I warmed up the jars in the oven, on the slow cook setting. I'm not sure if that's strictly necessary with the types of jars I use, but if it sterilises them, that's good. Also on the whole I think reducing the amount of sugar is good, as well as not cooking the jam for too long, so adding extra pectin should help there.

Again, I reduced the amount of sugar massively - on the 1.2 kg of gooseberries, I used 500 g of the jam sugar and I added 1 sachet (8 g) of pectin powder too. It still required about 15 minutes of boiling before they reached the setting point. I put in the whole gooseberries, then kept stirring frequently to prevent anything burning to the pot. They all popped in the mean time and I strained them through a colander, so that seeds and fruit flesh came through, but the skins didn't. I got just under 2 jars of this jam, it's now cooling.

Earlier I also had a bumper crop from our 8 rhubarb nests and wasn't really sure what to do with them. I spotted a jar of plum jam that my Mum had given me, and thought why not rhubarb? Again with reduced amount of sugar (by a third this time though), I'd cut them in bite sized pieces and they went completely mushy in the cooking process. 2 jars + one small jar was the result from just over 1 kg. We've already eaten the small jar, it was delicious. Both on toast for breakfast, but I think it would work nicely with cheese. It still retained a bit of its sourness, so more of a grown-up jam.

And because of the drought all over the land, I've been watering my rhubarbs and they've re-sprouted fabulously and I'll be picking them tomorrow for a second round of jam.

I'm quite looking forward to trying them out properly so to speak.

9 August 2010

August Birthdays

Well, both Lundulph's parents have birthday in the beginning of August. Originally we'd planned to get together the whole family to celebrate them, however this didn't quite work out. Still, I'd decided to make a cake at least.

IMG_0909

Lundulph had been talking about fancy jellied fruit contraptions and I thought I'd give that a go.

Sadly my capabilities with gelatine are limited to say the least, thus it was effectively a failure, but a highly edible one. So I'll be repeating the exercise as soon as possible.

First of all, a word on the design - I'd spotted a big three page article about strawberry cakes in a newspaper and cut it out and saved it in such a safe place that I wasn't able to find it. Thus plan B - improvise and make it look sort of the same way.

Thus, bright and early we went off to our PYO for strawberries. I picked 3 punnets, not sure how much that was, but I wanted enough for 500 ml of purée, a number of roughly equal sized ones for the filling and a few really big and red ones for decoration.

For the sponge I made a Génoise from Lenôtre's Desserts and Pastries. I made the single batch which gives a 20 cm sponge, about 5 cm high. The method was quite interesting too, never seen it before. I didn't have vanilla sugar, so used extract instead.

Génoise Ingredients

78 g caster sugar
3 medium eggs
2 ml vanilla extract
23 g unsalted butter
78 g plain flour

Génoise Method
  1. Pre-heat the oven to 180 degrees C. Line a cake tin with baking parchment and boil up some water for a bain marie, making sure that the top bowl will not touch the water in the bottom saucepan.

  2. In the top bowl, place the sugar, eggs and vanilla extract. Place the bowl over the saucepan with the boiling water and whisk by hand for 1 minute.

  3. Take off the double boiler, then whisk with an electric whisk on high for 2 minutes, then a further 5 minutes on low. It will be very pale and foamy and form ribbons.

  4. Melt the butter on low heat, while sifting the flour into the egg mixture and carefully folding it in. Then fold in the butter.

  5. Quickly pour into the cake tin and bake for 30 minutes until golden brown.


The first part of the whisking over a bain marie made the eggs runnier and they mixed very well with the sugar. It sounds overly complicated, but was well worth it and doesn't actually take too long to do. The resulting sponge was very light and moist. I let it cool completely, then cut it in two.

IMG_0903

Next it was time for the mousse. I used the instructions from my Le Cordon Bleu Complete Cooking Techniques.

While the Génoise was baking, I made the strawberry purée and strained it to get most of the seeds out. I then made mistake number 1. The mousse is made with gelatine, and I was worried that if I used the recommended amount on the packet, I'd end up with a jelly texture, rather than a mousse texture which I was after, so decided to halve the amount of gelatine. Big mistake! Huge!

Mousse Ingredients

leaf gelatine to set 810 ml
500 ml strained strawberry purée
1 dl caster sugar
310 ml double cream

Mousse Method
  1. Soak the gelatine in water according to the packet instructions, then squeeze out and put into the strawberry purée along with the sugar.

  2. Place the purée over a bain marie and heat up gently, stirring constantly to dissolve the gelatine.

  3. Let the purée cool down, then whisk the double cream to stiff peaks and fold it into the purée gently.


Putting the cake together
  1. Place one of the Génoise halves at the bottom of a cake ring.
    IMG_0904

  2. Brush over it with a little orange juice.

  3. Pour a thin layer of the strawberry mousse and spread it evenly.

  4. Cut some strawberries in half and line along the edge of the cake ring, with the cut side outwards. Then fill in the middle with more strawberries.
    IMG_0905

  5. Pour over more of the mousse to cover the strawberries.
    IMG_0906

  6. Brush the second Génoise with a bit more juice, then place it on top in the cake ring.

  7. If there is space and there's mousse left over, pour over the second Génoise. Then chill for at least 4 h until the mousse has set.
    IMG_0907

  8. Decorate with more strawberries shortly before serving.
    IMG_0908


Here is where I made my second big mistake. I wanted to glaze the decoration strawberries with more jelly and for this purpose had specifically bought a packet of so called Red Quick Jel, which is specifically designed for the purpose of glazing red fruit. I followed the instructions, however didn't realise how very fast it would set, so started covering the fruit far too late and ended up having to scoop it off the cake and ruined what I thought was a pretty cake decoration.

Once ready to serve, carefully cut around the cake ring (if the top layer is mousse), then even more carefully remove the ring.

My cake held long enough for me to take a photo, but by the time I'd taken it to the table for serving, the strawberry halves were poking out of the mousse and cutting the first piece pretty much made the whole lot collapse into what could be called an advanced Eton Mess.

3 August 2010

Vegetables Plakia with Pork Fillets

Having succeeded once with a plakia attempt, I've been wanting to try variations on it. I have several recipes and most of them sound appealing.

Today I couldn't make my mind up so decided to improvise. I ended up with something edible, but not entirely tasty. Very close to my gyuvetch failures.

It also took a lot longer than I expected, but then that's what happens with lots of vegetables to clean and chop.

Ready to go in the oven

On the plus side, I got to use some of the potatoes I planted this year that are now ready. Most of the other veg is from the Pick Your Own pace down the road and a couple are from the supermarket.

IMG_0895

You can also see the elephant garlic that I grew as well. It was massive, but only one bulb, no cloves, despite planting it last September and having a decent cold Winter, which should make it form cloves.

Ingredients
600 g potatoes
4 pork fillets
pepper and savory
1 tbsp grapeseed oil

2 medium sized onions
3 tbsp grapeseed oil

500 g courgettes
250 g French beans
175 g okra
2 tbsp tomato purée
2 dl water
1 tbsp paprika
187 ml red wine (small bottle)
2 cloves garlic
Salt, pepper and savory to taste

3 beef tomatoes (about 650 g)
1 lemon
1 dl olive oil


Method
  1. Wash and dice the potatoes and parboil for a few minutes.

  2. In the mean time sprinkle coarsely ground pepper and savory on one side of the pork fillets, heat up a little oil in a pan and brown them off. Start with the spiced side down and sprinkle the upper side before turning them. Then place in a deep baking pan.

  3. Peel and slice the onions, add a bit more oil to the pan from before and soften them for a few minutes, then transfer to the baking pan.

  4. Dice the courgettes to about the same size as the potatoes, wash and cut the French beans and okra also to the same size pieces and add to the pan.

  5. In a small bowl, stir together tomato purée, water and paprika, then pour over the vegetables, followed by the red wine. Season further with salt, pepper and savory and stir carefully to distribute the flavours.Slice the garlic and push the pieces in here and there among the vegetables.

  6. Remove the woody bits from the tomatoes, then slice them as thinly as possible and lay them on top of the baking pan. Peel the lemon, slice and lay over the tomatoes.

  7. Bake in the oven at 200 degrees C for about 45 minutes.


Ready to eat

I'm wondering if I should have steamed the courgettes and beans as well as the potatoes. I had definitely too little salt and things were crunchy, but not too unpleasant.

Some of the recipes call for adding a bit of flour to thicken the sauce. I did end up with a lot of it and it might have been better if it was thicker.

11 July 2010

Pie success

IMG_0858

Once again I managed to find a piece of hot smoked salmon in the freezer, I swear they are multiplying on their own when the door is closed.

Having had salmon, boiled potatoes and mustard/dill sauce the last x times we've had salmon for dinner, I decided on a last minute pie to create a bit of variation.

Last minute meant that I bought ready shortcrust pastry. I've never used ready made one before and had low expectations, but it turned out quite alright actually.

I rolled it out a bit thicker than normal and blind baked it at 200 degrees C until it had a bit of colour and looked dry. As with my own shortcrust pastry, the sides of the pie dish sank down to the bottom. I've yet to work out how to keep them on.

For the filling, I diced an onion and softened in a little grapeseed oil, stirring until translucent. Then I took the pan off the heat and added about 150 g of chopped spinach (also from the freezer, but thawed). I stirred through and poured in about 3 dl of double cream, salt and pepper. The salmon tends to be quite salty, so not too much salt. I also added a tablespoon of dried dill.

When the filling had cooled down, I stirred in three eggs and an egg white, keeping the yolk separate for glazing.

When the pie crust was ready, I filled the bottom with bits of salmon, about 200 g in all, then poured the spinach mixture over it. As the walls of the pie crust had sunk down, the spinach mix overflowed them. Not super.

I had some shortcrust pastry left over and remembering how hard the pie crust went in my last attempt, I rolled it out thinly and cut into strips for decoration.

I glazed the strips with the whisked up yolk as well as I could. Parts of them sunk into the spinach mixture and I tried not to dip the brush into it.

I baked it for some 35 minutes at 200 degrees C and it turned out rather nice this time. In fact, Lundulph had seconds.

4 July 2010

Grilled Duck Breast

Yesterday our town held a food festival. They've had it for a couple of years now and it's growing bigger and bigger.

IMG_0853

This year for the first time, I actually saw the posters and brochures a few weeks back. In previous years we'd just stumbled across the market. But not this time. We got up in time and walked down to the High Street at 10 am to watch the official opening.

There were loads of stalls, one was selling game, nicely vacuum packed ready to cook. Which gave Lundulph the idea that duck would be rather nice for a Sunday dinner. I wasn't too sure, it wasn't planned and I wasn't sure I'd be able to do anything decent. To play it safe, we bought two duck breasts.

In the evening I briefly searched for recipes and came across one for barbecued duck breasts. It seemed simple enough and I had all the ingredients for the marinade. I showed it to Lundulph and he seemed keen on firing up the barbecue, but I decided against it. Too much effort for just two duck breasts.

Thus this morning, I opened them up and removed the skin and very thick layer of fat.

IMG_0849

On closer inspection, a lot of the "roots" of the feathers were still on the skin, so removing the whole lot made sense to me. Besides, I've only had pan fried duck breast once at a Chinese restaurant in Düsseldorf over a decade ago and I've no memory of what it tasted, just that it was about 50% fat.

Luckily the fat came off quite easily, I'd expected to have to carve it off.

For the marinade, I used the ingredients listed in the recipe I found, but at different proportions, so I'm listing them here.

Ingredients

2 duck breasts, skin and fat removed
1 tbsp Worcestershire sauce
2 tbsp olive oil
0.5 tsp Tabasco sauce
2 cloves of garlic
coarsely ground black pepper

Method
  1. Place the duck breasts in a glass bowl, then add the ingredients for the marinade, pressing the garlic. Turn the meat a few times to get it coated evenly, then put in the fridge for a few hours.

  2. Pre-heat the grill on medium along with the tray where the meat will be cooked. Place the duck breasts under the grill, then keep turning them every minute. This will get them cooked without burning the surface too much. About 6 minutes will be enough to still keep the middle of the meat rosy-pink.


As I mentioned the other day, I had 3 courgette patties left over, they worked quite nicely as greens with the duck breasts, even if they were re-heated in the microwave. For carbs, I steamed some lovely Jersey Royal potatoes. I had no sauce, but frankly that wasn't necessary. The meat was a bit gamey, but very light textured and the marinade was perfect for it. This is definitely one to be repeated.

To accompany this lovely meal, we bought an English white wine from the market.

IMG_0854

Obviously the wine isn't 30 years old, but the vines that the grapes came from were planted 30 years ago.

IMG_0855

The vineyard is located in Sussex and is called Sedlescombe Organic Vineyard. Very drinkable wine, I thought. Lundulph says it was a bit like lightly oaked Chardonnay.

We did actually get to taste it at the market, along with their rosé, which was also very nice.

Cottage Loaf

As today turned into a baking day, I decided to make an English cottage loaf, it's been on my list for a long time.

IMG_0850

From what I understand, it's regular white bread baked in a specific shape. I did a bit of searching on the internet for a recipe with sourdough, but didn't find any, so decided to improvise as usual.

I did find this quite useful post, which had some good tips to help me succeed. Mainly that the dough needs to be fairly stiff, around 60 % hydration.

Having immersed myself into Baker's Percentage, I tried to work out a recipe with 1000 g strong white flour and 600 g water.

Lately I've followed the 1:2:3 recipe for my sourdough breads, meaning 1 part starter to 2 parts water to 3 parts flour and then usually 1 part would be 200 g, I thought that 300 g starter for my cottage loaf would be just right.

Meaning 150 g flour and 150 g water to be reduced from my above planned recipe.

Ingredients.

300 g starter
450 g water
850 g strong white flour

I put these all in my Kitchen Assistent and turned it on to combine the ingredients. I then allowed it to autolyse for 30 minutes, another thing I've been doing lately that has worked well. I then started the machine again and went away for 18 minutes, only to come back to something that had just started turning creamy. That means overworked!!! Some time ago I found a very interesting web site, where someone had made an experiment on this. Up to a point gluten develops, but if you don't stop, it breaks down again and becomes wet and gooey.

I didn't have the heart to just throw it away, but set it aside to see if it would rise. It did and pretty well too.

IMG_0851

Another hot tip from the web site was to have the top part of the cottage loaf be about half the weight of the bottom part. Now I had quite a lot of dough, so I decided to first divide it into two and make two cottage loaves.

Then I shaped two large and two small balls and let proof for about 45 minutes, then placed the larger balls onto baking dishes lined with baking parchment and sprinkled with flour. On top of each, I placed the smaller balls. I then pushed my thumb down in the middle of each loaf, all the way down to the bottom in order to get the two parts to hold together. I allowed a second proofing of some 30 minutes, while waiting for my sourdough cinnamon buns to finish baking.

IMG_0852

I brushed one of the loaves with the leftover egg wash, then slashed before putting in the oven and baking at around 200 degrees C for some 40 - 45 minutes.

Some time after I took them out of the oven, I realised that I'd forgotten to add salt. That might have made some difference to the dough coming together, must remember next time.

I guess they look OK for a first attempt, but some practice is required, as is watching the machine while it kneads the dough, so it doesn't get overworked. As per usual, my slashing didn't quite work, but I discovered that the razor blade had gone dull, which might explain this.

Sourdough Cinnamon Buns

We've finished our massive bread surplus and today I'll bake bread. Still there's way too much of my sourdough starter Monty for comfort, so I also decided to try and make cinnamon buns. I'm writing this entry as I make the buns, but will do an ingredients and method list at the bottom.

I prepared by reading through the great posts about Baker's Percentage from Susan at Wildyeastblog. Then I converted my existing recipe according to the instructions, but since my original measurements are by volume, I wasn't at all sure where I'd end up with. I did find a sort of volume to weight conversion web site.

I made up a table of how much of each ingredient I should use given that I'm using starter instead of yeast. But to be on the safe side, I also measured things up by weight "in reality" after I fed Monty. Poor Monty, he was very hungry, he had about half a cm layer of hooch on the surface. I removed that.

So I fed him 250 g water and 250 g strong white flour and had to split him up into two jars.

Next I weighed up the 1 litre of flour, that was spot on 700 g. I'd decided to use 300 g of starter, which according to the Baker's Percentage calculations would equate to 150 g flour + 150 g water.

Thus, 700 g (the total amount of flour give or take) - 150 g (contributed by Monty) = 550 g (what I'll need to add to make my dough). It was well sticky, so I added another 50 g of flour.

Liquids now. The recipe says 0.5 litre milk. That's about 500 g, but Monty contributes 150 g of that, so I'll only need 350 g.

At this point I took out the butter from the fridge and measured up two pieces of 100 g each. One for the dough, one for the filling. My kitchen is extremely hot these days and this didn't take long, so I prepared the filling: 140 g granulated sugar and 18 g ground cinnamon mixed in with the 100 g soft butter.

Then decided to add some experimentation. A yeast dough needs to develop gluten and fat tends to prevent that. The recipe says to melt the butter and mix into the dough with the milk at the start. This would imply that the dough will need to be worked for longer in order to develop the gluten. So I decided to keep the butter solid and knead it in after gluten has been developed, pretty much like in Brioche. I also had some ground almonds that I wanted to use up, so decided to include them in the filling.

And I remembered to prepare my egg wash early - one egg whisked together with a pinch of salt and set aside. This makes the egg runnier and more bright yellow, on the verge of orange.

Although my starter seemed very vigorous today - doubled in size in just under 3 h, I still needed to let the dough rise for a bit longer than the 40 minutes I've stated in the original recipe. The dough was still very soft and a bit on the sticky side. It weighed in at 1472 g, so I divided it in two, sprinkled a bit of flour on the work surface and the rolling pin and rolled out the dough. I managed to roll it quite thin and struggled to cover all of it with the filling. Then had a terrible time rolling it up, it was well stuck to the surface and I had to carefully scrape it off and roll it up. I ended up with something that looked like a rugged long slug, but I cut it up and placed in the paper cups and pressed down a bit and it took on the expected shape. This time I ended up with 34 buns.

The proofing was just over an hour, again, they swelled up a bit, but perhaps not as much as they might have with yeast. Maybe I should have done two batches simultaneously for comparison.

My oven was playing up again and instead of the 8 - 12 minutes, I ended up baking for quite a lot longer. Bah!

But the result was very good, possibly I need to increase the amount of sugar both in the dough and in the filling, they could be a bit sweeter. And I think I keep saying that every time I make (regular) cinnamon buns and keep forgetting. The ground almonds addition was a good one, though Lundulph said he didn't notice it.

Ingredients

1 egg
pinch of salt

100 g soft unsalted butter
18 g ground cinnamon
150 g granulated sugar
50 g ground almonds (optional)

300 g white sourdough starter at 100% hydration
600 g strong white flour
350 g milk (at room temperature)
150 g caster sugar
2 tbsp cardamom
100 g soft unsalted butter


Method
  1. Whisk the egg lightly with the salt and set aside until needed.

  2. Bring both amounts of butter up to room temperature, then mix one of them with granulated sugar and cinnamon and set aside until needed.

  3. Assuming the starter has been fed and is ready to use, mix it with the flour, milk, caster sugar and cardamom and work until full gluten development.

  4. Add the soft butter and work in well, then set the dough aside to rise until double in size.

  5. Divide the dough into two equal parts, dust the work surface with flour and roll out one part at a time to a rectangular shape and thickness of 5 mm.

  6. Spread half of the cinnamon filling evenly over the rolled out piece, all the way to the edges.

  7. Optionally sprinkle ground almonds over the filling, then roll up along the longer side of the rectangle.

  8. Cut the roll into pieces of 2 - 3 cm width and place in paper cups or on a baking tray lined with greaseproof paper.

  9. Let proof for about an hour until the buns have doubled in size. In the mean time pre-heat the oven to 200 degrees C.

  10. Bake until golden brown, then let cool on a wire rack.


In the listing above, I've adjusted the sugar, hopefully I'll get it right next time.

2 July 2010

Courgette Patties

The other day I stumbled across a Bulgarian cookery web site (Bulgarian only). It is the companion to a cookery show, that I believe I've watched once or twice a few years back.

IMG_0847 cropped

The website is extremely busy with all sorts of things, mostly adverts I think, making it almost impossible to find what you're looking for, but somehow I managed to navigate to the section entitled "Bulgarian cuisine". That had a long list of recipes, both from the TV show and from readers and viewers. So I started looking through it. There were many recipes that were very much not Bulgarian, but had been labelled as such.

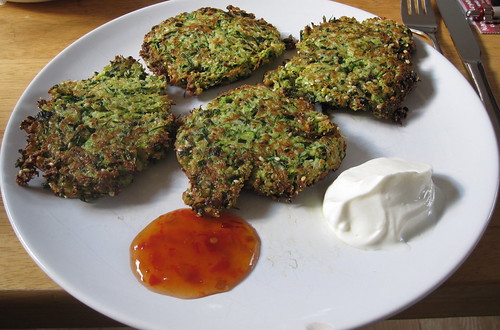
One of these (again in Bulgarian only) caught my eye and my mind started working and resulted in today's dinner - courgette patties.

Ingredients

Sauce
500 g strained Greek yoghurt
1 large clove of garlic
salt

10 patties
1 kg courgettes
2 tsp salt
1 large clove of garlic
1 dl chopped parsley
2 tbsp finely cut dill
1 dl finely cut chives
salt and black pepper to taste
2 dl mixture of bread crumbs, sesame seeds, polenta and oat bran
3 medium eggs
grapeseed oil for frying

Method

  1. Place the yoghurt into a bowl, press in the garlic and add salt to taste, then stir in well to make it smooth. Place in the fridge until it's time for serving.
  2. Trim the courgettes and wash well, then grate finely. Mix with the salt, then place in two layers of cheese cloth over a sieve and leave for at least 15 minutes to drain off the water.
    IMG_0844
  3. In the mean time press the garlic into a big bowl, chop the herbs and stir in, along with the black pepper and the breadcrumb mixture.
  4. Try to squeeze out as much of the liquid from the courgettes as possible, then add to the herb mixture and stir in well.
  5. Stir in the eggs into the mixture so that it just about sticks together. Also add a bit more salt, as the courgettes tend to be on the sweet side.
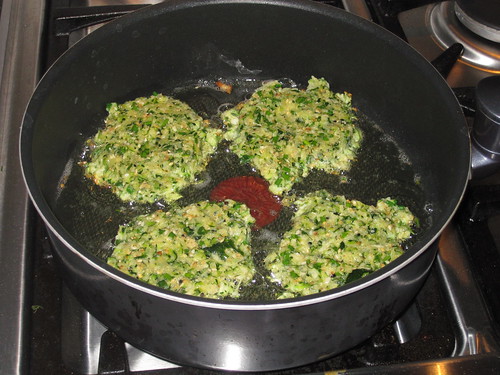
  6. In a large non-stick frying pan, pour grapeseed oil to depth of about 1 cm and heat up on medium.
  7. With a large spoon or an ice cream scoop place some of the mixture in the pan, then flatten with a turning utensil. Fry until the patties are golden brown, about 2 minutes on each side.
    IMG_0846
  8. Serve immediately with the garlic yoghurt.

I didn't add enough salt and the patties were a bit bland, so must remember to sort it out next time. These patties are quite filling, Lundulph had four and I had three. This left three more to nibble on tomorrow.

I did ask Lundulph for help in squeezing out liquid from the courgettes and that made a huge difference I think. Some sort of small press would come in handy if there's no strong-fingered husband nearby.

The original recipe called for breadcrumbs, but it turned out I had very little left, so I added some sesame seeds, polenta and oat bran from my collection of things to sprinkle on my breads. The sesame seeds were very good and I think I might fry the patties in toasted sesame oil next time, for a more exotic touch.

IMG_0845

On the whole, I think the patties were a success and we also had ready made sweet chilli sauce, which worked very well too. So this is a dish to do for the vegetarians at the next family do. And they'd do nicely as starters or with some grilled salmon steak.

I loved the colour too and am glad I decided against peeling the courgettes. Mind you, a processor of some sort for the grating is highly recommended.

Update 2020-04-18:
Last week we had a barbecue and in addition to all the meat, I also bought my regular staple vegetables - aubergines, peppers and courgettes. For some reason, I forgot to prepare the cougettes and they've been screaming at me from the bottom of the fridge.

Thus, I decided to make courgette patties once more (and I can honestly say, I've not done these since the original recipe was published, shame on me, they're very tasty). But reading through my original write-up, I decided to spruce them up a bit, so I added a second clove of garlic to the patty mixture along with two pieces of fresh ginger, the same size as the garlic cloves.

I also had a few scotch bonnet chillies in the fridge, so I added one to the mixture as well, but I made sure to remove the seeds and pith first. I didn't have chives, so added a fat spring onion and rather than chopping/slicing everything finely, I just whizzed it in the food processor. And I fried in toasted sesame oil, so all in all, my pimping worked very well, I'm pleased to say, even if I skipped the yoghurt sauce this time.

27 June 2010

Sourdough Mekitzi

IMG_0818 balanced

A couple of weeks ago, I got the opportunity to visit Borough Market in London. And I took the opportunity to also visit the English branch of Poilâne and get a loaf of their famous bread for comparison with the one we got in France. I found the shop easily enough, but on first look, it seemed closed. I tried the door and surprisingly it was open, so I walked in, but no one was there. A minute or two later, a lady came out from the back and seemed very startled at finding me there. I asked for a loaf, paid for it and went on to the barbecue at a friend's place. This was a Saturday. Early the next day, the first thing I did was slice up the loaf. I did weigh it first and it was 200 g lighter than the one from Paris. OK, so variations happen. But as I was cutting it became obvious that this bread was a bit stale - there was no crunch left in the crust, it felt more chewy/sinewy sort of. Now the Parisian bread was fine for several days, so at the very least the loaf I got was baked on Wednesday. At least, probably earlier. So I was rather disappointed. But I froze it and having it toasted takes away the staleness and it was very good. I'd hoped to also taste the freshness of it when I got it in the first place. But this might have been a fluke, I've only been there once, not enough for statistics.

Anyway, there is still some of this loaf in the freezer, along with a loaf of my own sourdough bread, so I'm up to two weeks of feeding my starter, but not really needing to bake. I also refuse to throw any of it away, so I decided to have a go at the Bulgarian version of doughnuts - mekitzi. We get these from the local bakeries when we go to Bulgaria and we always get them when we visit my parents. They are greasy as all doughnuts are and so we've not really felt we need to do them at home and thus I've never made them before.

I have my Mum's recipe somewhere, I keep stumbling across it now and then and forget where I put it. She makes a massive amount and half of it is made into mekitzi and the other half she makes into regular bread, as it is just plain white yeasted dough after all.

But I needed to use up some of my starter, so as with pizza dough of late, I take out some of the starter and keep adding flour until I get a decent consistency.

This time I fed the starter a little bit in advance, I had 275 g starter which I fed 100 g strong white flour and 100 g water. After 5 hours, I made my dough and the starter was unusually runny and smelt a bit differently from normal. Not sure what was going on there.

I took 200 g of starter and added 200 g of strong white flour. This was too much for it and I had to add 50 g of water, to soften it up. I mixed it for about 5 minutes, then left it for a 30 minute autolyse. I then made the poor decision to knead by hand, in one of the hottest days of the year. True it was at 10 pm, but it was still 25 degrees in the kitchen and kneading for 20 minutes does make you break into a sweat. So the dough went back into the bowl and the bowl went into the fridge to rise overnight. I did add some salt at the beginning of the kneading, perhaps a teaspoon or so.

This morning I took it out from the fridge and let it warm up for about 20 minutes. I then took it out onto the work surface, dusted a little flour on it and rolled out to about 0.5 cm thickness. The dough was still sticky and happily stuck to the work surface. I cut it with one of my cooking rings into largish circles. Of course this results in lots of spare dough between each circle and I ended up scraping off all the circles and setting aside in order to re-roll the leftover dough and cutting more circles. My Mum has rationalised this process by rolling out once and cutting diamond shapes with a knife and the edge bits end up with funny shapes.

Either way, once the shapes were ready, I heated up oil in a large, deep, non-stick pan. Large in order to fit more in and deep in order to protect the cooker from splatter. Non-stick is not essential, but most of my pans are non-stick. I used grapeseed oil to a depth of about 2 cm, so not completely deep fried as such.

The dough resulted in 12 circles, which fried very quickly, so it's important to have them all ready before heating up the oil, or they'll end up burnt. In fact, my parents have worked out a team routine for making them, it's quite amusing to watch. I over-cooked the first four, mainly because I got transfixed watching them swell up like balls. A tip is once they've expanded, flip over, then pierce a hole in them and press down. Also, I think my Mum stretches them out just before putting in the pan. That might help getting them cooked more evenly.

Once done, I placed them on a rack to make sure they didn't sit in oil.

IMG_0819

By the time I'd made tea and coffee and Lundulph was out of bed, the mekitzi had gone cold, but were still wonderfully crunchy and tasted "like the real thing" we get at my Mum's.

Traditionally bakeries just sprinkle icing sugar, but I prefer with jam or maple syrup. Of the jam selection we had today, the best one by far was the runny blackberry jam. Lundulph devoured five in a quick succession, I managed two, the remaining five are now in the fridge and I'll have them for breakfast in the next couple of days. They do freeze very well and can be reheated in the microwave. Although they won't have the crunch like fresh ones do.

Before writing this post I also looked up recipes in my book on Bulgarian cuisine. There are several variations on them, some with yeast, some with baking soda, some with yoghurt or milk instead of water.

At the end though, I still have too much starter in the jar, so I've decided to try and modify my recipe for cinnamon buns to see if I can make sourdough version of them.