28 November 2009

Brioche à tête

It's been over a year since I made brioches, mainly because Lundulph thought they were way too fatty for our veins to cope with on a more regular basis.

The other day we were invited to my parents-in-law and I decided to make a batch as a present. They went down quite well. I mixed up the dough in the morning, folded and rested and took over to their place, where I shaped and baked it. Freshly baked brioche with strawberry jam and clotted cream, definitely a hit. And don't think about the fat, it's practically 100%, no point in worrying... And it was a very good dough, kept trying to escape the bowl, I had to do an extra emergency fold just before I left home. It survived the 2 h trip quite happily.

And when I asked Lundulph if he'd like me to make some more for us, he said yes. So I did. Last night I mixed it up and folded and left to rest overnight. This time the kitchen was a bit colder, so the dough didn't rise as much, but well enough. I've also made a slight change to Richard Bertinet's recipe, since I've stopped buying large eggs. Lundulph read somewhere that laying large and extra large eggs is a bit painful for hens, so I've stopped buying them. I buy only medium sized ones. See, I've seen an egg being laid, it doesn't look easy, so I think what Lundulph read is correct. Thus I use 6 medium eggs instead of the 350 g eggs which should be equal to 6 large eggs. In fact I don't bother weighing the eggs. And I do the first knead in my beloved Kitchen Assistent machine. I let it run on medium, but keep an eye on it and vary the speed, if it looks like it's not being worked. When it goes stringy, I give it another couple of minutes, then turn the dough onto the work surface and work it for a bit before adding the butter. I still used 250 g butter, which is "the rich man's" amount. The recipe is here.

IMG_0334

The other reason for making the brioches is that finally Amazon are selling proper brioche moulds. I've been looking for these for ages and had recently given up asking in every kitchen shop I'd pass. All I'd get is a vacant look as if I'd spoken Latin to them.

IMG_0335

So, this morning I woke up really early to make the brioches. Lundulph was supposed to sleep on, but the sun had gone up and he went to look at the morning rush at the bird feeder, while I was baking. The goldfinches have been back for two weeks now, after a couple of months' absence. Very exciting.

IMG_0338

Sadly my oven decided to play up today. Gas mark 5 which should be 190 degrees C was in fact 210 degrees and the brioches coloured up too fast. I turned it down to gas mark 4, no change. After 15 minutes, I wasn't sure if they were done, so I gave them another 15 minutes and on gas mark 3. At least it went down to 190 degrees C then. But they were frighteningly pale underneath.

IMG_0339

The problem with not having a fan assisted oven and baking with silicone moulds - heat just doesn't reach where it's needed. One thing that turned out a very nice and unexpected surprise is that the dough of 500 g flour makes exactly 18 brioches of 60 g each. Well, there's about 30 g left over, which I divide between the pieces of dough. So I need to buy one more of these moulds. In the mean time, I have to bake the last 6 in another dish.

IMG_0340

Slightly better looking at the bottom, but not much. That oven is going as soon as possible. Grrr!

Raspberry Jam

The other day I had a big clear out of the freezer, it's been long overdue. I threw away quite a few things, mainly failed experiments that I couldn't bring myself to bin at the time. But then I did a lot of berry picking last Summer and had frozen in several ice cream boxes. So out they came and into my big pressure cooker to thaw. That took all day.

IMG_0276

The next day I went to the supermarket bright and early and bought 1 kg of jam sugar. There was also preserving sugar, I couldn't quite work out the difference, certainly the price was almost the same, 1 penny difference there. But the packet of jam sugar said it was particularly for soft fruit that doesn't contain pectin, i. e. strawberries, raspberries etc.

I've made jam before, on two occasions, both well before I started this blog, thus they are not here. And thus nothing to refer back to. The sugar packet had some instructions and when I worked out my amounts it seems I had twice the amount of berries to the sugar I'd bought. Well, that's not a big deal, on the contrary, my Mum's been making jam with reduced amounts of sugar for years, works perfectly well.

Ingredients

2.7 l raspberries and wild strawberries
1 kg jam sugar
25 g unsalted butter
1.5 dl plum brandy liqueur

Method

  1. Allow the berries to defrost completely, if frozen.

  2. Place in a large saucepan and put on low heat, then add the sugar and stir in.

  3. As the sugar dissolves, increase the heat little by little up to medium.

  4. Bring the mixture to a boil and add the butter and stir in well.

  5. Let boil for a few minutes, then add the brandy liqueur.

  6. Let simmer for 20-30 minutes. In the mean time pre-heat glass jars in the oven at it's lowest setting.

  7. When the jam is done, take out the jars and pour it quickly into them and close the lids tightly, then let cool before labelling up.


The reason I put the brandy liqueur in is because I'd had the bottle for ages and it didn't really taste very nice, so I thought this would be a good place to use it up. So completely optional this one.

I also made the mistake in thinking that the jam was way too watery after 25 minutes and left it simmering for a total of 50 minutes, when it had reduced to almost half. This was a mistake as it began to set extremely quickly and I just barely managed to pour it out into the jars. I got a total of 1.5 l jam.

It tasted very nice though, not extremely sweet, but had a bit of the raspberry tartness. Lundulph approved.

When I consulted my Mum, she said if the jam seems too thick, just add a bit of water. She also said this can be done even after it's been poured into the jars, it needs to be heated up first to loosen it up.

18 November 2009

Second batch of sourdough bread

As originally planned, I made a second batch of sourdough bread with the remaining ferment. With the benefit of watching Richard Bertinet's DVD, I thought I'd do better.

IMG_0239

I made the dough with 800 g of white flour, 650 g water and 20 g of salt. Still, the dough was pretty soft and sticky, even after working it for about 30 minutes. But I sprinkled more flour than before and folded it into a tighter ball for the first rise, then again folded a lot before the second rise too. Then I divided it up in two and placed in the bowl and the basket and left overnight. This time I sprinkled a mixture of flour and bran on the towels in the hopes that it would stick less.

IMG_0237

I was slightly worried as the room they were in was a bit warmer now, but neither tried escape from its container, which I took as a good sign.

When it came to turn them out, I sprinkled a lot of polenta on the baking sheet I'd use to place in the oven. As before, the bread that had risen in the bowl had soaked the linen towel completely and had to be teased out of it. And despite my efforts on forming a tight ball, the whole thing just sprawled over the worktop. So I folded it a few times, so that it would fit in the oven. At least I did manage to use the baking sheet as a peel, but that's again something that requires practice. But as before, the bread went quite dark on top and remained pale underneath and didn't sound hollow, but had baked through. In fact, the second boule was so light, I turned it upside-down and gave it another 10 minutes, not that it seemed to make any difference.

IMG_0238

Now we have four sourdough boules, sliced and frozen and these should see us through for a while, even if I have toast for breakfast every day. But my hands are itching for more baking and I'm doing pizza tonight. I've also been browsing through youtube and spotted a number of videos on how to make Kaiser rolls, which seems quite intriguing, so I'd like to give it a try next.

9 November 2009

First batch of sourdough bread

Finally, the first batch of the sourdough bread is now ready. I'd no idea there is so much work around it, but I'm guessing that once you have a ferment, things get easier. Still, I don't feel I'm getting things right.

Yesterday morning, I measured up 790 g strong white flour, 650 g water and 20 g salt in preparation.

I then added 400 g of my starter to the flour and the book said to mix it in and shred the ferment in doing that. Well, the ferment certainly had a honeycomb structure, which was very pretty and I regret that I didn't get a photo of that.

When I started incorporating the ferment into the flour, I noticed how stretchy and pliable it was, I hadn't expected that. Yet it wasn't at all sticky, so shredding it wasn't too easy, it just kept stretching instead. Once that was done, I added the water which resulted in a pretty wet and sticky dough, with quite a few lumps in it - bits of ferment that is. I kept mixing in the bowl, until I couldn't get it any smoother, then I turned it out on the work surface and worked the dough for about 10 minutes, then added the salt and worked it for another 20 or so. It still kept sticking to my fingers, but came off the surface quite nicely and also went very elastic, almost tough.

I shaped it into a ball, with some difficulty and let it rest for an hour, then folded and rested for a further hour. I prepared a basket and a bowl with linen cloth and loads of flour on them. I had serious doubts if I should do this, since I've never had any luck with this type of rising before, other than having to pick bits of dough from the linen cloths, not to mention that separating the cloth from the dough meant deflating the dough substantially. But these were to proof for at least 17 h, so I added even more flour to the cloths, divided the dough in two, shaped it and carefully placed it in the basket and the bowl. Then instructions were to keep it cool and at the moment our upstairs is very cool indeed, since we're getting our loft insulated.

This morning, I switched on the oven, placed a baking tray upside down, and went to fetch my two dough containers. Well, the one in the bowl certainly had bulged out, the other one didn't seem to have moved at all, yet they stood next to each other. I'd covered them with cling film and then a tea towel and a good thing too, because the cling film had stuck to the dough. I'd sprinkled lots of flour on top of each and there was no trace of it whatsoever, so it must have been absorbed.

IMG_0233

I sprinkled a lot of flour on a baking sheet to use as a peel to transfer the dough into the oven, however, by the time I'd turned out the first boule and had liberated the towel, it had spread well over the edges of the "peel" and it seemed to have no structural capabilities at all! Still, at least the dough came off the towel fairly easily, but the towel was soaked through and again, no trace of all the flour I'd sprinkled in. So I performed two emergency folds so that it would fit in the oven. I also spread a lot of flour on top and slashed it with my sharpest knife, but it wouldn't budge from the "peel" so into the oven it went as well. I kept spraying water every other minute for the first 10 minutes, then let it bake for another 15 when I remembered to turn it down from gas mark 9 (260 degrees C) to gas mark 6 (220 degrees C). I let it bake for another 20 minutes and then it had a very nice colour on top, so I took it out. It wouldn't come off the baking sheet and I had to prise it off with a knife - it hadn't baked enough underneath, so not sure what the inside will be like, it's still cooling now.

The second boule was from the basket, which I let rise a bit longer and in the warm kitchen. Again the same procedure as before, though this time the towel had only a few wet spots, I'm guessing some evaporated through the sides of the basket and a lot of the flour was still visible. But I had to fold it again and this time it visibly sank in, when I slashed it. To be sure, I baked it for almost an hour and still it was stuck to the baking sheet. Bah!

IMG_0234

Thus so far, I'm not too impressed with this method, but perhaps it requires tweaking. I'll watch the DVD that accompanies the book later today to see if I'd missed some important bit. Perhaps the fact that Richard Bertinet used a part spelt flour makes such a big difference, that skipping it caused it to not go entirely right?

Doesn't matter, I think it'll be edible either way and on Wednesday I'll repeat the process with the remainder of the sourdough and use a bit more flour for the dough and make it stiffer. Surely I won't need to bake before Christmas after this is over.

Update:
Well, I had a couple of slices for lunch and the breads had baked through, though the first one could have done with 5 more minutes perhaps. The overall flavour was fairly neutral, but there's a distinctive and long lasting aftertaste of sourness, which is quite nice. So not too far off from the mark.

I also took the opportunity to watch the DVD that accompanied the book. And apart from not using spelt flour, all the previous steps that I did seem correct. But what I failed at is the shaping of the boules, I was much too reluctant to tuck them in, so I'll keep it in mind later on this week when I make the next batch.

It's quite cool to have made bread without fresh yeast, though I'm not sure the flavour warrants all the effort, but perhaps it is easier once you have a ferment going.

6 November 2009

Sourdough Stage 4

Right, this is the final stage. My ferment has had 14 h worth of final growth period and looked like this, at 7 am this morning:

IMG_0227

OK, so I had a sniff before I took the photo and some of the air came out, but it was bulging just like in Stage 3. Generally, it still smelt more "off" than alcoholic and sweet, but I will persist. Into the fridge it went and when I checked it this evening, it has bulged again, so I hope it doesn't overrun it's bowl or the fridge will burst.

I did succeed in drying the left-over ferment from stage 2 and whizzed it last night. Very noisy and while drying it, it smelt again, slightly off, even Lundulph commented on it. So the likelihood of making a successful bread is dropping I'd say. Still, will give it a go.

IMG_0226

It's all now in a big jar, labelled as Dried Sourdough 05 Nov 2009. My plan is to try the first half of the ferment on Sunday as per Richard Bertinet's recommendation, then do a second lot next Tuesday, when it is more sour. Then that'll be it and I'll revive the dried stuff. That should see us to Christmas.

Cheeseless Lasagne

It's Friday, that means having a nice dinner with Lundulph and today it was time to put an idea into action - attempt at a cheese less lasagne. After all these years, Lundulph hasn't learned to eat and appreciate cheese and I've been wanting to do another batch of fresh pasta for some time, due to an administrative error resulting in an extra packet of durum wheat in the larder. So without further ado, here it is:

Ingredients for the pasta

250 g pasta (durum wheat) flour
3 large eggs

Method for the pasta

Mix the two ingredients and knead until it stops sticking and feels soft and pliable. Then let rest for at least 15 minutes in room temperature. These are the instructions on the packet of pasta flour.

Ingredients for the meat mixture

4 tbsp grape seed oil
600 g minced beef
260 g carrots
2 cans button mushrooms à 400 g each (net 230 g, do not throw away the liquid)
100 g crispy fried onions
1 can peeled plum tomatoes à 400 g
1 tbsp tomato puree
1 tbsp hot chilli powder
1 tbsp dried basil
1 tsp dried dill
1 tsp dried sage
1 tsp dried thyme
salt and pepper to taste

Method for the meat mixture

  1. Peel and finely dice the carrots. Drain the mushrooms and dice finely too.
  2. Generally fresh onions should be used, in which case peel and dice them here. I seem to forget to buy onions lately and cheated with the crispy fried one in a really bad way. Shame on me!
  3. Heat up the oil on medium heat, then add the mince, carrots and mushrooms and stir intensely so that the mince doesn't clump together.
  4. When the carrots begin to soften, add the tomatoes and chop them up with the spoon in the pan.
  5. Add the tomato puree, herbs and spices and leave to simmer for a few minutes, particularly if there is a lot of liquid. Then set aside and focus on the pasta.
IMG_0229

This is a good time to roll out the pasta. I divided the above amount into four equal pieces, wrapped three of them in cling film, dusted the work surface generously and rolled the fourth dough piece to the size of the deep baking pan I have. As today also happens to be yoghurt making night, I was very short of space, so I turned the baking tin upside-down, flowered it and placed the first sheet over it. What better proof that the pasta piece will fit? I then continued with the second piece, and stacked it on top of the first one, after dusting liberally with flour. Once I had all four pieces, I dusted the work surface with flour again and spread the rolled out pasta to dry out a bit, while I made the sauce.

IMG_0228

Ingredients for Béchamel sauce

1 dl grape seed oil
1 dl plain white flour
3.5 dl mushroom liquid (as drained from the cans)
7 dl semi-skimmed milk
0.25 tsp nutmeg, grated
salt and pepper to taste
2 medium eggs

Method for Béchamel sauce

  1. Heat up the oil at medium heat and add the flour, stirring intensively, so the flour doesn't burn.
  2. After a couple of minutes, start adding the milk, a little at a time, constantly stirring. It'll clump together as soon as the first milk is added, but this is correct, just keep adding more and stirring, eventually it'll become like porridge and finally like a sauce. After having added about half a litre of milk, switch to adding the mushroom liquid and keep at it until a thick-ish sauce has formed. Keep adding liquid if it keeps going thicker.
  3. Take off the heat, then add salt, pepper and nutmeg and stir in.
  4. Save the eggs, they are for the last layer.
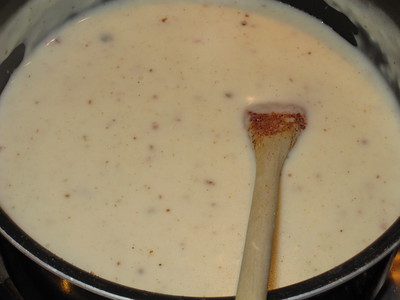
IMG_0230

I know it looks like it has lumps it it, that's black pepper and nutmeg, I need to work on my technique in adding there, because I get lumps every time.

Method for the lasagne

  1. Pre-heat the oven at gas mark 6 (just over 200 degrees C).
  2. Brush the bottom of the deep baking pan (6 cm deep) with a little olive oil and place the first pasta sheet onto it, making sure to remove any trapped air.
  3. Pour about 3 dl of the Béchamel sauce and spread it as evenly as possible over the sheet of pasta.
  4. Spread a third of the mince mixture on top of this and lay the second sheet of pasta.
  5. Continue layering like this, until you've laid the last sheet of pasta. Now the remaining sauce should be very little, about a dl or so and it should be fairly cool. Break the two eggs into it and stir in thoroughly, then pour over the top layer of pasta and spread to cover evenly. Even pick up the whole tray and bump it back on the work surface, to force the thick liquid to level out.
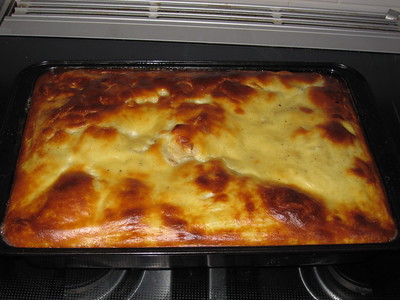
  6. Place the lasagne in the lower middle and bake for about an hour. I checked mine after 30 minutes and a good thing too, because it was browning unevenly, so I turned it around and baked for another 15 minutes and turned down to gas mark 5 and gave it another 10 minutes, as it was beginning to brown too much.
IMG_0231

Looks like a lasagne...

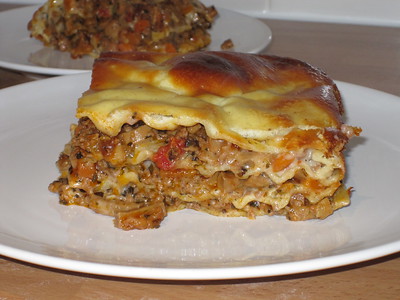
Well, I can honestly say, this was a definite success, even despite the cheating onion episode. And the lasagne is good enough to serve guests, but I'll reduce the amount of chilli powder dramatically in that case. As it was, it had a very good kick to it. I'd also like to add some oregano to it, I didn't because I hadn't realised I didn't have any at home. Unbelievable! And there's no space in my spice drawer either, so I'm not sure where I'd put it either. My herb/spice collection now amounts to over 40 different jars of various exciting flavours.

IMG_0232

Yep, definitely looks like a lasagne.

5 November 2009

Sourdough Stage 3

OK, getting closer to the end, I hope. About 28 h have passed since stage 2 (again a change to the original instructions of 24 h) and I took out my bowl of ferment.

IMG_0224

Needless to say, there has been intense activity in there.

Stage 3 adds further food to the mixture, so I measured that up first. 400 g strong white flour and 200 g warm water. This is mixed up with 200 g of the ferment from stage 2.

When I removed the cling film, it smelt the same as yesterday - mostly sickly sweet, a bit like cheese and with a hint of alcohol. I scraped off as much as possible of the ferment from the cling film, then measured up 200 g of it and added the previously measured flour and water and mixed it up into a very nice soft dough. In fact, it was tricky to mix with a spoon or a dough scraper, so I ended up mixing it by hand, but still in the bowl. I formed a decent ball, turned the seam side down and covered with a new piece of cling film. In 12 h it will be ready for stage 4, though since that'll be practically in the middle of the night, it'll be a bit longer than 12 h.

IMG_0225

The remaining 550 g (approximately) of ferment were not to be thrown away, but mixed with 500 g of white flour. As the instructions stated this is resulted in an extremely dry mixture, which pretty much stayed in crumbles, I didn't manage to get it to hold together like dough. But most of the flour was absorbed. Then, I crumbled this mixture further onto four baking sheets, lined with baking paper and now two of them are baking in the oven at hopefully less than 50 degrees C. The lowest setting on the main oven is "S" for slow cooking and this corresponds to around 100 degrees C, so I've placed a large empty baking tray at the top, then a second one near the bottom to stop the heat and keep it in the upper half, then the tray with the crumbles is on the very floor of the oven.

I've done the same with the secondary oven (grill) - an empty tray on the highest rack, then the crumb sheet on the floor of it. This is what the book recommends. Baking for about 3 h, then whizzing in a food processor and storing in airtight jars for later use. Which I will put to the test in a few weeks' time.

The two trays that are waiting to be oven dried have actually dried pretty nicely already, so won't require as long in the oven. The main worry here is that if the temperature is too high, the ferment will die. In which case I'll have a lot of funny tasting breadcrumbs to use up somehow.

One thing I noticed is that as I was pouring out the ferment, the alcohol aroma got stronger towards the bottom of the ferment, whereas the top was more sickly sweet smelling. I hope this is OK.

So, early tomorrow morning the sourdough will have risen a bit.

4 November 2009

Sourdough Stage 2

It has now been 48 h since I mixed up my sourdough starter and time for the first feed. This is what it looked like when I took it out:

IMG_0222

It had gone a bit dark like the book said and there were slow moving/popping bubbles too. I'm not sure if it smelt entirely correctly, there was a definite hint of alcohol, but not as sharp as I'd expected and there was a sweetness to the aroma that was like something going off. Hmmmm.

Anyway, the first feed uses all of the ferment from stage 1. To this I added

310 g strong white flour
150 g warm water

And stirred everything as well as I could until I couldn't see any dry flour. The mixture is now a bit thicker than the original.

IMG_0223

It will now rest for another 24 h an the book says not to let the temperature go below 24 degrees C, which won't be possible. Now that there have been a couple of cold nights, the whole house is colder and the kitchen is about 20. I also wonder if spelt flour has a higher content of wild yeasts relative to white flour. We'll see.

I'll have to work out something regarding the temperature, in order to be able to follow the next stage. I might have to put the bowl on the radiator...

2 November 2009

Sourdough Stage 1

Today is the beginning of week 4 as a housewife and I've decided to finally try my hand at real sourdough and I'll be following the method described by Richard Bertinet in his book Crust. And already I'm making alterations to the recipe. Richard calls for one part spelt flour and three parts white flour, but I don't have spelt flour at the moment, so I'm going with only white flour.

Also he adds honey and for the first time in many years, we've run out of honey! But yesterday Lundulph opened a jar of "pine cone elixir". We bought this in Bulgaria thinking it is pine jam/honey, which is a very tasty Bulgarian thing made with the new shoots of a pine. Now it is not really honey as pines are not pollinated by bees, but by wind. Still, it is a very tasty honey-like thing and is often recommended to eat for a sore throat. This thing however, was blander than bland and is just regular sugar syrup, so I used this for my sourdough ferment.

Ingredients

200 g strong white flour
150 g warm water
20 g sugar syrup

Stage 1

I've measured up the ingredients and mixed them well into what looks like thick, but smooth porridge.

IMG_0221

I then covered it with cling film and put it in what I believe is the warmest part of the kitchen - in the cupboard above the fridge and freezer. Richard says it should be about 30 degrees C and even in extreme cooking days, the kitchen doesn't reach such temperatures. I guess he's talking about an airing cupboard or such, but I don't have that either. So things will be a bit slower perhaps.

Now the mixture should rest for 36 to 48 h, during which time fermentation should begin. So I'm opting for the 48 h, before moving to the next stage.

1 November 2009

Mjukt tunnbröd

This translates to soft thin bread and is a bit of a holy grail for me. I do like bread generally and I'm very partial to the Swedish soft thin breads. There are may different variants on them and I've mainly been managing on the ones I can get from the IKEA Food Shop every now and then. These are either rectangular and really thin or slightly thicker and round.

IMG_0217

A holy grail simply because I've been hunting for a decent recipe for ages and finally I spotted one in one of my Mum's magazines when I visited in September. Since I came back, it has been hanging on the fridge door in preparation for making it. But of course my stint at fermenting dough resulted in not having to bake for several weeks.

This morning we had two small slices left after breakfast, so the time had come to try this recipe. According to the article, this is a very old family recipe of the article writer, Anette Uhlin. She calls them "Mammas segkakor" which translates to Mum's chewy cakes literally. The photos looked very much like the commercially available soft thin bread, which is what prompted me to rip out the page in the first place.

The original recipe is for a lot of these breads and I decided to halve it right off, not the least because I'd end up rolling and baking for the whole day otherwise. Sadly I got muddled up with one of the measurements, which called for half a bottle of sugar syrup, so I had to look up how much a bottle contains, of the kind sold in Sweden, and jotted down half of that amount on my re-calculation. I think this resulted in a very soft dough and I had to add quite a bit of flour in order to make it workable.

Additionally, I didn't have the special cooker plate for this type of bread, so I used a cast iron dish on my gas hob. The recipe said you can bake straight onto an electric hob too.

Ingredients

25 g fresh yeast (or corresponding amount dry)
480 g strong white flour
320 g rye flour
1 ml salt
1 tbsp ground anise seeds
1 tbsp ground fennel seeds
75 g salted butter
5 dl milk (full or semi-skimmed)
150 g golden syrup
white flour for rolling

Method

  1. Rub the yeast into the white flour. Add the rye flour, salt and spices and mix well.

  2. Melt the butter on low heat, then add the milk and warm up to around 37 degrees C.

  3. Pour the liquid into the flour mixture and also add the syrup and work well into a dough. I used my Kitchen Assistent for this, took it out of the bowl and shaped it into a ball, then dusted the mixer bowl with flour, put the ball back in and sprinkled a bit of flour on top as well. Then let rise for 30 - 40 minutes. Note that due to the high rye content, the dough won't really look like it has risen after this, but it is how it should be.

  4. Now dust the baking surface generously with white flour and take out the dough and fold it a couple of times. Then I recommend the dough is weighed, so you can work out how many pieces it should be divided into. The dough came in at just over 1800 g, so I decided to cut it up in pieces of about 150 g, but in hindsight, 80 g would be better for the size I could do (about 25 cm diameter and about 3 mm thick). Divide up all the dough and line the pieces up around the surface.

  5. Put the cast iron pan/dish or electric hob on medium-low heat, then roll out the dough pieces, keeping the surface well flowered. This is a good bread to do with the knobbly rolling pin, but I think a regular one will do too.

  6. Prick with a fork before baking, then bake in the pan for a couple of minutes. If you feel it's not sufficiently baked, turn the bread over and bake for another minute. Then take out and place on a clean kitchen towel and cover up. Keep stacking the breads as they get ready and keep them covered in between.

So, because my dough pieces were 150 g, and I rolled them out to about 25 cm diameter, they were a bit thicker 5 - 6 mm. This meant that it was a bit too thick to just bake on one side (as many of the Swedish breads are), so I had to turn them and bake on both sides. Also, the recipe didn't say anything about the heat level for baking and I put it on the highest, as this is what you do when you bake in the oven, but this is wrong and I did gradually turn the heat down, but all except the last bread were a bit burnt here and there. So this is very important. Again not putting too much syrup in would be good, but it wasn't too bad, actually. The breads ended up a bit thicker and with a heavier texture than the ones I get from IKEA, but overall, they were pretty close, so I will be tweaking this recipe, so that I can get it right. It'll be great with ham or salami or sausages.

I got 12 pieces out of this batch and I let them cool completely as they were stacked and wrapped in a towel. I've now kept a couple for tomorrow's breakfast and have frozen the rest.

Thank you Mum for letting me rip out this recipe!