18 June 2016

Frozen Mojito Cheesecake

Some time ago, my Sister discovered a recipe for frozen mojito cheesecake, which she made with great success among her friends. Recently she made it again, this time using up all the fresh spearmint my Mum had and as thanks,treated my parents to a small version of this cake. My parents did enjoy this very much and my Mum sent me the recipe once more. So as the English part of the family were gathering to celebrate Father's Day this week-end, I decided to make it, since we were going to have a barbecue and I thought an ice cream cake would fit nicely.

IMG_5026

The original recipe is in Swedish and can be found here. Reading through the recipe, the basis for the ice cream was very similar to the very smooth and rich non-churn ice cream I made last year. What also threw me a bit was that after making the ice cream mixture, it was to be poured straight into the springform tin. I had to read the instructions several times, until I realised that the biscuit base goes in at the end, on top of the ice cream mixture - the cake is made upside-down and turned onto a plate before serving.

Ingredients

Makes 10 portions

2 limes with good skin
25 g packet of mint
4 eggs
1.5 dl granulated sugar
200 g cream cheese
4 dl whipping cream
1 dl dulce de leche or caramelised condensed milk
½ dl dark rum or rum essence
200 g plain digestive biscuits
50 g butter

Method

  1. Grate the zest from the two limes and squeeze out the juice.
  2. Wash the mint, tear off the leaves and chop them finely - about 1 dl is required (not tightly packed though).
    IMG_5019
  3. Separate the egg whites and yolks. Place the whites in a large glass bowl, cover and set aside.
  4. Place the yolks in a different large bowl, add the sugar and whisk until pale and fluffy.
  5. At the end whisk in the creak cheese, the lime zest and juice and the chopped mint.
  6. In a third bowl, whip together the cream and the dulce de leche until stiff. Then fold into the egg mixture and follow with the rum or rum essence.
  7. Whisk the egg whites to stiff peaks, then fold into the rest of the mixture until fully incorporated.
    IMG_5020
  8. Pour into a 25 cm springform and smooth the surface so it's level.
  9. Break up the digestive biscuits in a food processor and melt the butter gently.
    IMG_5022
  10. Add the biscuit crumbs to the butter and stir through, then sprinkle over the ice cream, making sure it's level and push down on it gently.
  11. Cut out a circular piece of baking paper and cover the crumbs, then cover the springform with cling film and freeze for at least 8 h.

To be honest, I didn't like this one much. The mint was very overpowering and perhaps using spearmint works better, but it's not something that's easy to get hold of where I live, so I'll need to sow some and try again. Also possibly use more lime zest, although it looked like a lot from 2 limes.

I also wanted to make the cake pretty, so I buttered the bottom of the springform, and fixed large mint leaves in a circle, with the idea that the ice cream would freeze and they'd remain stuck to it.

IMG_5018
Sadly this was not to be, the leaves remained stuck in the butter.

IMG_5023 IMG_5024
My brother-in-law Roger and oldest niece Lou were very good and carefully peeled off each mint leaf and placed them on the cake again. It went quickly of course, even though we'd spent most of the day eating, there's always room for ice cream. But as I said, it didn't quite wow me, though the others said it was nice.

One good thing was that as Lundulph and I were preparing to leave for Roger's place, I caught sight of a new cookery show from Mary Berry, where she was demonstrating her favourite Knickerbocker Glory - which is an ice cream with fruits and the ice cream she made from scratch and it was very much the basic recipe as I've done here - eggs, sugar, whipping cream, so since I have some dulce de leche left, I'll make some ice cream next week, perhaps something with pistachios.

12 June 2016

Rhubarb Muffins with Crunchy Topping

IMG_5013

Well, I finally got round to harvesting the rhubarbs this year. They haven't been too prolific, but then I did harvest them last year, so I should have left them to recover this time, but I really fancied making something with rhubarbs and also wanted to clear out some space in the freezer, where I had two packets of diced frozen rhubarbs as well, not sure from which year. And as the fresh rhubarbs were mostly fairly thin long stalks, I decided to use them for rhubarb muffins. But I wanted to try out a different recipe to the one from Dr Cutie.

And then I remembered that my dear friend Patsy made some fabulous bilberry muffins for a good-bye fika, when I moved back to the UK in 2012. So yummy that I promptly asked her for the recipe and here it is, but with fresh rhubarbs, rather than frozen bilberries. The original recipe is in Swedish here.

Ingredients

20 at 5 cm size
280 g rhubarbs
100 g unsalted butter
2 dl full milk
1 packed tsp lemon zest
2 large eggs
2 dl granulated sugar
1 tsp vanilla essence
4 dl plain flour
2 tsp baking powder
1 pinch salt
3 tbsp potato flour

Topping
75 g cold unsalted butter
1 dl porridge oats
1 dl almond flakes
1 dl plain flour
1 dl granulated sugar
1 tsp ground cinnamon

Method

  1. Trim and wash the rhubarbs, then slice thinly, place in a large bowl and set aside.
  2. Pre-heat the oven to 185 °C and line up 20 paper muffin cases.
  3. Place the butter in a saucepan and melt on low medium heat.
  4. When it's completely melted, add the milk and the lemon zest and stir through. When it's at finger warmth, remove from the heat.
  5. In a bowl, whisk together the eggs, sugar and vanilla until light and fluffy.
  6. In another bowl, sift together the flour, baking powder and salt. Make sure the baking powder is well mixed in.
  7. Pour in the warm liquid into the egg-sugar mixture, then follow with the flour mixture and whisk to get a smooth batter.
  8. Sprinkle the potato flour over the rhubarbs and stir to get them all coated, then stir into the batter.
  9. Distribute the mixture into the muffin cases, filling to about two-thirds.
  10. Make the topping by dicing the cold butter into a bowl, adding the other ingredients and pinching together with your fingers to make crumbs. Distribute between the muffin cases, carefully, as a lot of crumbs will go between them, rather than on top.
  11. Bake each muffin tin/tray for 30 minutes, test with a toothpick, it should come out dry.
  12. Transfer to a wire rack and leave to cool completely, then store in an airtight container, but preferably eat on the same day.

The original recipe states that the amounts are for "6 portions", but this doesn't necessarily mean 6 muffins, although that was my original assumption. I started with 12 muffin cases and had to add 8 more and a second muffin tin. And like never before, they rose perfectly without busting like volcanoes or spilling over the edges and they didn't sink back when they came out of the oven, so finally success.

IMG_5007 IMG_5008
IMG_5009 IMG_5010

And boy, were they tasty! Lundulph didn't even wait until they had cooled down and ended up having to scrape crumbs off the paper case. Once they'd cooled down, they were easier to peel. But as per usual, he wants me to inject a blob of custard in the middle. I did think of that, but I'd planned things badly and couldn't try out my idea about this custard-in-the-middle concept.

As to the frozen rhubarbs, I made jam once more, my old recipe. But as the fresh rhubarbs were a bit on the depleted side, I used the thinner stalks for the muffins, as they seemed less fibrous and the thicker stalks went into the jam along with the ones from the freezer. Lundulph asked when we could start eating the jam, but he'll have to finish the jams he has on the go first. I'll save a jar for my Sister Bip, she really liked it with cheese.

5 June 2016

Green Masala

IMG_5004

A couple of weeks ago, there was a fête in a nearby village. We've been going to it for many years, it's a nice walk across the fields, even on rainy Spring days. This time it was a very warm and sunny day and we'd also decided to do a longer walk before the fête started at lunchtime. After the really nice walk in an area we didn't think existed, we went straight for the book stall and there I found a small treasure - The World Encyclopedia of Spices. It's not exhaustive in any way and I've used most of the spices described in there, but the book has some good tips on how to determine the quality of different spices. The book also has a lot of recipes for different spice mixtures and pastes, which is the really interesting part of the book. What really caught my eye was a recipe for green masala. This is not a dry spice mixture, but a paste and looks very much like pesto, but smells and tastes quite differently. Lundulph is sold on it and has suggested we move into industrial production and sell it.

A key point to note is that this requires a little bit of planning, as there's pre-soaking and resting/cooling time required before it's ready for use. A spice mill or a clean coffee grinder is needed as well, for best results.

Ingredients

Makes about 400 ml
1 tsp fenugreek seeds
10 green cardamom pods
6 cloves
2 tsp ground turmeric
2 tsp salt
4 cloves of garlic
5 cm piece of fresh root ginger
50 g fresh mint leaves
50 g fresh coriander leaves
1 small green pepper
50 ml cider vinegar
60 ml grapeseed or sunflower oil
60 ml sesame oil, preferably not toasted

Method

  1. Soak the fenugreek seeds in some water overnight.
  2. The next day, bruise the cardamom and dry-fry in a thick-bottomed pan together with the cloves, stirring constantly, until their aroma develops. Then grind these finely and add the turmeric and salt and set aside.
  3. Peel the garlic and ginger and cut into chunks.
  4. Wash and cut the mint and coriander. Wash, cut and de-seed the pepper.
  5. Drain the fenugreek seeds and place in a food processor, along with the garlic, ginger, mint, coriander, pepper and vinegar. Blend until a smooth purée forms, then stir in the ground spice mixture.
  6. Mix together the grapeseed/sunflower oil and the sesame oil and heat it in a pan. Add the green paste, stir through to combine and cook for a few minutes. Remove from the heat and allow to cool completely.
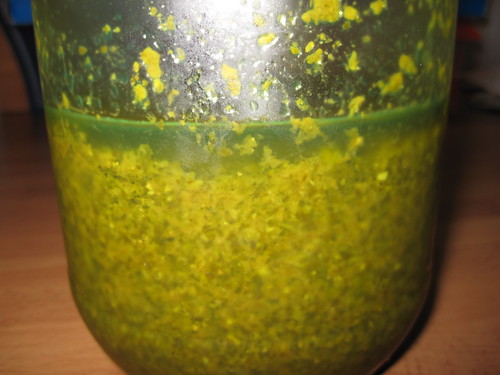
  7. Transfer to a clean glass jar, level the top with the back of a spoon and if necessary top up with a little grapeseed/sunflower oil to ensure there is a thin layer of it covering the top surface to preserve the colour and freshness. Close tightly and store in the fridge.

I recommend once it's in the fridge, it's left for a further night to allow the flavours to develop even further. A key point is the keeping of a layer of fat on the surface - after each use, I've topped up with a little grapeseed oil, to make sure the paste is kept sealed.

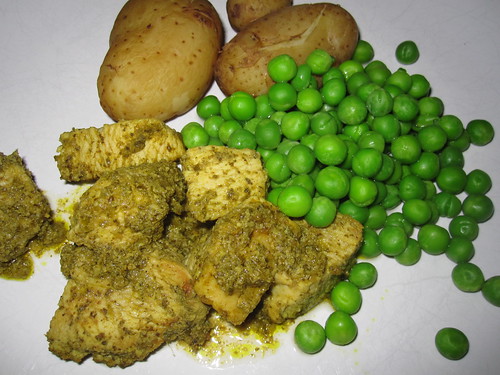
Now this can be used as a marinade - I used about 100 ml for 600 g chicken breasts, which had been cut into bite-sized chunks and I coated them with the green masala and left overnight in the fridge. I fried the chicken in a little toasted sesame oil and served with steamed Jersey Royal potatoes and some green peas.

Last week we had intended to barbecue and I wanted to try this out on another batch of marinated chicken. Sadly it rained the whole day, so I ended up frying it again, but this time we had it with Lebanese flat bread and hummus, also very tasty.

My plan for the remaining paste is to try it on salmon, before baking as usual in aluminium foil. Then I'll have to make another batch, probably a double one and freeze in ice cube trays as the other recommendation for this paste was to add a tablespoon or two to a regular curry, especially if it has coconut milk in it.

Lundulph also requested that I modify the recipe so that it can be used as a dip as well. I'll have to think about that, as it's very strongly flavoured in its "raw" form. The other thing Lundulph was speculating about was whether dramatic changes can be made to a traditional pesto recipe, so as to get the same texture and colour, but completely cut out the parmesan cheese. Another one to think about.

IMG_5006 IMG_5005

23 May 2016

Chocolate and Raspberry Chia Pudding

On my last visit to Sweden just after Easter, I came across a fabulous blog, Zeina's Kitchen (in Swedish). She's not been going for long, but is very talented and her blog won the People's Choice Award in the Food Blog Awards of 2015. The thing that particularly appealed to me then was her recipe for chia pudding, very similar to the one I've been doing, but made with chocolate and raspberries and to a thicker consistency. Not to mention much more attractive than mine. So when my parents came to visit at the end of May, I decided to try this out and I even bought special glasses to serve it in.

IMG_5002

Actually they are disposable margharita glasses. But it was rather tasty, especially with some fresh strawberries and kiwi fruit diced on top.

IMG_5003

So without further ado, here is the recipe. I doubled the recipe and made one small addition to Zeina's recipe, I added sweetener to the chocolate pudding, as it wasn't quite sweet enough.

Ingredients

7 - 8 portions

12 tbsp chia seeds
8 dl almond milk (sweetened)
4 tsp vanilla extract
4 tsp honey
2 tsp xylitol sweetener
8 tsp cocoa powder
4 dl fresh raspberries
2 kiwi fruits
7 - 8 large strawberries

Method

  1. Place 3 tbsp chia seeds in one bowl, and the other 3 tbsp in another.
  2. Add 2 dl almond milk to each bowl and stir.
  3. Add 1 tsp vanilla extract and 1 tsp honey to each bowl and stir in.
  4. Add the xylitol and cocoa powder to one of the bowls and stir through.
  5. Measure up the raspberries, place in a deep dish and mash up with a fork, then transfer to the second bowl and stir through.
  6. Cover the two bowls with cling film and place in the fridge overnight.
  7. Spoon alternate layers of raspberry and chocolate in serving dishes.
  8. Peel and dice the kiwi, wash and dice the strawberries and decorate each serving.

It is also possible to use frozen raspberries, the same amount, but they need to be thawed before mashing and mixing in and the amount of chia seeds needs to be increased slightly as they contain more liquid than fresh ones.

IMG_4996

The chocolate chia pudding is a lot less than the raspberry chia pudding, so keep that in mind when preparing to serve. IMG_4997

What surprised me was the combination with the fresh fruits on top, that really made a difference I think. We had the first four portions as dessert and the rest I had for breakfast in the following days, which was very nice, but I didn't bother with the fresh fruit then, so not as tasty as the first dessert. I also noticed that the chia pudding with fresh fruit doesn't last as long and towards the end, there was a distinct fermented tinge to it, so I should probably have stuck to a single batch.

Marinated Tuna

Finally after around 15 years, my Dad finally agreed to come and visit us. Not that we aren't on friendly terms, he's not keen on travelling much. Mum's last visit was when we bought our house some 11 years ago, so also definitely time for another visit, if nothing else to see how different the house now finally looks. She does like to travel and does a lot more now that she's retired.

IMG_5000

Thus I worked out a very intensive schedule for their visit, to try and catch up on lost time and cram in as much as possible that they would both enjoy.

For their first dinner after arriving, I decided to scale up a lovely starter recipe from Mary Berry Cooks. The recipe looked easy enough and the photo was very pretty and I could feed both Mum and Dad, since Mum doesn't eat meat and Dad does. The original recipe is for starters, I trippled the amounts to get a full meal.

Ingredients

180 ml soy sauce
90 ml balsamic glaze
90 ml sesame oil
6 tbsp light muscovado sugar
1.2 kg tuna steaks
225 g sesame seeds
sunflower oil for frying

Method

  1. Mix together the soy sauce, balsamic glaze, sesame oil and muscovado sugar in a large and wide-bottomed bowl, then set half of it aside as a dipping/drizzling sauce.
  2. Cut the tuna steaks into strips of about 3 x 3 cm and place in the mixture to marinate for about an hour.
  3. Place the sesame seeds in a flat bowl and heat up some sunflower oil in a pan.
  4. Fry the strips, turning them carefully so they don't break. A couple of minutes on each side should do.
  5. Remove from the frying pan and turn in the sesame seeds to coat well.
  6. Serve with the saved part of the soy sauce mixture for dipping or drizzling.

I served these with Jersey Royal potatoes and steamed asparagus and my usual egg sauce. I'd also been lucky to find black sesame seeds and used half black and half white, which I thought looked rather pretty.

IMG_5001

The amounts were way too much for 4 people, but it was very tasty and wonderfully easy to do. The soy sauce mixture was also very nice for other dipping as well, I'm sure it would work nicely with spring rolls or such.

16 May 2016

Flarn

Flarn is a thin baked wafer-like delicacy, quite popular in Sweden. The French word is tuile and I'm guessing the English version is the snap. I've never made these before, the shaping of them after baking has always seemed like something quite difficult to do. Lundulph is quite partial to the oat flans available to buy in IKEA's food shops and most supermarkets in Sweden. There are several variants in my big book of cakes and earlier this week, I decided to try my hand at two of them, as one of my colleagues was going on maternity leave and another was visiting my office and I wanted to take the opportunity to bake for both of them.

IMG_4994

Now the cake book has a few recipes that I've not liked much, but then there are others that have been really good and the two recipes I tried this time are actually really good.

Ingredients - oat snaps

Makes about 50
75 g unsalted butter
15 g baking powder
40 g plain flour
2 large eggs (around 125 g)
275 g caster sugar
175 g porridge oats

Method

  1. Melt the butter and set aside.
  2. Sift together the baking powder and flour and stir to ensure they are thoroughly mixed.
  3. In a large bowl, whisk the eggs and sugar with an electric whisk for about 5 minutes until really pale and fluffy.
  4. Add the flour mixture and fold in with a spatula.
  5. Add the oats and the melted butter, then set aside for about 30 minutes to let the mixture swell up a bit.
  6. Pre-heat the oven to 190 °C and line 3 baking sheets with baking paper.
  7. Place the mixture into a piping bag, cut a hole about 1 cm wide and pipe walnut-sized blobs on the baking sheets, making sure there's 6 - 7 cm between as they'll float out quite a lot. I managed to fit in 9 per tray.
  8. Bake for 6 - 7 minutes, until the snaps start browning around the edges and have an even lace-like surface throughout.
  9. Remove from the oven and leave on the baking sheet for about a minute, before carefully removing onto a cooling rack. At this point they can be shaped over e. g. a rolling pin or into tubes or bottles, but you need to be quick, they go solid quite fast.
  10. Store in an airtight container when they've cooled completely.

Ingredients - coconut snaps

Makes about 40
125 g caster sugar
125 g unsalted butter
25 g honey, preferably with a strong flavour
125 g dessicated coconut
75 g plain flour

Method

  1. Pre-heat the oven to 180 °C and line 3 baking sheets with baking paper
  2. With the fingers of one hand work together all the ingredients to a smooth paste.
  3. Spoon out 15 g balls onto the baking sheets, making sure there's 6 - 7 cm between them, then flatten each ball to about ½ cm thickness. I managed to get 8 in per tray.
  4. Bake for 6 - 7 minutes, until they go golden brown around the edges and have an even lace-like surface throughout. Watch them, because they will burn within seconds.
  5. Remove from the oven and leave to stand on the baking tray for about a minute, before carefully removing onto a cooling rack or shape over a rolling pin or roll into tubes. Again, work quickly as they go solid very fast.
  6. Place on a wire rack to cool, then store in an airtight container lined with some kitchen tissue to soak up some of the butter that'll come out in the baking.

What can I say - these were absolutely delicious and Lundulph didn't really want to let me take them in to work. He said they were very moreish and almost impossible to stop eating once you've started. They certainly were popular at work too. And there were some left for when Lundulph's parents came to visit - they also struggled to stop eating them.

I've also realised why all recipes for such snaps always say to bake ridiculously low numbers on each tray. Yes, they spread massively, but not just that, it's for when they're baked and need to be shaped - there is about a minute at most to shape all snaps on a tray and if you have 8 - 9 of them, you won't make it, but if there are just 4, then there's time, especially of making tubes. I left the oat snaps flat, and I placed the coconut snaps over my rolling pin and food rings to make them look a bit like pringles.

These snaps turned out to be the most popular bake I've taken to work, I think and word spread and loads of people came round my desk for a taste. Luckily I did leave some at home for Lundulph and for his parents when they came to visit us a couple of days later. All summed up in one work - moreish, almost impossible to stop once you've started.

Satay Chicken Salad

Now that Spring is in full swing and Lundulph and I have spent several week-ends cleaning and rejuvenating our patio, I want to cook things we can eat outside. Tonight was not to be sadly, it was just a little too cold, but we've had several meals at our little table outside and it's been very nice.

IMG_4985

I've had this recipe card from Waitrose stuck to the Fridge for a very long time and it's no longer on the Waitrose website. It's overly enthusiastic about preparation and cooking times as well as some of the proportions, but it was good enough as a start and there's room for improvement.

Ingredients

600 g chicken breasts
2 smallish carrots
6 - 7 radishes
half a small white cabbage (grapefruit size)
half a cucumber
2 salad onions
2 tbsp grapeseed oil
100 g satay sauce
1 tbsp toasted sesame oil
100 g frozen peas
2 tbsp water
150 g rice noodles
½ dl dry roasted crushed peanuts
1 lime (optional)

Method

  1. Trim the chicken breasts and cut into strips, about 3 cm thick, then set aside on a grill pan. Pre-heat the grill.
  2. Peel and julienne or grate the carrots thinly.
  3. Trim, wash and cut the radishes into thin slices.
  4. Remove any wilted outer leaves from the cabbage as well as the stalk, then shred finely.
  5. Peel the cucumber and cut in half lengthwise, then using a melon baller, remove the seeds and discard. Slice the cucumber thinly as well.
  6. Trim and finely cut the salad onions.
  7. Place all the sliced vegetables in a bowl and stir through to mix.
  8. Brush the grapeseed oil on the chicken strips and grill until fully cooked, turning a couple of times.
  9. As the chicken is almost ready, place the frozen peas in a bowl with a couple of tbsp water, cover and microwave for a minute, stir and then for a further few seconds to get them warmed through. Then drain and stir in with the other vegetables.
  10. Heat up the toasted sesame oil in a large pan and fry the rice noodles to warm them through. Then stir into the vegetables.
  11. When the chicken is ready, remove, cut the strips into bite-sized pieces and stir together with the satay sauce to get them coated all over.
  12. Stir in the chicken along with the crushed peanuts into the vegetables and serve immediately while the chicken and rice are still warm, with a wedge of lime to squeeze over.

This was a really nice and tasty surprise. What originally attracted me to the recipe was the photo on the card, I hadn't bothered to read it. When I did, I was a bit disappointed, as it didn't read like a "real" recipe, but I didn't have any better ideas, so I went for it anyway and I'm quite glad I did, it was a really good meal.

It's almost needless to say by now that I've made alterations to what the recipe card states, as I wasn't able to get hold of the special brand of satay sauce that the card was advertising and I forgot the lime, as Lundulph came home and was hungry, so we just sat down and ate straight away. When I remembered the lime and mentioned this to him, his comment was, that it would not have worked. I disagree, but didn't get to prove my point.

The recipe stated that it was 4 portions. I'd say more like 5 or even 6, so after we'd had our dinner, there was still quite a lot left, which went into the fridge. The fresh vegetables in the salad meant that it couldn't be reheated, but frankly it worked quite well cold as well, I took some with me for my lunch the next day and it was just as tasty as the night before.

2 April 2016

Lemon and Pistachio Easter Cake

I'm visiting my parents this week and I grabbed a few recipe cards to try out, since my Mum declared that she'd bought unsalted butter for me to play with.

IMG_4950

The first thing I decided to do was continue the Easter theme and made the lemon and pistachio Easter cake from one of my many Waitrose recipe cards. It's from March 2015, but I wasn't able to find it on the website.

Ingredients

Pistachio marzipan
100 g peeled unsalted pistachios
50 g ground almonds
75 g granulated sugar
75 g icing sugar
1 egg white (save the yolk for the sponge)

Sponge cake
340 g plain flour
2 tbsp baking powder
265 g unsalted butter at room temperature
265 g granulated sugar
finely grated zest from 3 large lemons
4 large eggs + the yolk
4.5 tbsp lemon juice


Butter icing
75 g unsalted butter at room temperature
75 g icing sugar
1 tbsp lemon juice

Decoration
icing sugar for dusting
a few copped pistachios

Method

  1. Pre-heat the oven to 180 °C and line a 20 cm round tin with baking paper at the bottom and grease the sides.
  2. For the marzipan, place the pistachios in a processor together with the ground almonds, granulated and icing sugars and whizz as fine as possible.
  3. Remove from the processor into a bowl, then stir in some of the egg white, a little at a time to make a thick marzipan paste.
  4. Divide into two equal parts and roll each one to a circle between two pieces of cling film. It should be slightly less than the diameter of the cake and be about 1 cm thick. Make sure the two circles are wrapped air tight and set aside.
    IMG_4942
  5. For the sponge, mix together the flour and the baking powder together well.
  6. Put the flour mixture, the butter, the sugar, the lemon zest and the eggs, including any left-over from the marzipan white and whisk together into a batter.
  7. Finally add the lemon juice and incorporate well.
  8. Pour a quarter of the batter into the baking tin<,
    IMG_4943
    then peel off the cling film from one side of one of the marzipan circles and carefully place it in the baking tin over the batter, making sure it's as centered as possible.
    IMG_4944
  9. Cover the marzipan with another quarter of the batter,
    IMG_4945
    then bake in the oven for about 30 - 35 minutes, until it goes golden brown on top and the sides come away from the tin.
  10. Remove from the oven, and transfer onto a wire rack covered with more baking paper, remove the paper circle and leave to cool down completely.
  11. Leave the tin to cool as well, then repeat by replacing the paper circle in the bottom and greasing the sides, then use the third and fourth quarter of the batter to cover the second marzipan circle and bake.
  12. While waiting for the two sponge cakes to cool, make the butter icing, by whisking together the butter and icing sugar white and fluffy, then adding the lemon juice and beating until fully incorporated.
    IMG_4947
  13. Once the sponges have cooled, place one of them on a serving plate. Spread the butter icing evenly over the top and place the second sponge on top.
  14. Dust with icing sugar and sprinkle a few pistachios. Ready to serve

In the original recipe, the batter wasn't quite enough for two sponge cakes, though admittedly I didn't divide it up evenly either,
IMG_4946
so I've adjusted the amounts to one and a half times that in the ingredients list. The original recipe also stated to use self-raising flour, but this is not available in Sweden, so I used regular flour with the adjustment of 2 tsp baking powder to 150 g flour.

I foolishly added the egg white to the food processor and it point blank refused to work, as the paste was very thick. This resulted in a very crunchy paste, with clear pieces of pistachio, however, this wasn't a bad thing actually.

IMG_4940

And my Sister Bip came round to have a taste and liked it, as did my Mum and Dad. My Dad grumbled about it being "too sweet", however this didn't stop him from having seconds, so I think he's complaining out of principle rather than anything else. I rushed the first serving a bit and the second sponge hadn't quite cooled completely, so everything was very soft when I cut the first slices and the internal design was lost a bit, but it was better on the following day. So although the recipe card said serve in the same day, I think it needs to stand for a few hours at least to set a bit.
IMG_4951

But it was a fairly easy recipe and a little different to what I normally make - first with pistachios and second a sandwich cake, which I've never made before. But otherwise, the concept was very similar to Lundulph's birthday cake of a couple of years ago.

IMG_4952

25 March 2016

Russian Easter Egg Hors D'Oeuvres

IMG_4938

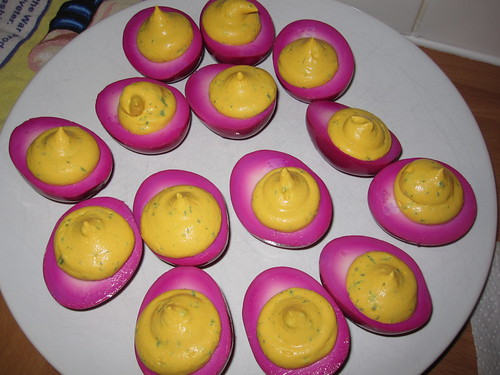
This is yet another recipe that I've come across thanks to Lundulph watching shows that I wouldn't normally watch. This time it was Mary Berry's Easter Feast. What caught his eye was a fish dish cooked by a lovely lady from the West Indies, which Lundulph thought looked very pretty. I went back and watched the whole episode and I'm not sure I want to try it out, not being a fan of fish and seafood in general, but I persisted in watching the whole episode, because Mary Berry was visiting people from different cultures with different Easter traditions and that was very interesting to me. One of the people she visited was from the large Russian community in London and they cooked something wonderfully eye-catching: hard-boiled egg, pickled with beetroots and "deviled", i. e. the yolks scooped out and blended with other things then piped back in.

So the episode barely over, I was tapping away on the computer to find the recipe on the BBC website, sadly it wasn't published, so I watched that segment a couple of times and jotted down what they said and what I saw and here is the result, which I made for the traditional family Easter gathering at our house. The result was very good.

Ingredients

12 eggs, hard-boiled, cooled down and peeled

For the marinade/pickling liquid

3 beet roots, slightly larger than an egg each
4 shallots
3 cloves of garlic
10 corns of allspice
20 black peppercorns
5 whole cloves
5 cm stick of cinnamon
1 pinch of chilli flakes
1 tbsp clear honey
5 dl water
2.5 dl white wine vinegar

For the filling

12 hard-boiled yolks from the eggs
2 tbsp chives
1 tbsp dill
1 tsp Dijon mustard
8 tbsp crème fraîche
salt and pepper
yellow food colouring (optional)

Method

  1. Trim, peel and rinse the beet roots and use gloves to avoid getting your fingers stained. Cut into chunks of around 2 cm and place in a large saucepan with a lid.
  2. Peel the shallots, halve or quarter if large and add to the saucepan.
  3. Peel the garlic and cut in half, then add to the saucepan and follow with the allspice, black peppercorns, cloves, cinnamon and chilli flakes.
  4. Drizzle over the honey, add the water and vinegar and stir. Then bring to the boil and simmer for a few minutes.
  5. Remove from the hob and sieve into a glass bowl, which is large enough for the 12 eggs and the marinating liquid. If it looks a bit transparent you can add the pieces of beet root back in, but it's not necessary.
  6. Leave the liquid to cool completely, and cut out a circle of baking paper to fit the top of the glass bowl.
  7. When the liquid has cooled, add the whole peeled eggs in, making sure they are fully covered. Place the baking paper on top to make sure the eggs stay under and cover with cling film. Place in the fridge overnight for about 12 h.
    IMG_4932
  8. Remove the eggs from the marinade and pat dry, then cut in half lengthwise and carefully scoop out the yolks with a small spoon. Set the now bright pink whites aside, cover and put back in the fridge.
    IMG_4933
  9. Put the yolks in a food processor and add the other filling ingredients, then blend until as smooth as possible. If the mixture looks a bit pale, add some yellow food colouring.
  10. When ready to serve, place in a piping bag with a round nozzle. Line up the whites with the flat sides up on your serving dish, then pipe some of the filling into each hole where the yolk used to be. At this point they are ready to serve, but you can decorate with e. g. small pieces of salmon, ham or brightly coloured peppers.
    IMG_4935

As the family turned up on Good Friday, I spent the evenings of the week before preparing all the food and I made these on the Tuesday already. This was fine, but I discovered that the beet root colouring continues to move inwards into the egg white as time passes. So the whites looked like I wanted them to look on Tuesday when I cut them, but were almost completely pink through and through by Friday when I was ready to serve them. So the effect of pink outside and white inside was a bit lost. But the beet root flavour did come through, which was rather nice I thought.

I also put some lettuce leaves around the eggs on the plate, mainly to make sure they were stable and didn't glide around and topple over. My idea of having each egg on a spoon for everyone to grab one didn't quite work out the way I'd imagined it, which was like a flower, but I didn't have time to go to the local restaurant supply shop to look for suitable spoons for this purpose.

But the eggs were very tasty and very visually appealing. I had some left-over filling mixture and it was a bit on the runny side, so could only be piped with a round nozzle. I think the amount of crème fraîche could be reduced to make a stiffer mixture for a star nozzle. But as I put some cold smoked salmon pieces on top, it didn't really matter much.

IMG_4937

20 March 2016

Chocolate Stamped Cookies

Since I got my cookie stamp, it appears that my Mum has had a bit of a revival on hers as well, because she's making stamped cookies every other week it seems. Though she's going for savoury versions and experimenting with new recipes and colours.

IMG_4931

I thought I'd make some chocolate ones and again opted to use one of the recipes in the booklet that came with the cookie press. I halved the amount, as I thought 12 dozen was over the top, small as they may be. But the recipe was not quite right to begin with, I had to tweak it in order to be able to stamp the cookies in the first place.

Ingredients

makes around 70

250 g plain flour
30 g cocoa powder
170 g unsalted butter 125 g caster sugar
¼ tsp salt
½ tsp vanilla essence
1 large egg

Royal icing for decoration

2 dl icing sugar
1 egg white

Method

  1. Pre-heat the oven to 190 ° C and place 3 baking trays in the freezer to chill. Then sift together the flour and cocoa powder.
  2. Cream together the butter, sugar and salt in a large bowl until light and fluffy.
  3. Add the vanilla and egg and incorporate well.
  4. Slowly add the flour/cocoa mixture and keep whisking until it's formed a soft dough.
  5. Take some of the dough, form into a sausage and place in the cookie press, closing with the pattern disk of choice.
  6. Take one baking tray out of the freezer and stamp directly onto it, no baking paper, no greasing.
  7. When the baking tray is full, bake the cookies for 8 - 10 minutes. Then remove onto a cooling rack and put the baking tray back in the freezer.
  8. Repeat until all the dough has been used up.
  9. Once all the cookies have cooled down, they can be iced. Stir egg white into thee icing sugar, a little at a time until the consistency is easy enough to pipe, but thick enough to keep its shape. Place in a piping bag, cut a tiny hole and pipe away.

It seems that for this particular recipe, there is no need to reduce the amount of flour, just because you're adding cocoa powder. I originally did that and had something not quite keeping together as a dough, but not a batter either.
IMG_4928
Couldn't be stamped at all!
IMG_4929
So I added more flour and at the point I hit the amount for the non-chocolate version, it just about came together to be stampable. Not all the shapes worked though. Still quite pleased with the end result, even if Lundulph grumbled that they were too small.

When the rest of the family turned up for Easter, they disappeared very quickly indeed, always nice.

11 March 2016

Swedish Garlic Mince Patties with Italian Kale and Cannellini Soup

IMG_4927

I've been struggling to think of what to cook for dinner lately, in particular something that's relatively quick to do. We've been having our bathroom renovated, something that's taken almost twice as long as originally indicated and it's surprising what a dramatic change in our lifestyle it has been. So cooking nice dinners has been far from my mind, but I had two recipe cards quite high up on the pile of things to do, so I decided to try them out. The first one is Swedish and from a Cash and Carry that my parents used to frequent, thus it's also designed for 10 portions originally. I've halved it for a more manageable amount. The original Swedish name is Vitlöksjärpar.

The second recipe card is Italian and from Waitrose. I've only cooked kale once before and it was far from successful, but I know it can taste lovely if done well, so I thought I'd give it another go. Besides, Lundulph has been asking to have more green greens in our diet. The recipe also had Savoy cabbage and that's quite nice as well, I think.I didn't buy the branded ingredients, so made some adjustments to the amounts based on what I did manage to get hold of.

Ingredients

Garlic mince patties
3 large cloves of garlic
1 medium sized onion
1.25 dl breadcrumbs
3 dl milk
600 g beef mince
1 large egg
1.5 dl chopped fresh parsley
1.5 tsp salt
½ tsp ground black pepper

Kale and Cannellini soup

2 cans (400g) chopped tomatoes
2 cloves of garlic
2 tbsp olive oil
100 g Savoy cabbage
200 g Kale
1 can (400 g) Cannellini beans
Salt and pepper

Method

  1. Starting with the patties, pre-heat the oven to 200 ° C and grease a baking tray with a lip. Peel the garlic and onion, then finely dice the onion, or better even whizz in a food processor.
  2. Place the breadcrumbs in a large bowl and stir together with the milk, then leave to soak swell for about 10 minutes.
  3. Add in the mince, egg, onion, parsley, salt and pepper. Press in the garlic and stir through to combine everything evenly.
    IMG_4923
  4. Using two large metal spoons, form quenelles and place on the baking tray, a couple of cm apart.
    IMG_4924
  5. Place in the oven to bake, 20 - 40 minutes depending on size.
    IMG_4925
  6. Moving on to the soup, place the canned tomatoes in a large deep pan. Add to them a can and a half of water, this is a good way to rinse them out.
  7. Peel the garlic and press it into the tomatoes and add the olive oil.
  8. Bring to the boil and in the meantime, wash and shred the Savoy cabbage and the kale. Drain and rinse the beans.
  9. Once the tomatoes are simmering, add the Savoy cabbage, stir through, cover and simmer for 5 minutes
  10. Next add the kale and the beans, stir through again, cover and simmer for a further 10 minutes.
  11. Season with salt and pepper.

I wasn't able to fit all of the mince mixture in the tray, I think there was enough for 3 more, so I froze it for future use. But I quite liked the idea that there was no frying involved, just baking, so this worked out to quite a healthy meal. This time the kale cooked well and so, we had a lovely tasting soup. The only odd thing about it was that the recipe didn't have any seasoning at all. The patties were quite garlicky, so the combination was rather good, but if doing just the soup, salt and pepper and Italian herbs would be really good, I think.

The amounts worked out equally well too, we had both patties and soup left over for another meal a few days later and one more small portion for Lundulph at the end.

8 March 2016

International Women's Day Bake Off

It seems this year the International Women's Day on the 8th of March is the thing to celebrate and some of the women at work got together and arranged a bake-off. As some of the men did last year for Movember, the baked goods was to be sold and the proceeds were donated to Your Sanctuary. The bake-off winner was the person whose bake sold out first.

IMG_4912

Again I thought I'd bring along something Swedish, and as we'd recently finished off Lundulph's Christmas crop of "hoovers", I thought I'd do that. I'd also recently come across a new recipe (in Swedish) for them and wanted to try it out. I also made vanilla dreams to cater for people with nut allergies.

Ingredients
Makes 24

Rolling marzipan
150 g icing sugar
300 g marzipan (50-50)
60 g glucose
green food colouring
yellow food colouring
icing sugar for rolling

Filling
350 g cake crumbs or ground digestive biscuits
120/140 g unsalted butter at room temperature
60/80 g icing sugar
20 g cocoa powder
1 - 2 tbsp dark rum

Decoration
200 g dark chocolate

Method

  1. First make the rolling marzipan, as it needs to rest for a couple of hours at least. Start by sifting the icing sugar into a bowl.
  2. Warm up the marzipan in the microwave to get it to around 30 °C. Do this in short bursts with a little kneading between each.
  3. Add the marzipan and the glucose to the icing sugar and knead carefully together until well combined. Add the food colourings at the end and knead to get it evenly spread through and get a pale warm green.
  4. Wrap the rolling marzipan in double layers of cling film and leave to rest.
  5. Place the cake crumbs in a food processor. If using digestive biscuits, break them up into pieces first.
  6. Place the butter in a bowl and stir with a spoon until creamy and soft. Use 120 g if using cake crumbs and 140 g if using digestive biscuits as they are drier.
  7. Stir carefully in the icing sugar, cocoa and rum. Again use the smaller amount of sugar if using cake crumbs and the larger if using digestives. Finally add the crumbs and knead together into a dough.
  8. Divide into four equal parts and carefully roll each one out to a sausage of about 30 cm length and about 2 cm diameter. Place on a baking tray lined with baking paper. Cover with cling film and chill in the fridge for at least 30 minutes.
    IMG_4903
  9. Divide up the rolling marzipan into four equal parts. Keep the parts not being used well wrapped up. Roll out one part at a time, dust with icing sugar to make sure it doesn't stick to the surface. Roll out to a rectangle, 2 - 3 mm thick, just over 30 cm long and wide enough to cover the filling and overlap a little.
    IMG_4904
  10. Brush off excess icing sugar, then place a filling roll onto the marzipan and roll it up. Brush a little water along the edge, to help it stick together in the overlap. Return to the fridge and repeat with the remaining three parts.
    IMG_4905
  11. Once all four parts are "dressed", take out of the fridge and divide each one of them into six pieces. First mark up and when you're happy that they are all equal, cut through with a sharp knife.
    IMG_4909
  12. Finally, melt the chocolate either over a water bath or in short bursts in the microwave with lots of stirring between. Make sure to use a narrow, deep bowl, to make dipping easier. The chocolate doesn't need to be tempered.
  13. Now dip each end of the rolls, to cover the edges. Carefully shake off excess chocolate and place on a baking tray lined with a clean piece of baking paper and leave to set. If they are well chilled, this won't take long.
    IMG_4910
  14. Store in an airtight container, with baking paper between layers in the fridge until ready to eat.

The filling here was a bit on the pale side and I think this is because of only using cocoa. There are other recipes where also melted chocolate is involved. Now the original recipe says using cake crumbs, as form a sponge cake, so I'm guessing they would be a bit more moist to start with. I used digestive biscuits, which were bone dry and so the filling barely kept together with 120 g butter, which is why I've made the adjustment above. I guess if some melted chocolate is added, that will help with binding as well, I might try that in my next batch. I've increased the amount of cocoa, to get more flavour into the filling. Finally I thought it could also be sweeter - again, I'm assuming crumbs from a sponge cake would be sweeter than the digestive biscuits.

A word of warning - dipping the first end of each roll is easy, but not so the second one without nudging the still liquid chocolate. So it's very important to make sure the dipping fingers are clean, or you'll end up with ugly chocolate marks on the next roll.

The rolling marzipan is well worth making, rolling is so much easier. And as long as it's well wrapped, it can stay in the fridge for a while. It will generally stay pliable, but should be brought up to room temperature before use.

What is good about this recipe is that any leftover cake crumbs can be saved in the freezer and when there's 350 g of them, a batch of these lovely hoovers can be made to use them up.

With the left-over melted chocolate, I thought I'd try my hand at decorations:
IMG_4911
Quite pleasing thing to do. I've layered these with small pieces of baking paper in between and put in the freezer for when I need them. There was quite a bit more chocolate left, but it had started to go solid, so I've put it away for my next bake.

I didn't win this bake-off, but all the rolls sold out as did the vanilla dreams and my manager actually put in a request for more "hoovers", which pleased me immensely. Lundulph was not happy as he didn't get to taste these, I took them all along to the bake-off. One of the other participants had made Chocolate Tiffin and I need to ask about the recipe, because I've not had this before and it was fabulous and tasty. At first sight the pieces looked well small, but it's so sweet, you really don't want them bigger. All in all, it was a fun event and we were all sugared up for the whole day.