14 February 2016

Bombay Potatoes

IMG_4902

Sprucing up boiled potatoes is not something I've thought about in the past, I like potatoes, so it's never been an issue. However, you can always tell the difference between freshly boiled potatoes and ones that have been reheated, so sprucing them up a little makes sense and is quite a good idea, I think. For example the dillstuvad potatis I made a couple of years ago, would work very nicely. Another way is to just fry them in a little butter to heat them through, which is what my Mum does (not that I can remember though). A third alternative is something I came across a few days ago and decided to try out straight away - Bombay Potatoes from the BBC website.

Ingredients

4 tbsp grapeseed oil
¼ tsp mustard seeds
¼ tsp of chilli powder
¼ tsp ground turmeric
350 g boiled and diced potatoes
Salt to taste

Method

  1. Heat the oil in a deep pan on medium heat and have a lid ready.
  2. Drop a mustard seed into the oil, when it pops, the oil is hot enough, so add the mustard seeds, quickly put the lid on and give the pan a shake.
  3. Once the mustard seeds have popped, add the chilli powder and turmeric and stir vigorously for a minute.
  4. Add the potatoes and stir to coat them with the spices and they start browning around the edges - about 4 minutes.
  5. Turn the heat to low, cover the pan and leave to cook for a further 5 minutes.
  6. Serve immediately.

As it was St Valentine's Day, we had these lovely potatoes with foil baked salmon, which this time was sprinkled with two different herb mixtures for fish and steamed broccoli. Very yummy!

A note about putting mustard seeds in hot oil - in the original recipe it says "pop", but what you actually get is "jump out of the pan and all over the kitchen", this is why I recommend putting a lid in immediately after adding them to the oil. So when I put my mustard seeds in, they all jumped out immediately and I had to try and catch them and put back in the ban again.

The fish herb mixtures are from the Krusmyntagården in Visby, Sweden, where we visited a few years ago and also took my parents and my sister last year. It's a really nice place, high up on the cliffs of Gotland, overlooking the sea, with a glitzy shop with all sorts herb and spice related articles, a lovely restaurant that does a great buffet lunch and a very pretty herb garden to wander around in and look at what different herbs look like. The first fish herb mixture I have contains dill, tarragon, lemon balm, thyme and coriander seeds. I'm not sure what the second one contains - definitely salt, but it's also ground finer, so it's hard to tell what's in it and they don't seem to have it on their website any more. I'm guessing oregano, basil and spearmint perhaps.


6 February 2016

Semla Cake For Roger's Birthday

P1190816

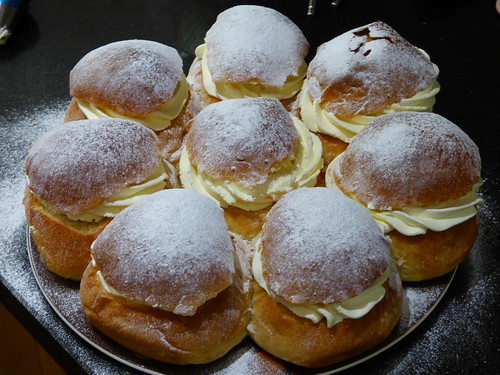
And it's time for semlas once again, yay! This year, I wanted to make mini-semlas and take into work, but as it's my brother-in-law Roger's birthday, I decided to make a semla cake as well and take along to the celebrations. I decided to use the the recipe from 2014 for the buns. A mixture of equal parts of plain and super strong flour worked splendidly.

I've heard of semla cakes, so I did some searching on the internet, but the ones I found were all basically a cake-sized bun done up like a semla. I didn't like the look of them and I guessed they'd take forever to bake. Instead I opted to do regular sized semlas but baked together in a circle.

I made the buns on the day before. For the cake, I took out 8 pieces of dough, to make the regular sized semlas. The remainder I turned into 40 mini-semla buns. I shaped the 8 pieces into balls and placed in a round baking tin, lined with baking paper. They didn't touch originally, but after proofing they had grown to the grapefruit size and were stuck together.

After brushing generously with whisked egg, I baked them a bit longer than for individual semlas, to make sure the middle one got baked. Then I carefully cut the lids off the buns - it's quite tricky when they're stuck together. And I pinched out the middles.

IMG_4901

I then prepared the filling with the crumbs, marzipan and milk and wrapped everything tightly with cling film and packed it, ready to go to Roger's birthday party.

Once at Roger's place, after dinner, I put together the semla cake, by distributing the filling

P1190808

After that, I piped the whipped cream and put the lids on and dusted with icing sugar. No time to cut the lids into triangles and one of the lids had cracked in transport sadly. Needless to say, the cake disappeared incredibly quickly.

P1190823

I'd also cut the lids off the mini-buns, but I didn't pinch out the middles. Instead, I made the filling from the mini-semlas of 2014. Marzipan and whipping cream (but not whipped).

On Tuesday morning, I got up early and spread a little of the marzipan filling on each mini-bun, piped a rose of whipped cream over it and put the lids on. No time for breakfast, but straight in to work. Again, these turned out to be a great success and several people had seconds. My manager even came over to my desk three times for a mini-semla. One colleague tried to resist having one, claiming to be on a diet, but caved in on the Wednesday and was wondering if there were any semlas left. But semlas are for Shrove Tuesday only, so he'll have to wait to next year now...

3 February 2016

Quick Soda Bread

Last week we ran out of bread. Normally I keep well on top of this and do a batch so that Lundulph and I can have toast on the week-end, but I've been rather busy at work and also a course I've been doing in the evenings as well as some DIY that I really should have sorted out back in 2014, so there was never a good time.

IMG_4900

So, I decided to try my hand at a quick soda bread. These featured in last year's Great British Bake-Off and looked well worth making, though I have had serious reservations about the concept for a long time.

Looking through my recipe collection, I had a couple of soda breads, but they were flavoured and I just wanted a really basic loaf, so I picked up Paul Hollywood's recipe from the BBC website.

As I read through the recipe, my heart sank a little - it calls for buttermilk. Not something I keep in stock. I've tried it once and didn't like it and left it at that. But there is lots on the internet about how one can go about substituting this. The website I found pointed out that the really important thing about buttermilk in recipes is the acidity, so replacing with regular milk requires adding some thing acidic. So here goes.

Ingredients

420 ml semi-skimmed milk
1 tbsp white wine vinegar
250 g plain flour
250 g wholemeal flour
1 tsp bicarbonate of soda
1 tsp salt
extra flour for dusting

Method

  1. Pre-heat the oven to 200 °C and line a baking sheet with baking paper.
  2. Measure up the milk and stir in the vinegar and let stand for a few minutes. It will feel a bit thick, that's as it should be.
  3. In a large bowl, blend together the two flours and stir in the bicarbonate of soda and salt, making sure to get them all well mixed through.
  4. Pour in the milk mixture and stir to make a sticky dough.
  5. Flour the work surface and pour out the dough onto it. Sprinkle some more flour on top and on your hands, then fold the dough a few times to shape it into a ball.
  6. Sprinkle some flour onto the lined baking sheet and carefully transfer the dough onto it. Flatten the dough, then cut a deep cross into it. Sprinkle with some more flour and bake for about 30 minutes, until the cross opens up and the crust goes golden brown.
  7. Remove from the oven and transfer the bread to a wire rack and leave to cool.

The whole thing took less than an hour. I took the bread out after precisely 30 minutes and it seemed a bit soft, but it was nearly bedtime, so not much choice. Paul Hollywood recommends eating on the day of baking. Lundulph had it the following day with his soup for lunch and said that it was quite nice, with great shaggy texture, but it felt a bit damp, so I'm guessing I should have baked it for a few more minutes. Possibly a bit more salt too.

I sliced and froze the loaf, it worked really well toasted, in particular with butter and jam.

On the repeat a week or so later, I baked for 40 minutes, which made a difference, but it was also not as fluffy as the first one.

29 December 2015

Pepparkaka macarons

This one has been on the back of my mind since Doctor Cutie was such a sweetie and gave me a book on how to make macarons a few years ago and this year, I managed to get around to that, since we spent a record 10 days in Stockholm over Christmas. Mostly eating and sleeping, with a couple of breaks for bird watching, since it was the hottest Winter/December on record ever. Many thanks to my Sister Bip for navigating us to a great nature reserve she found a few months ago nearby.

In Sweden they sell ready made gingersnap spice mixture and I found this recipe that seemed good, so I followed it as far as the macarons went.

Ingredients

110 g finely ground almonds (almond flour)
170 g icing sugar
2 tsp gingersnap spice mixture
90 g egg whites (from 3 medium eggs)
2 tbsp granulated sugar

Method

  1. Weigh up a bit more of the ground almonds than required, then sift twice and weigh the end result - that should be 110 g.
  2. Place the almond flour in a large bowl and sift in the icing sugar and the gingersnap spice mixture. Stir through to incorporate well.
  3. In a separate bowl (ceramic, glass or metal), whisk the egg whites to soft peaks, then gradually add the granulated sugar and keep whisking until they go glossy and stiff.
  4. Carefully fold in the dry mixture into the egg whites in three parts, make sure everything is well mixed. If it feels a bit stiff, continue to fold a few more times, it should loosen up.
  5. Prepare a couple of baking sheets with baking paper, then transfer the meringue mixture into a piping bag with a large round nozzle and pipe blobs onto the prepared sheets. The blobs should be about 2.5 cm diameter, flow out a bit and be fairly flat. They won't swell much during baking, so can be done fairly close to each other.
  6. Once a tray has been filled, lift 10 - 15 cm off the work top and drop onto it. Repeat a few times, this will make the macarons settle and any tops that had formed from piping should disappear. This can be a bit noisy, alternatively hold the baking sheet with one hand and tap underneath with the other.
  7. Leave the trays to rest for at least 30 minutes, more if the air is humid. A skin needs to form on the surface of the macarons to ensure they remain flat during the baking.
  8. Pre-heat the oven to 125 °C and bake for 12 - 15 minutes, watching so they don't start getting colour. If they do, turn down the temperature a bit.
  9. Remove from the oven and leave to cool completely. They should come off the baking paper easily, if not, bake for a bit longer.
  10. Once completely cooled, place in an airtight container and keep sealed until needed.

Filling
100 g unsalted butter at room temperature
100 g icing sugar
100 g marshmallow fluff
1 tsp vanilla extract
food colouring of choice (optional)

Method

  1. Stir the butter vigorously with a spoon to make it fluffy, then add the sugar and mix in well.
  2. Add the marshmallow fluff, vanilla extract and colouring and incorporate to get a homogenous mixture.
  3. Transfer to a piping bag, snip off the tip for a small hole (~5 mm) and pipe onto half of the macarons, placing the other half on top of them to form a sandwich.
  4. The above amounts make a lot more filling than the macarons. The filling can be kept in the fridge for a few days or frozen even for longer. It also works nicely on other biscuits or cupcakes. It keeps its shape fairly well and won't go solid over time.

The frosting recipe comes from this site and is for a much larger amount, but the key point is that each of the butter, sugar and marshmallow fluff are to be used in equal amounts per weight, so should be fairly easy to scale up or down as required. I used the basic vanilla flavouring and I didn't use any colouring, but I think I should have perhaps tried with yellow to make them more visually appealing, as the macarons were quite pale too. And don't get put off by the photo on the original website - I almost was and I know I'm pretty crap at taking attractive food photos myself, but this frosting is really good. My Sister Bip even tried it on pancakes and said it was absolutely yummy.

Sadly I went the lazy route (as I tend to for this delicacy) and skipped the sifting of the ground almonds, so my macarons were quite knobbly and seemed a bit crunchier than the fancy shop-bought ones. My Mum's oven is already madly uneven in baking, so most of the macarons ended up quite slopey, even though I turned the trays around half-way through baking.

I now also know that the ready gingersnap mixture is very heavy on the ginger, so this was quite dominating, too much for my liking, but this didn't prevent me from gobbling down a couple of macarons after each meal during the holidays. Lundulph also thought that there was a bit too much ginger, but said that they were quite a nice Christmas treat. I've also taken home the remainder of the gingersnap mixture and will try it out in next year's gingersnap batch, to see if it tastes differently in the cookies.

It also seems I forgot to take photos of my knobbly macarons. Oh well...

10 October 2015

Vegan paté

A couple of weeks back, my Mum sent me a new recipe that she and my Sister Bip had tried out, from Bip's ever growing collection of vegan recipes - a vegan paté which looks and tastes like the real thing. I put the idea forward to Lundulph and he seemed interested as he's always after a new healthy thing to eat and he's not too big a fan of regular paté. This recipe yields quite a lot, but it can be frozen in smaller portions for later use.

IMG_4861

Ingredients

2 tbsp vegetable oil
200 g finely chopped onion
5 - 6 cloves of garlic
100 g fresh chopped button or chestnut mushrooms
400 g canned chick peas
120 g chopped walnuts, can be roasted, but not necessary
1 tbsp soy sauce
1.5 tbsp lemon juice
1 tbsp fresh chopped rosemary
2 tbsp fresh chopped sage
1 tsp ground black pepper
salt to taste

Method

  1. Heat up the vegetable oil and fry off the onions and garlic until soft.
  2. Add the chopped mushrooms and fry to soften them as well.
  3. Remove from the heat and transfer to a deep bowl. Add the remaining ingredients and blend until smooth.
  4. Transfer to an air-tight container and chill in the fridge until needed.

The resulting paté has the texture of traditional fine liver paté and tastes similarly. The main flavours are the rosemary and sage and some experimentation may be required - I used too much rosemary and it dominated everything, so I have a lot of it now, frozen in chunks to use with something else. But it was very interesting that the flavour and texture matched a traditional pate so well.

5 October 2015

Breakfast variation

I've been quite happy with my new breakfast, but I've been wanting to have a seasonal variation on this. Even with an unusually warm Autumn and availability of strawberries, I want something to see me through the Winter and decided to give this one a try.

IMG_4860

As it turned out, this didn't work well at all, for me at least, there was very little flavour to it, though that could be down to the butternut squash, I don't know.

Ingredients

1 large butternut squash
350 ml water
2 roiboos chai teabags
3 tbsp coconut oil
4 tbsp chia seeds
1 tbsp honey

Method

  1. Pre-heat the oven to 180 °C.
  2. Cut the butternut squash in two and scoop out the seeds. Then bake in the oven, cut side up for about 45 minutes until it has gone soft.
  3. Scrape out some 400 g of the baked squash and place in a large saucepan together with the water and the contents of the teabags and the coconut oil, then bring to a simmer. Remove from the heat and set a side for a few minutes to cool a bit.
  4. Stir in the chia seeds and honey, making sure that there are no lumps.
  5. Leave for an hour at least to allow the chia seeds to swell a bit.
  6. Warm up before serving.

The amounts above were enough for 5 breakfasts for me and I might need to experiment a bit to get the flavour right - I think there was too much coconut oil and not enough sweetness. Unfortunately I don't know how to determine how sweet a butternut squash would be, so some adjustments for each batch would be required.

I also didn't see much point in the roiboos chai - I think some cinnamon should do the trick and I think maple syrup works really well with butternut squash, so I'd swap that out for some of the coconut oil.

The really good thing is that one batch was enough for the whole week and I only needed a quick whizz in the microwave to warm it up, no other effort required, meaning possibly a few extra minutes' sleep.

I served with flaked almonds and blueberries, which was OK, but still not enough to make this a meal to look forward to.

4 October 2015

Raspberry and Chia Pudding

As Autumn has been rolling in at a steady pace and the days have been getting shorter and shorter, both Lundulph and I have been hankering for "afters" in the evenings and so, I did some searching to find tasty, yet healthy options and from the trusty BBC web site, I found this. Which combined nicely with getting some of the last big British raspberries for the season.< br>
IMG_4856

I'd tried to pick out the punnets with the largest raspberries, as I also wanted to try out an idea I had a few years ago - raspberries filled with chocolate ganache. The ganache was equal parts of 55% dark chocolate and double cream. The cream was heated up to boiling point. The chocolate was broken up in small pieces and the hot cream was poured over it, then stirring until all the chocolate has melted, then left to cool down. After this, I picked out the largest raspberries for filling. I transferred the ganache into a piping bag and filled up the raspberries, then into the fridge to let them set completely.

IMG_4855

These can be made a couple of days in advance and stored in an airtight container with a piece of kitchen tissue inside it to take up the moisture. They are also nice to eat on their own. But are good as decorations too.

Ingredients

400 g crème fraîche
6 tbsp chia seeds
2 tbsp vanilla extract
4 tsp honey
300 g raspberries

Decoration sweetened whipped cream
ganache-filled raspberries
a handful of almond flakes

Method

  1. Blend together the crème fraîche, chia seeds, vanilla extract, honey and raspberries and spoon into serving bowls/glasses.
  2. Chill overnight, or at least 4 h before serving.
  3. Just before serving, pipe some sweetened whipped cream, add the ganache-filled raspberries on top and sprinkle almond flakes over.

The original recipe also recommends using liquid stevia to increase the sweetness, but I didn't use that and so the pudding was a bit on the bland side, but had a very nice texture. Possibly using mascarpone instead of crème fraîche might make it a little sweeter and perhaps more honey. I'm not a fan of sweeteners, so I'd rather not use any, if I can avoid it, tempting though it might be on occasion.

I also think chopped almonds might be nice in the pudding to add some crunch as well. The ganache-filled raspberries are very easy to make and very tasty, so I was really pleased with them. I've not been able to find them in the internet, though I don't think it's an original idea of mine. I think they can be also taken a step further and dipped in chocolate to make pralines, I'll give that a try once I've mastered the art of chocolate tempering.

26 September 2015

Cottage Pie

Goodness, I'm well behind my blogging, work has been so busy and stressful and I'm also doing a course in the evenings, there's not bee much inspiration at all in the past few weeks and the few new things I've tried were not a hit mostly. But today Lundulph has gone to a football match and I'm doing house chores, so might as well try to catch up.

IMG_4854

At the end of October, Lundulph expressed a hankering for pie and so we looked through the Hairy Bikers' Perfect Pie book and decided on a Cottage Pie. This is a pie that only has mashed potatoes as a topping, no dough involved at all. I had some minute steak and some braising chunks to use up, so was all in all a good match for all requirements.

On our trip to Dorset earlier this year, we had black garlic aioli at one of the restaurants. This was very tasty and rather curious, so when I saw that they were selling it in my local supermarket, I bought one to try out. How it's made is mentioned in Wikipedia. And I've subsequently seen it used in Swedish cuisine as well. So I swapped the garlic cloves for some of the black garlic in this pie recipe. Needless to say I also dropped the celery.

IMG_4852

Ingredients

1 tbsp grapeseed oil
1 large onion, peeled and chopped
2 medium carrots, peeled and diced
500 g beef in small chunks
187 ml (small bottle) red wine
2 tbsp plain flour
200 ml beef stock
a splash of chanterelle concentrate (optional)
200 ml water
2 tbsp tomato purée
1 tsp dried dill
1 tsp dried thyme
1 tsp dried rosemary
1 tsp dried sage
1 tsp dried oregano
1 tsp dried mint
1 bay leaf
a splash of Worcestershire sauce
4 black garlic cloves
salt and pepper to taste

Potato topping

Delia Smith's perfect mashed potatoes

Method

  1. Heat up the oil in a frying pan and gently fry the onion and carrots for a few minutes until the onions go translucent and the carrots soften. Stir regularly so they don't burn.
  2. Add the beef and fry until browned all over, then add the wine and let simmer until the liquid has reduced by half.
  3. In the meantime, make the beef stock and stir in the chanterelle concentrate, water, tomato purée, the dried herbs and Worcestershire sauce. Mash in the black garlic and stir through.
  4. When the wine has reduced in the pan, sprinkle the flour and stir in well and let simmer for a further couple of minutes, before adding the stock mixture.
  5. Bring to a gentle simmer, cover and leave to cook for some time, depending on the type of beef used.
  6. While the pie filling is cooking, prepare the mashed potatoes.
  7. Pre-heat the oven to 180 °C and transfer the beef into a pie dish.
  8. Spoon or pipe the mashed potato over the beef, starting from the edge and working inwards.
  9. For extra crunch on the topping, rough up the surface of the potatoes with a fork, then bake for about 25 minutes until the potatoes have gone golden brown and the filling is bubbling.
  10. Ready to serve

The amount of filling was a tad too much for my pie dish and I should have made adjustments to the mash, to make it more solid. As it was, it was very runny and at the top of an overfilled pie dish, the result was that things dripped to the bottom of the oven. So a very hot tip is to place a larger baking tray under the pie dish, to save yourself the trouble of oven cleaning. The original recipe calls for cheese in the mash, but we don't do that in our household.

IMG_4853

I also didn't allow for the fact that braising steak comes from an older animal and thus requires significantly longer to cook, so I ended up with rather chewy pieces in the pie. Lundulph was very good about it, but frankly this was a very stupid mistake to make.

19 September 2015

Blackberry and White Chocolate Mousse Cake

It is the season for blackberries and it's also Lundulph's birthday once again. And so, it had to be a blackberry cake this year, from a recipe I received from my Mum. It looked really pretty in the photo, so without delay I got going. IMG_4851

Ingredients
Base
400 g marzipan at 38% almond content
2 large eggs
4 tbsp cocoa powder
zest from 1 lemon

Blackberry mousse
5 dl blackberries
1.5 sachet vegegel
3 large pasteurised yolks
1.5 dl granulated sugar
3 dl whipping cream

White Chocolate mousse
150 g white chocolate
2.5 dl whipping cream
2 yolks

Decorations
Extra large blackberries
Grated white chocolate

Method

  1. Pre-heat the oven to 180 °C fan, then prepare a Springform cake tin of about 20 cm diameter by greasing and lining with baking paper. The edge of the paper should be a couple of cm above the edge of the Springform.
  2. Grate the marzipan into a large bowl. Break and lightly whisk the eggs in a side bowl, then add to the marzipan, a little at a time until the mixture is smooth.
  3. Stir in the cocoa and lemon zest, then spread into the cake tin and level it with a spatula, it should be around 2 cm thick.
  4. Bake the cake base for 12 - 15 minutes until it starts coming away from the edges and looks dry on top. Remove from the oven and allow to cool completely.
  5. Place the blackberries in a fine sieve over a bowl. Then using a spoon mash and press out as much juice as possible, about 2.5 dl.
  6. Whisk the pasteurised yolks with the sugar until light and fluffy. Whip the cream separately to stiff peaks.
  7. Stir in the vegegel into half of the blackberry juice, then pour into the remaining juice.
  8. Working quickly, pour the juice mixture into the egg mixture and fold in.
  9. Finally fold in the whipped cream into the egg mixture and pour over the cooled down cake base.
  10. Cover with cling film and chill until it sets.
  11. Chop the chocolate into small pieces and place in a heatproof bowl.
  12. Place 1 dl of the cream in a small pot along with the yolks and heat up until it bubbles, while stirring constantly.
  13. Remove from the heat when it begins to thicken and pour over the chopped chocolate.
  14. Stir until all the chocolate has melted and been incorporated into the mixture, which should have cooled down.
  15. Whip the remaining cream to stiff peaks, then fold into the chocolate mixture.
  16. Pour over the blackberry mousse, level and chill for at least 1 h until it has firmed up a little.
  17. Just before serving, carefully remove from the Springform cake tin and remove the lining paper.
  18. Arrange the extra large blackberries on top and sprinkle the grated white chocolate.

As happens with many recipes, this one was clearly not tested by the magazine that published it, nor was it reviewed by someone with baking experience, because I had to double the mixture for the cake base or I would not have been able to cover the base of the cake form. So the amounts above are about right.

The blackberry mousse was really nice, but again, the proportions were wrong once more, so I had to adjust on the fly and got lucky. The white chocolate mousse on the other hand seemed OK, however it tasted more of whipped cream than chocolate, so I'd say 200 g or even 250 g of white chocolate might be better. However the overall cake tasted nice as it is.

And as the family came to celebrate, this cake was much appreciated and very little remained from it at the end. Because of the grated chocolate, it's not a cake for candles. Lundulph wanted candles, otherwise it wouldn't be a birthday cake, so he had a couple on the side. And he was well happy about the marzipan base. It was nicely crunchy.

IMG_4850

15 September 2015

Chocolate Cookies With Toffee

IMG_4848

Back in July, my Sister Bip and I had a long talk about food and as she's doing a lot of cooking these days, she forwarded me a couple of recipes that seemed interesting. However, things were getting a bit busy around the house, so I sort of forgot about them until a couple of weeks ago, when I felt my colleagues needed a little reward for being so helpful to me and I dug one of the recipes out, this (in Swedish) one to be precise.

Ingredients

Makes about 50
200 g soft unsalted butter
2 dl granulated sugar
1 tsp vanilla essence
½ dl golden syrup
½ dl cocoa powder
4 dl plain flour
1 tsp bicarbonate of soda
½ tsp baking powder
1 pinch of salt
about ½ tsp of caramel/dolce de leche

Method

  1. Pre-heat the oven to 175 °C and line a couple of baking tins with baking paper and cut up a couple of more pieces to fit.
  2. Whisk together the butter, sugar, vanilla and syrup into a smooth mixture.
  3. Mix together all the dry ingredients in a separate bowl first, then stir into the butter mixture.
  4. As it gets thick, you'll need to knead it to make sure everything is well incorporated.
  5. Now take out walnut sized pieces, roll into balls and place on the baking tins and spare baking paper, making sure they are not too close together.
  6. Make a small well in each ball with your thumb and place a small blob of caramel into each.
  7. Bake in the oven for about 15 minutes, until the cookies have spread out, but watch so the caramel doesn't start burning.
  8. Remove from the oven and transfer to a wire rack to cool completely.
  9. Store in an air-tight container.

Now I made my own caramel from condensed milk in the past, but nowadays it's sold ready made in the shops, so might as well use that. I recommend stirring the caramel through until it's soft, if it has set, don't be tempted to use it if it's set, it won't run out over the cookie during the bake.

IMG_4846

Also, the original recipe says to divide up the dough into 24 pieces, but these were way too big, I ended up with huge cookies and as I didn't stir through the caramel, it stayed in a lump in the middle. But they were rather tasty, even if a couple burnt a bit. Very easy to do on the whole, I think, and not too sweet.

IMG_4847

26 August 2015

Birthday Kransekake

This year Lundulph's Mum (like my Mum earlier this year) is turning 70, so big celebrations are in the making, more on this later. But we also decided to have a small family get-together on the actual day and Lundulph kindly volunteered me to make a cake.
IMG_4779

Now times are busy at work at the moment, so I opted to work from home during the birthdays, as Lundulph's Dad also had his birthday a few days before his Mum. Thus we stayed at their place for a few days and while Lundulph was helping out with the party plans, I sat in the guest bedroom working.

This also meant that increasingly Lundulph got more and more nervous about the cake - he hadn't seen any signs of a cake, other than some odd looking biscuity rings that had been in the freezer and had meant he wasn't allowed to rummage around for food. This because I'd decided to make it a surprise for everyone and I was quite worried that Lundulph would get upset because I hadn't made a "real, traditional" cake. But I decided to plod on with my plan.

It all started of course when I went in to Lakeland for ideas and spotted a kransekake pan set. I couldn't resist it, it's as simple as that.

And while Lundulph was enjoying the Ashes for a couple of days, I used the opportunity to make the kransekake rings.

Ingredients

1 kg "50/50"-type marzipan
300 g icing sugar
80 g egg whites (2 eggs approximately)
50 g butter
2 dl ground almonds

Royal icing
2 dl icing sugar
1 egg white

Method

  1. Grate the marzipan coarsely into a large bowl.
  2. Add the icing sugar and stir together with your hand until the marzipan and sugar are mixed through.
  3. Whisk the egg whites lightly, then start adding to the marzipan mixture a little at a time, while kneading the marzipan.
  4. The mixture is ready when you can roll out a sausage of about 2 cm diameter and bend it into a circle without it cracking anywhere.
  5. Melt the butter and brush the moulds well, then sprinkle generously ground almonds and tap off the excess.
  6. Pre-heat the oven to 180 °C and start rolling the marzipan mixture to about 2 cm diameter lengths.
  7. Gently lay onto each ring mould, splicing the two edges with diagonal cuts.
  8. There should be some marzipan mixture left over, use about a ping-pong ball sized piece and shape into a cone for the top of the kransekake.
  9. Bake all in the oven for about 10 minutes, keeping an eye on them and removing as soon as they start getting a bit of colour. Bake the top on an oven safe dish lined with baking paper.
  10. Leave to cool down complete on the moulds, before carefully removing the rings. If they've puffed up too much and stuck together, carefully first separate in the moulds with a knife.
  11. Place the rings on a large plate, with smaller rings inside the larger ones, perhaps 3 - 4 stacked. Place in plastic bags and freeze until the day before they're needed.
  12. The day before serving, remove from the freezer and let thaw in room temperature.
  13. A few hours before serving, make up royal icing by mixing about 2 dl icing sugar with some egg white. Add the egg white a little at a time into the icing sugar and keep stirring through before adding more. Continue until the consistency is such that it can be piped , but it won't drip or run.
  14. To put the kransekake together, start by stacking all the rings, with the largest at the bottom and the smallest at the top, to make sure you have the right order as it can be difficult to tell, the size difference between neighbouring rings is small. Then remove them one at a time and lay them out in order.
  15. Put the royal icing into a piping bag fitted with a small round nozzle, then pipe four small blobs at the bottom of the largest ring and place it securely onto the serving plate.
  16. Pipe waves around the top of the large ring, always starting and ending in the inside of it, as this will get hidden with the next layer.
  17. Once the whole ring has completed, carefully place the next one on top, making sure it's centered and repeat the icing waves all around, before placing the next ring on top of that.
  18. Continue until the whole pyramid has completed - you may need to stand on a chair to reach the top layers. Finish with the little cone.
  19. The kransekake is eaten, by working your way down through the layers.
IMG_4776 IMG_4777 IMG_4778

And indeed it was a great success - it's simple, yet impressive as it's so tall once assembled. It was also very sweet, so I'll try to reduce this next time. The idea with the freezing is that it will make the kransekake crunchy on the outside and chewy in the middle. What happened was that the 4 - 5 rings Lundulph and I took home with us, got chewier and chewier with every day they stayed in the larder. It was very nice to have a little nibble after lunch or dinner. And Lundulph was not at all upset, but how could he with all the marzipan to munch on.

Some will also melt dark chocolate and make fancy filigree decorations which are stuck in between the rings. It was my intention to do this as well, however I ran out of time and as I don't trust myself to be able to temper the chocolate, I thought I'd better not bother. Next time I will and I'll also try the alternative traditional shape - a cornucopia, with small petit fours or such spilling out of it. This, however, requires the rings to be glued together with caramel and looking at some professionally made ones, they even have special stands for support, like here from a Danish brand of marzipan, it's in Danish, but just look at the photos.

Key thing to keep in mind - there must be at least 18 rings and preferably more. At the Danish Bake-Off in 2012, the kransekake (Norwegian) or kransekage (Danish) was one of the technical challenges and had to have 20 rings. I highly recommend doing an image search on Google for ideas on how to decorate.

Finally a word on the "50/50"-type marzipan. The numbers indicate the proportions of ground almonds to icing sugar if you're making it yourself. Rather go for a 50% marzipan, which tends to be more expensive and is not as soft to work with, but that's how it should be. I actually baked my kransekake at 200° and thanks to the egg white, it puffed up. I think in my Swedish baking book, it's recommended to shape everything and then let stand for 24 h to form a dry crust, before baking. A bit tricky in the UK, especially when moving towards Autumn and there's lots of rain and moisture in the air. Might be worth a try.

21 August 2015

Cake pop success!

And so the long-planned birthday celebrations neared and I baked cake-pops and was quite successful this time, very pleased indeed and discovered new things too.

IMG_4797

Ingredients

Cream cheese frosting
160 g unsalted butter
80 g cream cheese
400 g icing sugar
2 tsp vanilla extract

Cake pop mixture
860 g leftover cake sponge
646 g cream cheese frosting

Decorations
3 x 340 g blue Wilton Candy Melts
vegetable shortening
icing lace from Lakeland's magic icing powder
paper lolly sticks
large piece of polystyrene, fixed to the work surface, to push the cake pop sticks in while they set

Method

  1. To make the frosting, cream together the butter and cream cheese, then gradually add the icing sugar and finally the vanilla.
  2. Beat until light and fluffy,
    IMG_4787
    then cover and chill for 30 minutes at least.
  3. Make sure the cake crumbs are as fine as possible,
    IMG_4786
    then add the cream cheese frosting a little at a time until the mixture texture is a bit like fudge.
  4. Wrap in cling film and chill for at least an hour.
  5. Make sure there is space in the fridge before starting the next step.
  6. Roll small balls, about the size of a walnut,
    IMG_4789
    place on a tray, cover with cling film and chill again for an hour until they are firm.
  7. Melt some of the candy melts in the microwave, 10 s at a time and stirring after each burst until completely melted.
  8. Take the cake balls out from the fridge, dip a lolly stick in the melted candy and carefully push into one of the balls, to reach the centre.
  9. With your finger, wipe the melted candy around the lolly stick and put back on the tray.
  10. Repeat with the other cake balls, then cover with cling film and chill in the fridge until they are quite firm.
  11. Melt a couple of tbsp of vegetable shortening in the microwave and allow to cool down a bit.
  12. Now place a whole packet of candy melts in a narrow, deep bowl and melt in the microwave, again at 10 s intervals and stirring in between.
  13. When the candy melts have melted completely, add the melted vegetable shortening and stir in well, this will make the mixture a bit thinner.
  14. Take the cake pops out of the fridge, a few at a time, then dip each in the melted candy and tap the lolly on the edge of the bowl, to remove the excess.
  15. While you tap, also rotate the cake pop. When the excess has mostly been removed, gently place a piece of icing lace and push the lolly into a piece of polystyrene that has been secured to the work surface.
  16. Proceed with the remaining cake pops, only taking a few out from the fridge at a time, so they don't go soft in room temperature and fall off the sticks when dipped.
  17. If the candy melt starts setting, whizz in the microwave for another 10 s burst and if necessary add more melted vegetable shortening.
  18. Once the cake pops have set, keep in the fridge.

The cream cheese frosting recipe comes from here, where there are step by step instructions on how to make the cake pops with very useful tips and tricks. I used Philadelphia cheese, which worked very nicely.

Some time ago, I also came across this website. It offers a wide selection on various online video courses, though it requires registration and there are several free courses as well, one of which is on cake pop basics. It's quite good for decoration ideas, though I think their "standard" cake pops were too large for my liking. The ones I made were more of what was termed "mini" cake pops. The above amounts resulted in 75 cake pops.

Now for the icing lace. There are several brands out there and YouTube has plenty of videos on the topic. I bought the ones in Lakeland, which are their own brand and consists of two silicone mats and a tub of "magic icing". The instructions for the icing mixture are on the silicone mat packaging, but I took the precaution of reading all the comments on the Lakeland website, where it seems about 50% of the buyers had failed miserably and were understandably upset, whereas the other half had had great success and some of them had also written what they'd done. Now the packet instructions didn't quite match the instructions in the comments, so I decided to follow the instructions on the packet as a first attempt. But I scaled up the amounts a bit, as I don't think my kitchen scales are sufficiently precise for the minuscule amounts suggested.

Magic icing for lace
50 g magic icing powder
45 g boiling water
silicone mould mat with suitable patterns
firm plastic dough scraper

  1. Stir well with a spoon, it'll go quite stretchy and gloopy, but keep at it until the mixture is even.
  2. Wrap tightly in double cling film and leave for a few hours before using.
  3. Place the silicone mat on the work surface, unwrap the magic icing, cut a piece off with the dough scraper, then cover up the magic icing again.
  4. Now firmly run the dough scraper with the piece of magic icing over the silicone mat, pressing down so the mixture gets into the lace mould. The mixture should feel a bit like silicone sealant - pliable, but sticky.
  5. Continue to fill the silicone mat. Any left-over magic icing can be wrapped in double cling film for later.
  6. Leave the mould to dry for about 12 h, then carefully prise off the pieces of lace and store in an air-tight container.

My original intention was to use the round laces to form petals with each cake pop being the middle of a flower. Unfortunately, I wasn't able to make them stick to the cake pops and they kept falling off. So a quick adaptation was to cut out the middle of each piece of lace and stick on top of each cake pop. I did try a few cake pops with sprinkles, this worked quite well, but must be done before the candy coating sets.

IMG_4796

Needless to say that for 75 cake pops, I spent a lot of time in the days before the party, making icing laces. And as it took me a couple of silicone moulds to get the knack, I made well over 100 of the laces and there were quite a few left over.

One of the most interesting things the cake pops resulted in was that when Lundulph's Mum and Aunt tried them, there was a rush of childhood memories that came back to them - of a type of cake their Mother used to make. Some search on google came up with Russian Cake. I'm not sure how true the history of this is, but it's a very nifty way of using up scraps of sponge cake, however in this cake, jam is used as the binding agent, rather than cream cheese frosting. The texture is the same, and that's what triggered the memories.

As an aside I can also mention that Lundulph had no issues eating these either, even though there was cheese in them.

17 August 2015

Spiral Potatoes

IMG_4785

Sometime in July there was a food festival in our village and there was one stall I'd not seen before. They did one thing only - spiral potatoes and I just had to have one, despite Lundulph's tut-tuts.

Basically what it is, an oblong baking potato is run through a spiraliser and a bamboo skewer is stuck through the middle at the same time. It is then deep-fried. Finally, the hungry buyer gets to choose a sauce or spice mixture to sprinkle on top and off she goes.

Unfortunately until we buy a new and bigger house, a spiraliser is completely out of the question, so I bought a tiny little gadget which allegedly would do the same thing, albeit with a bit more elbow grease. I carefully selected narrow baking potatoes as well, since I don't have a deep fryer either, but would need to bake the potatoes. Sadly, the two parts of the little gizmo had been put together backwards, making it completely useless, so I had to throw it away, there was no way to fix it.

Instead, I searched YouTube and found several instructional videos on spiral potatoes and also on Hasselback potatoes, so was able to create the spirals and also use the baking instructions for Hasselback potatoes. Let's face it, they are in effect the same.

So, the skewer went in through the middle of the potatoes and then carefully with a small knife, I cut the spiral. It wasn't as thin as the spiraliser at the stall, but was thin enough.

IMG_4782

Once the full length of the potato has been spiralled, carefully stretch along the skewer. I used metal skewers with the thought that they would heat up in the oven and help bake the centre of the potatoes.

IMG_4783

While preparing the potatoes, pre-heat the oven along with a deep baking dish to 220 °C. The baking dish should be such that the skewers can be rested on it's edges, so the potato spirals are suspended.

IMG_4784

Brush the potatoes with a little oil when you put them in the oven and repeat a few times while they're baking. I also turned the skewers around, though I'm not sure that was actually necessary.

I don't remember how long it took to get them baked, but they were ever so tasty, I almost burnt my tongue trying to eat straight out of the oven. Lundulph was out that evening and got to try one the following night, reheated. This wasn't as good, so he wasn't very impressed, but they were looooovely!

6 August 2015

Wholemeal Chocolate Chocolate Chip Muffins

In my search for a good muffin recipe, I came across this one, which seemed very appealing as it had wholemeal flour and coconut oil in it. How wrong I was...

Ingredients

Makes 12
245 g wholemeal flour
65 g caster sugar
25 g cocoa powder
½ tsp sea salt
½ tsp baking powder
60 g melted coconut oil
1.6 dl semi-skimmed milk
1 large egg
0.6 dl chocolate chips

Method

  1. Pre-heat the oven to 200 °C and line a muffin tin with paper cases.
  2. Stir together the dry ingredients in a bowl.
  3. Mix in coconut oil, milk and egg.
  4. Fold in the chocolate chips
  5. Divide up the mixture between the cases and bake for about 20 minutes.

What I got was a very stiff batter, so I used an ice cream scoop to distribute among the paper cases. This was great I thought, no dribbling or fiddling with piping bags and such. And baking worked pretty well, they achieved a very nice domed shape, another plus point for this recipe.

But then we tried them and the taste was horrible. I imagine it would taste like this if I'd used sawdust and wood chippings instead of wholemeal flour. The texture was fairly unpleasant too, they were very heavy, which is no wonder with only wholemeal and a tiny amount of baking powder.

Possibly it might work OK as a loaf, where the slices can be eaten with butter and jam, though I'm not sure it would hold together, there's no kneading to develop a gluten structure.

Lundulph obligingly ate his and half of mine, as I decided not to force it down. Lundulph's parents and his brother and partner and a neighbour also kindly agreed to try them, all of us with the same verdict - these were no good at all. And I don't think these are worth experimenting with either, there's too much that's wrong with them. Still, a useful experience.

28 July 2015

New Breakfast 2

IMG_4764

The second breakfast recipe I tried was for "fruit porridge" and there were a couple of things I decided to ignore from the outset - one of the ingredients was celery. Just say no, that's all I'm saying. The second one was to blend the fruit together into some sort of porridge consistency. Well, that would be fruit purée, and why do that, when it's nicer to have it diced and have some textures and colours as well? Not to mention that surely if the stomach has something to digest, it might prevent getting cravings a couple of hours later?

Of course diced fruit in a bowl is a fruit salad and that would take some time to do, not enough of that in the mornings, so I prepared it on the evening before. Lundulph came into the kitchen to see what I was up to and as he saw the kiwi fruit, he decided that he'd like to try this new breakfast as well, so I made a second portion for him too.

Ingredients

1 portion
1 apple
1 pear
1 large kiwi fruit
a handful of raspberries and blueberries
1 tbsp crushed linseed
1 peeled hard-boiled egg

Method

  1. Wash, peel and core the apple, then dice and place in a bowl.
  2. Wash, peel and core the pear, then dice and add to the bowl.
  3. Peel and dice the kiwi fruit and add to the bowl.
  4. Gently wash raspberries and blueberries and add to the bowl
  5. Finally sprinkle the crushed linseed over and stir through to get everything mixed and it's ready to eat along with the egg.

When I handed Lundulph his fruit salad, his only comment was that this is one big bowl of fruit, then he went off to the home office, where he tends to eat breakfast most of the time.

I had the fruit salad first and then ate the egg with a little salt. It was a bit of a struggle to eat everything and I felt rather stuffed afterwards. The idea is of course that the egg provides the protein and again, I got through up to lunch without experiencing any cravings at all.

I was telling my Mum about this too, as she's been having fruit salads with nuts for breakfast for years and she concurred that it's a very filling meal indeed.

But it is also a bit more effort than I have time for, so I only made it a couple of times. I think it would work as a dessert for two, just the fruit salad that is, minus the egg. Making it on the evening before and keeping wrapped with cling film in the fridge works quite well and if you're already cooking in the evening, this won't add too much effort.

And yes, the raspberries and blueberries were the replacement for the celery. The photo in the book actually had pomegranate pieces and I suspect that's rather nice too.

27 July 2015

New Breakfast 1

IMG_4763

Now, my new diet books have lovely recipes and I've tried to follow their concept of palm portions, but I have a bad feeling that's too much for me anyway, perhaps because I no longer feel hungry around elevenses. In the second book there were a couple of breakfast recipes that seemed very appealing and I tried both. Here is the first one, which I've ended up sticking to, as it's a little quicker to do.

Ingredients

1 portion
4 tbsp cottage cheese
½ banana
4 - 5 large strawberries
1 dl heaped with blueberries
1 tbsp flaked almonds
1 tbsp sunflower seeds
1 tbsp whole linseeds
¼ tsp ground cinnamon

Method

  1. Scoop the cottage cheese into a bowl and slice the banana thinly over.
  2. Remove the stalks of the strawberries, wash and dice into the bowl.
  3. Wash the blueberries and add to the bowl as well.
  4. Finally add the almonds, sunflower seeds and linseeds and sprinkle the cinnamon on top.
  5. Stir to mix and eat.

Now, the palm portion concept states that the meal should consist of protein of about the size of one's palm (minus the fingers and thumb), then two fist-sized portions of veg or fruit and a fist-sized portion of carbs. This will help you keep your weight. If you want to lose weight, then swap the third fist-sized portion for veg or fruit as well. The book then provides loads of ideas for what to use in each of the food groups.

In this breakfast recipe, the cottage cheese provides the protein part and 4 tbsp are about the size of my palm. The ½ of banana counts as one fist-sized portion of fruit, the strawberries a second and the blueberries a third. I believe the nuts and seeds provide protein and some fat as well, not to mention that linseed tends to get the system going. The cinnamon is not necessary and I've forgotten it on some days, and it was still tasty. I will need to make it more seasonal, I'll have to do some research on what I can swap the strawberries and blueberries with, to make it more interesting. But it's a really nice and filling breakfast that keeps me going well up to lunchtime, no cravings at all.

Of course this takes a little longer to put together in the mornings than say müsli and milk or yoghurt, but not too bad and I think it's time well spent.

26 July 2015

Lemon and poppy seed cupcakes

This year has quite a few big birthdays in the family and next up is my Mother-in-Law. And I get the honour of making some of the desserts - cupcakes and cake pops. Lovely! So on my latest trip to my local Lakeland, I couldn't resist buying moulds for making lace out of icing. Of course it's not regular icing, it requires some special mixture to allow it to keep its shape.

IMG_4760

And as I'm doing more and more advanced things in my baking, I have to practice in advance and this is it - try out one of the many cup cake recipes I saved from the Danish Bake-off in 2012 and combine with icing lace. Note that the original recipe is in Danish.

Ingredients

125 g soft unsalted butter
100 g caster sugar
3 large eggs
2 tsp vanilla extract
2 tbsp lemon zest (about 2 lemons)
1 tbsp lemon juice
275 g plain flour
1 tsp baking powder
½ tsp bicarbonate of soda
1 ml salt
2 tbsp black poppy seeds
¾ dl single cream

Method

  1. Pre-heat the oven to 180 °C (160 ° C fan-assisted) and prepare some muffin cases.
  2. Whisk together the butter and sugar until pale and fluffy.
  3. Add the eggs, one at a time, and incorporate well. After the final egg, also stir in the vanilla extract, lemon zest and juice.
  4. In a separate bowl, sift together the flour, baking powder and bicarbonate of soda. Add the poppy seeds and stir through to make sure they are well mixed.
  5. Add the flour mixture a little at a time and whisk incorporate into the butter mixture to form a thick batter. Add the cream when the batter becomes stiff and the electric whisk is struggling.
  6. Spoon or pipe into the muffin cases, filling about ⅔ of each case.
  7. Bake for 15 - 25 minutes (depending on size), test with a toothpick to see if they're ready, it should come out clean.
  8. Remove from the oven and transfer to a wire rack and allow to cool.

I bought slightly smaller muffin cases recently, they are much more manageable when eating and have a better balance between the cake part and the icing. So I used them and had 20 muffins from the above amounts. I should have placed them in my metal muffin tins even if they are smaller, that would have helped them keep their shape, but instead I squeezed them all into one tray and so some went rectangular as they bumped into their neighbours while baking.

IMG_4755 IMG_4756

Now for the decorations, I first went for the recommended icing in the recipe, however it split and I couldn't sort it out, but it was very tasty, so I've frozen it into creamy ice lollies. I also was reluctant to flavour it - it was supposed to be divided in 2 equal parts and one to be flavoured with lemon juice and coloured yellow and the other part to be flavoured with orange juice and coloured orange. It seemed to be a lot of the two juices to be added and I thought it would end up being rather runny.

Ingredients for icing

90 g soft unsalted butter
75 g icing sugar
250 g mascarpone
1 tsp vanilla extract
yellow food colouring

Method
Whisk together everything until it's soft and fluffy. If it doesn't split, pipe onto the cooled down muffins. Otherwise freeze into ice lollies.

I tried to pipe the split icing with the hopes that it might force it to come together, but it started melting in my hands and I gave up. I put some giant raspberries on top, which tasted nice, but made the cupcakes so very top heavy they were not able to stand up on their own.

IMG_4759

The next thing was to try out the icing lace. The packet instructions were for industrial amounts, I made a fifth if them and still had a blob left over. The mixture was very rubbery from the start and it took me quite a while to work out the right level of pressure to use to get the lace moulds filled enough to form a lace and yet not accidentally scrape half of the filling off. I left them to dry naturally through the day and in the evening, I dug out some ready to roll blue icing, rolled it out and cut out circles, then put the icing lace on top and it looked very pretty.

The next day, the blue icing had bled into the muffins and also picked up lots of moisture from the air, as it is very rainy at the moment. The white icing lace kept well, but also succumbed to the strong blue colour of the rolled out icing on day 2. I'll need to make another batch of the icing lace, to make sure I have the knack for Mother-in-Law's birthday party. And I also need to work out a good recipe for the cupcakes.

I personally liked the poppy seeds, they give a very nice crunch, but Lundulph thought they were more of a savoury ingredient and we both were struggling to taste the lemon. I also thought the muffins were a bit on the dry side - the original recipe called for milk, but I think using single cream should make them a bit more moist. Lundulph suggested muffins with cardamom flavouring, like a cinnamon bun basically, so that'll be the next thing to try.

I also took some to work for some of my overworked colleagues. I've not heard anything from them, so my guess is these weren't quite a hit with them either. And not surprising, work has been hectic and stressful for weeks and I'm tired and have headaches, so my baking very much reflects this. I think I need to knead a dough by hand and get some of the built-up frustration out.

Everyday Beef Burgers with Veggie Mash

IMG_4757

Another recipe I picked from my new diet books, this time with beef. The original recipe is for 2 portions, but I scaled up to fit with the amount of mince I had to hand.

Ingredients

Veggie mash
300 g broccoli
300 g cauliflower
10 g chives
1 dl crème fraîche
salt and peppper

Burgers
240 g onions
95 g carrots
500 g beef mince
6 tbsp crème fraîche
4 tbsp Dijon mustard
Salt & pepper
butter for frying

Method

  1. Start by making the mash - trim and wash the broccoli and cauliflower, then divide into florets.
  2. Steam until they go soft - each on its own, as they take different amount of time for this.
  3. Place in a large bowl and mash together, adding a little of the steaming liquid if needed.
  4. Cut the chives into the mixture, add the crème fraiche and season to taste.
  5. Peel and finely dice the onions, peel and grate the carrots finely.
  6. In a large bowl, mix together the onions, arrots, mince, crème fraîche, mustard, salt and pepper to combine well.
  7. Heat up a little butter in a frying pan, then drop handfuls of the mince mixture into it and use a spoon to shape into burgers.
  8. Fry for 4 minutes on each side.
  9. Serve with the veggie mash and mixed salad or carbs of your choice.

Sadly this was ages ago and I've forgotten if we liked it or not. I have vague memories that I wasn't too impressed with the veggie mash, but I also have a feeling I might have forgotten to add the crème fraîche. Though the burgers were really nice - the carrots did make them very juicy, though without bread and egg, they didn't really hold together very well, were quite far removed from the photo in the book, which was more of a Wallenbergare type of burger.

Luckily Lundulph remembers this dish well and commented that it was very tasty, so a repeat for sure.

18 July 2015

Baked Churros

While spending a number of evenings watching youtube recipes, I came across the wonderful channel of Ann Reardon of How to Cook That and one of the recipes was for churros, which I think of as the Spanish version of mekitzi.

IMG_4753

I've had churros a couple of times and really enjoyed them, but never really thought about making them at home and when I found the tutorial video, I decided to try them out.

The basic dough is very similar to the choux dough, but with fewer eggs and I was a little concerned that they would puff up, but they didn't and perhaps that's down to the smaller amount of eggs in the mixture.

Ingredients

Churros dough
250 ml water
115 g butter
160 g plain flour
3 large eggs
1 tbsp granulated sugar
1 tsp vanilla extract
Cooking oil spray

Cinnamon sugar
54 g caster sugar
1 tbsp ground cinnamon

Nougat dipping sauce
1 part nougat
1 part semi-skimmed milk

Method

  1. Line a couple of baking sheets with baking paper and pre-heat the oven to 200 °C.
  2. Put the water and butter in a saucepan and melt on the hob.
  3. Stir briskly in the flour and once the dough starts thickening and comes together into a ball, remove from the hear.
  4. Add the eggs, one at a time and incorporate well in between.
  5. Finally stir in the sugar and vanilla and transfer to a piping bag with a fairly narrow star nozzle.
    IMG_4752
  6. Pipe straight lines, a couple of cm apart onto the prepared trays and spray with a little cooking oil.
  7. Bake each tray until the churros go golden brown on the ridges.
  8. Stir together the caster sugar and ground cinnamon to mix well.
  9. Remove from the oven and transfer to a cooling rack and sprinkle immediately with the cinnamon sugar.
  10. Make the dipping sauce by dicing the nougat and placing in a heat proof bowl.
  11. Bring the milk to the boil, then pour over the nougat and stir until the nougat has melted and has become a homogeneous mixture.

I also used a nozzle that was too wide, so my churros were a bit on the thick side, but I wasn't sure if I'd be able to pipe the dough, it felt a bit thick and I didn't want to get a smaller nozzle clogged up. In the past I've mostly used too small nozzles and had tremendous problems with piping things well. This meant I had to bake my churros for 25 minutes and I also upped the temperature to 220 °C as they seemed to be taking forever to develop colour. I also had some cinnamon sugar left over, but that can be used when I make cinnamon buns next.

IMG_4751

But they were crunchy on the outside and soft on the inside and worked very nicely with the nougat sauce. In fact the reason I made it was that I didn't have any chocolate in the larder and thought I could make a "ganache" with the nougat, but rather than using cream, I used semi-skimmed milk. This resulted in the mixture not setting like a ganache would, even after being chilled in the fridge, so it's a good one for ice cream as well I think.

This was a surprise for Lundulph and a very tasty one too. We ate almost all of the churros for breakfast, so if I make this for more people, I definitely need to increase the recipe. Hopefully I'll remember to use a smaller nozzle next time too, that should shorten the baking time considerably. Lundulph liked that they weren't greasy like deep fried ones and of course you could tell the difference, but it wasn't a bad one at all.

13 July 2015

Chicken Burger with Beetroot Tzatziki

After two fish recipes, we decided to go for a chicken recipe from my new diet book.

IMG_4747

Also pleasing is that I get to try out sambal ulek - I've heard of this, but never cooked with it. It's an Indonesian chilli paste. The brand I bought wasn't as spicy as I expected and would have liked, but was still very nice.

Ingredients

Beetroot tzatziki
2 large beetroot
300 ml light crème fraîche
1 tbsp horseradish paste/sauce
salt and pepper

Burgers
500 g chicken breast
4 shallots
2 large eggs
4 tsp sambal oelek
2 tsp lime juice
2 tbsp cornflour
salt and pepper
oil for frying

Method

  1. Peel the beetroot and then grate it coarsely and place in a large bowl.
  2. Stir in the crème fraîche, the horseradish, salt and pepper.
  3. Next, trim the chicken breasts and chop finely - or whizz in a food processor, then place in a large bowl.
  4. Peel and finely dice the shallots and add to the chicken.
  5. Stir in the eggs, sambal oelek, lime juice cornflour, salt and pepper and mix to get well combined. It will not be possible to form into burgers, that's OK.
  6. Heat up some oil in a frying pan, then using a scoop spoon 2 - 3 patties into the frying pan and press down into burger shapes, making sure they don't touch.
  7. Fry for a few minutes, then flip over and fry for a few more minutes and the burgers are done.
  8. Repeat with the rest of the mixture. Serve with the beetroot tzatziki and steamed or sautéed potatoes.

The beetroot tzatziki is a bit misleading I think - tzatziki has fairly fixed ingredients, none of them being beetroot. But the mixture was very nice. The key thing is to wear protective clothing when peeling and grating the beetroot and it should be preferably red in colouring or you'll be sorry. The book recommends stir-frying the beetroot first and letting it cool down before making the mixture, if you want to tone down the beetroot flavour. To be honest, I think it was nice raw and I keep thinking we should try to eat more beetroot, but it is a bit of a hassle to prepare it as it can stain and also as it would discolour our food. My Sister Bip usually makes juice and she's promised to make some for us next time we go to Sweden.

As for carbs, I'd bought some lovely baby potatoes, which I first steamed and then fried in the left-over oil from the chicken burgers. If you do that, I strongly recommend that you warm up the oven to about 80 °C and keep the burgers warm. But of course burger buns would work just as well, maybe add some sliced tomato, red onion and a couple of salad leaves.

Finely chopping the chicken took a lot of effort, as the processor attachment on my handheld blender broke the other week and so I don't recommend doing this on a week-day. But it's well worth trying to dice finely, rather than mince as the burger texture was very good. I was also pleased that I didn't need to get my hands dirty forming patties and I'll try that when I make Bulgarian meatballs in the future. I used my ice cream scoop to plop 3 scoops into the frying pan and then gently pressed them down, leaving about a cm between them. But next time I'll add a spicier chilli paste.

Lundulph's verdict - nice texture, meatier than normal burgers, tasted nice and the beetroot and potatoes worked well with them.