16 March 2013

Kolakakor

We've invited some friends over for afternoon tea on Saturday and as I'm working in the City since a week ago, I need to start well ahead, since I also have to do a number of shopping excursions to get the ingredients.

IMG_2865

So I started by buying most things today and making something quick. Thus the fudge biscuits. Besides, Lundulph has been asking for chewy biscuits for ages. The recipe is from my Swedish book on 277 types of cakes. It also utilises some ingredients that aren't readily available in the UK, so here is my version.

Ingredients
Makes about 60 pieces
320 g plain flour
5 g baking powder
160 g unsalted butter at room temperature
130 g granulated sugar
1 tsp vanilla essence
40 g golden syrup
30 g maple syrup

Method

  1. Pre-heat the oven to 180 degrees centigrade and line 2 - 3 baking sheets with baking paper.
  2. In a large bowl, mix together the flour and baking powder.
  3. Add the remaining ingredients and pinch together into a dough, but careful not to over-work it. It should just hold together.
  4. Divide up the dough into pieces, then each piece rolls out to the length of the baking sheet and is about 2 cm in diameter.
    IMG_2862
  5. Place two rolls per baking sheet only and bake until golden brown. The recipe said 15 minutes, but I ended up baking them for 22 minutes.
  6. Take out from the oven and immediately cut into pieces at a slight angle, then carefully transfer to a cooling rack and let cool down completely, then they will go harder and chewier.
    IMG_2864
  7. Once completely cooled, store in an airtight container and careful, they are very moreish!

I divided the dough into 6 parts of 115 g each and baked on 3 baking sheets. The first two went in as rolled and seemed to take ages to swell up. At the 15 minute mark, the edges had reached the right colour, but overall the sticks were fairly pale. Once they were golden brown, the edges were slightly overdone, so when I cut up the pieces, I trimmed the edges and gobbled them up together with Lundulph, while they were still hot. I then flattened the second and third batches, but it didn't seem to make much difference.

IMG_2863

I think my baking sheets are about 35 cm long and I got precisely 60 nice biscuits from this bake. We also tried one completely cooled down biscuit and it was very crunchy and chewy. Initially Lundulph thought they weren't sweet enough, but actually they were, it just takes a few seconds to kick in. Thus we're going to bed happy and sugared up tonight.

Update 16th March: After a week in a box, the biscuits have gone hard and lost most of their chewiness. I also felt they weren't sweet enough. I think caster sugar next time instead of granulated and maybe increase the amount of the golden syrup too, it's really sweet.

10 March 2013

Carrot and date cupcakes

A few weeks ago, I was treated to some really lovely muffins. I wasn't able to find out for sure what type they were, but it seemed that they had carrots, nuts and dates in them, along with some spices, so I decided to try and re-create them.

IMG_2861

After some searching I found a recipe that seemed to have the correct ingredients. So I got the ingredients and am particularly happy to have got hold of some really lovely dates - very soft and creamy. But when I came to actually making the muffins and started converting the amounts to metric, it became obvious that this recipe would not work for me. The amount of dates needed seemed way over the top and with my recent banana muffin experience, I'm very cautious. Some of the other amounts were also suspicious.

So, I resorted to checking what Delia Smith and Mary Berry had to say on the subject. Well, Delia had two recipes, but for carrot cake, not muffins and I didn't have all the ingredients for them. The Mary Berry one seemed very intriguing and I will give it a try some day. This time, I used it as a guidance for the amounts of my recipe instead.

Ingredients
Makes 24
12 whole dates
3 - 4 large carrots
400 g self-raising flour
2 tsp baking powder
3 tsp ground cinnamon
2 tsp ground ginger
2 dl chopped walnuts
250 g honey
4 medium eggs
4 dl water
1.2 dl grapeseed oil

Icing
300 g unsalted butter at room temperature
500 g icing sugar
2 tsp cinnamon
100 g maple syrup
4 tsp vanilla extract
1 tbsp milk (if needed)
ready-made tiny sugar carrots for decoration

Method

  1. Pre-heat the oven to 180 degrees C. Prepare the muffin cases - you need 24 of 5 cm diameter.
  2. Cut the dates lengthwise in half and remove the stone, then set aside.
  3. Peel and trim the carrots, then grate coarsely. Weigh up 300 g for the recipe.
  4. In a large bowl, mix together the flour, baking powder, cinnamon, ginger and walnuts.
  5. Add the carrots, honey, eggs, water and oil and stir together to get thoroughly mixed through. It will look like runny porridge with orange sticks in it.
  6. Pour some of the batter into the cases, filling to about a third. Then place a date half in each, with the cut side up.
    IMG_2855
  7. Distribute the remaining batter in the muffin cases, then bake until they go golden brown, about 50 minutes. Check with a toothpick for readiness.
  8. Remove from the oven and let cool on a wire rack.
    IMG_2856
  9. While the muffins are baking, place the butter, icing sugar and cinnamon in a bowl and stir together with a fork until well combined.
  10. Add the maple syrup and vanilla extract and incorporate well.
  11. If the mixture feels too thick for piping, add the milk and incorporate. Wrap tightly so the icing doesn't start drying and store in a cool place until it's needed.
  12. Once the muffins have cooled completely, prepare a piping bag with a nozzle and transfer the icing to it, then pipe onto each muffin.
    IMG_2858
  13. To finish, place a small sugar carrot decoration.

I have two muffin tins, taking 12 cases each, so had two batches to bake. The first one I baked for 45 minutes and they had a really nice colour on the surface when they came out. I'd tested for readiness several times and each time, the toothpick came out with small amounts of batter. I let them cool inside the muffin tin, which is fairly thick, so would extend the baking a little. They were slightly warm by the time I took them out.

The second tin, I left to bake for 60 minutes and it went a bit darker on the surface than I would have liked. But the tooth pick came out clean. However, when I cut in half one of each batch, the 45 minute one seemed moister than the 60 minute one. And this was indeed the feeling I had when I ate them. Lundulph commented that the 60 minute ones were better as the creaminess of the date became more prominent. However, once the icing was in place, the date creaminess was lost a little. Lundulph was adamant that the date should be in one piece in the middle and not chopped and stirred into the batter. These dates don't really have that strong a flavour, so chopping them up would make them disappear completely. Possibly this goes for all dates, I don't know.

IMG_2859

On the whole, I'm very pleased with this recipe, as I feel I put it together myself to a much larger extent than before. I've also been racking my brain on variations for the future. For starters, if the muffins won't be iced, then the amount of honey should be increased, they weren't very sweet on their own. The recipes on Delia Smith's website had orange zest in them and that might complement the flavours nicely.

After baking was over, the whole house smelt very nice, but I think if I'd used butternut squash instead of carrots, the result would have been the same. Lundulph reckoned it's just there to add bulk. The carrots do add some sweetness and certainly moisture. I would have liked a bit more crunch, so will probably toast the walnuts beforehand. And use honey with stronger flavour too.

IMG_2860

I'm particularly pleased with the icing - inspired from this recipe, I used the amounts from my cookie monster cupcakes, but added vanilla and cinnamon. Actually I made half the amount, from 150 g butter and this as barely enough for 20 cupcakes, so I've doubled the amounts in the recipe above, so that all 24 muffins can be decorated and one doesn't have to worry about running out. I should practise my piping though.

2 March 2013

Hot & spicy goose/chicken noodle soup

In the cold snap of late, I thought soup might be nice. My original plan was to make this on Wednesday, but due to Lundulph being out almost every evening this week, I only got to make it tonight.

This is a recipe card from Waitrose and a very recent at that - the card says early February 2013 and so it isn't on their website yet. At least I wasn't able to find it, as I trawled through the 350+ results on "soup" and 150+ results on "noodle".

IMG_2848

I also decided not to follow the recipe entirely - there is still some goose meat left in the freezer from Christmas and I really didn't like the look of the sugar snaps, so opted for green beans instead. And I wanted fancier mushrooms than regular button ones.

Ingredients
4 - 5 portions
150 g shiitake mushrooms
160 g enoki mushrooms
150 g green beans
2 - 3 breasts of chicken or goose (previously cooked)
5 Oxo reduced salt chicken stock cubes
1.7 l boiling water
0.5 dl dark soy sauce
0.5 tbsp chilli flakes
1 packet dried instant noodles, without the flavour sachet
1.5 tbsp lime juice
1 tbsp granulated sugar
a bunch of salad onions (8 - 9)

Method

  1. Brush the shiitake mushrooms clean and slice into strips. Remove the "root" parts of the enoki mushrooms and cut the bunches into 3, then divide into smaller bundles.
  2. Trim and wash the beans, then cut in two or three. Trim and wash the salad onions and cut into 3 cm pieces.
  3. Cut the meat into bite-sized pieces.
    IMG_2847
  4. Crumble up the stock cubes in a large saucepan. Boil up the water in a kettle, pour over the stock cubes and stir to dissolve them completely.
  5. Set the saucepan on the hob and add the soy sauce and the chilli flakes. Once the liquid is boiling, add the mushrooms, beans and meat. Break up the noodles and drop into the soup.
  6. Let simmer for 3 - 4 minutes, stirring occasionally. Then stir in the lime juice, sugar and onions and remove from the heat and serve.

OK, so I made some changes to the original recipe - dried chillies instead of fresh etc, but no matter how you look at it, it's a glorified way of preparing what is essentially student food. And it's nothing wrong with that - most of the time was spent cleaning and cutting things up. So very suitable for a mid-week dish.

Lundulph liked it and so did I.

1 March 2013

Banana-Nutella Muffins

Once again I mysteriously came across an appealing recipe, while browsing for something completely different.

IMG_2842

The combination of banana and Nutella is always a winning one, I've previously done - peeled and wrapped in aluminium foil together with generous dollops of Nutella.

So I had great hopes for these and set about to convert the measurements to metric. As I write this, I realise that I used baking powder instead of bicarbonate of soda (listed as "baking soda" in the original recipe). Dang!

Ingredient
Makes 12
6 tbsp butter, melted and cooled (about 100 g)
4.75 dl plain flour
1.8 dl granulated sugar
0.75 tsp bicarbonate of soda
0.5 tsp salt
3.5 dl very ripe bananas, mashed with a fork
0.6 dl plain yoghurt
2 eggs, lightly beaten
1 tsp vanilla extract
0.6 dl chopped and toasted hazelnuts
12 tsp Nutella

Method

  1. Pre-heat the oven to 180 degrees C (160 degrees for fan assisted) and line a muffin tin with paper cases. Gently melt the butter, removing from the heat before all of it has melted, that way it will cool quicker.
  2. Mix together the flour, sugar, bicarbonate of soda and salt in a large bowl and set aside.
  3. In a separate bowl, stir together the mashed bananas, yoghurt, eggs and vanilla extract.
    IMG_2836
  4. Quickly fold in the wet mixture into the dry mixture and also add the hazelnuts.
  5. Divide up the batter between the cases, add a tsp of Nutella to each and swirl around with a toothpick. The Nutella must be at room temperature and maybe even warmed up for a few seconds in a microwave, to make swirling easier.
    IMG_2837
  6. Bake for about 25 - 35 minutes until the muffins are golden brown and are baked through. Use a toothpick to test, it should come out clean.
    IMG_2838
  7. Remove to a wire rack to cool.

As the muffins were baking, they smelt so wonderful, I opened the kitchen door and let the smells spread out through the house. Once they were ready and out of the oven, I noticed that they were heavier than expected, as I moved them from the muffin tin to the cooling rack. And as tempting as it was, I managed to resist trying one, but waited for Lundulph to come home, which was very late.

And then disappointment - the muffins were heavy and didn't feel spongy. They tasted nice, but were very dense, not at all what I expected. Lundulph suggested having them with custard and I think perhaps a few seconds in the microwave might soften them up a bit.

IMG_2844

Thus we have 10 more muffins to get through, I've frozen most of them and perhaps I'll give this recipe another try, with bicarbonate of soda and I might change the amounts as well. I realise why there is yoghurt on the ingredients list, it is moist and acidic and activates the bicarbonate, so that it bubbles up and is the reason why the recipe of sponge cake without eggs. works. Oh well, never mind...

24 February 2013

Baba ganoush

Recently I've had several Lebanese dishes and have become keen to explore this cuisine further. I've already tried hummus, which seems to be a staple.

IMG_2832

Another staple seems to be the aubergine dip baba ganoush. Oddly enough, the one I had in a restaurant seems to be quite different from the recipes I found on the internet - it contained green pepper, red onion and tomato, all very finely diced. The result is that the dip is both creamy from the roasted aubergines and has a fresh crunchiness to it from the green pepper. Thus I decided to try and replicate this.

Ingredients
6 largish aubergines
1 medium sized green pepper
2 large tomatoes
1 medium sized red onion
2 cloves of garlic
1 tbsp lemon juice
1.5 tbsp tahini paste
salt and pepper to taste
fresh finely cut coriander

Method

  1. Pre-heat the oven to 240 degrees C. Wash the aubergines and trim the green bits around their "handles".
    IMG_2822
    Pierce each aubergine through with a skewer all around, then place on a rack in a pan and let bake in the oven until they go dark and soft, let the skin turn to charcoal even. This will take some 45 minutes - 1 h and the aubergines may need to be turned a couple of times.
    IMG_2827
  2. Take out the aubergines and set aside to cool. In the mean time, wash the pepper and tomatoes and peel the onion and garlic. Cut the pepper and tomatoes in half, then remove the stalks. Dice them finely along with the onion. I recommend using a mandolin or an alligator cutter.
    IMG_2829
  3. When the aubergines have cooled enough to handle (they will sink in a bit), carefully hold each by its "handle" and peel off the skin, removing any charcoal pieces as far as possible. When all aubergines are peeled, cut off the "handles" and place in a deep large bowl together with the garlic, lemon juice, tahini, salt and pepper and mash with a blender.
    IMG_2828
  4. Add the finely diced vegetables and coriander and stir in well. Let stand in the fridge for a couple of hours, check the seasoning and adjust if needed.

I'd only bought three aubergines and would normally have roasted them in my pepper roaster, however I was curious to see how it would work in the oven. The pepper roaster is faster I think and also creates the charcoaled skins, I wasn't able to achieve this in my oven. Perhaps putting the aubergines under the grill towards the end might have worked better. What is absolutely vital is to pierce the aubergines before the roasting/baking. Very, very important, otherwise they will explode as the internal juices start boiling and the rest of the day will have to be spent cleaning the oven. So pierce! This also goes for the pepper roaster and it's even harder to clean.

I also opted to dice the aubergines, so I didn't achieve the creaminess I was after and I forgot the coriander completely, which probably explains why it didn't taste like the stuff in the restaurant. Possibly some more lemon juice and tahini wouldn't hurt either. However, after resting this dish in the fridge for a couple of hours, it tasted quite nice anyway. And the only fat in it was from the tahini, so rather healthy.

Lundulph and I had another "myskväll" on Friday evening, with sticks of carrot, cucumber and colourful peppers, pita breads, hummus and this baba ganoush. I'd flavoured some of the hummous as before and again we ate quite a bit more than intended. So moreish!

23 February 2013

A new spice mixture

While watching the Danish Great Bake Off - Den store Bagedyst, one of the savoury breads was called manaish and had a spice mixture called zaarta, which looked intriguing.

After some googling, I found several synonyms for this, but no clear information on what the mixture contains. Luckily I was able to get hold of some the other day, under the name of za'atar. It's green and has sesame seeds in it and smells really nice.

As it was time to make bread, I decided to try out my new spice mixture. I still haven't worked out a routine for my sourdough starter and am still struggling to reduce the amount, but today I think I may have sussed it.

As usual, I began by feeding the starter. I had just over 300 g of starter into which I added 200 g water and then 150 g flour. A few hours later, it had doubled, so I transferred 200 g of it back to its jar and put the rest in the bowl of the kitchen machine.

I switched it on and started adding flour, a little at a time and when it came together, I checked for stickiness. When it was barely sticky and the gluten was almost fully developed, I manually incorporated about half a decilitre of olive oil and let it rise, a bit too long than I should have, but I was busy making the beef sarma.

IMG_2814

Still, I rolled out the dough, brushed with more olive oil, then sprinkled za'atar all over the surface and rolled it up like a Swiss roll. Then placed the roll into the loaf tin and let it proof for another hour before baking it at 240 degrees C for 20 minutes, covering with aluminium foil, reducing to 200 degrees C and baking for a further 30 minutes.

IMG_2817

The bread looked really pretty and smelt very nice. I had some toasted with butter. The za'atar mixture tasted a lot milder than I expected. Perhaps I should be even more generous with it, though I thought I'd sprinkled quite a lot on the bread to begin with.

22 February 2013

Marinated mushrooms

In my recent tidying up of my recipe collection, I came across a torn off page from one of my Mum's magazines from the Autumn 2009. It has three recipes on mushrooms and one of them was particularly appealing, so the other day I bought a lot of mushrooms and got to work.

IMG_2821

The recipe comments that these are good as a side dish with meat or fish, but also on their own as part of a buffé.

Ingredients
850 g baby chestnut and/or button mushrooms
a couple of pinches sea salt flakes
1 dl grapeseed oil
0.5 dl Malay kicap manis (soy sauce)
2 tbsp toasted sesame oil
1 tbsp sesame seeds
2 fresh kaffir lime leaves
1 large clove of garlic
1 dl finely chopped coriander
1 tsp dried crushed chillies
freshly milled black pepper

Method

  1. Pre-heat the oven to 200 degrees C and brush the mushrooms clean.
  2. Place the mushrooms in a deep pan, sprinkle some salt flakes over them and stir around, then bake in the oven for 30 - 40 minutes, stirring occasionally. The mushrooms need to release some of their liquid and cook through and soften, but not dry out.
    IMG_2818
  3. In the mean time, prepare the marinade by mixing together the grapeseed oil, kikap manis and the sesame oil in a large bowl.
  4. Toast the sesame seeds for a couple of minutes until they go glossy and start sticking together, then stir into the marinade.
  5. Wash the lime leaves and divide each in two and add to the marinade. Peel the garlic and press into the mixture as well.
  6. Add the coriander, chillies and pepper and stir through to combine, then let stand until the mushrooms are ready.
    IMG_2819
  7. Transfer the mushrooms to the marinade, pour over their liquid as well, then stir through to coat them well. Leave to cool completely, then taste and adjust the salt if necessary.
    IMG_2820
  8. The mushrooms are now ready to eat, but can be transferred to a jar and kept in the fridge. The flavours should develop more with time.

The original recipe called for 1 kg of mushrooms, but the ones in the shop had a lot of mud on them and I opted to reduce the amount to save myself some time in cleaning them. I think larger mushrooms can be used, but should be cut into chunks. Visually I think baby mushrooms are better.

I also started wondering what is the difference between a pickle and a marinade and wasn't really able to find a definitive answer. From what I could work out, marinade is a way to tenderise meat (mainly) before cooking, whereas pickling is a method of preserving food.

The above recipe is definitely a marinade, there is not enough sourness to preserve, so I suspect the mushrooms will last about a week.

One big substitution I made was on the soy sauce - the original recipe called for Japanese soy, but I couldn't find it in the supermarket and decided to go for the Indonesian version. I've used ketjap benteng many years ago in a nasi goreng dish and although I don't remember the exact flavour, I do remember it was very nice, so that's my reasoning behind the swap. The kicap manis was a lot thicker than I expected, very much like tomato ketchup (according to Wikipedia the word "ketchup" originates from "kicap"/"ketjap").

Overall the flavours came together very nicely and I should have bought the full kilogram of mushrooms, there was enough marinade for that. The cleverness of this recipe is the baking of the mushrooms before marinating - they are ready to eat after cooling down and have a nicer overall texture. I have had similarly prepared mushrooms in restaurants, but there they had been made with uncooked mushrooms, so require a couple of days at least for the marinade to go through them and soften them up. This is also nice, but requires vinegar. Also, if serving the mushrooms too early, they are still fairly raw inside and it doesn't work for me. I think adding some nice balsamic vinegar to the mixture should lower the pH value and reduce bacterial growth to some extent.

We had some of these lovely mushrooms with our salad yesterday, very yummy. I don't think there is any risk for them remaining too long in the fridge. I might reduce the amount of grapeseed oil a little for next time, though.

21 February 2013

Beef sarma

After a few weeks of focusing on baking, I thought it is time to do some cooking. Some time ago, I purchased a large jar of sour cabbage leaves from a Turkish shop in London and with Winter on its way out (fingers crossed!), I thought it would be good to make a hearty Winter dish.

IMG_2816
Originally I was planning to make the sarma entirely vegetarian, but as Lundulph needs meat, I decided to make a beef mixture filling. I also thought some iron boost might be good, so I decided to also add some liver. According to Lundulph, "beef" liver is the best one nutritionally. I think he spent some time researching this on the internet last year, while I was in Sweden. It's good for B12 vitamin.Of course there is no such thing as beef liver, but calf liver or ox liver. I opted for the former and wandered to our butcher's. As many times before, they seem to anticipate what I will ask for and had 300 g portions nicely vacuum packed and appealingly presented in the window display.
There was also a bottle of Faustino I from 1994. A precious bottle we'd saved through various house moves, to drink at a special occasion, only to find it corked. As always, I don't like to throw things away, so I put a wine saver on it and pumped out the air and put the bottle in the larder for a cooking opportunity.
Ingredients
0.5 dl grapeseed oil
2 onions
2 - 3 carrots
2 cloves of garlic
130 g calf liver
500 g lean beef mince
150 g pearl barley
7 dl red wine
1 bay leaf
1 tsp dried rosemary
1.5 tsp dried thyme
2 tsp dried dill
2 tsp dried savory
2 tsp dried mint
salt and black pepper to taste
1 tbsp granulated sugar
150 g parboiled girolles
350 g canned sliced button mushrooms
10 - 12 soured cabbage leaves
Bechemel sauce
1 dl grapeseed oil
1 dl plain flour
1 tsp salt
0.5 tsp black pepper
0.5 tsp grated nutmeg
5 dl milk
the liquid from the canned mushrooms
the liquid from the sarma
more milk or water if necessary
Method
  1. Peel and dice the onions and carrots. Peel the garlic and pre-heat the oil in a large deep frying pan.
  2. Add the onion and carrots to the oil and press in the garlic and let fry for a few minutes until they go soft. Stir occasionally.
  3. In the mean time, dice the liver as finely as possible, then add to the onions and carrots, followed by the mince. Stir vigorously to prevent lumps.
  4. Rinse the pearl barley and once the meat has browned, add it to the pan and stir in, then add the wine and all the herbs.
  5. Season with salt and black pepper, but careful with the salt as soured cabbage tends to be quite salty.
  6. Stir in the sugar, then cover and let simmer for 30 minutes.
  7. Check the filling and taste the pearl barley for readiness. If it looks dry, add some more water and let simmer for a further 15 minutes.
  8. Prepare the soured cabbage leaves on a plate. Pre-heat the oven to 200 degrees C.
  9. Just before taking the filling off the heat, stir in the mushrooms.
  10. Take some of the filling and place in the middle of a soured cabbage leaf, then fold the leaf around to make a packet and place it in an oven-proof dish with a lid. Place the packet so the cabbage folds are at the bottom, so that it doesn't unfold.
  11. Bake for at least an hour.
  12. When the sarma are ready, make the bechemel sauce by heating up the oil in a saucepan.
  13. Mix together flour, salt, black pepper and nutmeg, then add the flour and fry with the oil for a few minutes, stirring constantly.
  14. Pour in the milk, a little at a time, while continuing to stir. It will lump together and look like a dough, but will get runnier as more liquid is added. Once the initial 5 dl of milk have been added, continue with the mushroom liquid and also carefully pour in the liquid from the sarma.
  15. If the sauce still looks thick, add more milk or water to reach the desired consistency.
I don't often use liver and I've only had calf liver once to my knowledge - many years ago when I was maybe 14 and my Gran made me eat it. Lundulph did warn me that it has a stronger flavour than liver from other animals and he was right, it smelt quite strongly of liver while I was dicing it. I had planned to use more than 130 g, but it was very spongy to the touch, hard to cut and I didn't like the smell much - because I was forced to eat it all those years ago. I have similar issues with camomile.
However, the filling turned out rather nice, the liver contributed to the mixture of flavours, rather than overpowering everything. Lundulph was quite pleased with it too.
I actually didn't have enough soured cabbage leaves and used up only about two-thirds of the mixture. I froze the remainder to use as pie filling in the future. And I'm happy to have used up the corked wine. It had started to turn into vinegar a little, but was perfectly fine in the sarma.


6 February 2013

Almond biscuits with raspberry jam

The other day we visited Lundulph's parents as we haven't seen them since Christmas and I really wanted to bring them something baked.

IMG_2018

I had originally planned to bake bread, but didn't plan ahead and was short on time, so skipped it and went for the lovely almond biscuits with jam instead. This recipe is from the third week of Den Store Bagedyst, the Danish version of The Great British Bake Off.

Ingredients
Makes around 24, depending on size

200 g plain flour
75 g ground almonds/almond flour
50 g caster sugar
0.5 tsp almond extract
150 g unsalted butter at room temperature
icing sugar for dusting
smooth dark coloured jam

Method

  1. In a large bowl, blend together the flour, the ground almonds, the sugar and the almond extract.
  2. Cut the butter into 1 cm dice and add to the dry mixture, then using only the fingers of one hand, gently incorporate the butter. It is important that the dough is not over-worked.
  3. Once the mixture is homogeneous and looks a little like wet sawdust, use the whole hand to bring the dough together to one ball.
    IMG_2011
  4. Wrap in cling film or put in a plastic bag and place in the fridge for an hour.
  5. Pre-heat the oven to 160 degrees C. Prepare baking paper for the baking sheets.
  6. Place a piece of baking paper on the work surface, take half of the dough, form to a flat patty and place on the baking paper. Place a large piece of cling film on top and roll out over the baking sheet.
  7. When the dough is about 3 - 4 mm thick, remove the cling film and cut out biscuit shapes of your choice. Make an even number of biscuits and cut out holes in the middle of half of them. Leave at least half a cm between the biscuits.
    IMG_2015
  8. Remove all surplus dough around the biscuits, then bake for 15 - 20 minutes until golden brown.
    IMG_2014
  9. Repeat until all the dough has been used up.
  10. Once a baking tray is done, very carefully remove the biscuits to a wire rack to cool.
  11. When all biscuits are baked and cooled down, leave the ones with holes on the wire rack and move the others to one side.
  12. Dust the biscuits on the wire rack with icing sugar using a sieve.
    IMG_2016
  13. Warm up the jam for 10 - 15 seconds on half power in the microwave oven and stir it around.
  14. Place about a tsp of jam on each of the whole biscuits, then carefully spread it around evenly over each biscuit.
  15. Very carefully place an iced biscuit over each of the jam biscuits, press very gently in place.

The biscuits are very brittle and really melt in the mouth. This is why it is so important to be very careful when mixing the dough and only using the fingers and very gently squeezing the butter into the dry mixture. If kneading with the whole hand, I think gluten starts developing and makes the end result tough and chewy rather than melt in the mouth.

I made 16 biscuits and had about a quarter of the dough left over. I froze it and will try it out in a couple of weeks. I used a cutter that was about 6 cm diameter and made the holes using a metal cap from a wine bottle. I also rolled the dough to 5 mm, so overall the biscuits were a bit too big and too thick. Because of being so brittle, I think a 4 cm cutter would be better and also roll them slightly thinner too, so that a biscuit can be eaten in one bite.

I also cut them out a bit too close to each other. There is no leavening agent in the dough, but they still swell a little. Also it would be easier to remove the surplus dough. I had to use a toothpick.

I also didn't have any smooth jam, but used some of my raspberry jam, which had quite a lot of pips in it. The original recipe calls for blackcurrant jam ("solbær" in Danish, literally "sun berries"). I think raspberry worked quite nicely, but any dark coloured and tangy jam will do. However, it should definitely be smooth.

I think these are the fiddliest biscuits I've done to date, but they were well worth it and actually they didn't take too long to make. I'm very pleased with the dough and the texture I managed to achieve. Lundulph is still in awe of the angel food cupcakes, so his praise was subdued, but commented that they would be nice with strawberry jam. I'm not sure, but we'll see.

3 February 2013

Angel Food Cupcakes

After making egg yolk ravioli the other day, I had six egg whites to use up and I've been wanting to try my hand at angel food cake for a while.

IMG_2008

Not to be confused with the British angel cake, this is an American type of sponge cake which contains only egg whites. In my search for a recipe, I was lucky to come across this one, which I chose to make. However, I only had six egg whites, so I halved the recipe and also decided to make cupcakes rather than a big cake.

Ingredients
Makes 12

63 g plain flour
150 g caster sugar
180 ml egg whites
0.5 tsp cream of tartar
0.25 tsp salt
0.5 tbsp lemon juice
1 tsp vanilla extract
0.25 tsp almond extract

Method

  1. Pre-heat the oven to 180 degrees C. Line a muffin tin with paper muffin cases.
  2. Sift together the flour and 75 g of the caster sugar.
  3. Whisk the egg whites until they go foamy, then add the cream of tartar, salt and lemon juice.
  4. Continue whisking to soft peak stage, then add the remaining 75 g caster sugar, a little at a time while beating to the stiff peak stage. Add the vanilla and almond extracts towards the end.
    IMG_2000
  5. Now sift the flour-sugar mixture into the meringues, a quarter at a time, and fold in quickly but carefully.
    IMG_2001
  6. Equally carefully transfer the batter into a piping bag and pipe into the muffin cases. Level the top of the muffins with the back of a spoon.
    IMG_2003
  7. Bake for about 20 minutes, check for readiness with a toothpick, it should come out clean. Take the muffins out of the muffin tin and let cool down on a wire rack. Once completely cooled, they can be decorated into cupcakes.

I did measure the egg whites I had, they were from medium sized eggs and they worked out to a little more than 180 ml, maybe 185 ml, I put them all in.

IMG_2006

In other recipe instructions, it usually says to only fill the muffin cases about three-quarters. My muffin tin takes 12 cases, so I distributed all of the batter because I didn't fancy baking a second muffin tin with just one case in it. This meant that the cases were a little over-filled and I had some concerns about them running over during baking, they certainly ballooned very nicely.

The original recipe said to let the cake cool upside-down so that it doesn't sink back in and I was wondering how I could do this with the much smaller muffins. In the end I just let them stand on the wire rack. They did sink back and went almost level. My thinking was that a larger cake has more soft interior relative to the baked surface, so would be more prone to collapsing.

IMG_2007

I hadn't planned to glaze the muffins, but we had guests in the afternoon and I thought it would be nice to have them glazed. I had some lemon curd in the fridge and I heated it up in a bain marie and spread a dollop on each muffin. Not too pretty, but combined rather well, flavour-wise.

IMG_2010

The muffins were very pale inside, but of course there were no yolks or butter to add colour. The crumb was very fine, I didn't think it would be, I had a feeling I still managed to trap some air bubbles while piping into the muffin cases. They did crack on the surface though, I think just one of the 12 didn't. Perhaps baking at a lower temperature might avoid this, but the risk is that they would end up with thicker crust. They were also very light and fluffy and one could easily think they're less unhealthy than regular muffins, hi, hi. Lundulph had three in a row, "just to make sure" as he said.

So on the whole, this is a fabulous recipe I think and the amounts above are good. What I was a bit surprised about was that the cakes were rather sticky to the touch, once the paper cases were peeled off, I didn't expect that. But the original recipe instructions said not to over-bake or the cake would go chewy and I didn't want that.

There was also a casualty - my sieve broke, which is a bit annoying, it was a good one, but without it's handle, I will need an extra arm to hold it while using it.

IMG_2005

Update 21 September 2014:
To celebrate reaching a milestone at work, I decided to bake these for work. However, I decided to flavour them with orange instead of lemon. So instead of lemon juice, I used ½ tsp of orange extract. Now, the one I got from the shop is based on rape oil, so needs to be added at the end of mixing the meringue. I also used orange curd for the glazing on top.

1 February 2013

Chicken Bourguignon of sorts

The other day Lundulph commented that he fancied Boeuf Bourguignon. However not with beef, but with chicken and not with wine, but with cider. In fact he wanted Delia Smith's recipe in particular, apparently he'd cooked it on a number of occasions when he was at uni.

IMG_1997

Very well, I checked the recipe in the book (Delia Smith's Complete Cookery Course, Classic Edition 2001), decided to add carrots and went shopping for the ingredients.

And yesterday before I started cooking, I also checked the corresponding recipe on the website. There are tiny differences, but nothing extreme.

In addition to using chicken instead of beef, I also decided to only make half the amount for the simple reason that I only had just over 600 g chicken breast.

The trickiest part was finding the dry cider - there were several different brands in the shop, but most of them were medium or medium dry. Some were only listed as "oak aged" and I couldn't work out if they would do or not, but one bottle stated clearly that it was "dry cyder", so I bought it.

Ingredients
4 - 5 portions

630 g chicken breasts
3 - 4 tbsp olive oil
8 - 9 shallots
2 medium carrots
1 clove of garlic
6 rashers of smoked bacon
1 tbsp plain flour
300 g small chestnut mushrooms
250 ml dry cider
salt and pepper
0.5 tsp dried thyme
1 bay leaf
2 dl quinoa

Method

  1. Pre-heat the oven to 200 degrees C. As I'm using my gyuvetch, I placed in the oven and gradually heated it up.
  2. Remove any fat and sinews from the chicken and cut into small bite-size pieces.
  3. Peel shallots, carrots and garlic and brush the mushrooms clean. Slice the carrots to about 5 mm thickness.
  4. Heat up half of the olive oil and brown the chicken in batches and remove to the gyuvetch as they get ready.Stir now and then.
  5. If needed add a little more olive oil to the pan, then fry the shallots and carrots and also press in the garlic. Stir occasionally.
  6. In the mean time, trim away the fatty rind from the bacon for a healthier option and dice it.
  7. When the shallots have browned here and there and the carrots have softened a little, transfer to the gyuvetch, then sprinkle the flour and stir in well before replacing the gyuvetch in the oven.
  8. Next fry the pieces of bacon and transfer to the gyuvetch.
  9. If needed add a little more olive oil to the pan and fry off the mushrooms. Sprinkle a little salt to encourage release of liquid. When they start to soften, transfer to the gyuvetch, but don't replace in the oven this time.
  10. Pour the cider into the pan to deglaze it and heat up the cider. Stir in salt, pepper, thyme and bay leaf into the gyuvetch, quickly followed by the cider. Give it one more stir, cover and place in the oven to bake.
  11. After about an hour, rinse the quinoa and stir into the gyuvetch, cover and let bake for 30 more minutes.

Unfortunately I got distracted and let the stew continue baking for an hour after I added the quinoa, so not only had all the liquid been soaked up, it had started to burn slightly and overall was a bit on the dry side.

But on the whole it was rather tasty. I'll use pearl barley next time, I think the texture will be better suited to stew.

As accompaniment, I had the remainder of the cider. I didn't like the taste much and as I was putting the bottle into the recycling bin, I noticed that it is 7% alcohol. Oops. But I'm sure it boiled off in the oven. The cider made the stew feel a lot lighter than with wine, so a good combination with chicken.

Now as it ended up a bit on the dry side, I will try to spruce it up a little with some chicken stock for our next meal.

27 January 2013

Festive Sourdough Bread

Since my, Lou and Falbala's success with the festive Bulgarian bread for Christmas, I've been hankering to try out the shaping with my regular sourdough bread.

And it is once again time to feed Luke the Sourdough Starter, so might as well...

IMG_1988

I still haven't got the hang of the proportions for the bread - I always seem to end up with way too much sourdough to begin with and there is just not enough space in the freezer to follow the 1-2-3 recipe. At the last feed, I purposefully reduced the amount of water, so that the starter I saved was a bit stiffer than normal. It seems the benefit of this is that it didn't look as starved as last week, so this may be the way forward.

For the feeding, I had 200 g stiff starter, to which I added 200 g water and 300 g super strong white flour. After stirring it through, I took out 200 g to save for next time and the remainder (595 g) I placed in the biggest jar I have. I put a strip of sticky tape on the side and marked up the level. It was also a little runnier, so I hoped things would happen as fast as at the beginning, but after 3 h there was less than 1 cm rise in the jar.

Not what I'd expected, however worked very well with my overall schedule. 8 h later it had doubled in volume and had started going down again, so I transferred the starter to the bowl of the Kitchen Assistent. I wasn't very good at scraping it out of the jar, as it now weighed 585 g and was like thick batter. So this time the experiment was to tip in half the weight in flour, 292 g.

The machine was not able to cope with this and I ended up kneading it manually. It was also extremely stiff, I ended up adding about 1.5 dl water just to reach some sort of elasticity and gluten development.

I also added 15 g salt towards the end of the kneading. I think I worked on the dough for about 30 minutes at least. Lundulph came into the kitchen at one point to make himself some tea and mumbled about me being violent. I was banging the dough onto the work surface.

In the end it became sufficiently pliable and the gluten developed nicely. So I rolled it into a ball, placed it in a bowl and put the bowl on the window sill to give it extra warmth from the radiator.

2 h later the dough was wrestling with the cling film to get out, so I took it back to the kitchen and divided it into 8 pieces. The whole dough weighed now 940 g, so each piece was about 117 g.

Just as before, I rolled out each piece, trying to keep the flour dusting to a minimum. I brushed each piece with melted butter, I paired the rolled out sheets and rolled them into Swiss rolls and cut them appropriately.

I brushed some butter onto one of my baking sheets and I opened up the cake ring to 25 cm diameter, brushed with butter on the inside and placed on the baking sheet. Then the end pieces of each roll were placed in the middle. So far, so good.

However, when I cut the remaining rolled up dough pieces, I ended up with 6 - 7 triangles from each. Way too many, what to do? Well, create an additional circle between the outer ring of triangle pieces and the middle ring of twirly end pieces.

IMG_1986

At this point it was past 10 o'clock in the evening, so perfect timing for an overnight proofing. And about eleven hours later the dough flower had tripled in size! So I quickly turned on the oven to pre-heat at 200 degrees C, brushed the bread with egg wash and put it to bake.

IMG_1987

I baked the bread for 25 minutes, then I placed a sheet of aluminium foil over it and baked for a further 50 minutes. Then I took it out and let it cool on a wire rack. The result was a super-lovely bread with a wonderfully crunchy crust. So it all worked out very nicely in the end and it had browned even underneath.

IMG_1989

26 January 2013

Uovo in Raviolo

While browsing over the New Year's holidays, I came across an article about a ground-breaking innovation - the uovo in raviolo or the egg yolk ravioli. I'm guessing this is some time ago as Google comes back with a plethora of recipes for this dish. Although I wasn't too impressed with the article itself, the concept seemed far too appealing to ignore.
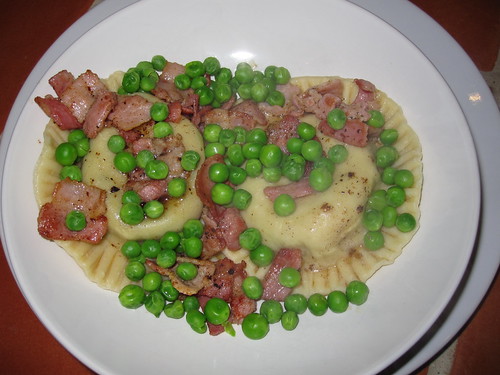
IMG_1985

Thus as it is Friday today and traditionally calls for a nicer dinner to start off the week-end, I decided to give this dish a go.

Reading back in the blog, it's been almost two years since I made ravioli and I'd forgotten that it is quite time consuming to make "free hand".

I read through a few recipes, before working out my own thing - they all called for ricotta and parmesan and that is out of the question in our household. When I mentioned to Lundulph that I would use mascarpone instead, he got a bit upset, as he associates this with tiramisu and desserts in general. I tried to explain that mascarpone is fairly neutral in flavour and can be used for both sweet and savoury dishes, but he didn't agree. Not that this stopped me, I'd already bought it.

Ingredients

Cheese filling
250 g mascarpone
20 g spinach, weight after wilting and thoroughly draining the liquid
1.5 tbsp finely cut chives
1.5 tbsp finely cut parsley
1 tsp dried dill
0.5 tsp salt
0.5 tsp ground black pepper

Pasta dough
250 g pasta flour
3 eggs
1 egg for sealing
2 tbsp water for sealing

Filling 6 egg yolks

Toppings
6 rashers of streaky bacon
3 dl peas
50 g unsalted butter

Method

  1. Starting with the cheese filling, if using fresh spinach, steam for a few minutes to wilt it, chop finely and place in a piece of cheese cloth and squeeze out as much as possible of its liquid. If using frozen spinach, thaw it and squeeze out the liquid with a cheese cloth.
  2. Stir together all the ingredients for the cheese filling, then transfer to a piping bag (but don't cut the tip), tie it up and place in the fridge.
  3. Make the pasta dough by mixing together the pasta flour and 3 eggs. If it's not coming together, crack the egg for the sealing and take a teaspoon or two from the white. Knead for a few minutes until it stops sticking and feels pliable. Cover with cling film and let rest for 15 - 20 minutes.
  4. Add 2 tbsp water to the egg for sealing and stir together.
  5. Heat up a frying pan. Cut the streaky bacon into small pieces and fry it for a few minutes. Remove onto kitchen tissue. Keep the frying pan nearby, but discard some of the bacon fat, if it's too much.
  6. Divide the dough into smaller pieces. Roll out one at a time, while keeping the others wrapped up. Try to use as little additional flour as possible and roll out as thinly as possible.
  7. Take the cheese filling out of the fridge and cut the tip to get a 1 cm diameter hole.
  8. Using a large cookie cutter, 9 - 10 cm diameter, cut out a round near the edge of the rolled out dough. Then pipe a circle of the filling, about 3 cm diameter. Pipe a second circle on top of the first one and a third one on top of the second one. This forms a cup for the egg yolk.
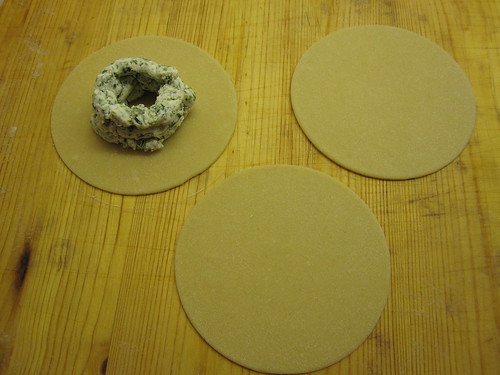
    IMG_1983
  9. Carefully separate a yolk and pour it into the "cup" of cheese filling, taking care not to break the yolk.
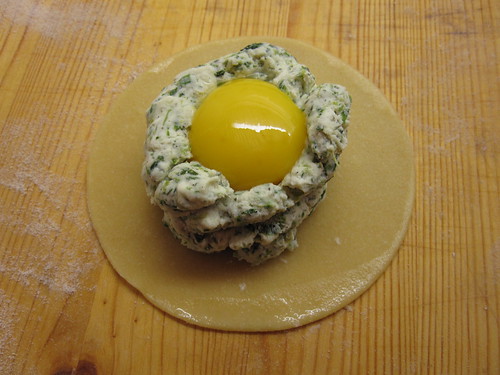
    IMG_1984
  10. Brush the dough outside the cheese "cup" with the egg wash, then using the remaining piece of the rolled out dough, carefully cover the yolk and cheese filling and press down to seal with the bottom layer. Then cut the top layer with the round cutter, matching the edges of the bottom layer.
  11. Repeat with the remaining five yolks.
  12. When the ravioli are ready, fill a large pot with two-thirds water, add a pinch of salt and bring to the boil.
  13. In a smaller pot, steam the peas.
  14. Heat up the frying pan again and add the butter. Let it bubble and go lightly brown, then take off the heat.
  15. Carefully drop two or three ravioli into the large pan with boiling water and cook for no more than 3 minutes.
  16. Take out the ravioli with a slotted spoon and place on the serving plates. Sprinkle some of the bacon and peas over and drizzle a little of the browned butter and serve immediately.

The steps are many and may seem complicated, but there are lots of videos on YouTube on how to make them.

There are a lot of things to do at the last minute, but it was well worth it. Once you cut into the ravioli, the yolk runs out and makes everything wonderfully creamy. The Mascarpone also melted during the cooking, I'm not sure if this would happen if using ricotta and parmesan.

I had a spot of luck with the bacon - the packet I got was very different from the others - the fat layer was missing completely from the rashers, like it had been removed before the bacon was sliced and packaged. This meant that there was no fat to throw away after the bacon had been fried and very little needed to be drained off on the kitchen towel. All the other packets in the shop looked "normal", so I guess it was not intentional, but in the future, it might be worth removing the fatty rind before cooking the bacon.

I had planned to have one raviolo for me and two for Lundulph, but he liked it so much, he had a third one. On the whole, I think this dish would be good as a starter.

I could have continued making the ravioli, I had a couple of eggs to spare, but my arms were a bit tired from re-rolling the pasta dough. I wasn't really sure how the construction of the ravioli would go and ended up with a lot of off cuts. In hindsight, I should have just cut them in strips and set them aside to dry out.

But instead I tried to get some pliability back into the off cuts by adding droplets of the egg wash. It didn't help much and a couple of my ravioli ended up a bit thicker and chewier than intended. The trick is to roll each piece of dough to a rather oblong shape, just wider than the cookie cutter and slightly longer than double the cookie cutter diameter, that should reduce the off cuts substantially. I think.

I also ended up pressing the edges with the tip of a fork, just to be on the safe side, as I made the first cheese "cup" a bit too small for the egg yolk and as I tried to get it to sink in, I punctured it and it ran out. I rescued it though. That's why it's better to do each raviolo one at a time, if something goes wrong, it's less stressful to deal with it, rather than also worry about the other ravioli in progress.

Timing-wise, I started at 4 o'clock and was ready as Lundulph wandered in through the door at quarter to seven. However, I noticed that once the ravioli are assembled, they stay that way quite happily on the side. So they could be done in advance, perhaps up to a day, and kept in the fridge.

The six ravioli used up about two thirds of the pasta dough, so I'm using this opportunity to freeze the remainder and see what happens. I also used about half of the cheese filling and I've wrapped it up air tight in a plastic bag and will need to think of a way to use it up. A further issue is also that I how have 6 egg whites to deal with, along with a lot of the egg wash. Hmmmm...