18 June 2016

Frozen Mojito Cheesecake

Some time ago, my Sister discovered a recipe for frozen mojito cheesecake, which she made with great success among her friends. Recently she made it again, this time using up all the fresh spearmint my Mum had and as thanks,treated my parents to a small version of this cake. My parents did enjoy this very much and my Mum sent me the recipe once more. So as the English part of the family were gathering to celebrate Father's Day this week-end, I decided to make it, since we were going to have a barbecue and I thought an ice cream cake would fit nicely.

IMG_5026

The original recipe is in Swedish and can be found here. Reading through the recipe, the basis for the ice cream was very similar to the very smooth and rich non-churn ice cream I made last year. What also threw me a bit was that after making the ice cream mixture, it was to be poured straight into the springform tin. I had to read the instructions several times, until I realised that the biscuit base goes in at the end, on top of the ice cream mixture - the cake is made upside-down and turned onto a plate before serving.

Ingredients

Makes 10 portions

2 limes with good skin
25 g packet of mint
4 eggs
1.5 dl granulated sugar
200 g cream cheese
4 dl whipping cream
1 dl dulce de leche or caramelised condensed milk
½ dl dark rum or rum essence
200 g plain digestive biscuits
50 g butter

Method

  1. Grate the zest from the two limes and squeeze out the juice.
  2. Wash the mint, tear off the leaves and chop them finely - about 1 dl is required (not tightly packed though).
    IMG_5019
  3. Separate the egg whites and yolks. Place the whites in a large glass bowl, cover and set aside.
  4. Place the yolks in a different large bowl, add the sugar and whisk until pale and fluffy.
  5. At the end whisk in the creak cheese, the lime zest and juice and the chopped mint.
  6. In a third bowl, whip together the cream and the dulce de leche until stiff. Then fold into the egg mixture and follow with the rum or rum essence.
  7. Whisk the egg whites to stiff peaks, then fold into the rest of the mixture until fully incorporated.
    IMG_5020
  8. Pour into a 25 cm springform and smooth the surface so it's level.
  9. Break up the digestive biscuits in a food processor and melt the butter gently.
    IMG_5022
  10. Add the biscuit crumbs to the butter and stir through, then sprinkle over the ice cream, making sure it's level and push down on it gently.
  11. Cut out a circular piece of baking paper and cover the crumbs, then cover the springform with cling film and freeze for at least 8 h.

To be honest, I didn't like this one much. The mint was very overpowering and perhaps using spearmint works better, but it's not something that's easy to get hold of where I live, so I'll need to sow some and try again. Also possibly use more lime zest, although it looked like a lot from 2 limes.

I also wanted to make the cake pretty, so I buttered the bottom of the springform, and fixed large mint leaves in a circle, with the idea that the ice cream would freeze and they'd remain stuck to it.

IMG_5018
Sadly this was not to be, the leaves remained stuck in the butter.

IMG_5023 IMG_5024
My brother-in-law Roger and oldest niece Lou were very good and carefully peeled off each mint leaf and placed them on the cake again. It went quickly of course, even though we'd spent most of the day eating, there's always room for ice cream. But as I said, it didn't quite wow me, though the others said it was nice.

One good thing was that as Lundulph and I were preparing to leave for Roger's place, I caught sight of a new cookery show from Mary Berry, where she was demonstrating her favourite Knickerbocker Glory - which is an ice cream with fruits and the ice cream she made from scratch and it was very much the basic recipe as I've done here - eggs, sugar, whipping cream, so since I have some dulce de leche left, I'll make some ice cream next week, perhaps something with pistachios.

12 June 2016

Rhubarb Muffins with Crunchy Topping

IMG_5013

Well, I finally got round to harvesting the rhubarbs this year. They haven't been too prolific, but then I did harvest them last year, so I should have left them to recover this time, but I really fancied making something with rhubarbs and also wanted to clear out some space in the freezer, where I had two packets of diced frozen rhubarbs as well, not sure from which year. And as the fresh rhubarbs were mostly fairly thin long stalks, I decided to use them for rhubarb muffins. But I wanted to try out a different recipe to the one from Dr Cutie.

And then I remembered that my dear friend Patsy made some fabulous bilberry muffins for a good-bye fika, when I moved back to the UK in 2012. So yummy that I promptly asked her for the recipe and here it is, but with fresh rhubarbs, rather than frozen bilberries. The original recipe is in Swedish here.

Ingredients

20 at 5 cm size
280 g rhubarbs
100 g unsalted butter
2 dl full milk
1 packed tsp lemon zest
2 large eggs
2 dl granulated sugar
1 tsp vanilla essence
4 dl plain flour
2 tsp baking powder
1 pinch salt
3 tbsp potato flour

Topping
75 g cold unsalted butter
1 dl porridge oats
1 dl almond flakes
1 dl plain flour
1 dl granulated sugar
1 tsp ground cinnamon

Method

  1. Trim and wash the rhubarbs, then slice thinly, place in a large bowl and set aside.
  2. Pre-heat the oven to 185 °C and line up 20 paper muffin cases.
  3. Place the butter in a saucepan and melt on low medium heat.
  4. When it's completely melted, add the milk and the lemon zest and stir through. When it's at finger warmth, remove from the heat.
  5. In a bowl, whisk together the eggs, sugar and vanilla until light and fluffy.
  6. In another bowl, sift together the flour, baking powder and salt. Make sure the baking powder is well mixed in.
  7. Pour in the warm liquid into the egg-sugar mixture, then follow with the flour mixture and whisk to get a smooth batter.
  8. Sprinkle the potato flour over the rhubarbs and stir to get them all coated, then stir into the batter.
  9. Distribute the mixture into the muffin cases, filling to about two-thirds.
  10. Make the topping by dicing the cold butter into a bowl, adding the other ingredients and pinching together with your fingers to make crumbs. Distribute between the muffin cases, carefully, as a lot of crumbs will go between them, rather than on top.
  11. Bake each muffin tin/tray for 30 minutes, test with a toothpick, it should come out dry.
  12. Transfer to a wire rack and leave to cool completely, then store in an airtight container, but preferably eat on the same day.

The original recipe states that the amounts are for "6 portions", but this doesn't necessarily mean 6 muffins, although that was my original assumption. I started with 12 muffin cases and had to add 8 more and a second muffin tin. And like never before, they rose perfectly without busting like volcanoes or spilling over the edges and they didn't sink back when they came out of the oven, so finally success.

IMG_5007 IMG_5008
IMG_5009 IMG_5010

And boy, were they tasty! Lundulph didn't even wait until they had cooled down and ended up having to scrape crumbs off the paper case. Once they'd cooled down, they were easier to peel. But as per usual, he wants me to inject a blob of custard in the middle. I did think of that, but I'd planned things badly and couldn't try out my idea about this custard-in-the-middle concept.

As to the frozen rhubarbs, I made jam once more, my old recipe. But as the fresh rhubarbs were a bit on the depleted side, I used the thinner stalks for the muffins, as they seemed less fibrous and the thicker stalks went into the jam along with the ones from the freezer. Lundulph asked when we could start eating the jam, but he'll have to finish the jams he has on the go first. I'll save a jar for my Sister Bip, she really liked it with cheese.

5 June 2016

Green Masala

IMG_5004

A couple of weeks ago, there was a fête in a nearby village. We've been going to it for many years, it's a nice walk across the fields, even on rainy Spring days. This time it was a very warm and sunny day and we'd also decided to do a longer walk before the fête started at lunchtime. After the really nice walk in an area we didn't think existed, we went straight for the book stall and there I found a small treasure - The World Encyclopedia of Spices. It's not exhaustive in any way and I've used most of the spices described in there, but the book has some good tips on how to determine the quality of different spices. The book also has a lot of recipes for different spice mixtures and pastes, which is the really interesting part of the book. What really caught my eye was a recipe for green masala. This is not a dry spice mixture, but a paste and looks very much like pesto, but smells and tastes quite differently. Lundulph is sold on it and has suggested we move into industrial production and sell it.

A key point to note is that this requires a little bit of planning, as there's pre-soaking and resting/cooling time required before it's ready for use. A spice mill or a clean coffee grinder is needed as well, for best results.

Ingredients

Makes about 400 ml
1 tsp fenugreek seeds
10 green cardamom pods
6 cloves
2 tsp ground turmeric
2 tsp salt
4 cloves of garlic
5 cm piece of fresh root ginger
50 g fresh mint leaves
50 g fresh coriander leaves
1 small green pepper
50 ml cider vinegar
60 ml grapeseed or sunflower oil
60 ml sesame oil, preferably not toasted

Method

  1. Soak the fenugreek seeds in some water overnight.
  2. The next day, bruise the cardamom and dry-fry in a thick-bottomed pan together with the cloves, stirring constantly, until their aroma develops. Then grind these finely and add the turmeric and salt and set aside.
  3. Peel the garlic and ginger and cut into chunks.
  4. Wash and cut the mint and coriander. Wash, cut and de-seed the pepper.
  5. Drain the fenugreek seeds and place in a food processor, along with the garlic, ginger, mint, coriander, pepper and vinegar. Blend until a smooth purée forms, then stir in the ground spice mixture.
  6. Mix together the grapeseed/sunflower oil and the sesame oil and heat it in a pan. Add the green paste, stir through to combine and cook for a few minutes. Remove from the heat and allow to cool completely.
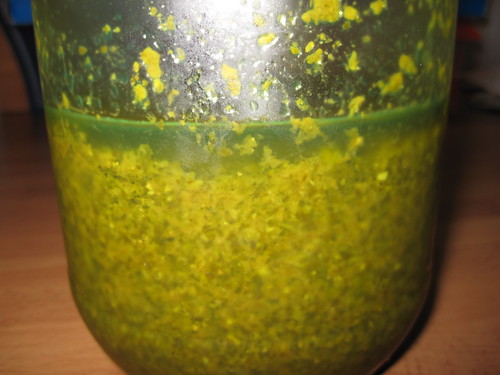
  7. Transfer to a clean glass jar, level the top with the back of a spoon and if necessary top up with a little grapeseed/sunflower oil to ensure there is a thin layer of it covering the top surface to preserve the colour and freshness. Close tightly and store in the fridge.

I recommend once it's in the fridge, it's left for a further night to allow the flavours to develop even further. A key point is the keeping of a layer of fat on the surface - after each use, I've topped up with a little grapeseed oil, to make sure the paste is kept sealed.

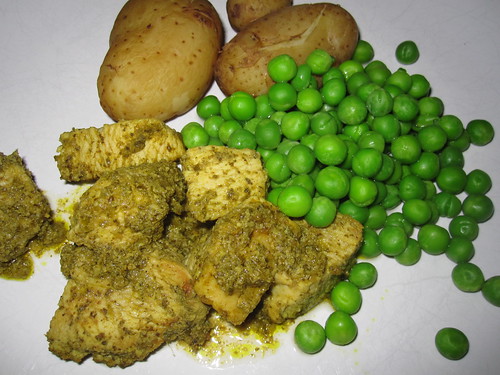
Now this can be used as a marinade - I used about 100 ml for 600 g chicken breasts, which had been cut into bite-sized chunks and I coated them with the green masala and left overnight in the fridge. I fried the chicken in a little toasted sesame oil and served with steamed Jersey Royal potatoes and some green peas.

Last week we had intended to barbecue and I wanted to try this out on another batch of marinated chicken. Sadly it rained the whole day, so I ended up frying it again, but this time we had it with Lebanese flat bread and hummus, also very tasty.

My plan for the remaining paste is to try it on salmon, before baking as usual in aluminium foil. Then I'll have to make another batch, probably a double one and freeze in ice cube trays as the other recommendation for this paste was to add a tablespoon or two to a regular curry, especially if it has coconut milk in it.

Lundulph also requested that I modify the recipe so that it can be used as a dip as well. I'll have to think about that, as it's very strongly flavoured in its "raw" form. The other thing Lundulph was speculating about was whether dramatic changes can be made to a traditional pesto recipe, so as to get the same texture and colour, but completely cut out the parmesan cheese. Another one to think about.

IMG_5006 IMG_5005