27 January 2013

Festive Sourdough Bread

Since my, Lou and Falbala's success with the festive Bulgarian bread for Christmas, I've been hankering to try out the shaping with my regular sourdough bread.

And it is once again time to feed Luke the Sourdough Starter, so might as well...

IMG_1988

I still haven't got the hang of the proportions for the bread - I always seem to end up with way too much sourdough to begin with and there is just not enough space in the freezer to follow the 1-2-3 recipe. At the last feed, I purposefully reduced the amount of water, so that the starter I saved was a bit stiffer than normal. It seems the benefit of this is that it didn't look as starved as last week, so this may be the way forward.

For the feeding, I had 200 g stiff starter, to which I added 200 g water and 300 g super strong white flour. After stirring it through, I took out 200 g to save for next time and the remainder (595 g) I placed in the biggest jar I have. I put a strip of sticky tape on the side and marked up the level. It was also a little runnier, so I hoped things would happen as fast as at the beginning, but after 3 h there was less than 1 cm rise in the jar.

Not what I'd expected, however worked very well with my overall schedule. 8 h later it had doubled in volume and had started going down again, so I transferred the starter to the bowl of the Kitchen Assistent. I wasn't very good at scraping it out of the jar, as it now weighed 585 g and was like thick batter. So this time the experiment was to tip in half the weight in flour, 292 g.

The machine was not able to cope with this and I ended up kneading it manually. It was also extremely stiff, I ended up adding about 1.5 dl water just to reach some sort of elasticity and gluten development.

I also added 15 g salt towards the end of the kneading. I think I worked on the dough for about 30 minutes at least. Lundulph came into the kitchen at one point to make himself some tea and mumbled about me being violent. I was banging the dough onto the work surface.

In the end it became sufficiently pliable and the gluten developed nicely. So I rolled it into a ball, placed it in a bowl and put the bowl on the window sill to give it extra warmth from the radiator.

2 h later the dough was wrestling with the cling film to get out, so I took it back to the kitchen and divided it into 8 pieces. The whole dough weighed now 940 g, so each piece was about 117 g.

Just as before, I rolled out each piece, trying to keep the flour dusting to a minimum. I brushed each piece with melted butter, I paired the rolled out sheets and rolled them into Swiss rolls and cut them appropriately.

I brushed some butter onto one of my baking sheets and I opened up the cake ring to 25 cm diameter, brushed with butter on the inside and placed on the baking sheet. Then the end pieces of each roll were placed in the middle. So far, so good.

However, when I cut the remaining rolled up dough pieces, I ended up with 6 - 7 triangles from each. Way too many, what to do? Well, create an additional circle between the outer ring of triangle pieces and the middle ring of twirly end pieces.

IMG_1986

At this point it was past 10 o'clock in the evening, so perfect timing for an overnight proofing. And about eleven hours later the dough flower had tripled in size! So I quickly turned on the oven to pre-heat at 200 degrees C, brushed the bread with egg wash and put it to bake.

IMG_1987

I baked the bread for 25 minutes, then I placed a sheet of aluminium foil over it and baked for a further 50 minutes. Then I took it out and let it cool on a wire rack. The result was a super-lovely bread with a wonderfully crunchy crust. So it all worked out very nicely in the end and it had browned even underneath.
IMG_1989

26 January 2013

Uovo in Raviolo

While browsing over the New Year's holidays, I came across an article about a ground-breaking innovation - the uovo in raviolo or the egg yolk ravioli. I'm guessing this is some time ago as Google comes back with a plethora of recipes for this dish. Although I wasn't too impressed with the article itself, the concept seemed far too appealing to ignore.

IMG_1985

Thus as it is Friday today and traditionally calls for a nicer dinner to start off the week-end, I decided to give this dish a go.

Reading back in the blog, it's been almost two years since I made ravioli and I'd forgotten that it is quite time consuming to make "free hand".

I read through a few recipes, before working out my own thing - they all called for ricotta and parmesan and that is out of the question in our household. When I mentioned to Lundulph that I would use mascarpone instead, he got a bit upset, as he associates this with tiramisu and desserts in general. I tried to explain that mascarpone is fairly neutral in flavour and can be used for both sweet and savoury dishes, but he didn't agree. Not that this stopped me, I'd already bought it.

Ingredients

Cheese filling
250 g mascarpone
20 g spinach, weight after wilting and thoroughly draining the liquid
1.5 tbsp finely cut chives
1.5 tbsp finely cut parsley
1 tsp dried dill
0.5 tsp salt
0.5 tsp ground black pepper

Pasta dough
250 g pasta flour
3 eggs
1 egg for sealing
2 tbsp water for sealing

Filling 6 egg yolks

Toppings
6 rashers of streaky bacon
3 dl peas
50 g unsalted butter

Method

  1. Starting with the cheese filling, if using fresh spinach, steam for a few minutes to wilt it, chop finely and place in a piece of cheese cloth and squeeze out as much as possible of its liquid. If using frozen spinach, thaw it and squeeze out the liquid with a cheese cloth.
  2. Stir together all the ingredients for the cheese filling, then transfer to a piping bag (but don't cut the tip), tie it up and place in the fridge.
  3. Make the pasta dough by mixing together the pasta flour and 3 eggs. If it's not coming together, crack the egg for the sealing and take a teaspoon or two from the white. Knead for a few minutes until it stops sticking and feels pliable. Cover with cling film and let rest for 15 - 20 minutes.
  4. Add 2 tbsp water to the egg for sealing and stir together.
  5. Heat up a frying pan. Cut the streaky bacon into small pieces and fry it for a few minutes. Remove onto kitchen tissue. Keep the frying pan nearby, but discard some of the bacon fat, if it's too much.
  6. Divide the dough into smaller pieces. Roll out one at a time, while keeping the others wrapped up. Try to use as little additional flour as possible and roll out as thinly as possible.
  7. Take the cheese filling out of the fridge and cut the tip to get a 1 cm diameter hole.
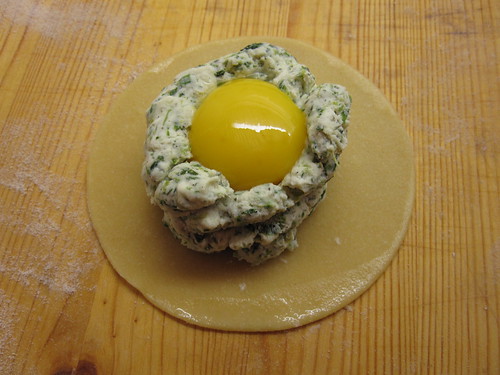
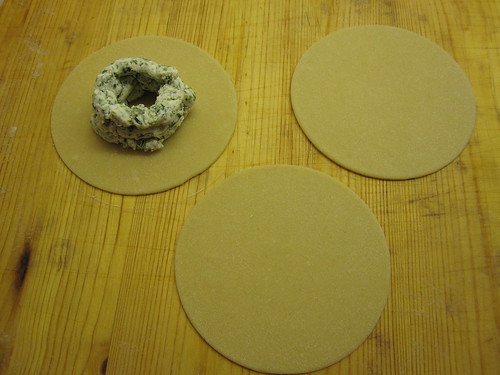
  8. Using a large cookie cutter, 9 - 10 cm diameter, cut out a round near the edge of the rolled out dough. Then pipe a circle of the filling, about 3 cm diameter. Pipe a second circle on top of the first one and a third one on top of the second one. This forms a cup for the egg yolk.
    IMG_1983
  9. Carefully separate a yolk and pour it into the "cup" of cheese filling, taking care not to break the yolk.
    IMG_1984
  10. Brush the dough outside the cheese "cup" with the egg wash, then using the remaining piece of the rolled out dough, carefully cover the yolk and cheese filling and press down to seal with the bottom layer. Then cut the top layer with the round cutter, matching the edges of the bottom layer.
  11. Repeat with the remaining five yolks.
  12. When the ravioli are ready, fill a large pot with two-thirds water, add a pinch of salt and bring to the boil.
  13. In a smaller pot, steam the peas.
  14. Heat up the frying pan again and add the butter. Let it bubble and go lightly brown, then take off the heat.
  15. Carefully drop two or three ravioli into the large pan with boiling water and cook for no more than 3 minutes.
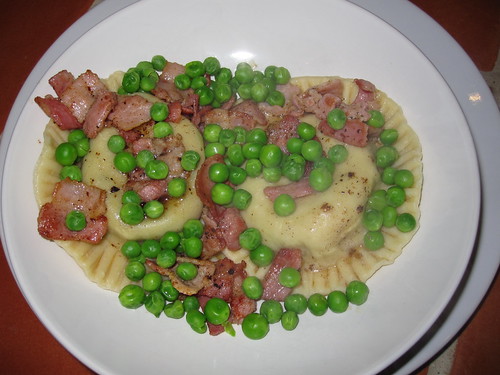
  16. Take out the ravioli with a slotted spoon and place on the serving plates. Sprinkle some of the bacon and peas over and drizzle a little of the browned butter and serve immediately.

The steps are many and may seem complicated, but there are lots of videos on YouTube on how to make them.

There are a lot of things to do at the last minute, but it was well worth it. Once you cut into the ravioli, the yolk runs out and makes everything wonderfully creamy. The Mascarpone also melted during the cooking, I'm not sure if this would happen if using ricotta and parmesan.

I had a spot of luck with the bacon - the packet I got was very different from the others - the fat layer was missing completely from the rashers, like it had been removed before the bacon was sliced and packaged. This meant that there was no fat to throw away after the bacon had been fried and very little needed to be drained off on the kitchen towel. All the other packets in the shop looked "normal", so I guess it was not intentional, but in the future, it might be worth removing the fatty rind before cooking the bacon.

I had planned to have one raviolo for me and two for Lundulph, but he liked it so much, he had a third one. On the whole, I think this dish would be good as a starter.

I could have continued making the ravioli, I had a couple of eggs to spare, but my arms were a bit tired from re-rolling the pasta dough. I wasn't really sure how the construction of the ravioli would go and ended up with a lot of off cuts. In hindsight, I should have just cut them in strips and set them aside to dry out.

But instead I tried to get some pliability back into the off cuts by adding droplets of the egg wash. It didn't help much and a couple of my ravioli ended up a bit thicker and chewier than intended. The trick is to roll each piece of dough to a rather oblong shape, just wider than the cookie cutter and slightly longer than double the cookie cutter diameter, that should reduce the off cuts substantially. I think.

I also ended up pressing the edges with the tip of a fork, just to be on the safe side, as I made the first cheese "cup" a bit too small for the egg yolk and as I tried to get it to sink in, I punctured it and it ran out. I rescued it though. That's why it's better to do each raviolo one at a time, if something goes wrong, it's less stressful to deal with it, rather than also worry about the other ravioli in progress.

Timing-wise, I started at 4 o'clock and was ready as Lundulph wandered in through the door at quarter to seven. However, I noticed that once the ravioli are assembled, they stay that way quite happily on the side. So they could be done in advance, perhaps up to a day, and kept in the fridge.

The six ravioli used up about two thirds of the pasta dough, so I'm using this opportunity to freeze the remainder and see what happens. I also used about half of the cheese filling and I've wrapped it up air tight in a plastic bag and will need to think of a way to use it up. A further issue is also that I how have 6 egg whites to deal with, along with a lot of the egg wash. Hmmmm...

24 January 2013

Den Store Bagedyst

A few days back, I stumbled across the Danish version of The Great British Bake Off and thanks to the generosity of the Danish Radio, the episodes are still available in their entirety and I've been working my way through them. Denmark has one massive baking tradition to dip in, so watching the shows was very inspirational and I've saved most of the recipes, even though I probably won't get round to actually trying them out.

IMG_1981

But I decided to start with what was called Nougatsnitter from week 3, when they made cookies, macaroons and small strawberry tarts. In the competition, they asked for 15 cookies, from the amounts below I got 58 pieces.

Ingredients
Vanilla dough
200 g plain flour
100 g caster sugar
0.25 tsp baker's ammonia
140 g unsalted butter at room temperature
2 tsp vanilla extract
0.5 egg

Cocoa dough
190 g plain flour
20 g cocoa powder
100 g caster sugar
0.25 tsp baker's ammonia
30 g finely chopped roasted hazelnuts
140 g unsalted butter at room temperature
0.5 egg
1 tsp water (if needed)

Nougat cream
250 g Danish soft nougat
zest from half an orange
zest from half a lemon

Decoration
whole blanched hazelnuts, one per biscuit
melted white chocolate to glue them on

Method

  1. For each of the two doughs, first mix together the dry ingredients.
  2. Then work in the butter to form fine crumbs.
  3. Finally add the liquid ingredients and stir in to form the doughs, but careful not to over-work. It may be better to use a food processor for this.
  4. Roll out each dough to long sticks of about 1.5 cm diameter. Then put the sticks together - one vanilla and one cocoa and gently press together.
  5. Wrap the pairs in cling film and chill in the fridge for at least 30 minutes.
  6. In the mean time, grate the nougat coarsely, add the zests and stir in well into a cream, then cover with cling film and set aside.
    IMG_1976
  7. Pre-heat the oven to 200 degrees C and line some baking sheets with baking paper.
  8. Take out the "double-sticks" from the fridge and put together so quadruples form and the vanilla and cocoa doughs alternate.
    IMG_1978
  9. Now cut out biscuits, about 5 mm thick and place on the baking sheets, making sure they have some 3 cm space between them.
  10. Bake for 8 - 10 minutes, keeping an eye on them, so the vanilla parts don't go brown.
  11. After baking, transfer the biscuits to a cooling rack and allow to cool down completely.
  12. Pair up the biscuits, then place the nougat cream in a piping bag with a smallish nozzle.
  13. Pipe a little cream in the middle of one biscuit and carefully press a second biscuit on top of the cream.
    IMG_1979
  14. Melt the white chocolate, dip the bottom of the whole hazelnuts and stick one in the middle of each top biscuit.

I've made some alterations to the original recipe. I did try to stick to the original when I made the biscuits today, but they weren't quite right for my and Lundulph's tastes.

The bake-off called for 15 biscuits, the above recipe resulted in 58. I increased the nougat cream, as the original was only enough for 51 of the biscuits.

And when I make these again, I need to get two rectangular wooden pieces of 1.5 cm thickness to use as guide when I make the initial dough sticks. It would work better if placing dough between the sticks and use a rolling pin with the guides. That would give me rectangular sticks and the final baked shape should be better and have a clearer chequered effect.

I was concerned about getting a cream out of the nougat, which is generally solid, but once I'd grated it and stirred in the zest, it turned out quite nice. But care must be taken with the zest, it can very easily over-power the hazelnut flavour and vanilla.

Lundulph's comment was that he would prefer the biscuits chewier, however these are not that type of biscuit. Also he wasn't too keen on the whole hazelnut on top, he didn't feel it added anything other than make it look pretty.

19 January 2013

Experimenting with Hummus

Yesterday finally we could try out our new woodburning stove for the very first time, so I thought we could have a nice cosy evening with dips.

But it has to be healthy, said Lundulph.

So I suggested I make some hummus and some guacamole and we dip vegetables and bread in them. Unfortunately I forgot to write down what veggies to buy and so completely forgot about them - so we only had cucumber and cauliflower to dip. Carrot and pepper would have been nice too, though.

IMG_1960

Thus, on Thursday, I started making a new batch of bread.

Ingredients
963 g starter that has been fed and has grown for 4 h
30 g coarse oat bran
105 g wholemeal flour
300 g super strong white flour
200 g water
25 g salt
olive oil for greasing the baking tin

Method

  1. Mix together all ingredients except the salt and work to develop gluten and get an elastic dough.
  2. Towards the end, add the salt carefully and incorporate well.
  3. Cover the bowl with cling film and let rise until double in size.
  4. Grease a roasting tin (21 x 31 cm) with olive oil.
  5. Cut up the dough into 20 equal pieces, shape into balls and place in the roasting tin.
  6. Brush with more olive oil, cover with cling film and let proof for 15 h.
  7. Bake at 200 degrees C for 1 h. Cover with aluminium foil 25 minutes into the baking, so they don't burn.
  8. Remove from the oven and the roasting tin onto a cooling rack.

The dough was a bit stiffer than I had intended, but the long proofing did wonders and it baked very nicely - I quite fancied a bread that can easily be broken up into pieces.

After the bread was done, I made the hummus, so that it would have some resting time in the fridge and allow the flavours to develop. The recipe is my original one, but with adjustments.

Ingredients
2 cans of chick peas (400 g each)
120 ml of the liquid
2 cloves of garlic
2 tbsp tahini paste
3 tbsp olive oil
2 tbsp lemon juice
salt and pepper to taste

Method

Put everything in a blender and process until smooth. Don't use too much salt if the hummus will be used as a dip for crisps or tortilla chips.

I divided up the hummous in two equal parts and added 2 tsp sweet paprika and 1 tsp cajun pepper to one of them. This made it go a bit orange and gave it a very nice heat kick. The paprika was a bit too subtle, so I will try harissa next time.

The remaining half was divided into four smaller parts (about 0.75 dl each):

IMG_1961

Part 1 got 1 tsp ground cumin powder. This was a bit too much, but on the whole was OK. Worked better with the bread, than the vegetables.

Part 2 got 0.5 tsp Dijon mustard. This I really liked, it was very toned down, but came through very well with cucumber and cauliflower. Lundulph doesn't like mustard, so I got to keep almost all of it.

Part 3 got 1 tsp Veeraswamy Gujarat Masala paste. This was rather interesting - this hummus on its own was way too sweet tasting, but combined with cucumber, it resulted in an amazing flavour sensation. Not nice with the bread at all.

Part 4 got 1 tsp of Branston original pickle. Now I think Lundulph was most surprised about this one - but even on its own, the hummus tasted very nice and with bread, it was super. The chick peas worked to neutralise the sweetness and acidity of the pickle a little and it just worked perfectly together.

Thus we stayed up to way past midnight and Lundulph put away most of the bread and we were both quite stuffed. This will definitely be worth repeating, with a greater selection of vegetables to dip and larger amounts of the lovely hummus.

I did also make guacamole, but it didn't really stand a chance next to the hummuses.

Real Mushroom Risotto

One of the lovely pressies I got for Christmas is a new cookbook called Polpo. It is an oddly bound large book with lots of very lovely photos of Italian dishes. There are lots that I intend to try out. Today I decided I would make a risotto and one that caught my fancy is risi e bisi, which is risotto with fresh green peas and mint.

IMG_1959

So I went shopping. And as the weather forecast predicts snow, the supermarkets were more crammed with people than Christmas time - everyone was stocking up, like we'll be snowed in for months on end. That never really crossed my mind, there's always enough food in the larder and freezer to last us at least a week. So gathering together everything on my shopping list took quite a bit longer. And I had to drive around one of the car parks four times before I found a spot to park, just so I could get some frozen peas.

Now the recipe was very clear that frozen peas shouldn't be used, but freshly picked ones and in the shell too. Non-negotiable the book said. Well, not in January. This would be the compromise.

But when I got home, I kind of fancied something with mushrooms and thought I'd just add some to the recipe. But thinking further, the combination peas, mint and mushrooms just didn't quite ring right and in the end, I decided to skip the peas and the whole risi e bisi recipe and make up my own one.

Ingredients
6 portions

1 largish onion
50 ml olive oil
30 g unsalted butter
salt
400 g carnaroli rice
freshly milled black pepper
1 l water
3 cubes of chicken stock
600 ml mushroom stock
1 can of sliced button mushrooms
1 dl parboiled girolles
200 ml water
1 tbsp olive oil infused with white truffle

Method

  1. Peel and dice thee onion. Heat up the olive oil and butter in a large deep saucepan until it starts bubbling.
  2. Add the onion and sprinkle a little salt over it, stir round to get it coated in the oil, then turn down the heat so that it just about bubbles. It will seem like too much oil for the onion, but this is OK. Let it fry gently for about 10 minutes until it goes translucent.
  3. In the mean time, boil 1 l water and stir in 3 chicken stock cubes.
  4. Place the chicken stock in a saucepan and add the mushroom stock, then place on very low heat to keep it hot, but not boiling.
  5. When the onion is ready, add the rice and stir it in for a couple of minutes to get it well coated with the oil. Mill some black pepper over the rice and stir in.
    IMG_1958
  6. Using a large ladle, add one at a time to the rice and keep stirring it around until all the liquid has been taken up before pouring in the next ladle-full.
  7. About two-thirds into adding the stock, stir in the mushrooms.
  8. Once all the stock has been added, taste the rice, if it still has crunch to it, add a ladle or two of water. Adjust the seasoning, if needed.
  9. The risotto should be served straight away. Drizzle the olive oil infused with white truffle and stir it in.

First a word of warning, the trick is in the constant slow stirring of the rice and adding the stock a little at a time. This took me about 30 minutes, which is tiring, so make sure not to do other heavy work with your arms before starting with this dish. As it happened today, I had quite a few bags to carry home. I then spent an hour and a half pulling nails and screws out of some planks in preparation for burning them in our new woodburning stove. And I'd also made a batch of bread, since Luke, my new sourdough starter, was getting hungry. Thus my arms were pretty tired to begin with and I felt it towards the end of the risotto cooking.

A quick search among all my blog entries, I spotted that I've already done a "mushroom risotto", but skimming through it quickly, I've basically made rice with mushrooms, it's quite obvious from the photo even that there was no creaminess involved. Bah, such cheating! I am ashamed of myself!

As to the mushroom stock - this was the liquid from 5 cans of mushrooms. I always save the mushroom stock and freeze it. I had 4 frozen ones and I added the one from the can I needed for the mushrooms. Mind you, this is the only liquid from canned food that I save.

Of course it may not be possible to get hold of girolles everywhere and in this particular case I think shiitake mushrooms would work nicely instead. Just make sure to parboil them first to get rid of all the water they contain.

We had this lovely risotto for dinner together with hot smoked salmon and it was absolutely delicious.

15 January 2013

Quinoa tasting

Last year, Lundulph and I tried quinoa for the very first time in our lives and liked it and have slowly started taking it into our hearts.

According to Wikipedia, the colour depends on the cultivar in question and we were wondering if there is any difference in flavour.

IMG_1944

Our local supermarkets only carry white or mixed quinoa, but luckily Lundulph makes regular trips to central London and was able to get hold of a packet of red quinoa.

So when I made Thai Red Curry yesterday, I decided to do a taste test of the two quinoas.

The white quinoa is a little bigger and was significantly bigger after boiling, otherwise the cooking instructions were the same for both - rinse, then boil for 10 minutes in double the volume of liquid.

We came to the conclusion that the white quinoa is softer and more floury tasting. The red quinoa is crunchier and had a more nutty flavour.

Looking at the saucepans in which I cooked the quinoas, the one from the red quinoa was easier to clean, the red quinoa was barely sticky, whereas the white quinoa behaved very much like sticky rice.

In Sweden I found there is also black quinoa, sadly I couldn't buy it to take home, as it came in a 5 kg packet. Maybe next time.

So the next step is to see if our local farm shop sells red quinoa and maybe even black quinoa.

And by the way, apparently 2013 is the International Year of Quinoa.

12 January 2013

Back to the regular schedule...

And so the holidays are now finally over. Lundulph and I both felt that we have been over-indulging on food and drink wise in the past weeks, so Lundulph put his foot down and decided that we need to get back on a healthy diet now.

IMG_1941

So to celebrate that we're back home after a lovely long holiday in Sweden, I decided to steam tuna. I did this once before, but I have vague memories of the fish being a bit on the bland side.

My theory is that if I reduce the amount of fat in my cooking, I need to use a lot more herbs and spices so as to compensate and still make things taste nice.

In addition, Lundulph has also requested that we avoid red meat as much as possible.

This time, I think I got it right.

Ingredients

2 dl sushi rice
3 dl water

Marinade
2 tbsp ginger paste
1 small clove of garlic
1 stalk lemon grass
2 tbsp soy sauce
3 tbsp fresh dill
2 fresh kaffir lime leaves

3 tuna steaks (about 130 g each)

Woked vegetables
2 handfuls cauliflower
2 handfuls broccoli
2 medium sized carrots
250 g chestnut mushrooms
225 g can of bamboo shoots
1 dl frozen peas
3 tbsp toasted sesame oil
2 tbsp soy sauce
1 tsp Thai seven spice (dry mixture)

Method

  1. Rinse the rice and place in a small saucepan, cover with the water and let soak for 30 minutes.
  2. Place the ginger paste in a small bowl. Peel and press in the garlic. Using a rolling pin, crush the lemon grass, then cut it in 1 cm pieces and add to the bowl. Pour in the soy sauce. Wash the dill and kaffir lime leaves, then cut finely and add to the bowl. Mix together the marinade.
  3. Then using a little of it, spread on one side of a tuna steak, place the steak in a small plastic bag with the coated side down. Spread more marinade on top of it and place the next steak over it. Repeat with the third steak, squeeze out as much of the air out and tie the bag securely, then rub in the marinade and set aside until it's time to cook.
  4. Wash the cauliflower and broccoli, then cut into small florets - about the size of a small bite.
  5. Wash and peel the carrots, then cut into julienne sticks. Peel and slice the mushrooms into 2 - 3 mm thickness. Drain the bamboo shoots.
  6. Prepare a large deepish and lidded saucepan with a steam inset. If it is a metal one, place two layers of cheese cloth on it to prevent the tuna from sticking.
  7. By now, the 30 minutes of soaking should be over, so cover the rice pan and put on medium heat and bring to the boil. Once boiling, turn down the heat a little and let cook for 10 minutes.
  8. At the same time bring the water for steaming to the boil
  9. Heat up the sesame oil in a large wok or frying pan until it bubbles, then add the cauliflower, broccoli and carrots and stir round to get them well coated. Then add the mushrooms and bamboo shoots and frozen peas.
  10. When the steamer is "ready" place the tuna steaks in a single layer on top of the cheese cloth, cover with the lid and let steam. Turn the steaks over if needed.
  11. Keep stirring the vegetables regularly and add the soy sauce and the Thai seven spice mixture. Fry until the vegetables have started to soften, they should be ready around the same time as the rice. The tuna may require a couple of minutes longer.
  12. Serve and eat immediately.

The big excitement was the fresh kaffir lime leaves, I'd not seen these in the supermarket before and have been using my old stash of dried ones, but this opportunity was too good to miss and I also got to smell and taste them - very delicate lemony aroma. And I worried for a short moment that it would be too overwhelming, combined with the lemon grass, but no, it was just fine.

Marinating was also a very good idea, I didn't do this as thoroughly the previous time.

This is also the first time I cook sushi rice. I bought the packet a while ago, to work on my alternative sushi, I think there is potential there, but somehow forgot about it and it had hidden away in a corner of the larder. I followed the cooking instructions on the packet, apart from the drizzling with rice wine at the end. I have rice vinegar, but suspected it could not be used as a replacement. The rice was wonderfully sticky and I used my ice cream scoop for putting on the plates.

And I decided to finally try out my two serving rings - yet another enthusiastic purchase a few years back - and never used. This is quite a gimmick, but I was quite pleased with my plating.

I left the marinade on the tuna while steaming and I told Lundulph to scrape off as much as possible rather than eat it. Not that it is dangerous, but I thought the lemon grass would be fairly fibrous and chewy and the kaffir lime leaves pretty thick too. But he ate them and commented on how lemony things tasted. Perhaps it would have been better to process the whole marinade before applying it to the steaks. I'll try that next time.

As for the frozen peas, I had intended to use edamame beans, but got the wrong packet out from the freezer, so left it at that. And the mushrooms were not my first choice - I wanted shiitake mushrooms, but they didn't look nice in the shops, that's why I opted for chestnut mushrooms.

Lundulph said he would have preferred brown rice instead, but ended up cleaning his plate anyway and so did I.