11 July 2010

Pie success

IMG_0858

Once again I managed to find a piece of hot smoked salmon in the freezer, I swear they are multiplying on their own when the door is closed.

Having had salmon, boiled potatoes and mustard/dill sauce the last x times we've had salmon for dinner, I decided on a last minute pie to create a bit of variation.

Last minute meant that I bought ready shortcrust pastry. I've never used ready made one before and had low expectations, but it turned out quite alright actually.

I rolled it out a bit thicker than normal and blind baked it at 200 degrees C until it had a bit of colour and looked dry. As with my own shortcrust pastry, the sides of the pie dish sank down to the bottom. I've yet to work out how to keep them on.

For the filling, I diced an onion and softened in a little grapeseed oil, stirring until translucent. Then I took the pan off the heat and added about 150 g of chopped spinach (also from the freezer, but thawed). I stirred through and poured in about 3 dl of double cream, salt and pepper. The salmon tends to be quite salty, so not too much salt. I also added a tablespoon of dried dill.

When the filling had cooled down, I stirred in three eggs and an egg white, keeping the yolk separate for glazing.

When the pie crust was ready, I filled the bottom with bits of salmon, about 200 g in all, then poured the spinach mixture over it. As the walls of the pie crust had sunk down, the spinach mix overflowed them. Not super.

I had some shortcrust pastry left over and remembering how hard the pie crust went in my last attempt, I rolled it out thinly and cut into strips for decoration.

I glazed the strips with the whisked up yolk as well as I could. Parts of them sunk into the spinach mixture and I tried not to dip the brush into it.

I baked it for some 35 minutes at 200 degrees C and it turned out rather nice this time. In fact, Lundulph had seconds.

4 July 2010

Grilled Duck Breast

Yesterday our town held a food festival. They've had it for a couple of years now and it's growing bigger and bigger.

IMG_0853

This year for the first time, I actually saw the posters and brochures a few weeks back. In previous years we'd just stumbled across the market. But not this time. We got up in time and walked down to the High Street at 10 am to watch the official opening.

There were loads of stalls, one was selling game, nicely vacuum packed ready to cook. Which gave Lundulph the idea that duck would be rather nice for a Sunday dinner. I wasn't too sure, it wasn't planned and I wasn't sure I'd be able to do anything decent. To play it safe, we bought two duck breasts.

In the evening I briefly searched for recipes and came across one for barbecued duck breasts. It seemed simple enough and I had all the ingredients for the marinade. I showed it to Lundulph and he seemed keen on firing up the barbecue, but I decided against it. Too much effort for just two duck breasts.

Thus this morning, I opened them up and removed the skin and very thick layer of fat.

IMG_0849

On closer inspection, a lot of the "roots" of the feathers were still on the skin, so removing the whole lot made sense to me. Besides, I've only had pan fried duck breast once at a Chinese restaurant in Düsseldorf over a decade ago and I've no memory of what it tasted, just that it was about 50% fat.

Luckily the fat came off quite easily, I'd expected to have to carve it off.

For the marinade, I used the ingredients listed in the recipe I found, but at different proportions, so I'm listing them here.

Ingredients

2 duck breasts, skin and fat removed
1 tbsp Worcestershire sauce
2 tbsp olive oil
0.5 tsp Tabasco sauce
2 cloves of garlic
coarsely ground black pepper

Method
  1. Place the duck breasts in a glass bowl, then add the ingredients for the marinade, pressing the garlic. Turn the meat a few times to get it coated evenly, then put in the fridge for a few hours.

  2. Pre-heat the grill on medium along with the tray where the meat will be cooked. Place the duck breasts under the grill, then keep turning them every minute. This will get them cooked without burning the surface too much. About 6 minutes will be enough to still keep the middle of the meat rosy-pink.


As I mentioned the other day, I had 3 courgette patties left over, they worked quite nicely as greens with the duck breasts, even if they were re-heated in the microwave. For carbs, I steamed some lovely Jersey Royal potatoes. I had no sauce, but frankly that wasn't necessary. The meat was a bit gamey, but very light textured and the marinade was perfect for it. This is definitely one to be repeated.

To accompany this lovely meal, we bought an English white wine from the market.

IMG_0854

Obviously the wine isn't 30 years old, but the vines that the grapes came from were planted 30 years ago.

IMG_0855

The vineyard is located in Sussex and is called Sedlescombe Organic Vineyard. Very drinkable wine, I thought. Lundulph says it was a bit like lightly oaked Chardonnay.

We did actually get to taste it at the market, along with their rosé, which was also very nice.

Cottage Loaf

As today turned into a baking day, I decided to make an English cottage loaf, it's been on my list for a long time.

IMG_0850

From what I understand, it's regular white bread baked in a specific shape. I did a bit of searching on the internet for a recipe with sourdough, but didn't find any, so decided to improvise as usual.

I did find this quite useful post, which had some good tips to help me succeed. Mainly that the dough needs to be fairly stiff, around 60 % hydration.

Having immersed myself into Baker's Percentage, I tried to work out a recipe with 1000 g strong white flour and 600 g water.

Lately I've followed the 1:2:3 recipe for my sourdough breads, meaning 1 part starter to 2 parts water to 3 parts flour and then usually 1 part would be 200 g, I thought that 300 g starter for my cottage loaf would be just right.

Meaning 150 g flour and 150 g water to be reduced from my above planned recipe.

Ingredients.

300 g starter
450 g water
850 g strong white flour

I put these all in my Kitchen Assistent and turned it on to combine the ingredients. I then allowed it to autolyse for 30 minutes, another thing I've been doing lately that has worked well. I then started the machine again and went away for 18 minutes, only to come back to something that had just started turning creamy. That means overworked!!! Some time ago I found a very interesting web site, where someone had made an experiment on this. Up to a point gluten develops, but if you don't stop, it breaks down again and becomes wet and gooey.

I didn't have the heart to just throw it away, but set it aside to see if it would rise. It did and pretty well too.

IMG_0851

Another hot tip from the web site was to have the top part of the cottage loaf be about half the weight of the bottom part. Now I had quite a lot of dough, so I decided to first divide it into two and make two cottage loaves.

Then I shaped two large and two small balls and let proof for about 45 minutes, then placed the larger balls onto baking dishes lined with baking parchment and sprinkled with flour. On top of each, I placed the smaller balls. I then pushed my thumb down in the middle of each loaf, all the way down to the bottom in order to get the two parts to hold together. I allowed a second proofing of some 30 minutes, while waiting for my sourdough cinnamon buns to finish baking.

IMG_0852

I brushed one of the loaves with the leftover egg wash, then slashed before putting in the oven and baking at around 200 degrees C for some 40 - 45 minutes.

Some time after I took them out of the oven, I realised that I'd forgotten to add salt. That might have made some difference to the dough coming together, must remember next time.

I guess they look OK for a first attempt, but some practice is required, as is watching the machine while it kneads the dough, so it doesn't get overworked. As per usual, my slashing didn't quite work, but I discovered that the razor blade had gone dull, which might explain this.

Sourdough Cinnamon Buns

We've finished our massive bread surplus and today I'll bake bread. Still there's way too much of my sourdough starter Monty for comfort, so I also decided to try and make cinnamon buns. I'm writing this entry as I make the buns, but will do an ingredients and method list at the bottom.

I prepared by reading through the great posts about Baker's Percentage from Susan at Wildyeastblog. Then I converted my existing recipe according to the instructions, but since my original measurements are by volume, I wasn't at all sure where I'd end up with. I did find a sort of volume to weight conversion web site.

I made up a table of how much of each ingredient I should use given that I'm using starter instead of yeast. But to be on the safe side, I also measured things up by weight "in reality" after I fed Monty. Poor Monty, he was very hungry, he had about half a cm layer of hooch on the surface. I removed that.

So I fed him 250 g water and 250 g strong white flour and had to split him up into two jars.

Next I weighed up the 1 litre of flour, that was spot on 700 g. I'd decided to use 300 g of starter, which according to the Baker's Percentage calculations would equate to 150 g flour + 150 g water.

Thus, 700 g (the total amount of flour give or take) - 150 g (contributed by Monty) = 550 g (what I'll need to add to make my dough). It was well sticky, so I added another 50 g of flour.

Liquids now. The recipe says 0.5 litre milk. That's about 500 g, but Monty contributes 150 g of that, so I'll only need 350 g.

At this point I took out the butter from the fridge and measured up two pieces of 100 g each. One for the dough, one for the filling. My kitchen is extremely hot these days and this didn't take long, so I prepared the filling: 140 g granulated sugar and 18 g ground cinnamon mixed in with the 100 g soft butter.

Then decided to add some experimentation. A yeast dough needs to develop gluten and fat tends to prevent that. The recipe says to melt the butter and mix into the dough with the milk at the start. This would imply that the dough will need to be worked for longer in order to develop the gluten. So I decided to keep the butter solid and knead it in after gluten has been developed, pretty much like in Brioche. I also had some ground almonds that I wanted to use up, so decided to include them in the filling.

And I remembered to prepare my egg wash early - one egg whisked together with a pinch of salt and set aside. This makes the egg runnier and more bright yellow, on the verge of orange.

Although my starter seemed very vigorous today - doubled in size in just under 3 h, I still needed to let the dough rise for a bit longer than the 40 minutes I've stated in the original recipe. The dough was still very soft and a bit on the sticky side. It weighed in at 1472 g, so I divided it in two, sprinkled a bit of flour on the work surface and the rolling pin and rolled out the dough. I managed to roll it quite thin and struggled to cover all of it with the filling. Then had a terrible time rolling it up, it was well stuck to the surface and I had to carefully scrape it off and roll it up. I ended up with something that looked like a rugged long slug, but I cut it up and placed in the paper cups and pressed down a bit and it took on the expected shape. This time I ended up with 34 buns.

The proofing was just over an hour, again, they swelled up a bit, but perhaps not as much as they might have with yeast. Maybe I should have done two batches simultaneously for comparison.

My oven was playing up again and instead of the 8 - 12 minutes, I ended up baking for quite a lot longer. Bah!

But the result was very good, possibly I need to increase the amount of sugar both in the dough and in the filling, they could be a bit sweeter. And I think I keep saying that every time I make (regular) cinnamon buns and keep forgetting. The ground almonds addition was a good one, though Lundulph said he didn't notice it.

Ingredients

1 egg
pinch of salt

100 g soft unsalted butter
18 g ground cinnamon
150 g granulated sugar
50 g ground almonds (optional)

300 g white sourdough starter at 100% hydration
600 g strong white flour
350 g milk (at room temperature)
150 g caster sugar
2 tbsp cardamom
100 g soft unsalted butter


Method
  1. Whisk the egg lightly with the salt and set aside until needed.

  2. Bring both amounts of butter up to room temperature, then mix one of them with granulated sugar and cinnamon and set aside until needed.

  3. Assuming the starter has been fed and is ready to use, mix it with the flour, milk, caster sugar and cardamom and work until full gluten development.

  4. Add the soft butter and work in well, then set the dough aside to rise until double in size.

  5. Divide the dough into two equal parts, dust the work surface with flour and roll out one part at a time to a rectangular shape and thickness of 5 mm.

  6. Spread half of the cinnamon filling evenly over the rolled out piece, all the way to the edges.

  7. Optionally sprinkle ground almonds over the filling, then roll up along the longer side of the rectangle.

  8. Cut the roll into pieces of 2 - 3 cm width and place in paper cups or on a baking tray lined with greaseproof paper.

  9. Let proof for about an hour until the buns have doubled in size. In the mean time pre-heat the oven to 200 degrees C.

  10. Bake until golden brown, then let cool on a wire rack.


In the listing above, I've adjusted the sugar, hopefully I'll get it right next time.
2 July 2010

Courgette Patties

The other day I stumbled across a Bulgarian cookery web site (Bulgarian only). It is the companion to a cookery show, that I believe I've watched once or twice a few years back.

IMG_0847 cropped

The website is extremely busy with all sorts of things, mostly adverts I think, making it almost impossible to find what you're looking for, but somehow I managed to navigate to the section entitled "Bulgarian cuisine". That had a long list of recipes, both from the TV show and from readers and viewers. So I started looking through it. There were many recipes that were very much not Bulgarian, but had been labelled as such.

One of these (again in Bulgarian only) caught my eye and my mind started working and resulted in today's dinner - courgette patties.

Ingredients

Sauce
500 g strained Greek yoghurt
1 large clove of garlic
salt

10 patties
1 kg courgettes
2 tsp salt
1 large clove of garlic
1 dl chopped parsley
2 tbsp finely cut dill
1 dl finely cut chives
salt and black pepper to taste
2 dl mixture of bread crumbs, sesame seeds, polenta and oat bran
3 medium eggs
grapeseed oil for frying

Method

  1. Place the yoghurt into a bowl, press in the garlic and add salt to taste, then stir in well to make it smooth. Place in the fridge until it's time for serving.
  2. Trim the courgettes and wash well, then grate finely. Mix with the salt, then place in two layers of cheese cloth over a sieve and leave for at least 15 minutes to drain off the water.
    IMG_0844
  3. In the mean time press the garlic into a big bowl, chop the herbs and stir in, along with the black pepper and the breadcrumb mixture.
  4. Try to squeeze out as much of the liquid from the courgettes as possible, then add to the herb mixture and stir in well.
  5. Stir in the eggs into the mixture so that it just about sticks together. Also add a bit more salt, as the courgettes tend to be on the sweet side.
  6. In a large non-stick frying pan, pour grapeseed oil to depth of about 1 cm and heat up on medium.
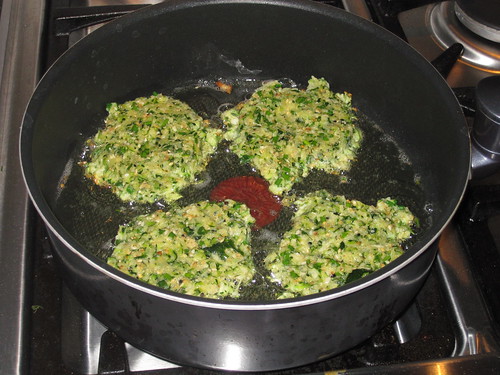
  7. With a large spoon or an ice cream scoop place some of the mixture in the pan, then flatten with a turning utensil. Fry until the patties are golden brown, about 2 minutes on each side.
    IMG_0846
  8. Serve immediately with the garlic yoghurt.

I didn't add enough salt and the patties were a bit bland, so must remember to sort it out next time. These patties are quite filling, Lundulph had four and I had three. This left three more to nibble on tomorrow.

I did ask Lundulph for help in squeezing out liquid from the courgettes and that made a huge difference I think. Some sort of small press would come in handy if there's no strong-fingered husband nearby.

The original recipe called for breadcrumbs, but it turned out I had very little left, so I added some sesame seeds, polenta and oat bran from my collection of things to sprinkle on my breads. The sesame seeds were very good and I think I might fry the patties in toasted sesame oil next time, for a more exotic touch.

IMG_0845

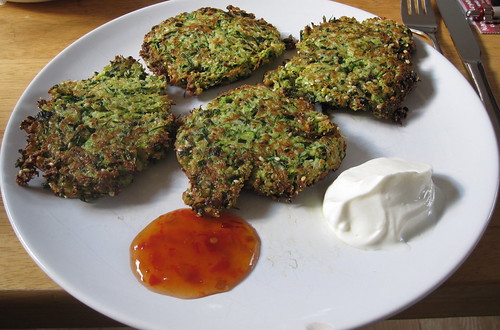
On the whole, I think the patties were a success and we also had ready made sweet chilli sauce, which worked very well too. So this is a dish to do for the vegetarians at the next family do. And they'd do nicely as starters or with some grilled salmon steak.

I loved the colour too and am glad I decided against peeling the courgettes. Mind you, a processor of some sort for the grating is highly recommended.

Update 2020-04-18:
Last week we had a barbecue and in addition to all the meat, I also bought my regular staple vegetables - aubergines, peppers and courgettes. For some reason, I forgot to prepare the cougettes and they've been screaming at me from the bottom of the fridge.

Thus, I decided to make courgette patties once more (and I can honestly say, I've not done these since the original recipe was published, shame on me, they're very tasty). But reading through my original write-up, I decided to spruce them up a bit, so I added a second clove of garlic to the patty mixture along with two pieces of fresh ginger, the same size as the garlic cloves.

I also had a few scotch bonnet chillies in the fridge, so I added one to the mixture as well, but I made sure to remove the seeds and pith first. I didn't have chives, so added a fat spring onion and rather than chopping/slicing everything finely, I just whizzed it in the food processor. And I fried in toasted sesame oil, so all in all, my pimping worked very well, I'm pleased to say, even if I skipped the yoghurt sauce this time.