25 March 2016

Russian Easter Egg Hors D'Oeuvres

IMG_4938

This is yet another recipe that I've come across thanks to Lundulph watching shows that I wouldn't normally watch. This time it was Mary Berry's Easter Feast. What caught his eye was a fish dish cooked by a lovely lady from the West Indies, which Lundulph thought looked very pretty. I went back and watched the whole episode and I'm not sure I want to try it out, not being a fan of fish and seafood in general, but I persisted in watching the whole episode, because Mary Berry was visiting people from different cultures with different Easter traditions and that was very interesting to me. One of the people she visited was from the large Russian community in London and they cooked something wonderfully eye-catching: hard-boiled egg, pickled with beetroots and "deviled", i. e. the yolks scooped out and blended with other things then piped back in.

So the episode barely over, I was tapping away on the computer to find the recipe on the BBC website, sadly it wasn't published, so I watched that segment a couple of times and jotted down what they said and what I saw and here is the result, which I made for the traditional family Easter gathering at our house. The result was very good.

Ingredients

12 eggs, hard-boiled, cooled down and peeled

For the marinade/pickling liquid

3 beet roots, slightly larger than an egg each
4 shallots
3 cloves of garlic
10 corns of allspice
20 black peppercorns
5 whole cloves
5 cm stick of cinnamon
1 pinch of chilli flakes
1 tbsp clear honey
5 dl water
2.5 dl white wine vinegar

For the filling

12 hard-boiled yolks from the eggs
2 tbsp chives
1 tbsp dill
1 tsp Dijon mustard
8 tbsp crème fraîche
salt and pepper
yellow food colouring (optional)

Method

  1. Trim, peel and rinse the beet roots and use gloves to avoid getting your fingers stained. Cut into chunks of around 2 cm and place in a large saucepan with a lid.
  2. Peel the shallots, halve or quarter if large and add to the saucepan.
  3. Peel the garlic and cut in half, then add to the saucepan and follow with the allspice, black peppercorns, cloves, cinnamon and chilli flakes.
  4. Drizzle over the honey, add the water and vinegar and stir. Then bring to the boil and simmer for a few minutes.
  5. Remove from the hob and sieve into a glass bowl, which is large enough for the 12 eggs and the marinating liquid. If it looks a bit transparent you can add the pieces of beet root back in, but it's not necessary.
  6. Leave the liquid to cool completely, and cut out a circle of baking paper to fit the top of the glass bowl.
  7. When the liquid has cooled, add the whole peeled eggs in, making sure they are fully covered. Place the baking paper on top to make sure the eggs stay under and cover with cling film. Place in the fridge overnight for about 12 h.
    IMG_4932
  8. Remove the eggs from the marinade and pat dry, then cut in half lengthwise and carefully scoop out the yolks with a small spoon. Set the now bright pink whites aside, cover and put back in the fridge.
    IMG_4933
  9. Put the yolks in a food processor and add the other filling ingredients, then blend until as smooth as possible. If the mixture looks a bit pale, add some yellow food colouring.
  10. When ready to serve, place in a piping bag with a round nozzle. Line up the whites with the flat sides up on your serving dish, then pipe some of the filling into each hole where the yolk used to be. At this point they are ready to serve, but you can decorate with e. g. small pieces of salmon, ham or brightly coloured peppers.
    IMG_4935

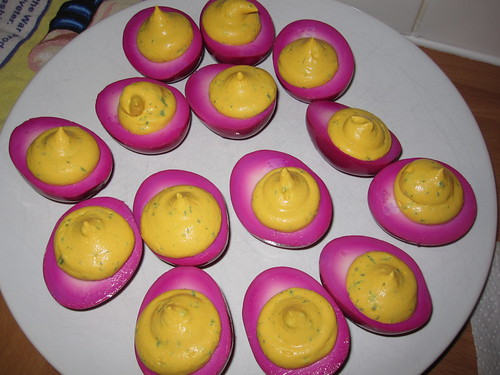
As the family turned up on Good Friday, I spent the evenings of the week before preparing all the food and I made these on the Tuesday already. This was fine, but I discovered that the beet root colouring continues to move inwards into the egg white as time passes. So the whites looked like I wanted them to look on Tuesday when I cut them, but were almost completely pink through and through by Friday when I was ready to serve them. So the effect of pink outside and white inside was a bit lost. But the beet root flavour did come through, which was rather nice I thought.

I also put some lettuce leaves around the eggs on the plate, mainly to make sure they were stable and didn't glide around and topple over. My idea of having each egg on a spoon for everyone to grab one didn't quite work out the way I'd imagined it, which was like a flower, but I didn't have time to go to the local restaurant supply shop to look for suitable spoons for this purpose.

But the eggs were very tasty and very visually appealing. I had some left-over filling mixture and it was a bit on the runny side, so could only be piped with a round nozzle. I think the amount of crème fraîche could be reduced to make a stiffer mixture for a star nozzle. But as I put some cold smoked salmon pieces on top, it didn't really matter much.

IMG_4937

20 March 2016

Chocolate Stamped Cookies

Since I got my cookie stamp, it appears that my Mum has had a bit of a revival on hers as well, because she's making stamped cookies every other week it seems. Though she's going for savoury versions and experimenting with new recipes and colours.

IMG_4931

I thought I'd make some chocolate ones and again opted to use one of the recipes in the booklet that came with the cookie press. I halved the amount, as I thought 12 dozen was over the top, small as they may be. But the recipe was not quite right to begin with, I had to tweak it in order to be able to stamp the cookies in the first place.

Ingredients

makes around 70

250 g plain flour
30 g cocoa powder
170 g unsalted butter 125 g caster sugar
¼ tsp salt
½ tsp vanilla essence
1 large egg

Royal icing for decoration

2 dl icing sugar
1 egg white

Method

  1. Pre-heat the oven to 190 ° C and place 3 baking trays in the freezer to chill. Then sift together the flour and cocoa powder.
  2. Cream together the butter, sugar and salt in a large bowl until light and fluffy.
  3. Add the vanilla and egg and incorporate well.
  4. Slowly add the flour/cocoa mixture and keep whisking until it's formed a soft dough.
  5. Take some of the dough, form into a sausage and place in the cookie press, closing with the pattern disk of choice.
  6. Take one baking tray out of the freezer and stamp directly onto it, no baking paper, no greasing.
  7. When the baking tray is full, bake the cookies for 8 - 10 minutes. Then remove onto a cooling rack and put the baking tray back in the freezer.
  8. Repeat until all the dough has been used up.
  9. Once all the cookies have cooled down, they can be iced. Stir egg white into thee icing sugar, a little at a time until the consistency is easy enough to pipe, but thick enough to keep its shape. Place in a piping bag, cut a tiny hole and pipe away.

It seems that for this particular recipe, there is no need to reduce the amount of flour, just because you're adding cocoa powder. I originally did that and had something not quite keeping together as a dough, but not a batter either.
IMG_4928
Couldn't be stamped at all!
IMG_4929
So I added more flour and at the point I hit the amount for the non-chocolate version, it just about came together to be stampable. Not all the shapes worked though. Still quite pleased with the end result, even if Lundulph grumbled that they were too small.

When the rest of the family turned up for Easter, they disappeared very quickly indeed, always nice.

11 March 2016

Swedish Garlic Mince Patties with Italian Kale and Cannellini Soup

IMG_4927

I've been struggling to think of what to cook for dinner lately, in particular something that's relatively quick to do. We've been having our bathroom renovated, something that's taken almost twice as long as originally indicated and it's surprising what a dramatic change in our lifestyle it has been. So cooking nice dinners has been far from my mind, but I had two recipe cards quite high up on the pile of things to do, so I decided to try them out. The first one is Swedish and from a Cash and Carry that my parents used to frequent, thus it's also designed for 10 portions originally. I've halved it for a more manageable amount. The original Swedish name is Vitlöksjärpar.

The second recipe card is Italian and from Waitrose. I've only cooked kale once before and it was far from successful, but I know it can taste lovely if done well, so I thought I'd give it another go. Besides, Lundulph has been asking to have more green greens in our diet. The recipe also had Savoy cabbage and that's quite nice as well, I think.I didn't buy the branded ingredients, so made some adjustments to the amounts based on what I did manage to get hold of.

Ingredients

Garlic mince patties
3 large cloves of garlic
1 medium sized onion
1.25 dl breadcrumbs
3 dl milk
600 g beef mince
1 large egg
1.5 dl chopped fresh parsley
1.5 tsp salt
½ tsp ground black pepper

Kale and Cannellini soup

2 cans (400g) chopped tomatoes
2 cloves of garlic
2 tbsp olive oil
100 g Savoy cabbage
200 g Kale
1 can (400 g) Cannellini beans
Salt and pepper

Method

  1. Starting with the patties, pre-heat the oven to 200 ° C and grease a baking tray with a lip. Peel the garlic and onion, then finely dice the onion, or better even whizz in a food processor.
  2. Place the breadcrumbs in a large bowl and stir together with the milk, then leave to soak swell for about 10 minutes.
  3. Add in the mince, egg, onion, parsley, salt and pepper. Press in the garlic and stir through to combine everything evenly.
    IMG_4923
  4. Using two large metal spoons, form quenelles and place on the baking tray, a couple of cm apart.
    IMG_4924
  5. Place in the oven to bake, 20 - 40 minutes depending on size.
    IMG_4925
  6. Moving on to the soup, place the canned tomatoes in a large deep pan. Add to them a can and a half of water, this is a good way to rinse them out.
  7. Peel the garlic and press it into the tomatoes and add the olive oil.
  8. Bring to the boil and in the meantime, wash and shred the Savoy cabbage and the kale. Drain and rinse the beans.
  9. Once the tomatoes are simmering, add the Savoy cabbage, stir through, cover and simmer for 5 minutes
  10. Next add the kale and the beans, stir through again, cover and simmer for a further 10 minutes.
  11. Season with salt and pepper.

I wasn't able to fit all of the mince mixture in the tray, I think there was enough for 3 more, so I froze it for future use. But I quite liked the idea that there was no frying involved, just baking, so this worked out to quite a healthy meal. This time the kale cooked well and so, we had a lovely tasting soup. The only odd thing about it was that the recipe didn't have any seasoning at all. The patties were quite garlicky, so the combination was rather good, but if doing just the soup, salt and pepper and Italian herbs would be really good, I think.

The amounts worked out equally well too, we had both patties and soup left over for another meal a few days later and one more small portion for Lundulph at the end.

8 March 2016

International Women's Day Bake Off

It seems this year the International Women's Day on the 8th of March is the thing to celebrate and some of the women at work got together and arranged a bake-off. As some of the men did last year for Movember, the baked goods was to be sold and the proceeds were donated to Your Sanctuary. The bake-off winner was the person whose bake sold out first.

IMG_4912

Again I thought I'd bring along something Swedish, and as we'd recently finished off Lundulph's Christmas crop of "hoovers", I thought I'd do that. I'd also recently come across a new recipe (in Swedish) for them and wanted to try it out. I also made vanilla dreams to cater for people with nut allergies.

Ingredients
Makes 24

Rolling marzipan
150 g icing sugar
300 g marzipan (50-50)
60 g glucose
green food colouring
yellow food colouring
icing sugar for rolling

Filling
350 g cake crumbs or ground digestive biscuits
120/140 g unsalted butter at room temperature
60/80 g icing sugar
20 g cocoa powder
1 - 2 tbsp dark rum

Decoration
200 g dark chocolate

Method

  1. First make the rolling marzipan, as it needs to rest for a couple of hours at least. Start by sifting the icing sugar into a bowl.
  2. Warm up the marzipan in the microwave to get it to around 30 °C. Do this in short bursts with a little kneading between each.
  3. Add the marzipan and the glucose to the icing sugar and knead carefully together until well combined. Add the food colourings at the end and knead to get it evenly spread through and get a pale warm green.
  4. Wrap the rolling marzipan in double layers of cling film and leave to rest.
  5. Place the cake crumbs in a food processor. If using digestive biscuits, break them up into pieces first.
  6. Place the butter in a bowl and stir with a spoon until creamy and soft. Use 120 g if using cake crumbs and 140 g if using digestive biscuits as they are drier.
  7. Stir carefully in the icing sugar, cocoa and rum. Again use the smaller amount of sugar if using cake crumbs and the larger if using digestives. Finally add the crumbs and knead together into a dough.
  8. Divide into four equal parts and carefully roll each one out to a sausage of about 30 cm length and about 2 cm diameter. Place on a baking tray lined with baking paper. Cover with cling film and chill in the fridge for at least 30 minutes.
    IMG_4903
  9. Divide up the rolling marzipan into four equal parts. Keep the parts not being used well wrapped up. Roll out one part at a time, dust with icing sugar to make sure it doesn't stick to the surface. Roll out to a rectangle, 2 - 3 mm thick, just over 30 cm long and wide enough to cover the filling and overlap a little.
    IMG_4904
  10. Brush off excess icing sugar, then place a filling roll onto the marzipan and roll it up. Brush a little water along the edge, to help it stick together in the overlap. Return to the fridge and repeat with the remaining three parts.
    IMG_4905
  11. Once all four parts are "dressed", take out of the fridge and divide each one of them into six pieces. First mark up and when you're happy that they are all equal, cut through with a sharp knife.
    IMG_4909
  12. Finally, melt the chocolate either over a water bath or in short bursts in the microwave with lots of stirring between. Make sure to use a narrow, deep bowl, to make dipping easier. The chocolate doesn't need to be tempered.
  13. Now dip each end of the rolls, to cover the edges. Carefully shake off excess chocolate and place on a baking tray lined with a clean piece of baking paper and leave to set. If they are well chilled, this won't take long.
    IMG_4910
  14. Store in an airtight container, with baking paper between layers in the fridge until ready to eat.

The filling here was a bit on the pale side and I think this is because of only using cocoa. There are other recipes where also melted chocolate is involved. Now the original recipe says using cake crumbs, as form a sponge cake, so I'm guessing they would be a bit more moist to start with. I used digestive biscuits, which were bone dry and so the filling barely kept together with 120 g butter, which is why I've made the adjustment above. I guess if some melted chocolate is added, that will help with binding as well, I might try that in my next batch. I've increased the amount of cocoa, to get more flavour into the filling. Finally I thought it could also be sweeter - again, I'm assuming crumbs from a sponge cake would be sweeter than the digestive biscuits.

A word of warning - dipping the first end of each roll is easy, but not so the second one without nudging the still liquid chocolate. So it's very important to make sure the dipping fingers are clean, or you'll end up with ugly chocolate marks on the next roll.

The rolling marzipan is well worth making, rolling is so much easier. And as long as it's well wrapped, it can stay in the fridge for a while. It will generally stay pliable, but should be brought up to room temperature before use.

What is good about this recipe is that any leftover cake crumbs can be saved in the freezer and when there's 350 g of them, a batch of these lovely hoovers can be made to use them up.

With the left-over melted chocolate, I thought I'd try my hand at decorations:
IMG_4911
Quite pleasing thing to do. I've layered these with small pieces of baking paper in between and put in the freezer for when I need them. There was quite a bit more chocolate left, but it had started to go solid, so I've put it away for my next bake.

I didn't win this bake-off, but all the rolls sold out as did the vanilla dreams and my manager actually put in a request for more "hoovers", which pleased me immensely. Lundulph was not happy as he didn't get to taste these, I took them all along to the bake-off. One of the other participants had made Chocolate Tiffin and I need to ask about the recipe, because I've not had this before and it was fabulous and tasty. At first sight the pieces looked well small, but it's so sweet, you really don't want them bigger. All in all, it was a fun event and we were all sugared up for the whole day.